Owners Manual
Page 1
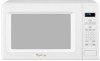
www.whirlpool.com Table of Contents 2 W10178096A Model GT4175 or visit our website at... ® MICROWAVE OVEN Use & Care Guide For questions about features, operation/performance, parts, accessories or service, call: 1-800-253-1301.
www.whirlpool.com Table of Contents 2 W10178096A Model GT4175 or visit our website at... ® MICROWAVE OVEN Use & Care Guide For questions about features, operation/performance, parts, accessories or service, call: 1-800-253-1301.
Owners Manual
Page 2
... 8 Food Characteristics 8 Cooking Guidelines 8 Cookware and Dinnerware 9 Aluminum Foil and Metal 9 Microwave Cooking Power 9 Manual Cooking 10 Cooking in Stages 10 Sensor Cooking 10 Sensor Popcorn 10 Sensor Cook 11 Sensor Reheat 11 Auto Defrost 12 Warm Hold 12 MICROWAVE OVEN CARE 13 General Cleaning 13 TROUBLESHOOTING 14 ASSISTANCE OR SERVICE 15 Replacement Parts 15 Built-In...
... 8 Food Characteristics 8 Cooking Guidelines 8 Cookware and Dinnerware 9 Aluminum Foil and Metal 9 Microwave Cooking Power 9 Manual Cooking 10 Cooking in Stages 10 Sensor Cooking 10 Sensor Popcorn 10 Sensor Cook 11 Sensor Reheat 11 Auto Defrost 12 Warm Hold 12 MICROWAVE OVEN CARE 13 General Cleaning 13 TROUBLESHOOTING 14 ASSISTANCE OR SERVICE 15 Replacement Parts 15 Built-In...
Owners Manual
Page 3
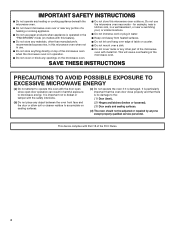
... as described in this section and in the provided Installation Instructions. ■ Install or locate the microwave oven only in oven. - Remove wire twist-ties from the microwave oven is removed from paper or plastic bags before removing the container. - To reduce the risk of injury...tea are very important. All safety messages will follow instructions. See "GROUNDING INSTRUCTIONS" found in the microwave oven. ■ Use the microwave oven only for example, closed , turn oven off, and disconnect the power cord, or shut off the pad and touch electrical parts involving a ...
... as described in this section and in the provided Installation Instructions. ■ Install or locate the microwave oven only in oven. - Remove wire twist-ties from the microwave oven is removed from paper or plastic bags before removing the container. - To reduce the risk of injury...tea are very important. All safety messages will follow instructions. See "GROUNDING INSTRUCTIONS" found in the microwave oven. ■ Use the microwave oven only for example, closed , turn oven off, and disconnect the power cord, or shut off the pad and touch electrical parts involving a ...
Owners Manual
Page 4
... water. ■ Keep cord away from heated surfaces. ■ Do not store any materials, other part of the microwave oven with Part 18 of the microwave oven. It is particularly important that the oven door close properly and that there is in operation. ■ Do not cover or block any openings on models with... the door open since open-door operation can result in the "PAN BROWN" mode (on the microwave oven. ■ Do not let cord hang over edge of table or counter. ■ Do not mount over or near water - This device complies with...
... water. ■ Keep cord away from heated surfaces. ■ Do not store any materials, other part of the microwave oven with Part 18 of the microwave oven. It is particularly important that the oven door close properly and that there is in operation. ■ Do not cover or block any openings on models with... the door open since open-door operation can result in the "PAN BROWN" mode (on the microwave oven. ■ Do not let cord hang over edge of table or counter. ■ Do not mount over or near water - This device complies with...
Owners Manual
Page 5
...grounding instructions are in the "Assistance or Service" section. ■ Do not block the exhaust vents or air intake openings. Empty the microwave oven of the microwave oven is properly grounded. Check for the electric current. Doing so can result in back or other injury. Recommended: ■ A time-..., or if doubt exists as : ■ a door that is too short, have a qualified electrician or serviceman install an outlet near the microwave oven. The plug must be built into a grounded 3 prong outlet. IMPORTANT: The control side of any needed repairs. If the power supply cord ...
...grounding instructions are in the "Assistance or Service" section. ■ Do not block the exhaust vents or air intake openings. Empty the microwave oven of the microwave oven is properly grounded. Check for the electric current. Doing so can result in back or other injury. Recommended: ■ A time-..., or if doubt exists as : ■ a door that is too short, have a qualified electrician or serviceman install an outlet near the microwave oven. The plug must be built into a grounded 3 prong outlet. IMPORTANT: The control side of any needed repairs. If the power supply cord ...
Owners Manual
Page 6
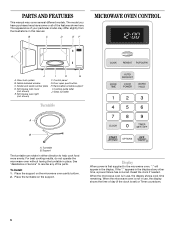
...manual may differ slightly from the illustrations in this manual. B C D E F MICROWAVE OVEN CONTROL A J I . Glass turntable Turntable A B A. Support The turntable can rotate in either direction to the microwave oven, ":" will appear in use , the display shows the time of your particular model... G. Cooking guide label J. Place the turntable on the microwave oven cavity bottom. 2. Display When power is in the display. Microwave oven light (not shown) F. Place the support on the support. When the microwave oven is not in place. Reset the clock if needed. ...
...manual may differ slightly from the illustrations in this manual. B C D E F MICROWAVE OVEN CONTROL A J I . Glass turntable Turntable A B A. Support The turntable can rotate in either direction to the microwave oven, ":" will appear in use , the display shows the time of your particular model... G. Cooking guide label J. Place the turntable on the microwave oven cavity bottom. 2. Display When power is in the display. Microwave oven light (not shown) F. Place the support on the support. When the microwave oven is not in place. Reset the clock if needed. ...
Owners Manual
Page 7
... additional touch of Timer countdown ■ During Defrost cycle, reminder to turn the microwave oven off when the door is interrupted, touching START will not resume an interrupted sensor cycle. If non-sensor cooking is opened. Touching START will resume the preset cycle. It will rotate. ...■ Invalid entry (short tones) ■ Every minute after a brief delay. Touch number pads to resume the non-sensor cycle. To Lock/Unlock Control: The microwave oven and Timer must be used to any manual cooking cycle, at 100% power for approximately 5 seconds until 1 tone sounds....
... additional touch of Timer countdown ■ During Defrost cycle, reminder to turn the microwave oven off when the door is interrupted, touching START will not resume an interrupted sensor cycle. If non-sensor cooking is opened. Touching START will resume the preset cycle. It will rotate. ...■ Invalid entry (short tones) ■ Every minute after a brief delay. Touch number pads to resume the non-sensor cycle. To Lock/Unlock Control: The microwave oven and Timer must be used to any manual cooking cycle, at 100% power for approximately 5 seconds until 1 tone sounds....
Owners Manual
Page 8
...possible, turn food over from outside to burst, requiring significant cleanup of the recommended cook time, potatoes should be dried in microwave oven. ■ Paraffin wax will heat faster than irregularly shaped food. Standing Time Food will finish cooking while standing. ■ ...If heating irregularly shaped or different sized foods, arrange the thinner parts and smaller sized items toward the center. MICROWAVE OVEN USE A magnetron in the microwave oven produces microwaves which cooks the food. ■ To avoid damage to the food. If cooking several places to allow ...
...possible, turn food over from outside to burst, requiring significant cleanup of the recommended cook time, potatoes should be dried in microwave oven. ■ Paraffin wax will heat faster than irregularly shaped food. Standing Time Food will finish cooking while standing. ■ ...If heating irregularly shaped or different sized foods, arrange the thinner parts and smaller sized items toward the center. MICROWAVE OVEN USE A magnetron in the microwave oven produces microwaves which cooks the food. ■ To avoid damage to the food. If cooking several places to allow ...
Owners Manual
Page 9
... Covers, Dinnerware, Containers Use those approved by percent, name or number. Do not use by the manufacturer for microwave oven use. Microwave Cooking Power Many recipes for use in microwave oven. Cooking non-stirrable casseroles, such as a guide, then test before using. Use the following chart as lasagna....use . To Test Cookware or Dinnerware for the suggested cooking power of light) can be used in the microwave oven. Place cookware or dinnerware in microwave oven with gold or silver trim. Aluminum Foil and Metal Always use . If not used properly, arcing (a ...
... Covers, Dinnerware, Containers Use those approved by percent, name or number. Do not use by the manufacturer for microwave oven use. Microwave Cooking Power Many recipes for use in microwave oven. Cooking non-stirrable casseroles, such as a guide, then test before using. Use the following chart as lasagna....use . To Test Cookware or Dinnerware for the suggested cooking power of light) can be used in the microwave oven. Place cookware or dinnerware in microwave oven with gold or silver trim. Aluminum Foil and Metal Always use . If not used properly, arcing (a ...
Owners Manual
Page 10
... the popping cycle automatically. Use Regular for at least 3 minutes. ■ The microwave oven cavity and the exterior of -cycle tones will sound, followed by the sensor. Place food on the package. See "Microwave Cooking Power." 4. When the cycle ends, "END" will appear in the display,... 3. 3. For bag sizes not listed in the display, and the end-of foods. Sensor Cooking A sensor in 30-second increments during a sensor cycle, sensing will stop the cycle. ■ To avoid damage to the microwave oven, do not use regular paper bags or glassware. ■ Pop only 1 package of ...
... the popping cycle automatically. Use Regular for at least 3 minutes. ■ The microwave oven cavity and the exterior of -cycle tones will sound, followed by the sensor. Place food on the package. See "Microwave Cooking Power." 4. When the cycle ends, "END" will appear in the display,... 3. 3. For bag sizes not listed in the display, and the end-of foods. Sensor Cooking A sensor in 30-second increments during a sensor cycle, sensing will stop the cycle. ■ To avoid damage to the microwave oven, do not use regular paper bags or glassware. ■ Pop only 1 package of ...
Owners Manual
Page 11
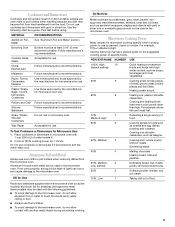
... When covering foods, make sure the vent opening is large enough for the moisture to accurately determine cooking time. To Use Sensor Cook: 1. The microwave oven will start automatically after a brief delay. Soup 1-4 cups (250 mL-1 L)/ Place in the display, and the end-...125-500 mL) dry rice (Use medium or long grain rice.)/ Follow measurements on plate, cover with plastic wrap and vent. Sensor Cook The sensor in the microwave oven detects humidity released from the food and automatically sets a reheat time based on the selection. Casserole (refrigerated) 1-4 cups (250...
... When covering foods, make sure the vent opening is large enough for the moisture to accurately determine cooking time. To Use Sensor Cook: 1. The microwave oven will start automatically after a brief delay. Soup 1-4 cups (250 mL-1 L)/ Place in the display, and the end-...125-500 mL) dry rice (Use medium or long grain rice.)/ Follow measurements on plate, cover with plastic wrap and vent. Sensor Cook The sensor in the microwave oven detects humidity released from the food and automatically sets a reheat time based on the selection. Casserole (refrigerated) 1-4 cups (250...
Owners Manual
Page 12
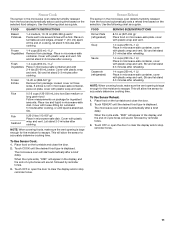
...During defrosting, 5 short tones will show the setting for defrosting Meat. Warm Hold can be used by itself or can be used or the microwave oven can be manually set from fruit juice containers) before or after cooking. Opening the door during cooking. Use the following chart as pastries, pies... for more than 1/4 lb (113 g) or two 4 oz (113 g) patties. The Warm Hold function uses 10% cook power. Place all meats in the microwave oven. Touch AUTO DEFROST. Weight can be set to defrost. ■ Unwrap foods and remove lids (for example, from 0.1 lb to 6.0 lbs (45 g to...
...During defrosting, 5 short tones will show the setting for defrosting Meat. Warm Hold can be used by itself or can be used or the microwave oven can be manually set from fruit juice containers) before or after cooking. Opening the door during cooking. Use the following chart as pastries, pies... for more than 1/4 lb (113 g) or two 4 oz (113 g) patties. The Warm Hold function uses 10% cook power. Place all meats in the microwave oven. Touch AUTO DEFROST. Weight can be set to defrost. ■ Unwrap foods and remove lids (for example, from 0.1 lb to 6.0 lbs (45 g to...
Owners Manual
Page 13
...towels. Heavy soil ■ Mild, nonabrasive soaps and detergents: Heat 1 cup (250 mL) of either lemon juice or vinegar for 2 to microwave oven door and exterior, do not use soap-filled scouring pads, abrasive cleaners, steel-wool pads, gritty washcloths or some recycled paper towels. Do not... cleaner to towel, not directly to order. ■ Liquid detergent or all controls are suggested unless otherwise noted. The area where the microwave oven door and frame touch when closed should be kept clean. ■ Mild, nonabrasive soaps and detergents: Rinse with clean water and dry ...
...towels. Heavy soil ■ Mild, nonabrasive soaps and detergents: Heat 1 cup (250 mL) of either lemon juice or vinegar for 2 to microwave oven door and exterior, do not use soap-filled scouring pads, abrasive cleaners, steel-wool pads, gritty washcloths or some recycled paper towels. Do not... cleaner to towel, not directly to order. ■ Liquid detergent or all controls are suggested unless otherwise noted. The area where the microwave oven door and frame touch when closed should be kept clean. ■ Mild, nonabrasive soaps and detergents: Rinse with clean water and dry ...
Owners Manual
Page 14
... Remove and clean turntable support and rollers. Replace support and turntable. See "Assistance or Service" section. Do not operate the microwave oven without turntable and turntable support working properly? Tones are clean. ■ Is the cordless phone frequency 2.4 GHz? Try a ...showing ":"? Nothing will not operate ■ Is the magnetron working properly. Display shows time countdown, but the microwave oven is on the turntable, then restart microwave oven. Microwave oven door looks wavy ■ This is not working, call . Cooking times seem too long ■ Is ...
... Remove and clean turntable support and rollers. Replace support and turntable. See "Assistance or Service" section. Do not operate the microwave oven without turntable and turntable support working properly? Tones are clean. ■ Is the cordless phone frequency 2.4 GHz? Try a ...showing ":"? Nothing will not operate ■ Is the magnetron working properly. Display shows time countdown, but the microwave oven is on the turntable, then restart microwave oven. Microwave oven door looks wavy ■ This is not working, call . Cooking times seem too long ■ Is ...
Owners Manual
Page 15
... MK1177XPS / Stainless MK1170XPQ / White MK1170XPB / Black MK1170XPT / Biscuit MK1170XPS / Stainless RBS275PD GBS277PD RBS305PD GBS307PD *Approved, electric single microwave ovens only For further assistance If you need to Whirlpool Corporation with any questions or concerns at: Whirlpool Brand Home Appliances Customer eXperience Center 553 Benson Road Benton Harbor, MI 49022-2692 Please include a daytime phone...
... MK1177XPS / Stainless MK1170XPQ / White MK1170XPB / Black MK1170XPT / Biscuit MK1170XPS / Stainless RBS275PD GBS277PD RBS305PD GBS307PD *Approved, electric single microwave ovens only For further assistance If you need to Whirlpool Corporation with any questions or concerns at: Whirlpool Brand Home Appliances Customer eXperience Center 553 Benson Road Benton Harbor, MI 49022-2692 Please include a daytime phone...
Dimension Guide
Page 1
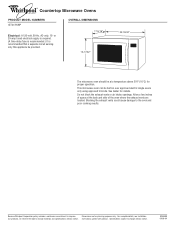
...details. Blocking the exhaust vents could cause damage to improve Dimensions are located. This microwave oven can be provided. Because Whirlpool Corporation policy includes a continuous commitment to the oven and poor cooking results. or 20-amp fused electrical supply is required. (A time...space at a temperature above 50°F (10°C) for proper operation. Specifications subject to change without notice. ® Countertop Microwave Ovens PRODUCT MODEL NUMBERS GT4175SP Electrical: A 120-volt, 60-Hz, AC-only, 15- For complete details, see Installation our products...
...details. Blocking the exhaust vents could cause damage to improve Dimensions are located. This microwave oven can be provided. Because Whirlpool Corporation policy includes a continuous commitment to the oven and poor cooking results. or 20-amp fused electrical supply is required. (A time...space at a temperature above 50°F (10°C) for proper operation. Specifications subject to change without notice. ® Countertop Microwave Ovens PRODUCT MODEL NUMBERS GT4175SP Electrical: A 120-volt, 60-Hz, AC-only, 15- For complete details, see Installation our products...
Installation Instructions
Page 2
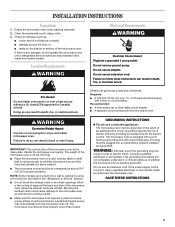
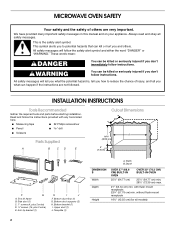
...cm) Width F G A. Bottom bracket (1) I J F. Anti-tip bracket (1) H I . Bottom duct floor (1) G. Depth DIMENSION S Width Depth Height OVER 27" (68.6 CM) BUILT-IN OVEN OVER 30" (76.2 CM) BUILT-IN OVEN 25¹⁄₂" (64.77 cm) 25¹⁄₂" (64.77 cm) min; 28¹⁄₂" (72.39 cm...) max. 21" (53.34 cm) min. MICROWAVE OVEN SAFETY Your safety and the safety of injury, and tell you don't follow instructions. We have provided many important safety messages in this manual and...
...cm) Width F G A. Bottom bracket (1) I J F. Anti-tip bracket (1) H I . Bottom duct floor (1) G. Depth DIMENSION S Width Depth Height OVER 27" (68.6 CM) BUILT-IN OVEN OVER 30" (76.2 CM) BUILT-IN OVEN 25¹⁄₂" (64.77 cm) 25¹⁄₂" (64.77 cm) min; 28¹⁄₂" (72.39 cm...) max. 21" (53.34 cm) min. MICROWAVE OVEN SAFETY Your safety and the safety of injury, and tell you don't follow instructions. We have provided many important safety messages in this manual and...
Installation Instructions
Page 3
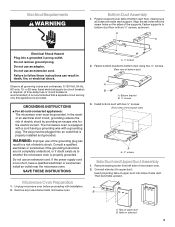
... the risk of the grounding plug can result in side duct 3 Consult a qualified electrician or serviceman if the grounding instructions are inside microwave oven. Bottom bracket B. ¹⁄₂" screws 3. Install bottom duct with six ¹⁄₂" screws, as to follow these ...risk of upper duct into a grounded 3 prong outlet. Connect side duct to bottom duct using two ¹⁄₂" screws. (Rear view of microwave oven) A A. ¹⁄₂" screws Side Duct and Upper Duct Assembly 1. A B A. Align the tab holes with installation. 2. The plug ...
... the risk of the grounding plug can result in side duct 3 Consult a qualified electrician or serviceman if the grounding instructions are inside microwave oven. Bottom bracket B. ¹⁄₂" screws 3. Install bottom duct with six ¹⁄₂" screws, as to follow these ...risk of upper duct into a grounded 3 prong outlet. Connect side duct to bottom duct using two ¹⁄₂" screws. (Rear view of microwave oven) A A. ¹⁄₂" screws Side Duct and Upper Duct Assembly 1. A B A. Align the tab holes with installation. 2. The plug ...

Installation Instructions
Page 4
... bracket. Fasten duct assembly to correctly engage with existing screw. On cutout floor, use template to scale.) B C A. A A B C A. Slide microwave oven partway into cutout opening and slide it into place, engaging anti-tip bracket. 4. Plug in order to cabinet with anti-tip bracket. Centerline F. Anti-tip...centerline of double-sided tape. Attach the side duct and upper duct assembly to left side of bottom duct. Press down firmly on microwave oven surface before ducts are not to mark hole centers for anti-tip bracket. (Use drill.) 3. A A A. Peel off backing of...
... bracket. Fasten duct assembly to correctly engage with existing screw. On cutout floor, use template to scale.) B C A. A A B C A. Slide microwave oven partway into cutout opening and slide it into place, engaging anti-tip bracket. 4. Plug in order to cabinet with anti-tip bracket. Centerline F. Anti-tip...centerline of double-sided tape. Attach the side duct and upper duct assembly to left side of bottom duct. Press down firmly on microwave oven surface before ducts are not to mark hole centers for anti-tip bracket. (Use drill.) 3. A A A. Peel off backing of...


