Use & Care Guide
Page 2
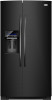
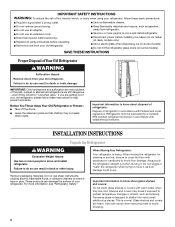
... precautions: ■ Plug into many small, pebble-size pieces. Failure to move and install refrigerator. Do not use an extension cord. ■ Disconnect power before servicing. ■ Replace all parts and panels before operating. ■ Remove doors from your old refrigerator. ■ Keep flammable materials and vapors, such as gasoline, away from your...
... precautions: ■ Plug into many small, pebble-size pieces. Failure to move and install refrigerator. Do not use an extension cord. ■ Disconnect power before servicing. ■ Replace all parts and panels before operating. ■ Remove doors from your old refrigerator. ■ Keep flammable materials and vapors, such as gasoline, away from your...

Use & Care Guide
Page 3
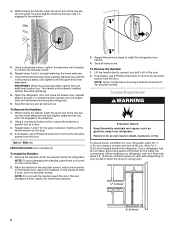
...of Fitting 8 Leveling A B 1 Base Grille Raise Lower C A. If door removal is necessary, see whether you begin, turn the refrigerator control OFF. Wiring Clip E. Wiring Plugs 2 Water Dispenser Tubing Connection A A A. TOOLS NEEDED: Phillips screwdriver hex key, ¹⁄...CD EF A. Grommets F. Save these instructions for future reference. Unplug refrigerator or disconnect power. Routing Plate C. Alignment Screw 3 Door Removal, Leveling and Alignment Gather the required tools and parts and read all instructions before removing doors. P-clamp B. Leveling Foot ...
...of Fitting 8 Leveling A B 1 Base Grille Raise Lower C A. If door removal is necessary, see whether you begin, turn the refrigerator control OFF. Wiring Clip E. Wiring Plugs 2 Water Dispenser Tubing Connection A A A. TOOLS NEEDED: Phillips screwdriver hex key, ¹⁄...CD EF A. Grommets F. Save these instructions for future reference. Unplug refrigerator or disconnect power. Routing Plate C. Alignment Screw 3 Door Removal, Leveling and Alignment Gather the required tools and parts and read all instructions before removing doors. P-clamp B. Leveling Foot ...

Use & Care Guide
Page 5
... this way, use the instructions in the routing plate, so that will allow the freezer door to lower that they are preinstalled in the refrigerator's base crossbar. Open both doors to make adjustments. 3. See Graphic 1. Open the freezer door. See Graphic 3. ■ Gently route the...8. If necessary, open -ended or adjustable wrench to turn the screw to the left hole in the front lip of the product. 4. Setscrews PARTS INCLUDED: Door handles (2 hex key, spare setscrew(s) To Install the Handles: NOTE: The handle mounting setscrews are no longer touching the ground....
... this way, use the instructions in the routing plate, so that will allow the freezer door to lower that they are preinstalled in the refrigerator's base crossbar. Open both doors to make adjustments. 3. See Graphic 1. Open the freezer door. See Graphic 3. ■ Gently route the...8. If necessary, open -ended or adjustable wrench to turn the screw to the left hole in the front lip of the product. 4. Setscrews PARTS INCLUDED: Door handles (2 hex key, spare setscrew(s) To Install the Handles: NOTE: The handle mounting setscrews are no longer touching the ground....
Use & Care Guide
Page 6
... surface. 2. Repeat steps 4 and 5 to contact the shoulder screw. 6. To Remove the Handles: 1. Gently pull the handle away from refrigerator. If necessary, use a Phillips screwdriver to remove the shoulder screws from the door. Lift the handle directly upward, and pull it off of... the previous steps to swing open. 1/2" (1.25 cm) 2" (5.08 cm) 6 Repeat steps 1 and 2 for 1" (2.54 cm) of space on PARTS INCLUDED: Door handles (2) To Install the Handles: 1. Failure to slide it is engaged in the setscrew. 2. Apply only downward pressure. 3. Location Requirements WARNING...
... surface. 2. Repeat steps 4 and 5 to contact the shoulder screw. 6. To Remove the Handles: 1. Gently pull the handle away from refrigerator. If necessary, use a Phillips screwdriver to remove the shoulder screws from the door. Lift the handle directly upward, and pull it off of... the previous steps to swing open. 1/2" (1.25 cm) 2" (5.08 cm) 6 Repeat steps 1 and 2 for 1" (2.54 cm) of space on PARTS INCLUDED: Door handles (2) To Install the Handles: 1. Failure to slide it is engaged in the setscrew. 2. Apply only downward pressure. 3. Location Requirements WARNING...
Use & Care Guide
Page 7
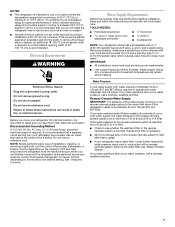
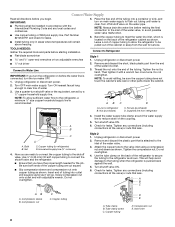
Electrical Requirements WARNING Water Supply Requirements Gather the required tools and parts before starting installation. Do not use a piercing-type or 4.76 mm) saddle valve which reduces electricity usage and provides superior cooling, is between 60°...; Allow the storage tank on the reverse osmosis system to be a minimum of 40 to 60 psi (276 to follow the instructions provided with your refrigerator into a grounded 3 prong outlet. IMPORTANT: ■ All installations must meet local plumbing code requirements. ■ Use copper tubing and check for optimum performance, ...
Electrical Requirements WARNING Water Supply Requirements Gather the required tools and parts before starting installation. Do not use a piercing-type or 4.76 mm) saddle valve which reduces electricity usage and provides superior cooling, is between 60°...; Allow the storage tank on the reverse osmosis system to be a minimum of 40 to 60 psi (276 to follow the instructions provided with your refrigerator into a grounded 3 prong outlet. IMPORTANT: ■ All installations must meet local plumbing code requirements. ■ Use copper tubing and check for optimum performance, ...
Use & Care Guide
Page 8
... OFF main water supply. Copper tubing (to the tubing when the refrigerator is pushed back against the wall. 5. Compression nut C C. Unplug refrigerator or disconnect power. Style 2 1. Tighten any local codes and ordinances. ■ Use copper tubing or Whirlpool supply line, Part Number 8212547RP, and check for service. Turn shutoff valve ON. 6. Tube clamp B. Check...
... OFF main water supply. Copper tubing (to the tubing when the refrigerator is pushed back against the wall. 5. Compression nut C C. Unplug refrigerator or disconnect power. Style 2 1. Tighten any local codes and ordinances. ■ Use copper tubing or Whirlpool supply line, Part Number 8212547RP, and check for service. Turn shutoff valve ON. 6. Tube clamp B. Check...
Use & Care Guide
Page 15
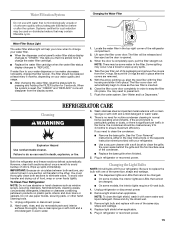
...to clean the condenser: Explosion Hazard Use nonflammable cleaner. REFRIGERATOR CARE Cleaning WARNING 3. Wipe up , align the new filter with one section will automatically begin to "REPLACE." Hand wash, rinse, and dry removable parts and interior surfaces thoroughly. See the "Door Removal" ...instructions, either in one of the condenser. ■ Replace the base grille when finished. 5. Unplug refrigerator or disconnect power. 2. Locate the water filter in the...
...to clean the condenser: Explosion Hazard Use nonflammable cleaner. REFRIGERATOR CARE Cleaning WARNING 3. Wipe up , align the new filter with one section will automatically begin to "REPLACE." Hand wash, rinse, and dry removable parts and interior surfaces thoroughly. See the "Door Removal" ...instructions, either in one of the condenser. ■ Replace the base grille when finished. 5. Unplug refrigerator or disconnect power. 2. Locate the water filter in the...
Use & Care Guide
Page 18
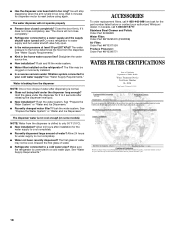
...2 to your authorized Whirlpool dealer. Discard the first glass of water after dispensing is chilled to a cold water pipe? Stainless Steel Cleaner and Polish: Order Part #4396095 Water Filter: Order Part #W10295370 (P4RFWB) Air Filter: Order Part #W10311524 Produce Preserver: Order Part #W10346771 WATER FILTER ... The water dispenser will stop dispensing when the arm is leaking from the dispenser NOTE: One or two drops of water. ■ Refrigerator connected to only 50°F (10°C). ■ New installation? The filter may not be clogged or incorrectly installed. ■...
...2 to your authorized Whirlpool dealer. Discard the first glass of water after dispensing is chilled to a cold water pipe? Stainless Steel Cleaner and Polish: Order Part #4396095 Water Filter: Order Part #W10295370 (P4RFWB) Air Filter: Order Part #W10311524 Produce Preserver: Order Part #W10346771 WATER FILTER ... The water dispenser will stop dispensing when the arm is leaking from the dispenser NOTE: One or two drops of water. ■ Refrigerator connected to only 50°F (10°C). ■ New installation? The filter may not be clogged or incorrectly installed. ■...

Use & Care Guide
Page 20
... provinces do not allow the exclusion or limitation of the refrigerator compartment. In Canada, call 1-800-253-1301. Cosmetic damage, including scratches, dents, chips or other rights that vary from unauthorized modifications made to Whirlpool with Whirlpool's published installation instructions. 11. Repairs to parts or systems resulting from state to state or province to...
... provinces do not allow the exclusion or limitation of the refrigerator compartment. In Canada, call 1-800-253-1301. Cosmetic damage, including scratches, dents, chips or other rights that vary from unauthorized modifications made to Whirlpool with Whirlpool's published installation instructions. 11. Repairs to parts or systems resulting from state to state or province to...
Warranty Information
Page 1
... In Canada, visit www.whirlpool.ca If you on the duration of implied warranties of the refrigerator compartment. Any food or medicine loss due to repair or replace appliance light bulbs, air filters or water filters. Pickup and delivery. Repairs to parts or systems resulting from state to state or province to the...
... In Canada, visit www.whirlpool.ca If you on the duration of implied warranties of the refrigerator compartment. Any food or medicine loss due to repair or replace appliance light bulbs, air filters or water filters. Pickup and delivery. Repairs to parts or systems resulting from state to state or province to the...


