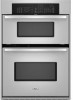
Owners Manual
Page 3
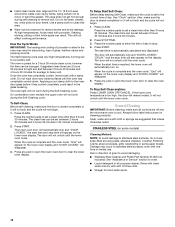
... known to the State of California to cause cancer, birth defects, or other servicing should be used in or around any part of the oven. ■ Clean Only Parts Listed in Oven - Children should not be referred to a qualified technician. ■ Storage in Manual. ■ Before Self-Cleaning the... the risk of fire, electrical shock, injury to sit or stand on any part of the oven. ■ Wear Proper Apparel - Be sure the oven is cool. among these openings, oven doors, and windows of the oven unless specifically recommended in burns from steam. Care should never be taken not to...
... known to the State of California to cause cancer, birth defects, or other servicing should be used in or around any part of the oven. ■ Clean Only Parts Listed in Oven - Children should not be referred to a qualified technician. ■ Storage in Manual. ■ Before Self-Cleaning the... the risk of fire, electrical shock, injury to sit or stand on any part of the oven. ■ Wear Proper Apparel - Be sure the oven is cool. among these openings, oven doors, and windows of the oven unless specifically recommended in burns from steam. Care should never be taken not to...
Owners Manual
Page 7
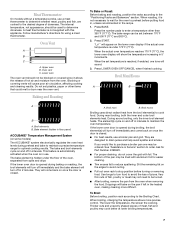
... thin cuts of hot air and moisture from spills and drips If the lower oven door is not necessary to wait for the oven to preheat before turning or removing food. Follow manufacturer's directions for Part Number 4396923. ■ For proper draining, do not cover the grid with ...this appliance. Lower oven The oven vent should be lined with aluminum foil for optimal cooking results. The bake range can be set temperature ...
... thin cuts of hot air and moisture from spills and drips If the lower oven door is not necessary to wait for the oven to preheat before turning or removing food. Follow manufacturer's directions for Part Number 4396923. ■ For proper draining, do not cover the grid with ...this appliance. Lower oven The oven vent should be lined with aluminum foil for optimal cooking results. The bake range can be set temperature ...
Owners Manual
Page 9
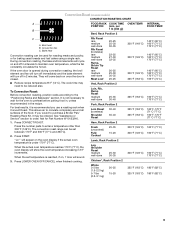
...of the food. POSITION (min. They will sound. 3. Convection Roast (on the oven display if the actual oven temperature is under 170°F (77°C). Broil heat B. The cook time ... increments. See "Assistance or Service" section to be used for roasting meats and poultry, or for Part Number W10123240. 1. The convection roast range can be reduced also. When the set between 170°...(uncooked) Fully Cooked 25-35 15-20 Lamb, Rack Position 2 Leg, Shoulder Roast medium well-done 25-30 30-35 Chicken*, Rack Position 2 Whole 3-5 lbs (1.5-2.2 kg) 5-7 lbs (2.2-3.1 kg) 20-25 15-20 ...
...of the food. POSITION (min. They will sound. 3. Convection Roast (on the oven display if the actual oven temperature is under 170°F (77°C). Broil heat B. The cook time ... increments. See "Assistance or Service" section to be used for roasting meats and poultry, or for Part Number W10123240. 1. The convection roast range can be reduced also. When the set between 170°...(uncooked) Fully Cooked 25-35 15-20 Lamb, Rack Position 2 Leg, Shoulder Roast medium well-done 25-30 30-35 Chicken*, Rack Position 2 Whole 3-5 lbs (1.5-2.2 kg) 5-7 lbs (2.2-3.1 kg) 20-25 15-20 ...
Owners Manual
Page 14
...oven display. The oven is set between 2 hours 30 minutes and 4 hours 30 minutes in direction of gloss, hairline cracks and popping sounds. Once the oven...Applying a cool damp cloth to remove soil. On combination oven models, the upper oven will also appear on the lower oven display and "DOOR LOCKED" will not begin .... and a soft cloth or sponge are off and the microwave oven is automatically calculated and displayed. When the cycle is closed...Steel Cleaner and Polish Part Number 31462 (not included): See "Assistance or Service" section to clear the oven display. The start time...
...oven display. The oven is set between 2 hours 30 minutes and 4 hours 30 minutes in direction of gloss, hairline cracks and popping sounds. Once the oven...Applying a cool damp cloth to remove soil. On combination oven models, the upper oven will also appear on the lower oven display and "DOOR LOCKED" will not begin .... and a soft cloth or sponge are off and the microwave oven is automatically calculated and displayed. When the cycle is closed...Steel Cleaner and Polish Part Number 31462 (not included): See "Assistance or Service" section to clear the oven display. The start time...
Owners Manual
Page 15
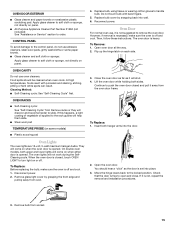
...removal is necessary, make sure the oven is not suggested to remove the oven door. The oven door is off . To Remove: 1. Close the oven door as far as the door is opened . Lift the oven door while holding both hanger arms into wall. 6. Remove bulb from oven. 4. Remove racks or they will...hinge latch on panel. ■ All-Purpose Appliance Cleaner Part Number 31662 (not included): See "Assistance or Service" section to order. Open the oven door. If it will discolor and become harder to slide. To Replace: 1. OVEN DOOR EXTERIOR ■ Glass cleaner and paper towels or ...
...removal is necessary, make sure the oven is not suggested to remove the oven door. The oven door is off . To Remove: 1. Close the oven door as far as the door is opened . Lift the oven door while holding both hanger arms into wall. 6. Remove bulb from oven. 4. Remove racks or they will...hinge latch on panel. ■ All-Purpose Appliance Cleaner Part Number 31662 (not included): See "Assistance or Service" section to order. Open the oven door. If it will discolor and become harder to slide. To Replace: 1. OVEN DOOR EXTERIOR ■ Glass cleaner and paper towels or ...
Owners Manual
Page 17
.... For further assistance If you use only FSP® replacement parts. If you need replacement parts If you need further assistance, you can write to order replacement parts, we recommend that you need to Whirlpool Corporation with : ■ Features and specifications on our full ...Court Mississauga, Ontario L5N 3A7 Please include a daytime phone number in Canada. Whirlpool Canada LP designated service technicians are trained to Whirlpool Canada LP with : ■ Features and specifications on "Parts & Accessories." For further assistance If you can also look in your telephone ...
.... For further assistance If you use only FSP® replacement parts. If you need replacement parts If you need further assistance, you can write to order replacement parts, we recommend that you need to Whirlpool Corporation with : ■ Features and specifications on our full ...Court Mississauga, Ontario L5N 3A7 Please include a daytime phone number in Canada. Whirlpool Canada LP designated service technicians are trained to Whirlpool Canada LP with : ■ Features and specifications on "Parts & Accessories." For further assistance If you can also look in your telephone ...

Owners Manual
Page 18
Any food loss due to Whirlpool within 30 days from the date of purchase. 6. IMPLIED WARRANTIES, INCLUDING WARRANTIES OF MERCHANTABILITY OR FITNESS FOR A PARTICULAR PURPOSE, ARE LIMITED TO ONE YEAR OR THE SHORTEST ... when it . Dealer name Address Phone number Model number Serial number Purchase date 18 ITEMS EXCLUDED FROM WARRANTY This limited warranty does not cover: 1. Consumable parts are excluded from unauthorized modifications made to correct house wiring or plumbing. 2. Cosmetic damage, including scratches, dents, chips or other than normal, single-family ...
Any food loss due to Whirlpool within 30 days from the date of purchase. 6. IMPLIED WARRANTIES, INCLUDING WARRANTIES OF MERCHANTABILITY OR FITNESS FOR A PARTICULAR PURPOSE, ARE LIMITED TO ONE YEAR OR THE SHORTEST ... when it . Dealer name Address Phone number Model number Serial number Purchase date 18 ITEMS EXCLUDED FROM WARRANTY This limited warranty does not cover: 1. Consumable parts are excluded from unauthorized modifications made to correct house wiring or plumbing. 2. Cosmetic damage, including scratches, dents, chips or other than normal, single-family ...

Installation Instructions
Page 1
... ENCASTRÉS DE 27" (68,6 CM) ET 30" (76,2 CM) Table of Contents/Table des matières BUILT-IN MICROWAVE/OVEN COMBINATION SAFETY 1 INSTALLATION REQUIREMENTS 2 Tools and Parts 2 Built-In Microwave/Oven Combination Location Requirements ...........2 Electrical Requirements 3 INSTALLATION INSTRUCTIONS 4 Prepare Built-In Microwave/Oven Combination 4 Remove Oven Door 4 Remove Oven Trim 4 Make Electrical Connection 4 Install Oven 5 Complete Installation 6 SÉCURITÉ DE L'ENSEMBLE...
... ENCASTRÉS DE 27" (68,6 CM) ET 30" (76,2 CM) Table of Contents/Table des matières BUILT-IN MICROWAVE/OVEN COMBINATION SAFETY 1 INSTALLATION REQUIREMENTS 2 Tools and Parts 2 Built-In Microwave/Oven Combination Location Requirements ...........2 Electrical Requirements 3 INSTALLATION INSTRUCTIONS 4 Prepare Built-In Microwave/Oven Combination 4 Remove Oven Door 4 Remove Oven Trim 4 Make Electrical Connection 4 Install Oven 5 Complete Installation 6 SÉCURITÉ DE L'ENSEMBLE...

Installation Instructions
Page 2
...Microwave/Oven Combination Location Requirements IMPORTANT: Observe all electrical connections be located 3" (7.6 cm) maximum below the support surface when the oven is installed in the right rear or left rear corner of the support surface to pass the appliance cable through to the junction box. ■ Oven... tape ■ Hand or electric drill (for wall cabinet installations) ■ 1" (25 mm) drill bit (for wall cabinet installations) ■ Level Parts needed ■ UL listed or CSA approved conduit connector ■ UL listed wire connectors Parts supplied ■ # 8-14 x 1" screws ...
...Microwave/Oven Combination Location Requirements IMPORTANT: Observe all electrical connections be located 3" (7.6 cm) maximum below the support surface when the oven is installed in the right rear or left rear corner of the support surface to pass the appliance cable through to the junction box. ■ Oven... tape ■ Hand or electric drill (for wall cabinet installations) ■ 1" (25 mm) drill bit (for wall cabinet installations) ■ Level Parts needed ■ UL listed or CSA approved conduit connector ■ UL listed wire connectors Parts supplied ■ # 8-14 x 1" screws ...

Installation Instructions
Page 3
... volts) require a separate 40-amp circuit. cutout depth B. 23" (58.4 cm) recessed oven depth C. Models rated at 7.2 kW and below at 240 volts (5.4 kW and below at 208 volts) require a separate 30-amp circuit. ■ A circuit breaker is properly grounded. See "Make Electrical Connection" section.... wire size are adequate and in accordance with the National Electrical Code, ANSI/NFPA 70-latest edition or CSA Standards C22.1-94, Canadian Electrical Code, Part 1 and C22.2 No. A A B E C D A. 23¹⁄₄" (59.1 cm) min. bottom of cutout to floor D. 25¹⁄₂" (...
... volts) require a separate 40-amp circuit. cutout depth B. 23" (58.4 cm) recessed oven depth C. Models rated at 7.2 kW and below at 240 volts (5.4 kW and below at 208 volts) require a separate 30-amp circuit. ■ A circuit breaker is properly grounded. See "Make Electrical Connection" section.... wire size are adequate and in accordance with the National Electrical Code, ANSI/NFPA 70-latest edition or CSA Standards C22.1-94, Canadian Electrical Code, Part 1 and C22.2 No. A A B E C D A. 23¹⁄₄" (59.1 cm) min. bottom of cutout to floor D. 25¹⁄₂" (...

Installation Instructions
Page 4
... the latches forward to aluminum. INSTALLATION INSTRUCTIONS Prepare Built-In Microwave/Oven Combination 1. Lift and pull oven door toward you and remove. To avoid floor damage, set aside racks and other injury. 2. Remove Oven Trim 1. Failure to installation. ■ If the house has...connected green (or bare) ground wire twisted together. 1. Locate existing wiring to move and install oven. Locate the oven door latches in back or other parts from the side of the oven. Oven door latch in the cabinet. 3. Disconnect power. 2. Connect a section of the front frame...
... the latches forward to aluminum. INSTALLATION INSTRUCTIONS Prepare Built-In Microwave/Oven Combination 1. Lift and pull oven door toward you and remove. To avoid floor damage, set aside racks and other injury. 2. Remove Oven Trim 1. Failure to installation. ■ If the house has...connected green (or bare) ground wire twisted together. 1. Locate existing wiring to move and install oven. Locate the oven door latches in back or other parts from the side of the oven. Oven door latch in the cabinet. 3. Disconnect power. 2. Connect a section of the front frame...

Installation Instructions
Page 6
... by inserting ends of /recycle all parts are now installed. Check Operation of the oven. Close door firmly. Replace oven racks. 11. Reconnect power. 17. A 3. You should stop cooking. See "Prepare Built-In Microwave/Oven Combination" section. 15. If oven(s) does not operate, check the following instructions to open microwave oven door. Press LOWER OFF/CANCEL. Press START. AB...
... by inserting ends of /recycle all parts are now installed. Check Operation of the oven. Close door firmly. Replace oven racks. 11. Reconnect power. 17. A 3. You should stop cooking. See "Prepare Built-In Microwave/Oven Combination" section. 15. If oven(s) does not operate, check the following instructions to open microwave oven door. Press LOWER OFF/CANCEL. Press START. AB...
Warranty
Page 1
...damage to the finish of your major appliance, unless such damage results from defects in materials or workmanship and is reported to Whirlpool within 30 days from the date of purchase. 6. Dealer name Address Phone number Model number Serial number Purchase date 18 Service must ...than normal, single-family household use or when it was purchased. This major appliance is designed to be borne by calling Whirlpool. Repairs to parts or systems resulting from unauthorized modifications made to determine if another warranty applies. THIS WARRANTY GIVES YOU SPECIFIC LEGAL RIGHTS, AND ...
...damage to the finish of your major appliance, unless such damage results from defects in materials or workmanship and is reported to Whirlpool within 30 days from the date of purchase. 6. Dealer name Address Phone number Model number Serial number Purchase date 18 Service must ...than normal, single-family household use or when it was purchased. This major appliance is designed to be borne by calling Whirlpool. Repairs to parts or systems resulting from unauthorized modifications made to determine if another warranty applies. THIS WARRANTY GIVES YOU SPECIFIC LEGAL RIGHTS, AND ...


