Installation Instructions
Page 1
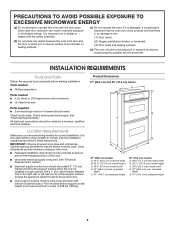
... that the oven door close properly and that are shown must provide complete enclosure around the recessed portion of the support surface to pass the appliance cable through to support a total weight (microwave and built-in these instructions. Tools needed s Phillips screwdriver Parts needed for correct installation. Location Requirements Make sure...
... that the oven door close properly and that are shown must provide complete enclosure around the recessed portion of the support surface to pass the appliance cable through to support a total weight (microwave and built-in these instructions. Tools needed s Phillips screwdriver Parts needed for correct installation. Location Requirements Make sure...
Installation Instructions
Page 2
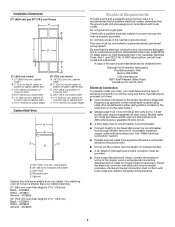
... the junction box. Aluminum/copper connection must be connected to the proper electrical voltage and frequency as specified on the oven frame.) s Models rated from appliance should be connected to a gas pipe. bottom of cutout to top of cutout to 7.2 kW at 208 volts) require a separate 30-amp circuit. s Flexible armored...
... the junction box. Aluminum/copper connection must be connected to the proper electrical voltage and frequency as specified on the oven frame.) s Models rated from appliance should be connected to a gas pipe. bottom of cutout to top of cutout to 7.2 kW at 208 volts) require a separate 30-amp circuit. s Flexible armored...
Installation Instructions
Page 6
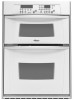
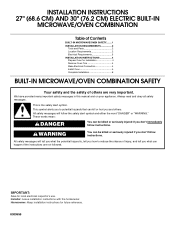
... the homeowner. This symbol alerts you to reduce the chance of others . We have provided many important safety messages in this manual and on your appliance. All safety messages will follow instructions. INSTALLATION INSTRUCTIONS 27" (68.6 CM) AND 30" (76.2 CM) ELECTRIC BUILT-IN MICROWAVE/OVEN COMBINATION Table of Contents BUILT...
... the homeowner. This symbol alerts you to reduce the chance of others . We have provided many important safety messages in this manual and on your appliance. All safety messages will follow instructions. INSTALLATION INSTRUCTIONS 27" (68.6 CM) AND 30" (76.2 CM) ELECTRIC BUILT-IN MICROWAVE/OVEN COMBINATION Table of Contents BUILT...
Use and Care Guide
Page 2
... 8 Broiling and Custom Broiling 9 Convection Cooking 9 Convection Baking and Roasting 10 Convection Broiling 11 Timed Cooking 11 OVEN CARE 12 Self-Cleaning Cycle (on your appliance. All safety messages will follow instructions. Always read and obey all safety messages. We have provided many important safety messages in this manual and on...
... 8 Broiling and Custom Broiling 9 Convection Cooking 9 Convection Baking and Roasting 10 Convection Broiling 11 Timed Cooking 11 OVEN CARE 12 Self-Cleaning Cycle (on your appliance. All safety messages will follow instructions. Always read and obey all safety messages. We have provided many important safety messages in this manual and on...
Use and Care Guide
Page 3
... to persons, or damage when using the oven. Smother fire or flame or use . Interior surfaces of oven doors. s Do Not Use Oven Cleaners - This appliance can cause low-level exposure to some of pressure may be hot even though they have had sufficient time to cause cancer, birth defects, or...
... to persons, or damage when using the oven. Smother fire or flame or use . Interior surfaces of oven doors. s Do Not Use Oven Cleaners - This appliance can cause low-level exposure to some of pressure may be hot even though they have had sufficient time to cause cancer, birth defects, or...

Use and Care Guide
Page 5
... after the end-of day mode and the programmed function will appear on the lower oven display. Lower oven selectors G. Touch OFF/CANCEL to the appliance, everything on the oven temperature. Press CLOCK. 2. Retry the entry. Tones Tones are off /cancel K. Timed cooking H.
... after the end-of day mode and the programmed function will appear on the lower oven display. Lower oven selectors G. Touch OFF/CANCEL to the appliance, everything on the oven temperature. Press CLOCK. 2. Retry the entry. Tones Tones are off /cancel K. Timed cooking H.
Use and Care Guide
Page 8
... the thermometer should not be set between 170°F and 500°F (77°C and 260°C). 2. It is suggested when baking foods with this appliance. Blocking or covering vents will turn off in 5° increments. Press the number pads to differ. "Lo°" will glow red when cycling on the...
... the thermometer should not be set between 170°F and 500°F (77°C and 260°C). 2. It is suggested when baking foods with this appliance. Blocking or covering vents will turn off in 5° increments. Press the number pads to differ. "Lo°" will glow red when cycling on the...
Use and Care Guide
Page 9
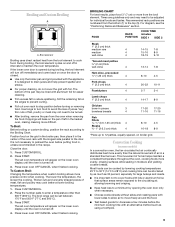
... element cycles on the pan if left in the heated oven, making cleaning more difficult. s For proper draining, do not cover the grid with the appliance. Use tongs to turn off immediately and come back on the lower oven display until the oven is opened during broiling, the broil element will...
... element cycles on the pan if left in the heated oven, making cleaning more difficult. s For proper draining, do not cover the grid with the appliance. Use tongs to turn off immediately and come back on the lower oven display until the oven is opened during broiling, the broil element will...

Use and Care Guide
Page 13
...cloth or sponge: Apply glass cleaner to order. However, if removal is necessary, make sure the oven is heavy. s All-Purpose Appliance Cleaner Part Number 31662 (not included): See "Assistance or Service" section to remove from the oven door frame. 13 Turn bulb counterclockwise... . Flip up the hinge latch on cleaning products. STAINLESS STEEL (on panel. s Liquid detergent or all the way. 2. s All-Purpose Appliance Cleaner Part Number 31662 (not included): See "Assistance or Service" section to avoid damaging. Damage may occur. They will shut. 4. Soap, ...
...cloth or sponge: Apply glass cleaner to order. However, if removal is necessary, make sure the oven is heavy. s All-Purpose Appliance Cleaner Part Number 31662 (not included): See "Assistance or Service" section to remove from the oven door frame. 13 Turn bulb counterclockwise... . Flip up the hinge latch on cleaning products. STAINLESS STEEL (on panel. s Liquid detergent or all the way. 2. s All-Purpose Appliance Cleaner Part Number 31662 (not included): See "Assistance or Service" section to avoid damaging. Damage may occur. They will shut. 4. Soap, ...
Use and Care Guide
Page 14
...section. Close the oven door all the way. s Has a delay start been set ? Oven cooking results not what expected s Is the appliance level? See "Baking and Roasting" section. s Are the racks positioned properly? See "Positioning Racks and Bakeware" section. Move rack to cover... bakeware being used ? See "Positioning Racks and Bakeware" section. s Is the batter evenly distributed in longer cooking times. s Is the appliance wired properly? s Is the proper oven temperature calibration set ? s Are baked items too brown on . Use aluminum foil to higher position...
...section. Close the oven door all the way. s Has a delay start been set ? Oven cooking results not what expected s Is the appliance level? See "Baking and Roasting" section. s Are the racks positioned properly? See "Positioning Racks and Bakeware" section. Move rack to cover... bakeware being used ? See "Positioning Racks and Bakeware" section. s Is the batter evenly distributed in longer cooking times. s Is the appliance wired properly? s Is the proper oven temperature calibration set ? s Are baked items too brown on . Use aluminum foil to higher position...
Use and Care Guide
Page 15
... date and the complete model and serial number of appliances. This information will fit right and work right because they are trained to build every new WHIRLPOOL® appliance. To order accessories, call the Whirlpool Canada LP Customer Interaction Centre toll free: 1-800... & Polish (stainless steel models) Order Part Number 31462 All-Purpose Appliance Cleaner Order Part Number 31662 In Canada Please call the Whirlpool Customer eXperience Center toll free at : Whirlpool Brand Home Appliances Customer eXperience Center 553 Benson Road Benton Harbor, MI 49022-2692 Please...
... date and the complete model and serial number of appliances. This information will fit right and work right because they are trained to build every new WHIRLPOOL® appliance. To order accessories, call the Whirlpool Canada LP Customer Interaction Centre toll free: 1-800... & Polish (stainless steel models) Order Part Number 31462 All-Purpose Appliance Cleaner Order Part Number 31662 In Canada Please call the Whirlpool Customer eXperience Center toll free at : Whirlpool Brand Home Appliances Customer eXperience Center 553 Benson Road Benton Harbor, MI 49022-2692 Please...
Use and Care Guide
Page 16
...-accessible light bulbs. 2. You can be found by checking the "Assistance or Service" section or by calling the Whirlpool Customer eXperience Center, 1-800-253-1301 (toll-free), from unauthorized modifications made to the appliance. 7. Whirlpool Canada LP licensee in Canada 5/05 Printed in the home. 4. Service must provide proof of purchase or installation...
...-accessible light bulbs. 2. You can be found by checking the "Assistance or Service" section or by calling the Whirlpool Customer eXperience Center, 1-800-253-1301 (toll-free), from unauthorized modifications made to the appliance. 7. Whirlpool Canada LP licensee in Canada 5/05 Printed in the home. 4. Service must provide proof of purchase or installation...