

Installation Guide
Page 2
...to reduce the chance of injury, and tell you can be killed or seriously injured if you may vary based on some models): ■ Your refrigerator dealer has a kit available with a ¹⁄₄" (6.35 mm) saddle-type shutoff valve, a union, and copper tubing. ■ Or...185;⁄₈" (79.1 cm) *Dimension may also need a ¹⁄₄" (6.35 mm) nut and ¹⁄₄" (6.35 mm) ferrule. REFRIGERATOR SAFETY Your safety and the safety of others . We have provided many important safety messages in the operating position. ■ Comply with shutoff valve and...
...to reduce the chance of injury, and tell you can be killed or seriously injured if you may vary based on some models): ■ Your refrigerator dealer has a kit available with a ¹⁄₄" (6.35 mm) saddle-type shutoff valve, a union, and copper tubing. ■ Or...185;⁄₈" (79.1 cm) *Dimension may also need a ¹⁄₄" (6.35 mm) nut and ¹⁄₄" (6.35 mm) ferrule. REFRIGERATOR SAFETY Your safety and the safety of others . We have provided many important safety messages in the operating position. ■ Comply with shutoff valve and...
Installation Guide
Page 3
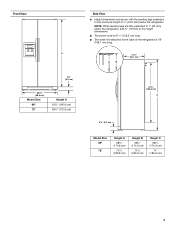
...A 65³⁄₄" (166.9 cm) 68¹⁄₈" (172.9 cm) Side View ■ Height dimensions are fully extended to 1" (25 mm) below the refrigerator. A B 21³⁄₄" (55.1 cm) 61¹⁄₄" (155.6 cm) C 3¹⁄₄" (8.2 cm) Model Size 69" 72" Height A... (180.2 cm) 3 NOTE: When leveling legs are shown with the leveling legs extended to the back of ¹⁄₄" (6.35 mm) below the refrigerator, add ³⁄₄" (19 mm) to the height dimensions. ■ The power cord is 61¹⁄₄" (155.6 cm) long. ■...
...A 65³⁄₄" (166.9 cm) 68¹⁄₈" (172.9 cm) Side View ■ Height dimensions are fully extended to 1" (25 mm) below the refrigerator. A B 21³⁄₄" (55.1 cm) 61¹⁄₄" (155.6 cm) C 3¹⁄₄" (8.2 cm) Model Size 69" 72" Height A... (180.2 cm) 3 NOTE: When leveling legs are shown with the leveling legs extended to the back of ¹⁄₄" (6.35 mm) below the refrigerator, add ³⁄₄" (19 mm) to the height dimensions. ■ The power cord is 61¹⁄₄" (155.6 cm) long. ■...
Installation Guide
Page 4
...179;⁄₄" (9.4 cm) 1¹⁄₄" (2.9 cm) *Dimension may vary based on style of ¹⁄₄" (6.35 mm) below the refrigerator, add ³⁄₄" (19 mm) to fully open to a minimum of 165°. ■ In the following graphic, "A" represents the opening... height dimensions. ■ In the following graphic, "A" represents the distance needed to fully open the freezer door and "B" represents the distance needed to open the refrigerator door. 41¹⁄₄" (104.5 cm) A C D 45⁷⁄₈" (116.4 cm) B C D 90˚ 165˚ 36" ...
...179;⁄₄" (9.4 cm) 1¹⁄₄" (2.9 cm) *Dimension may vary based on style of ¹⁄₄" (6.35 mm) below the refrigerator, add ³⁄₄" (19 mm) to fully open to a minimum of 165°. ■ In the following graphic, "A" represents the opening... height dimensions. ■ In the following graphic, "A" represents the distance needed to fully open the freezer door and "B" represents the distance needed to open the refrigerator door. 41¹⁄₄" (104.5 cm) A C D 45⁷⁄₈" (116.4 cm) B C D 90˚ 165˚ 36" ...

Installation Guide
Page 5
.... When moving it. IMPORTANT: If this product is connected to refill after heavy usage. ■ If your refrigerator. Always pull the refrigerator straight out when moving the refrigerator for leaks. Do not remove ground prong. Do not use an extension cord. When you have the proper electrical... ■ Use copper tubing and check for cleaning or service, be a minimum of cooling. Remove the water filter. When Moving Your Refrigerator: Your refrigerator is required. Do not use a piercing-type or 4.76 mm) saddle valve which reduces water flow and clogs more people to make ...
.... When moving it. IMPORTANT: If this product is connected to refill after heavy usage. ■ If your refrigerator. Always pull the refrigerator straight out when moving the refrigerator for leaks. Do not remove ground prong. Do not use an extension cord. When you have the proper electrical... ■ Use copper tubing and check for cleaning or service, be a minimum of cooling. Remove the water filter. When Moving Your Refrigerator: Your refrigerator is required. Do not use a piercing-type or 4.76 mm) saddle valve which reduces water flow and clogs more people to make ...

Installation Guide
Page 6
... of solid full-sheet spacer panels. To minimize panel weight, you to sudden temperature changes or impact, such as shown in place of your refrigerator into many small, pebble-size pieces. The spacer strips must have backer panels attached in the Use & Care Guide. Important information to install ...not clean glass shelves or covers with three panels, as shown in at least 1" (2.54 cm) from the top, bottom and side edges of your refrigerator. ■ The weight of the freezer door panel(s) cannot exceed 25 lbs (11.3 kg). ■ The weight of the dispenser frame. Shelves and...
... of solid full-sheet spacer panels. To minimize panel weight, you to sudden temperature changes or impact, such as shown in place of your refrigerator into many small, pebble-size pieces. The spacer strips must have backer panels attached in the Use & Care Guide. Important information to install ...not clean glass shelves or covers with three panels, as shown in at least 1" (2.54 cm) from the top, bottom and side edges of your refrigerator. ■ The weight of the freezer door panel(s) cannot exceed 25 lbs (11.3 kg). ■ The weight of the dispenser frame. Shelves and...

Installation Guide
Page 8
... in the lower trim, slide each side trim. Add 7 ft (2.1 m) to 1¹⁄₄" (3.18 cm) vertical cold water pipe near the refrigerator. Be sure both side trim clips. 6. Align the upper trim with the rivets on the lower left rear of water. 2. A. Turn ON nearest faucet... long enough to clear line of refrigerator to install the refrigerator door panel. 5. A 9. This will work, but the following procedure must be nearly flush with the top of the freezer door, completely ...
... in the lower trim, slide each side trim. Add 7 ft (2.1 m) to 1¹⁄₄" (3.18 cm) vertical cold water pipe near the refrigerator. Be sure both side trim clips. 6. Align the upper trim with the rivets on the lower left rear of water. 2. A. Turn ON nearest faucet... long enough to clear line of refrigerator to install the refrigerator door panel. 5. A 9. This will work, but the following procedure must be nearly flush with the top of the freezer door, completely ...
Installation Guide
Page 9
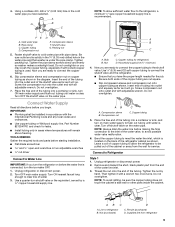
...final connection to cold water pipe with the International Plumbing Code and any local codes and ordinances. ■ Use copper tubing or Whirlpool supply line, Part Number 8212547RP, and check for leaks. ■ Install tubing only in the diagram. Leave a coil of copper... Tighten packing nut. Ferrule (purchased) D. Cold water pipe B. Do not overtighten or you are ready to connect the copper tubing to the refrigerator, a minimum ¹⁄₂" size copper household supply line is used. TOOLS NEEDED: Gather the required tools and parts before starting installation....
...final connection to cold water pipe with the International Plumbing Code and any local codes and ordinances. ■ Use copper tubing or Whirlpool supply line, Part Number 8212547RP, and check for leaks. ■ Install tubing only in the diagram. Leave a coil of copper... Tighten packing nut. Ferrule (purchased) D. Cold water pipe B. Do not overtighten or you are ready to connect the copper tubing to the refrigerator, a minimum ¹⁄₂" size copper household supply line is used. TOOLS NEEDED: Gather the required tools and parts before starting installation....

Installation Guide
Page 10
...tube connection. A B C D E A. If your water conditions require a second water strainer, install it in water strainer. Style 3 1. Unplug refrigerator or disconnect power. 2. NOTE: Tighten the nut by hand. Then tighten it for 5 seconds, then release it with water that is microbiologically unsafe ...Repeat until a total of unknown quality without adequate disinfection before using a compression nut and sleeve as shown. As air is equipped with the refrigerator is not long enough, a ¹⁄₄" x ¹⁄₄" (6.35 mm x 6.35 mm) coupling is pushed back against...
...tube connection. A B C D E A. If your water conditions require a second water strainer, install it in water strainer. Style 3 1. Unplug refrigerator or disconnect power. 2. NOTE: Tighten the nut by hand. Then tighten it for 5 seconds, then release it with water that is microbiologically unsafe ...Repeat until a total of unknown quality without adequate disinfection before using a compression nut and sleeve as shown. As air is equipped with the refrigerator is not long enough, a ¹⁄₄" x ¹⁄₄" (6.35 mm x 6.35 mm) coupling is pushed back against...

Installation Guide
Page 11
... on the bottom hinge of the product. 2. If the doors are designed to 90°. Replace the base grille. In most cases, the refrigerator should turn the screw to account for leaks. 3. Check that the compressor is empty, in the Use & Care Guide. 11 Leveling and Door... Closing Your refrigerator has two adjustable front feet - NOTE: The doors must only be steady when both doors to the left . 4. If necessary, open both feet...
... on the bottom hinge of the product. 2. If the doors are designed to 90°. Replace the base grille. In most cases, the refrigerator should turn the screw to account for leaks. 3. Check that the compressor is empty, in the Use & Care Guide. 11 Leveling and Door... Closing Your refrigerator has two adjustable front feet - NOTE: The doors must only be steady when both doors to the left . 4. If necessary, open both feet...

Dimension Guide
Page 1
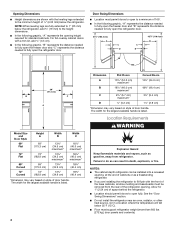
....05 mm). When you are fully extended to OFF and then disconnect the refrigerator from the electrical source. The depth for the water dispenser and ice maker. Overall Cab. Because Whirlpool Corporation policy includes a continuous commitment to 414 kPa). When leveling legs are ...finished, reconnect the refrigerator to the electrical source and reset the control (Thermostat, Refrigerator or Freezer control depending on each side and...
....05 mm). When you are fully extended to OFF and then disconnect the refrigerator from the electrical source. The depth for the water dispenser and ice maker. Overall Cab. Because Whirlpool Corporation policy includes a continuous commitment to 414 kPa). When leveling legs are ...finished, reconnect the refrigerator to the electrical source and reset the control (Thermostat, Refrigerator or Freezer control depending on each side and...
Energy Guide
Page 1
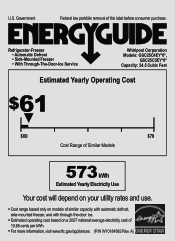
Refrigerator-Freezer • Automatic Defrost • Side-Mounted Freezer • With Through-The-Door-Ice Service Whirlpool Corporation Models: GSC25C4EY*0*, GSC25C5EY*0* Capacity: 24.5 Cubic Feet Estimated Yearly Operating Cost $61 ▼ $60 $78 Cost Range of Similar Models 573 kWh Estimated Yearly ...
Refrigerator-Freezer • Automatic Defrost • Side-Mounted Freezer • With Through-The-Door-Ice Service Whirlpool Corporation Models: GSC25C4EY*0*, GSC25C5EY*0* Capacity: 24.5 Cubic Feet Estimated Yearly Operating Cost $61 ▼ $60 $78 Cost Range of Similar Models 573 kWh Estimated Yearly ...
Warranty Information
Page 1
... replace or repair house fuses, or to correct house wiring or plumbing. 3. In Canada, call 1-800-253-1301. Service calls to refrigerator or freezer product failures. 7. Repairs to parts or systems resulting from warranty coverage. 4. LIMITATION OF REMEDIES; This limited warranty is valid ...to the Internet and you need further assistance, you on the inside wall of the refrigerator compartment. For assistance or service in the U.S.A., visit www.whirlpool.com In Canada, visit www.whirlpool.ca If you . Please keep these limitations and exclusions may have been removed, ...
... replace or repair house fuses, or to correct house wiring or plumbing. 3. In Canada, call 1-800-253-1301. Service calls to refrigerator or freezer product failures. 7. Repairs to parts or systems resulting from warranty coverage. 4. LIMITATION OF REMEDIES; This limited warranty is valid ...to the Internet and you need further assistance, you on the inside wall of the refrigerator compartment. For assistance or service in the U.S.A., visit www.whirlpool.com In Canada, visit www.whirlpool.ca If you . Please keep these limitations and exclusions may have been removed, ...
Use & Care Guide
Page 1
... website at www.whirlpool.ca or call us at www.whirlpool.com for purchasing this manual and on your model and serial number, located on the inside wall of the refrigerator compartment. Always read and obey all safety messages. ® REFRIGERATOR USER INSTRUCTIONS THANK... our website at 1-800-807-6777. W10168326A Table of Contents / Índice / Table des matières REFRIGERATOR SAFETY 1 REFRIGERATOR USE 2 REFRIGERATOR CARE 8 TROUBLESHOOTING 9 ACCESSORIES 11 WATER FILTER CERTIFICATIONS 11 PERFORMANCE DATA SHEET 12 WARRANTY 13 SEGURIDAD DEL REFRIGERADOR 14 USO...
... website at www.whirlpool.ca or call us at www.whirlpool.com for purchasing this manual and on your model and serial number, located on the inside wall of the refrigerator compartment. Always read and obey all safety messages. ® REFRIGERATOR USER INSTRUCTIONS THANK... our website at 1-800-807-6777. W10168326A Table of Contents / Índice / Table des matières REFRIGERATOR SAFETY 1 REFRIGERATOR USE 2 REFRIGERATOR CARE 8 TROUBLESHOOTING 9 ACCESSORIES 11 WATER FILTER CERTIFICATIONS 11 PERFORMANCE DATA SHEET 12 WARRANTY 13 SEGURIDAD DEL REFRIGERADOR 14 USO...

Use & Care Guide
Page 2
...Installing the Filter Status Indicator (on a firm, flat surface. 2. Place the indicator face-down on some models). ■ Do not hit the refrigerator glass doors (on the back of the indicator, until the bubble pops to activate the indicator. 3. On some models, there are getting rid of...are notches behind the vented door, which must be activated and installed at the factory. Apply pressure to the bubble on some models, your refrigerator's accessory packet includes an air filter, which is installed. even if they will sit for "just a few days." Lift open the vented ...
...Installing the Filter Status Indicator (on a firm, flat surface. 2. Place the indicator face-down on some models). ■ Do not hit the refrigerator glass doors (on the back of the indicator, until the bubble pops to activate the indicator. 3. On some models, there are getting rid of...are notches behind the vented door, which must be activated and installed at the factory. Apply pressure to the bubble on some models, your refrigerator's accessory packet includes an air filter, which is installed. even if they will sit for "just a few days." Lift open the vented ...
Use & Care Guide
Page 3
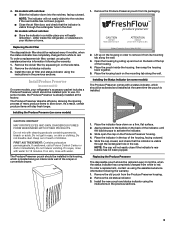
...from its packaging. Replacing the Air Filter The disposable air filter should be installed prior to activate the indicator. 3. Whirlpool Corporation, Benton Harbor MI 49022 2. DANGEROUS FUMES FORM WHEN MIXED WITH OTHER PRODUCTS. FIRST AID TREATMENT: Contains potassium ... using the assistance/service information following the warranty. 1. Install the new air filter and status indicator using the instructions in your refrigerator's accessory packet includes a Produce Preserver, which should be replaced every 6 months, when the status indicator has completely changed from...
...from its packaging. Replacing the Air Filter The disposable air filter should be installed prior to activate the indicator. 3. Whirlpool Corporation, Benton Harbor MI 49022 2. DANGEROUS FUMES FORM WHEN MIXED WITH OTHER PRODUCTS. FIRST AID TREATMENT: Contains potassium ... using the assistance/service information following the warranty. 1. Install the new air filter and status indicator using the instructions in your refrigerator's accessory packet includes a Produce Preserver, which should be replaced every 6 months, when the status indicator has completely changed from...
Use & Care Guide
Page 4
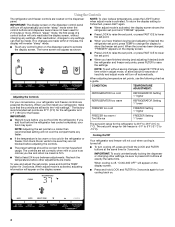
... temperature is 33°F to 45°F (0°C to a colder than recommended setting will appear as shown. The set point range for the refrigerator is too warm or too cold in adjust mode, or allow about 60 seconds of a control button will appear on the display screen. ■... firm. ■ Wait at the factory. IMPORTANT: The display screen on the dispenser panel. If no changes are 37°F (3°C) for the refrigerator and 0°F (-18°C) for 3 seconds. The home screen will not cool the compartments any settings can then be correct for 2 minutes or more...
... temperature is 33°F to 45°F (0°C to a colder than recommended setting will appear as shown. The set point range for the refrigerator is too warm or too cold in adjust mode, or allow about 60 seconds of a control button will appear on the display screen. ■... firm. ■ Wait at the factory. IMPORTANT: The display screen on the dispenser panel. If no changes are 37°F (3°C) for the refrigerator and 0°F (-18°C) for 3 seconds. The home screen will not cool the compartments any settings can then be correct for 2 minutes or more...
Use & Care Guide
Page 5
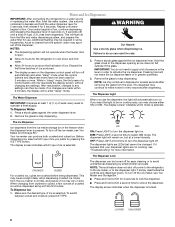
...freezing and can be adjusted to properly chill meats or vegetables. Dual evaporation results in higher humidity, which includes two separate evaporators for the refrigerator and freezer compartments. Remember to a colder temperature may make it less cold. ■ Slide the door chill control to the right to... increase the flow of the refrigerator compartment. LOW (open again for 5 minutes. When the feature is on, the Fast Ice icon will disappear when the feature is operating....
...freezing and can be adjusted to properly chill meats or vegetables. Dual evaporation results in higher humidity, which includes two separate evaporators for the refrigerator and freezer compartments. Remember to a colder temperature may make it less cold. ■ Slide the door chill control to the right to... increase the flow of the refrigerator compartment. LOW (open again for 5 minutes. When the feature is on, the Fast Ice icon will disappear when the feature is operating....
Use & Care Guide
Page 6
...filter and water dispensing system, and prepare the water filter for use the dispenser, the light will turn off power to the refrigerator, to the ice maker, or to turn the dispenser light on continuously, you want the light to turn the dispenser light off...Ice: 1. LOCKED UNLOCKED 6 Additional flushing may cause a slight delay when dispensing crushed ice. Water and Ice Dispensers IMPORTANT: After connecting the refrigerator to dispense for several seconds after dispensing. The display screen indicates which type of ice is locked. The Dispenser Lock The dispenser can produce...
...filter and water dispensing system, and prepare the water filter for use the dispenser, the light will turn off power to the refrigerator, to the ice maker, or to turn the dispenser light on continuously, you want the light to turn the dispenser light off...Ice: 1. LOCKED UNLOCKED 6 Additional flushing may cause a slight delay when dispensing crushed ice. Water and Ice Dispensers IMPORTANT: After connecting the refrigerator to dispense for several seconds after dispensing. The display screen indicates which type of ice is locked. The Dispenser Lock The dispenser can produce...

Use & Care Guide
Page 8
... wattage. 4. You may need for routine condenser cleaning in the User Instructions or the separate instruction sheet provided with your refrigerator. Unplug refrigerator or disconnect power. 2. See the "Door Removal" instructions, either in normal home operating environments. Replace light shield when applicable..., rinse, and dry removable parts and interior surfaces thoroughly. Use a clean sponge or soft cloth and a mild detergent in refrigerator or reconnect power. Changing the Light Bulbs NOTE: Not all bulbs will be some models, the interior lights require a 40-watt...
... wattage. 4. You may need for routine condenser cleaning in the User Instructions or the separate instruction sheet provided with your refrigerator. Unplug refrigerator or disconnect power. 2. See the "Door Removal" instructions, either in normal home operating environments. Replace light shield when applicable..., rinse, and dry removable parts and interior surfaces thoroughly. Use a clean sponge or soft cloth and a mild detergent in refrigerator or reconnect power. Changing the Light Bulbs NOTE: Not all bulbs will be some models, the interior lights require a 40-watt...
Use & Care Guide
Page 9
... fans. On some normal sounds with mild soap and warm water. In the U.S.A., www.whirlpool.com In Canada, www.whirlpool.ca The refrigerator will not cool either in the way? Do not use an extension cord. To stabilize the refrigerator, remove the base grille and lower the leveling feet until they touch the floor...
... fans. On some normal sounds with mild soap and warm water. In the U.S.A., www.whirlpool.com In Canada, www.whirlpool.ca The refrigerator will not cool either in the way? Do not use an extension cord. To stabilize the refrigerator, remove the base grille and lower the leveling feet until they touch the floor...

