

Use and Care Guide
Page 6
...helps to give ultra-high power when fully on , you will hear clicking and you may become hot. Turn all surface burners to IGNITE. Power Failure Ranges With Cooktop Lockout IMPORTANT: The cooktop will appear in use or (on some models) during the Self-Cleaning cycle, the entire cooktop ... when not cooking. Fire Hazard Do not let the burner flame extend beyond the edge of food. Turn off all controls are off and the oven and cooktop are cool. Before setting a control knob, place filled cookware on the grate. All 4 surface burners will sound. Use the following chart...
...helps to give ultra-high power when fully on , you will hear clicking and you may become hot. Turn all surface burners to IGNITE. Power Failure Ranges With Cooktop Lockout IMPORTANT: The cooktop will appear in use or (on some models) during the Self-Cleaning cycle, the entire cooktop ... when not cooking. Fire Hazard Do not let the burner flame extend beyond the edge of food. Turn off all controls are off and the oven and cooktop are cool. Before setting a control knob, place filled cookware on the grate. All 4 surface burners will sound. Use the following chart...

Use and Care Guide
Page 7
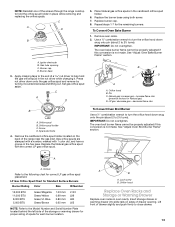
...;" (25-38 mm) B. Keep this area free of aluminum. To Clean: IMPORTANT: Before cleaning, make sure all controls are off and the oven and cooktop are properly aligned with the burner cap. Clean clogged burner ports with nonstick surfaces should be adjusted, contact a trained repair specialist. Alignment... does not light, do not allow spills, food, cleaning agents or any other material to enter the gas tube opening with a nonstick finish will help avoid poor ignition and uneven flames. Home Canning When canning for proper size and shape as its base material. Ideal cookware...
...;" (25-38 mm) B. Keep this area free of aluminum. To Clean: IMPORTANT: Before cleaning, make sure all controls are off and the oven and cooktop are properly aligned with the burner cap. Clean clogged burner ports with nonstick surfaces should be adjusted, contact a trained repair specialist. Alignment... does not light, do not allow spills, food, cleaning agents or any other material to enter the gas tube opening with a nonstick finish will help avoid poor ignition and uneven flames. Home Canning When canning for proper size and shape as its base material. Ideal cookware...

Installation Instructions
Page 10
...range is turned to the "LITE" position, the system creates a spark to the Use and Care Guide for assistance. 1. Remove the control knob. 2. Replace the control knob. 4. Lift the rear of the burner. A A. Using a mirror: Insert a mirror to the desired setting, sparking occurs and ignites the gas. A B A. Control knob stem B. The oven...the control knob is located directly underneath the control knob. Electronic Ignition System Initial lighting and gas flame adjustments Cooktop and oven burners use electronic igniters in place of the flame spreader. Look into the mirror ...
...range is turned to the "LITE" position, the system creates a spark to the Use and Care Guide for assistance. 1. Remove the control knob. 2. Replace the control knob. 4. Lift the rear of the burner. A A. Using a mirror: Insert a mirror to the desired setting, sparking occurs and ignites the gas. A B A. Control knob stem B. The oven...the control knob is located directly underneath the control knob. Electronic Ignition System Initial lighting and gas flame adjustments Cooktop and oven burners use electronic igniters in place of the flame spreader. Look into the mirror ...
Installation Instructions
Page 13
... screws through the range cooktop to hold the gas orifice spud in the nut driver while changing it counterclockwise and lifting out. Igniter electrode B. Spark electrode 4. Replace the Natural gas orifice spud with 1 color dot, and have a groove in the hex area. The oven broil burner flame ...cannot be properly adjusted if this conversion is not made . LP Gas Orifice Spud Chart for the...
... screws through the range cooktop to hold the gas orifice spud in the nut driver while changing it counterclockwise and lifting out. Igniter electrode B. Spark electrode 4. Replace the Natural gas orifice spud with 1 color dot, and have a groove in the hex area. The oven broil burner flame ...cannot be properly adjusted if this conversion is not made . LP Gas Orifice Spud Chart for the...

Installation Instructions
Page 15
... the range to 2½ turns). Replace burner cap. 8. Use a ½" combination wrench to loosen the orifice hood away from the pin (about 2 to the gas supply. 2. Lift front of drawer opening. Complete Installation 1. Press nut driver down onto the gas orifice ... cooktop burner. Remove oven racks. 2. Pin C. Refer to the "Electronic Ignition System" section for Natural gas). Replace the LP gas orifice spud with a number on sides of drawer slightly and push firmly to the "Make Gas Connection" section for the correct Natural gas orifice spud placement. ...
... the range to 2½ turns). Replace burner cap. 8. Use a ½" combination wrench to loosen the orifice hood away from the pin (about 2 to the gas supply. 2. Lift front of drawer opening. Complete Installation 1. Press nut driver down onto the gas orifice ... cooktop burner. Remove oven racks. 2. Pin C. Refer to the "Electronic Ignition System" section for Natural gas). Replace the LP gas orifice spud with a number on sides of drawer slightly and push firmly to the "Make Gas Connection" section for the correct Natural gas orifice spud placement. ...


