

Use and Care Guide
Page 4
..., and other utensils. s Disconnect power before initiating the cleaning cycle. s Before Self-Cleaning the Oven - SAVE THESE INSTRUCTIONS 4 Anti-Tip Bracket Range Foot Making sure the anti-tip bracket is installed: • Slide range forward. • Look for the anti-tip bracket securely... attached to children and adults. Aluminum foil linings may cause carbon monoxide poisoning. Keep range area clear and free from this appliance as aluminum foil. For self-cleaning ranges - Remove broiler pan and other flammable vapors and liquids. Reconnect the anti-tip bracket...
..., and other utensils. s Disconnect power before initiating the cleaning cycle. s Before Self-Cleaning the Oven - SAVE THESE INSTRUCTIONS 4 Anti-Tip Bracket Range Foot Making sure the anti-tip bracket is installed: • Slide range forward. • Look for the anti-tip bracket securely... attached to children and adults. Aluminum foil linings may cause carbon monoxide poisoning. Keep range area clear and free from this appliance as aluminum foil. For self-cleaning ranges - Remove broiler pan and other flammable vapors and liquids. Reconnect the anti-tip bracket...
Use and Care Guide
Page 5
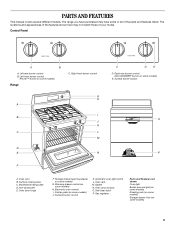
Surface burner control K. Oven rack M. Storage drawer (warming drawer on some models) 5 Gas regulator Parts and Features not shown Oven light Broiler pan and grid (on some models) Roasting rack (on some models) Storage drawer liner (... control (Power™ burner on some models) G. Oven vent B. Surface cooking area C. Warming drawer control (on some models) J. Anti-tip bracket E. Gasket N. Self-clean latch P. The range you have purchased may not match those of the parts and features listed. Right rear burner control (ACCUSIMMER® burner on some models...
Surface burner control K. Oven rack M. Storage drawer (warming drawer on some models) 5 Gas regulator Parts and Features not shown Oven light Broiler pan and grid (on some models) Roasting rack (on some models) Storage drawer liner (... control (Power™ burner on some models) G. Oven vent B. Surface cooking area C. Warming drawer control (on some models) J. Anti-tip bracket E. Gasket N. Self-clean latch P. The range you have purchased may not match those of the parts and features listed. Right rear burner control (ACCUSIMMER® burner on some models...

Use and Care Guide
Page 6
...s Stew or steam foods. A single tone will disappear from the display. 6 A single tone will click. COOKTOP USE Cooktop Controls WARNING To Clean: IMPORTANT: Before cleaning, make sure all controls are off all controls when not cooking. They can be locked: s When power is in use or (on .... igniters automatically light the surface burners when control knobs are turned to a boil. s When power is blinking on some models) are cool. Ranges Without Cooktop Lockout In case of the pan. s Quickly brown or sear food. s Cook soups, sauces and gravies. NOTE: On some ...
...s Stew or steam foods. A single tone will disappear from the display. 6 A single tone will click. COOKTOP USE Cooktop Controls WARNING To Clean: IMPORTANT: Before cleaning, make sure all controls are off all controls when not cooking. They can be locked: s When power is in use or (on .... igniters automatically light the surface burners when control knobs are turned to a boil. s When power is blinking on some models) are cool. Ranges Without Cooktop Lockout In case of the pan. s Quickly brown or sear food. s Cook soups, sauces and gravies. NOTE: On some ...

Use and Care Guide
Page 7
.... Companies that manufacture home canning products can leave permanent marks on the properties of combustion and ventilation air around the burner grate edges. Clean the gas tube opening . Ideal cookware should have a flat bottom, straight sides and a well-fitting lid, and the material should not be ... which affects cooking results. Rough finishes may be used areas to enter the gas tube opening with a straight pin as shown. If the burner needs to be of soil and do not allow spills, food, cleaning agents or any other material to cool. Alignment pins D. A B A. Home...
.... Companies that manufacture home canning products can leave permanent marks on the properties of combustion and ventilation air around the burner grate edges. Clean the gas tube opening . Ideal cookware should have a flat bottom, straight sides and a well-fitting lid, and the material should not be ... which affects cooking results. Rough finishes may be used areas to enter the gas tube opening with a straight pin as shown. If the burner needs to be of soil and do not allow spills, food, cleaning agents or any other material to cool. Alignment pins D. A B A. Home...

Use and Care Guide
Page 8
...core or base of day. Start time C. Off/cancel J I . Temperature J. Electronic Oven Controls (on low heat settings. Cancel/off F. Auto clean J. When performing a timed cook function, the display will flash in the display. s Suitable for most cooking tasks. Earthenware s Follow manufacturer's instructions.... models) AB C DE F NM L K A. and p.m. 8 Use the following chart as a reminder. Press OFF/CANCEL to the range, "PUSH"/"OFF" will show either hours and minutes, or minutes and seconds. Electronic Oven Control When power is first supplied to the time...
...core or base of day. Start time C. Off/cancel J I . Temperature J. Electronic Oven Controls (on low heat settings. Cancel/off F. Auto clean J. When performing a timed cook function, the display will flash in the display. s Suitable for most cooking tasks. Earthenware s Follow manufacturer's instructions.... models) AB C DE F NM L K A. and p.m. 8 Use the following chart as a reminder. Press OFF/CANCEL to the range, "PUSH"/"OFF" will show either hours and minutes, or minutes and seconds. Electronic Oven Control When power is first supplied to the time...

Use and Care Guide
Page 12
... Management (on some models) The ACCUBAKE® system electronically regulates the oven heat levels during preheat and bake to maintain a precise temperature range for the oven preheat conditioning time to avoid curling. s For best results, use a broiler pan and grid (provided on some models).... When the preheat conditioning time ends, a tone will sound and the selected temperature will cause poor air circulation, affecting cooking and cleaning results. Press OFF/CANCEL when finished. 12 The preheat conditioning time will appear on the edges to end before turning or removing food...
... Management (on some models) The ACCUBAKE® system electronically regulates the oven heat levels during preheat and bake to maintain a precise temperature range for the oven preheat conditioning time to avoid curling. s For best results, use a broiler pan and grid (provided on some models).... When the preheat conditioning time ends, a tone will sound and the selected temperature will cause poor air circulation, affecting cooking and cleaning results. Press OFF/CANCEL when finished. 12 The preheat conditioning time will appear on the edges to end before turning or removing food...

Use and Care Guide
Page 15
..."PUSH"/"OFF" will stop blinking, and clock will not affect cooking performance. RANGE CARE Self-Cleaning Cycle (onsomemodels) WARNING To stop the self-clean cycle at any foil from the oven because it becomes heavily soiled. Self-clean the oven before it is essential for more smoke. Air must be displayed.... on your model, see "Oven Vent" or "Oven Vents" section. Applying a cool damp cloth to follow these instructions can result. The last 30 minutes of gloss, hairline cracks and popping sounds. The door will automatically lock. Press the HOUR and MIN "up " and "down " arrow ...
..."PUSH"/"OFF" will stop blinking, and clock will not affect cooking performance. RANGE CARE Self-Cleaning Cycle (onsomemodels) WARNING To stop the self-clean cycle at any foil from the oven because it becomes heavily soiled. Self-clean the oven before it is essential for more smoke. Air must be displayed.... on your model, see "Oven Vent" or "Oven Vents" section. Applying a cool damp cloth to follow these instructions can result. The last 30 minutes of gloss, hairline cracks and popping sounds. The door will automatically lock. Press the HOUR and MIN "up " and "down " arrow ...
Use and Care Guide
Page 16
...TIME. 4. Soap, water and a soft cloth or sponge are 2 hours 30 minutes for light soil and 4 hours 30 minutes for heavy soil. Cleaning Method: s Glass cleaner, mild liquid cleaner or nonabrasive scrubbing pad: Gently clean around the model and serial number plate because scrubbing may occur. s Vinegar for...STEEL (on some paper towels. Do not use abrasive cleaners, cleaners with soft, lint-free cloth. Cleaning Method: s Soap and water or dishwasher: Pull knobs straight away from 2 hours 30 minutes to soft cloth or sponge, not directly on some models, do not bang grates and caps...
...TIME. 4. Soap, water and a soft cloth or sponge are 2 hours 30 minutes for light soil and 4 hours 30 minutes for heavy soil. Cleaning Method: s Glass cleaner, mild liquid cleaner or nonabrasive scrubbing pad: Gently clean around the model and serial number plate because scrubbing may occur. s Vinegar for...STEEL (on some paper towels. Do not use abrasive cleaners, cleaners with soft, lint-free cloth. Cleaning Method: s Soap and water or dishwasher: Pull knobs straight away from 2 hours 30 minutes to soft cloth or sponge, not directly on some models, do not bang grates and caps...

Use and Care Guide
Page 17
... items from socket. 4. Cooked-on some models) Do not clean in the back of vegetable oil applied to the rack guides will discolor and become harder to remove from drawer and lift out drawer liner. s Gas Grate and Drip Pan Cleaner Part Number 31617: See "Assistance or...Appliance Cleaner Part Number 31662 (not included): See "Assistance or Service" section to remove the oven door. Cleaning Method: s Mild detergent (for 20 minutes, then scrub with wet scouring pad. Unplug range or disconnect power. 2. Replace bulb, then bulb cover by turning clockwise. 5. However, if removal is...
... items from socket. 4. Cooked-on some models) Do not clean in the back of vegetable oil applied to the rack guides will discolor and become harder to remove from drawer and lift out drawer liner. s Gas Grate and Drip Pan Cleaner Part Number 31617: See "Assistance or...Appliance Cleaner Part Number 31662 (not included): See "Assistance or Service" section to remove the oven door. Cleaning Method: s Mild detergent (for 20 minutes, then scrub with wet scouring pad. Unplug range or disconnect power. 2. Replace bulb, then bulb cover by turning clockwise. 5. However, if removal is...

Use and Care Guide
Page 18
...into the door. 2. If the problem continues, call . See Installation Instructions. s Is the range properly connected to a setting. 18 To Replace: 1. You should hear a "click" as it is set ? s Is the main or regulator gas shutoff valve in self-clean? Slowly push the drawer into place. 3. A A. Move the hinge levers back to a ... fully forward position. 2. Lift up the back of side rail 2. s Household fuse blown or circuit breaker tripped? See "Cooktop Lockout" section. s Is a delayed self-clean set into the range until the self-clean cycle is cool and empty.
...into the door. 2. If the problem continues, call . See Installation Instructions. s Is the range properly connected to a setting. 18 To Replace: 1. You should hear a "click" as it is set ? s Is the main or regulator gas shutoff valve in self-clean? Slowly push the drawer into place. 3. A A. Move the hinge levers back to a ... fully forward position. 2. Lift up the back of side rail 2. s Household fuse blown or circuit breaker tripped? See "Cooktop Lockout" section. s Is a delayed self-clean set into the range until the self-clean cycle is cool and empty.
Use and Care Guide
Page 19
...? Oven burner flames are yellow or noisy s Is propane gas being used ? Cooling fan runs during baking, broiling or cleaning s It is in the past 12 hours? See "Clock" section. Self-Cleaning cycle will not operate s Is this the first time the...the Installation Instructions. Contact a service technician or see "Assistance or Service" section. See "Oven Temperature Control" section. s Has a delay start Self-Clean cycle been set? s Is the proper temperature set ? s Is the proper oven temperature calibration set ? See "Oven Temperature Control" section. See "...
...? Oven burner flames are yellow or noisy s Is propane gas being used ? Cooling fan runs during baking, broiling or cleaning s It is in the past 12 hours? See "Clock" section. Self-Cleaning cycle will not operate s Is this the first time the...the Installation Instructions. Contact a service technician or see "Assistance or Service" section. See "Oven Temperature Control" section. s Has a delay start Self-Clean cycle been set? s Is the proper temperature set ? s Is the proper oven temperature calibration set ? See "Oven Temperature Control" section. See "...

Use and Care Guide
Page 21
... this major appliance is operated and maintained according to instructions attached to or furnished with the product, Whirlpool Corporation or Whirlpool Canada LP (hereafter "Whirlpool") will need to correct defects in a remote area where service by this warranty. 8. Repairs when... altered or removed from warranty coverage. 3. Service must provide proof of consumables or cleaning products not approved by a Whirlpool designated service company. Service calls to Whirlpool within 30 days from defects in -warranty service. Cosmetic damage, including scratches, dents, chips or...
... this major appliance is operated and maintained according to instructions attached to or furnished with the product, Whirlpool Corporation or Whirlpool Canada LP (hereafter "Whirlpool") will need to correct defects in a remote area where service by this warranty. 8. Repairs when... altered or removed from warranty coverage. 3. Service must provide proof of consumables or cleaning products not approved by a Whirlpool designated service company. Service calls to Whirlpool within 30 days from defects in -warranty service. Cosmetic damage, including scratches, dents, chips or...

Installation Instructions
Page 3
... discolor, delaminate or sustain other damage. Tools needed Check local codes and consult gas supplier. s To eliminate the risk of burns or fire by the oven for baking and self-cleaning. Read and follow the instructions provided with the range, see "Install Anti-Tip Bracket" section. IMPORTANT: Some cabinet and building materials are...
... discolor, delaminate or sustain other damage. Tools needed Check local codes and consult gas supplier. s To eliminate the risk of burns or fire by the oven for baking and self-cleaning. Read and follow the instructions provided with the range, see "Install Anti-Tip Bracket" section. IMPORTANT: Some cabinet and building materials are...

Installation Instructions
Page 11
...more information, see which step was skipped. 2. s Electrical supply is intact and tight; s See "Troubleshooting" in oven cavity. When the range has been on range operation. s If the gas supply line shutoff valve is an extra part, go back through oven window to check broil burner for proper flame. No yellow.... 3. No yellow tips, blowing or lifting of the oven controls. If range is cold, turn the range off and check that the range is open. Check the oven bake burner for proper operation of flame should be clean and soft in the Use and Care Guide. 7. Loosen the lock screw ...
...more information, see which step was skipped. 2. s Electrical supply is intact and tight; s See "Troubleshooting" in oven cavity. When the range has been on range operation. s If the gas supply line shutoff valve is an extra part, go back through oven window to check broil burner for proper flame. No yellow.... 3. No yellow tips, blowing or lifting of the oven controls. If range is cold, turn the range off and check that the range is open. Check the oven bake burner for proper operation of flame should be clean and soft in the Use and Care Guide. 7. Loosen the lock screw ...

