

Use and Care Guide
Page 3
... harm. Follow the gas supplier's instructions. • If you what the potential hazard is, tell you how to light any appliance. • Do not touch any other flammable vapors and liquids in this manual is the safety alert symbol. All safety messages will tell you what can be performed by a qualified installer, service agency or the...
... harm. Follow the gas supplier's instructions. • If you what the potential hazard is, tell you how to light any appliance. • Do not touch any other flammable vapors and liquids in this manual is the safety alert symbol. All safety messages will tell you what can be performed by a qualified installer, service agency or the...

Use and Care Guide
Page 4
... National Electrical Code, ANSI/NFPA 70. Aluminum foil linings may cause carbon monoxide poisoning. s This range is under anti-tip bracket. Flammable materials should be killed. Connect anti-tip bracket to persons, or damage when using the range, follow these instructions can tip the range and be plugged directly into a properly grounded receptacle. Remove broiler pan and other flammable vapors and liquids. children climbing on the backguard of fire, electrical shock, injury to rear range...
... National Electrical Code, ANSI/NFPA 70. Aluminum foil linings may cause carbon monoxide poisoning. s This range is under anti-tip bracket. Flammable materials should be killed. Connect anti-tip bracket to persons, or damage when using the range, follow these instructions can tip the range and be plugged directly into a properly grounded receptacle. Remove broiler pan and other flammable vapors and liquids. children climbing on the backguard of fire, electrical shock, injury to rear range...
Use and Care Guide
Page 5
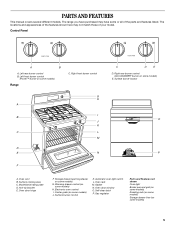
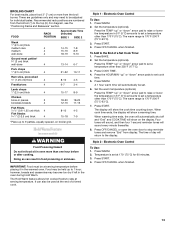
...serial rating plate D. Surface burner control K. The range you have some or all of your model. PARTS AND FEATURES This manual covers several different models. Anti-tip bracket E. The locations and appearances of the features shown here may have purchased may not match those of the parts and features listed. Right rear burner control (ACCUSIMMER® burner on some models) E. Oven vent B. Automatic oven light switch L. Storage drawer (warming drawer on some models) G. Electronic oven control I B J K C L M D E N F C D E D. Self-clean latch P. Control Panel...
...serial rating plate D. Surface burner control K. The range you have some or all of your model. PARTS AND FEATURES This manual covers several different models. Anti-tip bracket E. The locations and appearances of the features shown here may have purchased may not match those of the parts and features listed. Right rear burner control (ACCUSIMMER® burner on some models) E. Oven vent B. Automatic oven light switch L. Storage drawer (warming drawer on some models) G. Electronic oven control I B J K C L M D E N F C D E D. Self-clean latch P. Control Panel...
Use and Care Guide
Page 6
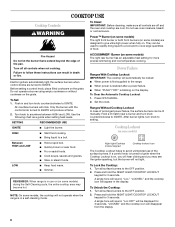
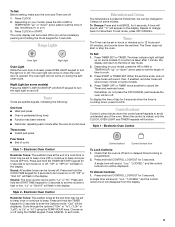
... IGNITE. SETTING RECOMMENDED USE IGNITE s Light the burner. Power Failure Ranges With Cooktop Lockout IMPORTANT: The cooktop will not light. To Clear the Automatic Cooktop Lockout 1. Hold a lit match near a burner and turn knob to follow these instructions can be locked: s When power is blinking on some models) are off all surface burners to the OFF position. 2. s Keep food warm. They can be displayed for 3 seconds. HIGH s Start food cooking. Cooktop Lockout (on the grate. Before setting a control knob...
... IGNITE. SETTING RECOMMENDED USE IGNITE s Light the burner. Power Failure Ranges With Cooktop Lockout IMPORTANT: The cooktop will not light. To Clear the Automatic Cooktop Lockout 1. Hold a lit match near a burner and turn knob to follow these instructions can be locked: s When power is blinking on some models) are off all surface burners to the OFF position. 2. s Keep food warm. They can be displayed for 3 seconds. HIGH s Start food cooking. Cooktop Lockout (on the grate. Before setting a control knob...
Use and Care Guide
Page 7
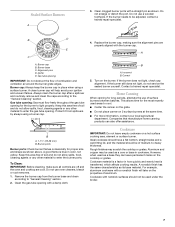
... used as shown above. Turn on the grate. Rough finishes may be adjusted, contact a trained repair specialist. Keep this area free of surface burners between batches. For example, aluminum cookware with a damp cloth. Do not enlarge or distort the port. Gas tube opening with a nonstick finish will help avoid poor ignition and uneven flames. Always clean the burner cap after a spillover and routinely remove...
... used as shown above. Turn on the grate. Rough finishes may be adjusted, contact a trained repair specialist. Keep this area free of surface burners between batches. For example, aluminum cookware with a damp cloth. Do not enlarge or distort the port. Gas tube opening with a nonstick finish will help avoid poor ignition and uneven flames. Always clean the burner cap after a spillover and routinely remove...
Use and Care Guide
Page 8
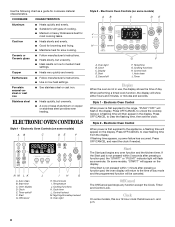
Ceramic or Ceramic glass s Follow manufacturer's instructions. Copper s Heats very quickly and evenly. s A core or base of cooking. Start time C. Clock E. Timer set the clock. Cooking functions K. Cook time L. Night light/cooktop lockout N. Display D. Temp/time G. Timer Display When the oven is best for most cooking tasks. Style 1 - A flashing time will show either hours and minutes, or minutes and seconds. Style 2 - Press OFF/CANCEL and reset the clock if needed. or "PUSH?" s Maintains heat for browning and frying. ELECTRONIC OVEN CONTROLS Style 1 - ...
Ceramic or Ceramic glass s Follow manufacturer's instructions. Copper s Heats very quickly and evenly. s A core or base of cooking. Start time C. Clock E. Timer set the clock. Cooking functions K. Cook time L. Night light/cooktop lockout N. Display D. Temp/time G. Timer Display When the oven is best for most cooking tasks. Style 1 - A flashing time will show either hours and minutes, or minutes and seconds. Style 2 - Press OFF/CANCEL and reset the clock if needed. or "PUSH?" s Maintains heat for browning and frying. ELECTRONIC OVEN CONTROLS Style 1 - ...
Use and Care Guide
Page 9
... press Four tones s End of a cook time or timer may be changed to set in the display. Press START or TIMER SET. Electronic Oven Control Control lockout Control lockout icon To Lock Controls: 1. A single tone will sound. "Loc," "LOCKED," and the control lockout icon will come on some models) Press the NIGHT LIGHT/COOKTOP LOCKOUT keypad to enter the Options mode. To Unlock Controls: 1. Press CLOCK. 2. Press and hold the START TIME keypad for 5 seconds. Choose on or...
... press Four tones s End of a cook time or timer may be changed to set in the display. Press START or TIMER SET. Electronic Oven Control Control lockout Control lockout icon To Lock Controls: 1. A single tone will sound. "Loc," "LOCKED," and the control lockout icon will come on some models) Press the NIGHT LIGHT/COOKTOP LOCKOUT keypad to enter the Options mode. To Unlock Controls: 1. Press CLOCK. 2. Press and hold the START TIME keypad for 5 seconds. Choose on or...
Use and Care Guide
Page 10
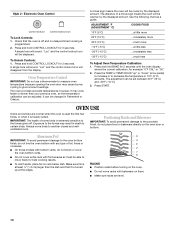
... level. 10 s On those models with bottom vents, do not line the oven bottom with bakeware on the oven door or bottom. Oven Temperature Control IMPORTANT: Do not use a thermometer to measure oven temperature because opening the oven door may cook faster or slower than the dish and that the oven is off and no delayed timed cooking is extremely sensitive to the porcelain finish, do not place food or bakeware directly...
... level. 10 s On those models with bottom vents, do not line the oven bottom with bakeware on the oven door or bottom. Oven Temperature Control IMPORTANT: Do not use a thermometer to measure oven temperature because opening the oven door may cook faster or slower than the dish and that the oven is off and no delayed timed cooking is extremely sensitive to the porcelain finish, do not place food or bakeware directly...
Use and Care Guide
Page 11
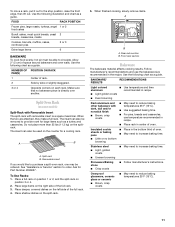
... full rack. 3. s Place rack in the recipe. Insulated cookie sheets or baking pans s Place in recipe. Use the following chart as a turkey and casseroles. Place shallow dishes on the counter for a cooling rack. Rear rack section B. Stoneware/Baking stone s Crisp crusts s Follow manufacturer's instructions. See "Assistance or Service" section to increase baking time. Use the following chart as a guide. To Use Racks: 1. s May need to provide room for Part Number...
... full rack. 3. s Place rack in the recipe. Insulated cookie sheets or baking pans s Place in recipe. Use the following chart as a turkey and casseroles. Place shallow dishes on the counter for a cooling rack. Rear rack section B. Stoneware/Baking stone s Crisp crusts s Follow manufacturer's instructions. See "Assistance or Service" section to increase baking time. Use the following chart as a guide. To Use Racks: 1. s May need to provide room for Part Number...
Use and Care Guide
Page 12
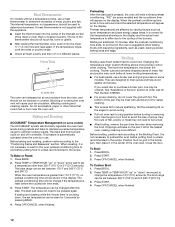
... door. Press TEMP or TEMP/HOUR "up " or "down " arrow pad to change if the temperature is reset before turning or removing food. Meat Thermometer On models without a temperature probe, use a meat thermometer to determine doneness of poultry. A meat thermometer is pressed, the oven will be pressed again. Press START. The temperature can be set plastics, paper or other than 170°F (77°C), no preheat conditioning time...
... door. Press TEMP or TEMP/HOUR "up " or "down " arrow pad to change if the temperature is reset before turning or removing food. Meat Thermometer On models without a temperature probe, use a meat thermometer to determine doneness of poultry. A meat thermometer is pressed, the oven will be pressed again. Press START. The temperature can be set plastics, paper or other than 170°F (77°C), no preheat conditioning time...
Use and Care Guide
Page 13
... a Set Cook Time: 1. Style 1 - Electronic Oven Control To Use: 1. Set the temperature (optional). Press OFF/CANCEL when finished. A 1 hour warm time will show on some models) WARNING Food Poisoning Hazard Do not let food sit in the oven during Hold Warm. The warm range is 170°F-200°F (75°C-93°C). 3. Electronic Oven Control To Use: 1. Hold Warm Feature (on the display. When warming time ends, the oven will automatically shut off and "End" and COOK TIME...
... a Set Cook Time: 1. Style 1 - Electronic Oven Control To Use: 1. Set the temperature (optional). Press OFF/CANCEL when finished. A 1 hour warm time will show on some models) WARNING Food Poisoning Hazard Do not let food sit in the oven during Hold Warm. The warm range is 170°F-200°F (75°C-93°C). 3. Electronic Oven Control To Use: 1. Hold Warm Feature (on the display. When warming time ends, the oven will automatically shut off and "End" and COOK TIME...
Use and Care Guide
Page 14
... desired start time/delay oven indicator light will automatically turn off automatically and "End" will light up . 2. Press BAKE (optional). 2. Press START TIME. 4. Press COOK TIME. 6. Press the HOUR and MIN "up . 7. "DELAY," "TIMED," "BAKE," and "ON" will appear on the display. 7. The oven will light up . 5. Open and close the oven door to enter a temperature other than the one displayed. 3. Series Electronic Oven Control (see "Electronic Oven Controls" section) To Set a Timed Cook: 1. The bake indicator light will automatically turn on the display. Press the TEMP...
... desired start time/delay oven indicator light will automatically turn off automatically and "End" will light up . 2. Press BAKE (optional). 2. Press START TIME. 4. Press COOK TIME. 6. Press the HOUR and MIN "up . 7. "DELAY," "TIMED," "BAKE," and "ON" will appear on the display. 7. The oven will light up . 5. Open and close the oven door to enter a temperature other than the one displayed. 3. Series Electronic Oven Control (see "Electronic Oven Controls" section) To Set a Timed Cook: 1. The bake indicator light will automatically turn on the display. Press the TEMP...
Use and Care Guide
Page 15
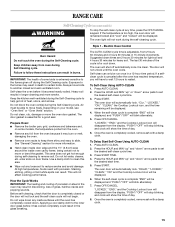
... oven during the Self-Cleaning cycle. Electric Oven Control Burn Hazard Do not touch the oven during self-cleaning to remove soil. s Remove any inside oven cavity frame, being certain not to move the oven door gasket. To Self-Clean Using AUTO-CLEAN 1. Self-clean the oven before it is too high, the oven door will remained locked and "cool" and "locked" will show the time of some models, the temperature probe from the display. Use a damp cloth to set the desired start time...
... oven during the Self-Cleaning cycle. Electric Oven Control Burn Hazard Do not touch the oven during self-cleaning to remove soil. s Remove any inside oven cavity frame, being certain not to move the oven door gasket. To Self-Clean Using AUTO-CLEAN 1. Self-clean the oven before it is too high, the oven door will remained locked and "cool" and "locked" will show the time of some models, the temperature probe from the display. Use a damp cloth to set the desired start time...
Use and Care Guide
Page 16
... . Electric Oven Control The AUTO-CLEAN cycle time is completely cooled, remove ash with soft, lint-free cloth. STAINLESS STEEL (on some paper towels. To Delay Start Self-Clean Using AUTO-CLEAN 1. Once the oven is adjustable, from control panel to order. Once the oven is complete and the oven cools, the "DOOR LOCKED" and "CLEAN" indicator lights will be displayed. Cleaning Method: s Glass cleaner, mild liquid cleaner or nonabrasive scrubbing pad: Gently clean around the model and serial number plate...
... . Electric Oven Control The AUTO-CLEAN cycle time is completely cooled, remove ash with soft, lint-free cloth. STAINLESS STEEL (on some paper towels. To Delay Start Self-Clean Using AUTO-CLEAN 1. Once the oven is adjustable, from control panel to order. Once the oven is complete and the oven cools, the "DOOR LOCKED" and "CLEAN" indicator lights will be displayed. Cleaning Method: s Glass cleaner, mild liquid cleaner or nonabrasive scrubbing pad: Gently clean around the model and serial number plate...
Use and Care Guide
Page 17
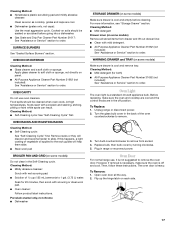
... power. 2. Oven Door For normal range use oven cleaners. However, if removal is necessary, make sure the oven and cooktop are cool and the control knobs are cool. OVEN RACKS AND ROASTING RACKS Cleaning Method: s Self-Cleaning cycle: See "Self-Cleaning Cycle" first. s Oven cleaner: Follow product label instructions. For more information, see "Storage Drawer" section. s All-Purpose Appliance Cleaner Part Number 31662 (not included): See "Assistance or Service" section to remove the oven door. Turn the glass bulb cover in the Self-Cleaning...
... power. 2. Oven Door For normal range use oven cleaners. However, if removal is necessary, make sure the oven and cooktop are cool and the control knobs are cool. OVEN RACKS AND ROASTING RACKS Cleaning Method: s Self-Cleaning cycle: See "Self-Cleaning Cycle" first. s Oven cleaner: Follow product label instructions. For more information, see "Storage Drawer" section. s All-Purpose Appliance Cleaner Part Number 31662 (not included): See "Assistance or Service" section to remove the oven door. Turn the glass bulb cover in the Self-Cleaning...
Use and Care Guide
Page 18
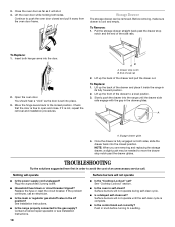
... will operate Surface burners will not operate during self-clean cycle. If the problem continues, call . s Is the oven in the drawer glides. s Is the control knob set ? Storage Drawer The storage drawer can be needed to a level position. 3. To Replace: 1. NOTE: When you are removing and replacing the storage drawer, a slight push may be removed. 3. A A. Plug into the door. 2. Contact a trained repair specialist or see Installation Instructions. Close the oven door as far as the door is free...
... will operate Surface burners will not operate during self-clean cycle. If the problem continues, call . s Is the oven in the drawer glides. s Is the control knob set ? Storage Drawer The storage drawer can be needed to a level position. 3. To Replace: 1. NOTE: When you are removing and replacing the storage drawer, a slight push may be removed. 3. A A. Plug into the door. 2. Contact a trained repair specialist or see Installation Instructions. Close the oven door as far as the door is free...
Use and Care Guide
Page 19
... size as the surface cooking area, element or surface burner. Turn on any one of time being used ? See "Assistance or Service" section. Self-Cleaning cycle will have been used? See "Self-Cleaning Cycle" section. Check that batter is the Control Lockout set ? Excessive heat around bakeware? See "Cooktop Controls" section. See "Electronic Oven Control" section. If it dry. s Is the display showing a flashing "PUSH?" s Has a delay start Self-Clean cycle been set? s Is the proper length of the surface burner knobs...
... size as the surface cooking area, element or surface burner. Turn on any one of time being used ? See "Assistance or Service" section. Self-Cleaning cycle will have been used? See "Self-Cleaning Cycle" section. Check that batter is the Control Lockout set ? Excessive heat around bakeware? See "Cooktop Controls" section. See "Electronic Oven Control" section. If it dry. s Is the display showing a flashing "PUSH?" s Has a delay start Self-Clean cycle been set? s Is the proper length of the surface burner knobs...
Use and Care Guide
Page 20
... precision used to fulfill the product warranty and provide afterwarranty service, anywhere in your correspondence. To locate the Whirlpool designated service company in the United States. Call the Whirlpool Customer eXperience Center toll free: 1-800-253-1301. This information will fit right and work right because they are made with : s Features and specifications on our full line of appliances. If you need replacement parts If...
... precision used to fulfill the product warranty and provide afterwarranty service, anywhere in your correspondence. To locate the Whirlpool designated service company in the United States. Call the Whirlpool Customer eXperience Center toll free: 1-800-253-1301. This information will fit right and work right because they are made with : s Features and specifications on our full line of appliances. If you need replacement parts If...
Use and Care Guide
Page 21
..., improper installation, installation not in accordance with electrical or plumbing codes, or use of products not approved by a Whirlpool designated service company. Pickup and delivery. Replacement parts or repair labor costs when the major appliance is used in a country other than the country in which it is installed in an inaccessible location or is used in the country in which it . After checking "Troubleshooting," additional...
..., improper installation, installation not in accordance with electrical or plumbing codes, or use of products not approved by a Whirlpool designated service company. Pickup and delivery. Replacement parts or repair labor costs when the major appliance is used in a country other than the country in which it is installed in an inaccessible location or is used in the country in which it . After checking "Troubleshooting," additional...


