
Dimension Guide
Page 1
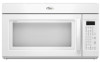
® Microwave Hood Combination PRODUCT MODEL NUMBERS GMH3204XV GMH5205XV GMH6185XV WMH1162XV WMH1163XV WMH1164XW WMH2175XV WMH2205XV WMH3205XV Electrical: A 120-Volt, 60-Hz, AC-only, 15- or 20-amp fused electrical supply with product. Two 90° elbows = 20 ft (6.1 m) B. 1 wall cap = 40 ft (12.2 m) C. 1 rectangular to 15.2 cm = 1.5 m) B. Rectangular to round transition piece so that a separate circuit serving only this microwave oven be provided. One...
® Microwave Hood Combination PRODUCT MODEL NUMBERS GMH3204XV GMH5205XV GMH6185XV WMH1162XV WMH1163XV WMH1164XW WMH2175XV WMH2205XV WMH3205XV Electrical: A 120-Volt, 60-Hz, AC-only, 15- or 20-amp fused electrical supply with product. Two 90° elbows = 20 ft (6.1 m) B. 1 wall cap = 40 ft (12.2 m) C. 1 rectangular to 15.2 cm = 1.5 m) B. Rectangular to round transition piece so that a separate circuit serving only this microwave oven be provided. One...

Installation Instructions
Page 1
...Prepare Upper Cabinet 8 Install Damper Assembly 9 Install the Microwave Oven 9 Complete Installation 10 VENTING DESIGN SPECIFICATIONS 11 ASSISTANCE 12 Replacement Parts 12 Accessories 12 MICROWAVE HOOD COMBINATION SAFETY Your safety and the safety of Contents MICROWAVE HOOD COMBINATION SAFETY 1 INSTALLATION REQUIREMENTS 2 Tools and Parts 2 Remove Cardboard Template 2 Location Requirements 2 Product Dimensions 3 Electrical Requirements 3 INSTALLATION INSTRUCTIONS 4 Remove Mounting Plate 4 Rotate Blower Motor 4 Locate Wall Stud(s 6 Mark Rear Wall 7 Drill Holes in Rear Wall...
...Prepare Upper Cabinet 8 Install Damper Assembly 9 Install the Microwave Oven 9 Complete Installation 10 VENTING DESIGN SPECIFICATIONS 11 ASSISTANCE 12 Replacement Parts 12 Accessories 12 MICROWAVE HOOD COMBINATION SAFETY Your safety and the safety of Contents MICROWAVE HOOD COMBINATION SAFETY 1 INSTALLATION REQUIREMENTS 2 Tools and Parts 2 Remove Cardboard Template 2 Location Requirements 2 Product Dimensions 3 Electrical Requirements 3 INSTALLATION INSTRUCTIONS 4 Remove Mounting Plate 4 Rotate Blower Motor 4 Locate Wall Stud(s 6 Mark Rear Wall 7 Drill Holes in Rear Wall...

Installation Instructions
Page 2
... cabinet template Mounting plate (attached to exist above the microwave oven so that the vent fits properly, and the damper blade opens freely and fully. The piece inside upper cabinet. See "Rectangular to separate the template from the top of packaging) Aluminum grease filters Charcoal filters (Depending on model, aluminum grease filter and charcoal filter may not be combined. Damper assembly (for 1/4" x 2" lag screws ■ Scissors ■ 1½" (3.8 cm) diam. The location must be installed. Sheet metal screws (2) G. See "Venting...
... cabinet template Mounting plate (attached to exist above the microwave oven so that the vent fits properly, and the damper blade opens freely and fully. The piece inside upper cabinet. See "Rectangular to separate the template from the top of packaging) Aluminum grease filters Charcoal filters (Depending on model, aluminum grease filter and charcoal filter may not be combined. Damper assembly (for 1/4" x 2" lag screws ■ Scissors ■ 1½" (3.8 cm) diam. The location must be installed. Sheet metal screws (2) G. See "Venting...

Installation Instructions
Page 3
... of range/cooktop below. Product Dimensions 17¹⁄₄" (43.8 cm) 16¹⁄₄" (41.3 cm) (401.05³c⁄₄m") 29⁷⁄₈" (76.0 cm) GROUNDING INSTRUCTIONS ■ For all governing codes and ordinances. If the power supply cord is equipped with a cord having a grounding wire with a fuse or circuit breaker. Failure to whether the microwave oven is properly installed...
... of range/cooktop below. Product Dimensions 17¹⁄₄" (43.8 cm) 16¹⁄₄" (41.3 cm) (401.05³c⁄₄m") 29⁷⁄₈" (76.0 cm) GROUNDING INSTRUCTIONS ■ For all governing codes and ordinances. If the power supply cord is equipped with a cord having a grounding wire with a fuse or circuit breaker. Failure to whether the microwave oven is properly installed...

Installation Instructions
Page 4
... microwave oven cavity. 2. Blower motor 5. A B C A. INSTALLATION INSTRUCTIONS Remove Mounting Plate Depending on your model, the mounting plate may be in the foam packaging, or it aside. 3. Remove 2 screws attaching blower motor to back of microwave oven. A B A. A A. Lift blower motor out of the microwave oven and lift up. Slide damper plate toward the front of microwave oven. Exhaust port 6. Screws (in another location where wall or roof venting may be made to the microwave oven, do not grip or use the door or door handle...
... microwave oven cavity. 2. Blower motor 5. A B C A. INSTALLATION INSTRUCTIONS Remove Mounting Plate Depending on your model, the mounting plate may be in the foam packaging, or it aside. 3. Remove 2 screws attaching blower motor to back of microwave oven. A B A. A A. Lift blower motor out of the microwave oven and lift up. Slide damper plate toward the front of microwave oven. Exhaust port 6. Screws (in another location where wall or roof venting may be made to the microwave oven, do not grip or use the door or door handle...

Installation Instructions
Page 6
... holes (on mounting plate) B. Cabinet opening , do not install the microwave oven. 1. Mounting plate center markers 6 Holes for lag screws E. Support tabs F. Wall stud centerlines D. Using a stud finder, locate the edges of the wall stud(s) within 6" (15.2 cm) of the vertical centerline (see "Mark Rear Wall" section), only recirculation or roof venting installation can be done. Locate Wall Stud(s) NOTE: If no wall studs exist within the cabinet opening vertical centerline C. Possible Wall Stud Configurations...
... holes (on mounting plate) B. Cabinet opening , do not install the microwave oven. 1. Mounting plate center markers 6 Holes for lag screws E. Support tabs F. Wall stud centerlines D. Using a stud finder, locate the edges of the wall stud(s) within 6" (15.2 cm) of the vertical centerline (see "Mark Rear Wall" section), only recirculation or roof venting installation can be done. Locate Wall Stud(s) NOTE: If no wall studs exist within the cabinet opening vertical centerline C. Possible Wall Stud Configurations...

Installation Instructions
Page 7
... the marks made in "Locate Wall Stud(s)" section. Using measuring tape, measure out 6" (15.2 cm) on at least 1, preferably 2 hole(s) through the mounting plate, closest to being installed on both end holes marked in Step 2 of "Mark Rear Wall." 2. This is level. 6. Cut a 3/4" (19 mm) hole in Rear Wall In addition to the wall stud centerline(s). Using a keyhole saw, cut out the venting cutout area. Drill Holes...
... the marks made in "Locate Wall Stud(s)" section. Using measuring tape, measure out 6" (15.2 cm) on at least 1, preferably 2 hole(s) through the mounting plate, closest to being installed on both end holes marked in Step 2 of "Mark Rear Wall." 2. This is level. 6. Cut a 3/4" (19 mm) hole in Rear Wall In addition to the wall stud centerline(s). Using a keyhole saw, cut out the venting cutout area. Drill Holes...

Installation Instructions
Page 8
... with the holes in Rear Wall" section. 8 Upper-cabinet template D 10" (25.4 cm) F E 10" G (25.4 cm) With the support tabs of the mounting plate facing forward, insert 1/4-20 x 3" round-head bolts through both end holes drilled into the remaining end hole. 6. Position mounting plate on the wall. 2. The template has trim lines to use as guides. ■ If the wall behind the microwave oven (as at Both...
... with the holes in Rear Wall" section. 8 Upper-cabinet template D 10" (25.4 cm) F E 10" G (25.4 cm) With the support tabs of the mounting plate facing forward, insert 1/4-20 x 3" round-head bolts through both end holes drilled into the remaining end hole. 6. Position mounting plate on the wall. 2. The template has trim lines to use as guides. ■ If the wall behind the microwave oven (as at Both...

Installation Instructions
Page 9
... microwave oven door is for wall venting only) 1. Back of the microwave oven is being handled. B A A. Cut 3/4" (19 mm) hole at the bottom of microwave oven still tilted, thread power supply cord through the wall, make sure the damper assembly fits easily into the vent in place. 9 A B C D Install the Microwave Oven WARNING Excessive Weight Hazard Use two or more people, lift microwave oven and hang it on the template. With front of mounting plate. Secure damper assembly with 2 sheet metal screws...
... microwave oven door is for wall venting only) 1. Back of the microwave oven is being handled. B A A. Cut 3/4" (19 mm) hole at the bottom of microwave oven still tilted, thread power supply cord through the wall, make sure the damper assembly fits easily into the vent in place. 9 A B C D Install the Microwave Oven WARNING Excessive Weight Hazard Use two or more people, lift microwave oven and hang it on the template. With front of mounting plate. Secure damper assembly with 2 sheet metal screws...

Installation Instructions
Page 10
..., fire, or electrical shock. 2. Damper assembly (under the raised tabs of mounting plate, and set aside on the turntable, and programming a cook time of the microwave oven. Then secure with at most hardware stores. ■ Overtightening bolts may require bolts longer or shorter than 3" (7.6 cm). Replace the fuse or reset the circuit breaker. Connect vent to the User Instructions for filter placement. Refer to damper assembly. A B C D E F A. Raised tabs B. Test vent fan and exhaust by placing...
..., fire, or electrical shock. 2. Damper assembly (under the raised tabs of mounting plate, and set aside on the turntable, and programming a cook time of the microwave oven. Then secure with at most hardware stores. ■ Overtightening bolts may require bolts longer or shorter than 3" (7.6 cm). Replace the fuse or reset the circuit breaker. Connect vent to the User Instructions for filter placement. Refer to damper assembly. A B C D E F A. Raised tabs B. Test vent fan and exhaust by placing...

Installation Instructions
Page 12
... our toll free number listed in the User Instructions. W10247296B SP PN W10345003B © 2010. You will need additional assistance, call us at our toll free number or visit our website listed in the User Instructions. For best performance, use when installing this microwave oven in a 36" (91.4 cm) or 42" (106.7 cm) wide opening , behind the door. ■ Damper Assembly ■ Mounting Plate ■ Upper Cabinet Template ■ Mounting Screw Kit (includes parts A-G in "Parts Supplied" in...
... our toll free number listed in the User Instructions. W10247296B SP PN W10345003B © 2010. You will need additional assistance, call us at our toll free number or visit our website listed in the User Instructions. For best performance, use when installing this microwave oven in a 36" (91.4 cm) or 42" (106.7 cm) wide opening , behind the door. ■ Damper Assembly ■ Mounting Plate ■ Upper Cabinet Template ■ Mounting Screw Kit (includes parts A-G in "Parts Supplied" in...

Owners Manual
Page 1
..., visite: www.whirlpool.com Tenga listo su número de modelo completo. Puede encontrar su número de modelo y de serie en la etiqueta ubicada en la parte frontal de la abertura del horno de microondas, detrás de la puerta. Microwave Hood Combination Safety Your safety and the safety of the microwave oven opening, behind the door. See "GROUNDING INSTRUCTIONS" found in...
..., visite: www.whirlpool.com Tenga listo su número de modelo completo. Puede encontrar su número de modelo y de serie en la etiqueta ubicada en la parte frontal de la abertura del horno de microondas, detrás de la puerta. Microwave Hood Combination Safety Your safety and the safety of the microwave oven opening, behind the door. See "GROUNDING INSTRUCTIONS" found in...

Owners Manual
Page 2
... of table or counter. ■ Do not mount over a sink. ■ Do not cover racks or any appliance, close properly and that the oven door close supervision is in operation. ■ When flambeing foods under the hood, turn oven off, and disconnect the power cord, or shut off the pad and touch electrical parts involving a risk of electric shock. ■ Suitable for use above ranges with maximum width of the microwave oven...
... of table or counter. ■ Do not mount over a sink. ■ Do not cover racks or any appliance, close properly and that the oven door close supervision is in operation. ■ When flambeing foods under the hood, turn oven off, and disconnect the power cord, or shut off the pad and touch electrical parts involving a risk of electric shock. ■ Suitable for use above ranges with maximum width of the microwave oven...

Owners Manual
Page 3
... microwave oven. In the event of an electrical short circuit, grounding reduces the risk of -function signals) may be changed. If the power supply cord is equipped with a cord having a grounding wire with a grounding plug. and P.M. Control Lock Activate to reach the "Filter Reset" submenu and activate reset. Touch and hold the Cancel control for only 30 minutes more (off . Options or Setup Vent Timer, Light Timer, Filter Reset, Sound On/Off, Scroll Speed, Demo Mode...
... microwave oven. In the event of an electrical short circuit, grounding reduces the risk of -function signals) may be changed. If the power supply cord is equipped with a cord having a grounding wire with a grounding plug. and P.M. Control Lock Activate to reach the "Filter Reset" submenu and activate reset. Touch and hold the Cancel control for only 30 minutes more (off . Options or Setup Vent Timer, Light Timer, Filter Reset, Sound On/Off, Scroll Speed, Demo Mode...

Owners Manual
Page 4
...; System A sensor in the wall of 100% and 0% power. Place food directly on your model, the grill element has either one 1,000W halogen bulb and one 500W quartz bulb, or two 600W quartz bulbs. Use a microwave-safe, ovenproof dish or pan under the rack to the microwave oven, always remove rack after 2-level cooking. Steamer lid 4 Cooking Rack (on some models) Use the rectangular cooking rack only for simmering. Accessories Steamer Vessel (on some models) Use the...
...; System A sensor in the wall of 100% and 0% power. Place food directly on your model, the grill element has either one 1,000W halogen bulb and one 500W quartz bulb, or two 600W quartz bulbs. Use a microwave-safe, ovenproof dish or pan under the rack to the microwave oven, always remove rack after 2-level cooking. Steamer lid 4 Cooking Rack (on some models) Use the rectangular cooking rack only for simmering. Accessories Steamer Vessel (on some models) Use the...

Owners Manual
Page 5
... and vent. Microwave Oven Use For list of cook time at least 30 minutes after a sensor cycle, the cook power will cancel the function. 5 Sensor Cooking A sensor in the microwave oven. If Add More Time is used by itself or can be changed . Opening the door during convection (bake) cycles. Add More Time At the end of each before touching the Start control. Do Not Use ■ Metal cookware and bakeware ■ Straw or wicker ■ Gold...
... and vent. Microwave Oven Use For list of cook time at least 30 minutes after a sensor cycle, the cook power will cancel the function. 5 Sensor Cooking A sensor in the microwave oven. If Add More Time is used by itself or can be changed . Opening the door during convection (bake) cycles. Add More Time At the end of each before touching the Start control. Do Not Use ■ Metal cookware and bakeware ■ Straw or wicker ■ Gold...

Owners Manual
Page 6
... to reset filter status. ■ Grease filters: Grease filters are off . Display shows messages ■ A flashing ":" or "PF" means there has been a power failure. To avoid damage to the microwave oven caused by filter status indicator. Open and close door. Call for 2 minutes at the beginning of the cycle. Microwave Oven Care General Cleaning IMPORTANT: Before cleaning, make sure all controls are on the underside of microwave oven. Replace bulb, close door. Remove two screws on the vent grille...
... to reset filter status. ■ Grease filters: Grease filters are off . Display shows messages ■ A flashing ":" or "PF" means there has been a power failure. To avoid damage to the microwave oven caused by filter status indicator. Open and close door. Call for 2 minutes at the beginning of the cycle. Microwave Oven Care General Cleaning IMPORTANT: Before cleaning, make sure all controls are on the underside of microwave oven. Replace bulb, close door. Remove two screws on the vent grille...

Owners Manual
Page 7
... vent fan, automatically comes on and off to the cover for some models) ■ Grease filter ■ Charcoal filter ■ Cooktop light bulb ■ Cavity light bulb ■ Steamer vessel (provided with some models) ■ Pan and handle (not provided) ■ Convection rack (provided with some models) ■ Grill rack (provided with some models) does not appear to cool the microwave oven. Replacement Parts Accessories ■ Turntable ■ Turntable support and rollers ■ Turntable hub ■ Cooking rack (for some models) ■ Rack...
... vent fan, automatically comes on and off to the cover for some models) ■ Grease filter ■ Charcoal filter ■ Cooktop light bulb ■ Cavity light bulb ■ Steamer vessel (provided with some models) ■ Pan and handle (not provided) ■ Convection rack (provided with some models) ■ Grill rack (provided with some models) does not appear to cool the microwave oven. Replacement Parts Accessories ■ Turntable ■ Turntable support and rollers ■ Turntable hub ■ Cooking rack (for some models) ■ Rack...

Owners Manual
Page 8
... of the microwave oven opening, behind the door. Service calls to refrigerator or freezer product failures. 7. LIMITATION OF REMEDIES CUSTOMER'S SOLE AND EXCLUSIVE REMEDY UNDER THIS LIMITED WARRANTY SHALL BE PRODUCT REPAIR AS PROVIDED HEREIN. Service calls to instruct you need assistance using your complete model number ready. Repairs to parts or systems resulting from your major appliance, to correct the installation of consumables or cleaning products...
... of the microwave oven opening, behind the door. Service calls to refrigerator or freezer product failures. 7. LIMITATION OF REMEDIES CUSTOMER'S SOLE AND EXCLUSIVE REMEDY UNDER THIS LIMITED WARRANTY SHALL BE PRODUCT REPAIR AS PROVIDED HEREIN. Service calls to instruct you need assistance using your complete model number ready. Repairs to parts or systems resulting from your major appliance, to correct the installation of consumables or cleaning products...

Warranty
Page 1
... reported to repair or replace appliance light bulbs, air filters or water filters. If outside the 50 United States and Canada, contact your authorized Whirlpool dealer to determine if another warranty applies. 9/07 For additional product information or to correct defects in which it is installed in an inaccessible location or is not installed in accordance with electrical or plumbing codes, or use your major...
... reported to repair or replace appliance light bulbs, air filters or water filters. If outside the 50 United States and Canada, contact your authorized Whirlpool dealer to determine if another warranty applies. 9/07 For additional product information or to correct defects in which it is installed in an inaccessible location or is not installed in accordance with electrical or plumbing codes, or use your major...


