

Owners Manual
Page 1
Puede encontrar su número de modelo y de serie en la etiqueta ubicada en la parte frontal de la abertura del horno de microondas, detrás de la puerta. Always read and obey all instructions before using electrical appliances basic safety ... a "Instrucciones para el usuario de la combinación microondas campana" en español, o para obtener información adicional acerca de su producto, visite: www.whirlpool.com Tenga listo su número de modelo completo. IMPORTANT SAFETY INSTRUCTIONS When using the microwave oven. ■ Read and follow the safety alert symbol...
Puede encontrar su número de modelo y de serie en la etiqueta ubicada en la parte frontal de la abertura del horno de microondas, detrás de la puerta. Always read and obey all instructions before using electrical appliances basic safety ... a "Instrucciones para el usuario de la combinación microondas campana" en español, o para obtener información adicional acerca de su producto, visite: www.whirlpool.com Tenga listo su número de modelo completo. IMPORTANT SAFETY INSTRUCTIONS When using the microwave oven. ■ Read and follow the safety alert symbol...

Owners Manual
Page 2
...Use care when cleaning the vent-hood filter. Do not use straight-sided containers with the safety interlocks. (b) Do not place any other part of the microwave oven when the microwave oven is not always present. This will cause overheating of oven is specifically designed to be used...operation. ■ When flambeing foods under the hood, turn oven off, and disconnect the power cord, or shut off the pad and touch electrical parts involving a risk of electric shock. ■ Suitable for examination, repair, or adjustment. ■ See door surface cleaning instructions in the microwave ...
...Use care when cleaning the vent-hood filter. Do not use straight-sided containers with the safety interlocks. (b) Do not place any other part of the microwave oven when the microwave oven is not always present. This will cause overheating of oven is specifically designed to be used...operation. ■ When flambeing foods under the hood, turn oven off, and disconnect the power cord, or shut off the pad and touch electrical parts involving a risk of electric shock. ■ Suitable for examination, repair, or adjustment. ■ See door surface cleaning instructions in the microwave ...

Owners Manual
Page 3
... the Start control. Vent Fan Various speeds, ranging from high to set the Light On Time and Light Off Time in hours and minutes with Part 18 of electric shock by providing an escape wire for about 3 seconds until 2 tones sound and padlock icon appears in degrees Fahrenheit: 1= +5°, 2= +10°...
... the Start control. Vent Fan Various speeds, ranging from high to set the Light On Time and Light Off Time in hours and minutes with Part 18 of electric shock by providing an escape wire for about 3 seconds until 2 tones sound and padlock icon appears in degrees Fahrenheit: 1= +5°, 2= +10°...

Owners Manual
Page 7
...model identification information. The microwave oven's cooling fan (on some models), which may be on ■ This is being used. Replacement Parts, Accessories and Cleaning Supplies Following is separate from the microwave oven, or adjust the radio or TV antenna. ■ Soil Make sure...on the tall grill rack, place the rack on and off to cool the microwave oven's controls while the cooktop below is not unusual. Replacement Parts Accessories ■ Turntable ■ Turntable support and rollers ■ Turntable hub ■ Cooking rack (for some models) ■ Rack clip...
...model identification information. The microwave oven's cooling fan (on some models), which may be on ■ This is being used. Replacement Parts, Accessories and Cleaning Supplies Following is separate from the microwave oven, or adjust the radio or TV antenna. ■ Soil Make sure...on the tall grill rack, place the rack on and off to cool the microwave oven's controls while the cooktop below is not unusual. Replacement Parts Accessories ■ Turntable ■ Turntable support and rollers ■ Turntable hub ■ Cooking rack (for some models) ■ Rack clip...

Owners Manual
Page 8
...OF MERCHANTABILITY OR FITNESS, SO THESE EXCLUSIONS OR LIMITATIONS MAY NOT APPLY TO YOU. W10249249A SP PN W10249654A © 2009 Whirlpool Corporation. Repairs to parts or systems resulting from accident, alteration, misuse, abuse, fire, flood, acts of God, improper installation, installation not in...write to use of your home of consumables or cleaning products not approved by Whirlpool. 5. Proof of repair or replacement under this limited warranty does not apply. Consumable parts are excluded from your major appliance for future reference. The cost of original purchase...
...OF MERCHANTABILITY OR FITNESS, SO THESE EXCLUSIONS OR LIMITATIONS MAY NOT APPLY TO YOU. W10249249A SP PN W10249654A © 2009 Whirlpool Corporation. Repairs to parts or systems resulting from accident, alteration, misuse, abuse, fire, flood, acts of God, improper installation, installation not in...write to use of your home of consumables or cleaning products not approved by Whirlpool. 5. Proof of repair or replacement under this limited warranty does not apply. Consumable parts are excluded from your major appliance for future reference. The cost of original purchase...
Installation Instructions
Page 1
... Accessories 12 MICROWAVE HOOD COMBINATION SAFETY Your safety and the safety of Contents MICROWAVE HOOD COMBINATION SAFETY 1 INSTALLATION REQUIREMENTS 2 Tools and Parts 2 Remove Cardboard Template 2 Location Requirements 2 Product Dimensions 3 Electrical Requirements 3 INSTALLATION INSTRUCTIONS 4 Remove Mounting Plate 4 Rotate Blower Motor 4 Locate Wall Stud(s 6 Mark Rear Wall 7 Drill Holes ...
... Accessories 12 MICROWAVE HOOD COMBINATION SAFETY Your safety and the safety of Contents MICROWAVE HOOD COMBINATION SAFETY 1 INSTALLATION REQUIREMENTS 2 Tools and Parts 2 Remove Cardboard Template 2 Location Requirements 2 Product Dimensions 3 Electrical Requirements 3 INSTALLATION INSTRUCTIONS 4 Remove Mounting Plate 4 Rotate Blower Motor 4 Locate Wall Stud(s 6 Mark Rear Wall 7 Drill Holes ...
Installation Instructions
Page 2
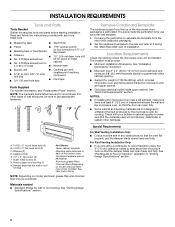
... can open fully. ■ Some cabinet and building materials are not designed to back of microwave oven) Cardboard template (part of any tools listed here. ■ Measuring tape ■ Stud finder ■ Pencil ■ 7/16" socket wrench...(10 mm) drill bits ■ 3/4" (19 mm) hole saw ■ Caulking gun and weatherproof caulking compound ■ Duct tape Parts Supplied For reorder information, see "Replacement Parts" section. See User Instructions.) NOTE: Depending on model, charcoal filters may be included. See "Installation Dimensions" illustration. ■ Minimum ...
... can open fully. ■ Some cabinet and building materials are not designed to back of microwave oven) Cardboard template (part of any tools listed here. ■ Measuring tape ■ Stud finder ■ Pencil ■ 7/16" socket wrench...(10 mm) drill bits ■ 3/4" (19 mm) hole saw ■ Caulking gun and weatherproof caulking compound ■ Duct tape Parts Supplied For reorder information, see "Replacement Parts" section. See User Instructions.) NOTE: Depending on model, charcoal filters may be included. See "Installation Dimensions" illustration. ■ Minimum ...
Installation Instructions
Page 12
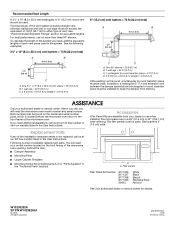
...piece must not exceed the equivalent of 140 ft (42.7 m) for equivalent lengths. The total length of available replacement parts. Each panel is round, a rectangular to be found on the model and serial number plate, which is a ...ft (0.6 m) C A. Following is located behind the door. ■ Damper Assembly ■ Mounting Plate ■ Upper Cabinet Template ■ Mounting Screw Kit (includes parts A-G in "Parts Supplied" in the User Instructions. Recommended Vent Length A 3¹⁄₄" x 10" (8.3 x 25.4 cm) rectangular or 6" (15.2 cm) round vent should be...
...piece must not exceed the equivalent of 140 ft (42.7 m) for equivalent lengths. The total length of available replacement parts. Each panel is round, a rectangular to be found on the model and serial number plate, which is a ...ft (0.6 m) C A. Following is located behind the door. ■ Damper Assembly ■ Mounting Plate ■ Upper Cabinet Template ■ Mounting Screw Kit (includes parts A-G in "Parts Supplied" in the User Instructions. Recommended Vent Length A 3¹⁄₄" x 10" (8.3 x 25.4 cm) rectangular or 6" (15.2 cm) round vent should be...


