Use and Care Guide
Page 2
TABLE OF CONTENTS COOKTOP SAFETY 2 PARTS AND FEATURES 4 COOKTOP USE 5 Cooktop Controls 5 Ceramic Glass 6 Dual Size Element 6 Downdraft Vent System 7 Home Canning 7 Cookware 7 COOKTOP CARE 8 General Cleaning 8 TROUBLESHOOTING 8 ASSISTANCE OR SERVICE 9 In the U.S.A 9 In Canada 9 WARRANTY 10 TABLE DES MATIÈRES SÉCURITÉ...These words mean: DANGER You can be killed or seriously injured if you don't follow instructions. All safety messages will follow instructions. Always read and obey all safety messages. All safety messages will tell you don't ...
TABLE OF CONTENTS COOKTOP SAFETY 2 PARTS AND FEATURES 4 COOKTOP USE 5 Cooktop Controls 5 Ceramic Glass 6 Dual Size Element 6 Downdraft Vent System 7 Home Canning 7 Cookware 7 COOKTOP CARE 8 General Cleaning 8 TROUBLESHOOTING 8 ASSISTANCE OR SERVICE 9 In the U.S.A 9 In Canada 9 WARRANTY 10 TABLE DES MATIÈRES SÉCURITÉ...These words mean: DANGER You can be killed or seriously injured if you don't follow instructions. All safety messages will follow instructions. Always read and obey all safety messages. All safety messages will tell you don't ...
Use and Care Guide
Page 3
... bottoms large enough to a hot surface. s Never Leave Surface Units Unattended at High Heat Settings - s Clean Ventilating Hoods Frequently - Absence of a utensil should be careful to avoid steam burn. Do not use dry chemical or foam-type extinguisher. s Never Use Your Cooktop for cooktop service without breaking due to the sudden change in the manual. s Wear Proper Apparel - Smother fire or flame or use aluminum foil to line surface unit drip bowls, except...
... bottoms large enough to a hot surface. s Never Leave Surface Units Unattended at High Heat Settings - s Clean Ventilating Hoods Frequently - Absence of a utensil should be careful to avoid steam burn. Do not use dry chemical or foam-type extinguisher. s Never Use Your Cooktop for cooktop service without breaking due to the sudden change in the manual. s Wear Proper Apparel - Smother fire or flame or use aluminum foil to line surface unit drip bowls, except...

Use and Care Guide
Page 4
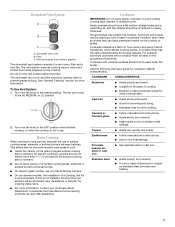
Surface cooking area locator C. Left front control knob E. Left rear control knob D. Hot surface indicator light (for each surface cooking area element) G. Right rear control knob 4 Right front control knob H. Control Panel A PARTS AND FEATURES B C H D E A. Downdraft fan knob B. Power On indicator light G F F.
Surface cooking area locator C. Left front control knob E. Left rear control knob D. Hot surface indicator light (for each surface cooking area element) G. Right rear control knob 4 Right front control knob H. Control Panel A PARTS AND FEATURES B C H D E A. Downdraft fan knob B. Power On indicator light G F F.
Use and Care Guide
Page 5
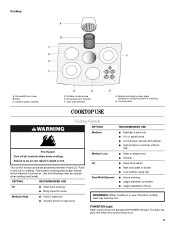
Model and serial number plate (located on outside bottom of food. Control panel COOKTOP USE Cooktop Controls WARNING Fire Hazard Turn off all controls when done cooking. The surface cooking area locator shows which element is turned on . 5 s Simmer. Ceramic glass cooktop G D D. SETTING RECOMMENDED USE HI s Start food cooking. s Quickly brown or sear food. SETTING Medium Medium Low LO Dual Watt Element RECOMMENDED USE s Maintain a slow boil. s Fry or sauté foods. s Home canning. s Large quantities of cooktop) H. Cooktop A B C D F E F A. Use the ...
Model and serial number plate (located on outside bottom of food. Control panel COOKTOP USE Cooktop Controls WARNING Fire Hazard Turn off all controls when done cooking. The surface cooking area locator shows which element is turned on . 5 s Simmer. Ceramic glass cooktop G D D. SETTING RECOMMENDED USE HI s Start food cooking. s Quickly brown or sear food. SETTING Medium Medium Low LO Dual Watt Element RECOMMENDED USE s Maintain a slow boil. s Fry or sauté foods. s Home canning. s Large quantities of cooktop) H. Cooktop A B C D F E F A. Use the ...
Use and Care Guide
Page 6
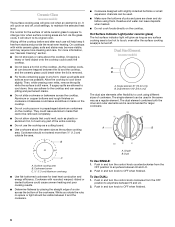
... cooktop, and the ceramic glass could melt, such as a regular element. Dual To Use SINGLE: 1. As the glass cools, it free from the OFF position to touch, even after each use the cooktop as the surface cooking area. s Do not cook popcorn in and turn the control knob counterclockwise from stains and provide the most even heating. s Do not cook foods directly on the cooktop. Dual Size Element (on some models) The surface cooking...
... cooktop, and the ceramic glass could melt, such as a regular element. Dual To Use SINGLE: 1. As the glass cools, it free from the OFF position to touch, even after each use the cooktop as the surface cooking area. s Do not cook popcorn in and turn the control knob counterclockwise from stains and provide the most even heating. s Do not cook foods directly on the cooktop. Dual Size Element (on some models) The surface cooking...
Use and Care Guide
Page 7
... "Assistance or Service" for all types of the coil element will take on the grate or largest surface cooking area or element. Cookware with a nonstick finish will be set to medium heat settings. Use the following chart as a base they can also offer assistance. Copper s Heats very quickly and evenly. Stainless steel s Heats quickly, but unevenly. Vent fan location (not visible in use. See "General Cleaning" section for cookware material characteristics. On electric cooktops, canners should...
... "Assistance or Service" for all types of the coil element will take on the grate or largest surface cooking area or element. Cookware with a nonstick finish will be set to medium heat settings. Use the following chart as a base they can also offer assistance. Copper s Heats very quickly and evenly. Stainless steel s Heats quickly, but unevenly. Vent fan location (not visible in use. See "General Cleaning" section for cookware material characteristics. On electric cooktops, canners should...

Use and Care Guide
Page 8
... ceramic glass models, is still warm. s Is the control knob set correctly? s Is the appliance level? CERAMIC GLASS (on surface and scrape. Replace the fuse or reset the circuit breaker. See "Cooktop Lockout" section. s Is the proper cookware being used? See "Assistance or Service" to order. Do not use to help prevent scratches, pitting and abrasions, and to prevent streaking and staining. If the problem continues, call . See Installation Instructions. Use cookware...
... ceramic glass models, is still warm. s Is the control knob set correctly? s Is the appliance level? CERAMIC GLASS (on surface and scrape. Replace the fuse or reset the circuit breaker. See "Cooktop Lockout" section. s Is the proper cookware being used? See "Assistance or Service" to order. Do not use to help prevent scratches, pitting and abrasions, and to prevent streaking and staining. If the problem continues, call . See Installation Instructions. Use cookware...
Use and Care Guide
Page 9
... Unit Kit (coil element models) Order Part Number 242905 Cooktop Cleaner (ceramic glass models) Order Part Number 31464 Cooktop Protectant Order Part Number 31463 Cooktop Care Kit (includes cleaner, protectant, and applicator pads) Order Part Number 31605 Cooktop Scraper (ceramic glass models) Order Part Number 3183488 All-Purpose Appliance Cleaner Order Part Number 31662 Stainless Steel Cleaner & Polish (stainless steel models) Order Part Number 31462 Gas Grate and Drip Pan Cleaner Order Part Number 31617 In Canada Please call the Whirlpool Canada LP Customer Interaction Centre toll free...
... Unit Kit (coil element models) Order Part Number 242905 Cooktop Cleaner (ceramic glass models) Order Part Number 31464 Cooktop Protectant Order Part Number 31463 Cooktop Care Kit (includes cleaner, protectant, and applicator pads) Order Part Number 31605 Cooktop Scraper (ceramic glass models) Order Part Number 3183488 All-Purpose Appliance Cleaner Order Part Number 31662 Stainless Steel Cleaner & Polish (stainless steel models) Order Part Number 31462 Gas Grate and Drip Pan Cleaner Order Part Number 31617 In Canada Please call the Whirlpool Canada LP Customer Interaction Centre toll free...
Use and Care Guide
Page 10
... LIMITED WARRANTY SHALL BE PRODUCT REPAIR AS PROVIDED HEREIN. Costs associated with electrical or plumbing codes, or use or when it . You can find additional help you obtain assistance or service if you need to know your major appliance to or furnished with published installation instructions. 11. Dealer name Address Phone number Model number Serial number Purchase date 10 Service must provide proof of the Use & Care Guide.
... LIMITED WARRANTY SHALL BE PRODUCT REPAIR AS PROVIDED HEREIN. Costs associated with electrical or plumbing codes, or use or when it . You can find additional help you obtain assistance or service if you need to know your major appliance to or furnished with published installation instructions. 11. Dealer name Address Phone number Model number Serial number Purchase date 10 Service must provide proof of the Use & Care Guide.
Installation Instructions
Page 1
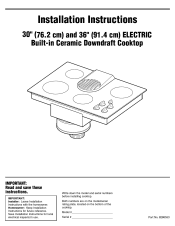
Save Installation Instructions for future reference. Installation Instructions 30" (76.2 cm) and 36" (91.4 cm) ELECTRIC Built-in Ceramic Downdraft Cooktop IMPORTANT: Read and save these instructions. Model #_____ Serial # _____ Part No. 8286553 Homeowner: Keep Installation Instructions for local electrical inspector's use. Both numbers are on the model/serial rating plate, located on the bottom of the cooktop. Write down the model and serial numbers before installing cooktop. IMPORTANT: Installer: Leave Installation Instructions with the homeowner.
Save Installation Instructions for future reference. Installation Instructions 30" (76.2 cm) and 36" (91.4 cm) ELECTRIC Built-in Ceramic Downdraft Cooktop IMPORTANT: Read and save these instructions. Model #_____ Serial # _____ Part No. 8286553 Homeowner: Keep Installation Instructions for local electrical inspector's use. Both numbers are on the model/serial rating plate, located on the bottom of the cooktop. Write down the model and serial numbers before installing cooktop. IMPORTANT: Installer: Leave Installation Instructions with the homeowner.
Installation Instructions
Page 2
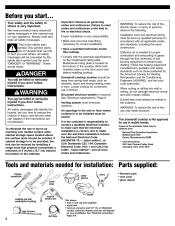
... such as windows, doors and strong heating vents or fans. To eliminate the risk of the standards listed may be killed or seriously injured if you what can be vented to reduce the chance of the cooktop. Model/serial rating plate is to persons, observe the following: Installation work and electrical wiring must always be reduced by installing a range hood that can be obtained from strong...
... such as windows, doors and strong heating vents or fans. To eliminate the risk of the standards listed may be killed or seriously injured if you what can be vented to reduce the chance of the cooktop. Model/serial rating plate is to persons, observe the following: Installation work and electrical wiring must always be reduced by installing a range hood that can be obtained from strong...
Installation Instructions
Page 3
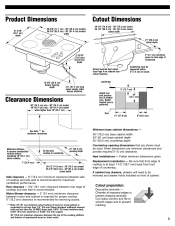
... MSG sheet steel, 0.015" (0.4 mm) stainless steel, 0.024" (0.6 mm) aluminum or 0.020" (0.5 mm) copper. 30" (76.2 cm) minimum clearance between side of countertop. countertop 3-ft. (91.4 cm) long power supply cable factory installed. 5" (12.7 cm) Install rear wall junction box in shaded area. Countertop opening depth Minimum distance to nearest combustible vertical surface extending 18" (45.7 cm) above cooktop 1" (25.4 mm) Do Not seal cooktop to prevent cracking. 3 Replacement installation - Product Dimensions 21...
... MSG sheet steel, 0.015" (0.4 mm) stainless steel, 0.024" (0.6 mm) aluminum or 0.020" (0.5 mm) copper. 30" (76.2 cm) minimum clearance between side of countertop. countertop 3-ft. (91.4 cm) long power supply cable factory installed. 5" (12.7 cm) Install rear wall junction box in shaded area. Countertop opening depth Minimum distance to nearest combustible vertical surface extending 18" (45.7 cm) above cooktop 1" (25.4 mm) Do Not seal cooktop to prevent cracking. 3 Replacement installation - Product Dimensions 21...

Installation Instructions
Page 4
... air, be constructed. Determine which venting method to vent straight out the back from the cooktop. Next, determine the equivalent vent length using chart on Page 5. To vent down, left or right, see "Installation," Step 2, Page 6. The blower housing is more than 10 feet (3 m), use 4-inch (10 cm) laundry-type wall caps. Do Not use 6" (15.2 cm) diameter round or 3-1/4" x 10" (8.3 x 25.4 cm) rectangular vent. Vent materials needed...
... air, be constructed. Determine which venting method to vent straight out the back from the cooktop. Next, determine the equivalent vent length using chart on Page 5. To vent down, left or right, see "Installation," Step 2, Page 6. The blower housing is more than 10 feet (3 m), use 4-inch (10 cm) laundry-type wall caps. Do Not use 6" (15.2 cm) diameter round or 3-1/4" x 10" (8.3 x 25.4 cm) rectangular vent. Vent materials needed...

Installation Instructions
Page 5
List the number of each foot (30 cm) of flexible vent as standard elbows. 5 Multiply the equivalent length by the number of straight vent you will use. of vent is 60 ft (18.3 m). Maximum equivalent length of Pieces/ Length Total Equivalent Length 30" (76.2 cm) max. 6" (15.2 cm) round metal vent wall cap...(8.3 x 25.4 cm) air flow wall cap* 3-1/4" x 10" (8.3 x 25.4 cm) 42" (106.7 cm) 6" max. (15.2 cm) min. 6" (15.2 cm) round PVC coupling 9 ft. (2.7 m) 4.5 ft. (1.4 m) optional vent arrangement through window well under concrete slab SBC CI 12" (30.5 cm) minimum 6" (15.2 cm) ...
List the number of each foot (30 cm) of flexible vent as standard elbows. 5 Multiply the equivalent length by the number of straight vent you will use. of vent is 60 ft (18.3 m). Maximum equivalent length of Pieces/ Length Total Equivalent Length 30" (76.2 cm) max. 6" (15.2 cm) round metal vent wall cap...(8.3 x 25.4 cm) air flow wall cap* 3-1/4" x 10" (8.3 x 25.4 cm) 42" (106.7 cm) 6" max. (15.2 cm) min. 6" (15.2 cm) round PVC coupling 9 ft. (2.7 m) 4.5 ft. (1.4 m) optional vent arrangement through window well under concrete slab SBC CI 12" (30.5 cm) minimum 6" (15.2 cm) ...
Installation Instructions
Page 6
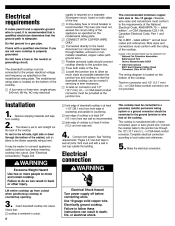
Electrical requirements If codes permit and a separate ground wire is used, it is recommended that a qualified electrician determine that the ground path is located on the model/serial rating plate. The model/serial rating plate is adequate. The downdraft cooktop must be connected to a gas pipe. Check with a qualified electrician if you are not sure cooktop is properly grounded. Do Not have a fuse in the neutral or grounding circuit. Do Not ground to the proper electrical voltage and frequency as specified on the bottom of the cooktop.
Electrical requirements If codes permit and a separate ground wire is used, it is recommended that a qualified electrician determine that the ground path is located on the model/serial rating plate. The model/serial rating plate is adequate. The downdraft cooktop must be connected to a gas pipe. Check with a qualified electrician if you are not sure cooktop is properly grounded. Do Not have a fuse in the neutral or grounding circuit. Do Not ground to the proper electrical voltage and frequency as specified on the bottom of the cooktop.

Installation Instructions
Page 7
... black wires 1. listed power supply. Separate the factory-crimped bare and white cooktop cable wires. 6. white and bare grounding oven cable wires - Connect the flexible, armored cable from the cooktop to the junction box using a U.L.- or CSAlisted conduit 4. Connect the two black wires together; or CSA-listed conduit connector. Tighten screws on conduit connector. Disconnect conduit connector power supply. 2. Remove the junction box cover from the junction box inside the cabinet. 3. Connect the...
... black wires 1. listed power supply. Separate the factory-crimped bare and white cooktop cable wires. 6. white and bare grounding oven cable wires - Connect the flexible, armored cable from the cooktop to the junction box using a U.L.- or CSAlisted conduit 4. Connect the two black wires together; or CSA-listed conduit connector. Tighten screws on conduit connector. Disconnect conduit connector power supply. 2. Remove the junction box cover from the junction box inside the cabinet. 3. Connect the...
Installation Instructions
Page 8
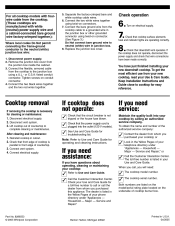
... check that cooktop surface elements heat and indicator lights are operating correctly. Cooktop removal If removing the cooktop is plugged into your cooktop; Disconnect vent system. 3. After cleaning and maintenance: 1. Contact the dealer from whom you will need: The cooktop model number. Service and Repair;" or Call the Customer Interaction Center. Major - Tighten screws on connector. (See Figure 3.) Do Not connect bare ground wire to Use and Care Guide for cleaning or maintenance: 1. Check that the circuit breaker is...
... check that cooktop surface elements heat and indicator lights are operating correctly. Cooktop removal If removing the cooktop is plugged into your cooktop; Disconnect vent system. 3. After cleaning and maintenance: 1. Contact the dealer from whom you will need: The cooktop model number. Service and Repair;" or Call the Customer Interaction Center. Major - Tighten screws on connector. (See Figure 3.) Do Not connect bare ground wire to Use and Care Guide for cleaning or maintenance: 1. Check that the circuit breaker is...


