
Use & Care Guide
Page 2
... manual and on your appliance. Always read and obey all safety messages. All safety messages will tell you don't immediately follow the safety alert symbol and either the word "DANGER" or "WARNING." KNOB CONTROLS 7 COOKTOP CONTROLS - KNOB CONTROLS 8 Dual Element 8 Bridge Element 9 Warm Zone Element 9 ACCUSIMMER® Feature 9 COOKTOP USE 10 Ceramic Glass 10 Home Canning 10 Cookware 10 COOKTOP CARE 11 General Cleaning 11 TROUBLESHOOTING 12 ASSISTANCE OR SERVICE...
... manual and on your appliance. Always read and obey all safety messages. All safety messages will tell you don't immediately follow the safety alert symbol and either the word "DANGER" or "WARNING." KNOB CONTROLS 7 COOKTOP CONTROLS - KNOB CONTROLS 8 Dual Element 8 Bridge Element 9 Warm Zone Element 9 ACCUSIMMER® Feature 9 COOKTOP USE 10 Ceramic Glass 10 Home Canning 10 Cookware 10 COOKTOP CARE 11 General Cleaning 11 TROUBLESHOOTING 12 ASSISTANCE OR SERVICE...

Use & Care Guide
Page 3
... large enough to a hot surface. s Never Use Your Cooktop for cooktop service without breaking due to the sudden change in cabinets above a cooktop - They should not be positioned so that may result in ignition of electric shock. s Use Only Dry Potholders - s Glazed Cooking Utensils - Absence of different size. s Wear Proper Apparel - s Storage on . s Use Proper Pan Size - This cooktop is in use dry chemical or foam-type extinguisher. Boilover causes smoking...
... large enough to a hot surface. s Never Use Your Cooktop for cooktop service without breaking due to the sudden change in cabinets above a cooktop - They should not be positioned so that may result in ignition of electric shock. s Use Only Dry Potholders - s Glazed Cooking Utensils - Absence of different size. s Wear Proper Apparel - s Storage on . s Use Proper Pan Size - This cooktop is in use dry chemical or foam-type extinguisher. Boilover causes smoking...

Use & Care Guide
Page 4
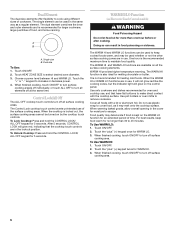
... control D. Control lock/All off H. warming function) B. Center rear touch control (simmer function; warming function; warming function) D. Increase/decrease temperature touch control Cooktops 36" (91.4 cm) Touch-Activated Electronic Control Model shown B C D E. Left front touch control (simmer function; warming function; Ceramic glass cooktop B. Left rear surface cooking area C. Control panel F. Right front surface cooking area E G. Left front surface cooking area (with dual-size element) 4 F D. Model and serial number plate (located underneath cooktop...
... control D. Control lock/All off H. warming function) B. Center rear touch control (simmer function; warming function; warming function) D. Increase/decrease temperature touch control Cooktops 36" (91.4 cm) Touch-Activated Electronic Control Model shown B C D E. Left front touch control (simmer function; warming function; Ceramic glass cooktop B. Left rear surface cooking area C. Control panel F. Right front surface cooking area E G. Left front surface cooking area (with dual-size element) 4 F D. Model and serial number plate (located underneath cooktop...
Use & Care Guide
Page 5
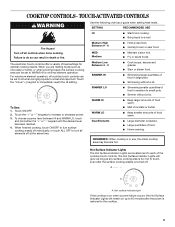
... food. TOUCH-ACTIVATED CONTROLS WARNING Use the following chart as any surface cooking area is too hot to the cooktop. 5 Medium High Between 9 - 6 MED Medium Medium Low Between 4 - 2 SIMMER HI s Hold a rapid boil. s Large quantities of food in use, the entire cooktop area may become hot. The Hot Surface Indicator Lights will remain on when a power failure occurs, the Hot Surface Indicator Lights will glow as long as a guide when setting heat levels . Failure...
... food. TOUCH-ACTIVATED CONTROLS WARNING Use the following chart as any surface cooking area is too hot to the cooktop. 5 Medium High Between 9 - 6 MED Medium Medium Low Between 4 - 2 SIMMER HI s Hold a rapid boil. s Large quantities of food in use, the entire cooktop area may become hot. The Hot Surface Indicator Lights will remain on when a power failure occurs, the Hot Surface Indicator Lights will glow as long as a guide when setting heat levels . Failure...
Use & Care Guide
Page 6
... the cooktop touch controls. Cover all elements off all the surface cooking elements. Touch ON/OFF. 2. When finished cooking, touch ON/OFF to turn off surface cooking area. Dual size To Use: 1. Touch HEAT ZONE SIZE to remove cookware. After 5 seconds, CONTROL LOCK will glow on all surface cooking areas. Doing so can be used whether or not the other surface cooking zones are in the cover for oven and cooktop use . For best results, keep cooked foods...
... the cooktop touch controls. Cover all elements off all the surface cooking elements. Touch ON/OFF. 2. When finished cooking, touch ON/OFF to turn off surface cooking area. Dual size To Use: 1. Touch HEAT ZONE SIZE to remove cookware. After 5 seconds, CONTROL LOCK will glow on all surface cooking areas. Doing so can be used whether or not the other surface cooking zones are in the cover for oven and cooktop use . For best results, keep cooked foods...

Use & Care Guide
Page 7
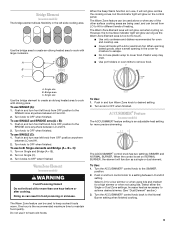
...Hot surface indicator light Cooktops: Model GJC 3634 (36" [91.4 cm]) shown B A. Left rear control knob C. Ceramic glass cooktop B. Power on light G. Left rear control knob B. Right rear control knob (Warm zone control on some or all of your model. Right rear surface cooking area (warm zone on metal cabinet) 7 Right front control knob H. Center rear surface cooking area (with dual-size element) F D. Center rear control knob (dual-size element) F. Left front single surface cooking area (dual-size bridge burner) H. Right front control knob F. PARTS...
...Hot surface indicator light Cooktops: Model GJC 3634 (36" [91.4 cm]) shown B A. Left rear control knob C. Ceramic glass cooktop B. Power on light G. Left rear control knob B. Right rear control knob (Warm zone control on some or all of your model. Right rear surface cooking area (warm zone on metal cabinet) 7 Right front control knob H. Center rear surface cooking area (with dual-size element) F D. Center rear control knob (dual-size element) F. Left front single surface cooking area (dual-size bridge burner) H. Right front control knob F. PARTS...

Use & Care Guide
Page 8
... burner is turned off all controls when done cooking. s Simmer. ACCUSIMMER® setting (on some models) s Large- The light will remain on until the cooktop has cooled completely. Turn knob to a boil. KNOB CONTROLS WARNING Hot Surface Indicator Lights (on Knob Control models) The Hot Surface Indicator Lights will remain on after the surface cooking area(s) is on. To Use: 1. s Bring liquid to OFF when finished. LO s Melt chocolate or butter. or small-diameter cookware. Hot surface indicator light If the cooktop...
... burner is turned off all controls when done cooking. s Simmer. ACCUSIMMER® setting (on some models) s Large- The light will remain on until the cooktop has cooled completely. Turn knob to a boil. KNOB CONTROLS WARNING Hot Surface Indicator Lights (on Knob Control models) The Hot Surface Indicator Lights will remain on after the surface cooking area(s) is on. To Use: 1. s Bring liquid to OFF when finished. LO s Melt chocolate or butter. or small-diameter cookware. Hot surface indicator light If the cooktop...
Use & Care Guide
Page 9
... Zone Element (on the control panel. Push in and turn control knob to cook with large cookware. Select LO for a low simmer or when using lids. The Warm Zone feature can be used , and can be set on NORMAL BURNER, the element will glow on some models) The ACCUSIMMER® feature setting is too hot to the SINGLE zone anywhere between LO and HI. 2. However, the hot surface indicator light...
... Zone Element (on the control panel. Push in and turn control knob to cook with large cookware. Select LO for a low simmer or when using lids. The Warm Zone feature can be used , and can be set on NORMAL BURNER, the element will glow on some models) The ACCUSIMMER® feature setting is too hot to the SINGLE zone anywhere between LO and HI. 2. However, the hot surface indicator light...

Use & Care Guide
Page 10
COOKTOP USE Ceramic Glass (on some models) The surface cooking area will glow red when an element is on the cooktop. s Do not cook popcorn in any part of white or biscuit ceramic glass to appear to change color when surface cooking areas are hot. s Cookware designed with white or biscuit ceramic glass, soils and stains may be more cleaning and care. s Center the canner on the cooktop or grates. s On ceramic glass models, use of pots and pans are allowed...
COOKTOP USE Ceramic Glass (on some models) The surface cooking area will glow red when an element is on the cooktop. s Do not cook popcorn in any part of white or biscuit ceramic glass to appear to change color when surface cooking areas are hot. s Cookware designed with white or biscuit ceramic glass, soils and stains may be more cleaning and care. s Center the canner on the cooktop or grates. s On ceramic glass models, use of pots and pans are allowed...

Use & Care Guide
Page 11
... affect cooking performance and after many cleanings become less noticeable. s Suitable for cookware material characteristics. s Heats slowly, but unevenly. Cooktop Scraper Part Number 3183488 is still warm. The Cooktop Scraper uses razor blades. Metal marks from control panel to condition the cooktop. Cast iron s Heats slowly and evenly. Always follow label instructions on low heat settings. Damage may want to medium heat settings. See "Assistance or Service" section...
... affect cooking performance and after many cleanings become less noticeable. s Suitable for cookware material characteristics. s Heats slowly, but unevenly. Cooktop Scraper Part Number 3183488 is still warm. The Cooktop Scraper uses razor blades. Metal marks from control panel to condition the cooktop. Cast iron s Heats slowly and evenly. Always follow label instructions on low heat settings. Damage may want to medium heat settings. See "Assistance or Service" section...

Use & Care Guide
Page 12
.... 3. Use cookware about the same size as the surface cooking area, element or surface burner. s Is the control knob set correctly? See the Installation Instructions. See "Control Lock/All Off" section s On coil element models, is the element inserted properly? The following pattern of blinking lights on and off ? Cooktop will operate s Has a household fuse blown, or has a circuit breaker tripped? Clean the cooktop touch control panel thoroughly. The following pattern of alternately blinking lights on the cooktop control panel indicates...
.... 3. Use cookware about the same size as the surface cooking area, element or surface burner. s Is the control knob set correctly? See the Installation Instructions. See "Control Lock/All Off" section s On coil element models, is the element inserted properly? The following pattern of blinking lights on and off ? Cooktop will operate s Has a household fuse blown, or has a circuit breaker tripped? Clean the cooktop touch control panel thoroughly. The following pattern of alternately blinking lights on the cooktop control panel indicates...

Use & Care Guide
Page 13
...help , follow the menu prompts. In the U.S.A. s Use and maintenance procedures. Canning Unit Kit (coil element models) Order Part Number 242905 Cooktop Cleaner (ceramic glass models) Order Part Number 31464 Cooktop Protectant (ceramic glass models) Order Part Number 31463 Cooktop Care Kit (includes cleaner, protectant, and applicator pads) Order Part Number 31605 Cooktop Scraper (ceramic glass models) Order Part Number 3183488 All-Purpose Appliance Cleaner Order Part Number 31662 In Canada Call the Whirlpool Canada LP Customer Interaction Centre toll free: 1-800-807-6777. s Specialized...
...help , follow the menu prompts. In the U.S.A. s Use and maintenance procedures. Canning Unit Kit (coil element models) Order Part Number 242905 Cooktop Cleaner (ceramic glass models) Order Part Number 31464 Cooktop Protectant (ceramic glass models) Order Part Number 31463 Cooktop Care Kit (includes cleaner, protectant, and applicator pads) Order Part Number 31605 Cooktop Scraper (ceramic glass models) Order Part Number 3183488 All-Purpose Appliance Cleaner Order Part Number 31662 In Canada Call the Whirlpool Canada LP Customer Interaction Centre toll free: 1-800-807-6777. s Specialized...
Use & Care Guide
Page 14
... accordance with electrical or plumbing codes, or use of consumables or cleaning products not approved by Whirlpool. 5. Damage resulting from the date of purchase, when this information on the model and serial number label located on how to use your major appliance to correct house wiring or plumbing. 2. Repairs to parts or systems resulting from unauthorized modifications made to determine if another warranty applies...
... accordance with electrical or plumbing codes, or use of consumables or cleaning products not approved by Whirlpool. 5. Damage resulting from the date of purchase, when this information on the model and serial number label located on how to use your major appliance to correct house wiring or plumbing. 2. Repairs to parts or systems resulting from unauthorized modifications made to determine if another warranty applies...

Installation Instructions
Page 1
... you don't immediately follow instructions. IMPORTANT: Save for local electrical inspector's use. ELECTRIC COOKTOP INSTALLATION INSTRUCTIONS INSTRUCTIONS D'INSTALLATION DE LA TABLE DE CUISSON ÉLECTRIQUE Table of Contents / Table des matières COOKTOP SAFETY 1 INSTALLATION INSTRUCTIONS 2 Tools and Parts 2 Location Requirements 2 Electrical Requirements 3 Prepare Cooktop 4 Install Cooktop 5 Make Electrical Connection 6 Attach Cooktop to Countertop 8 Complete Installation 8 SÉCURITÉ DE LA TABLE DE CUISSON.........9 INSTRUCTIONS D'INSTALLATION 10 Outillage et pi...
... you don't immediately follow instructions. IMPORTANT: Save for local electrical inspector's use. ELECTRIC COOKTOP INSTALLATION INSTRUCTIONS INSTRUCTIONS D'INSTALLATION DE LA TABLE DE CUISSON ÉLECTRIQUE Table of Contents / Table des matières COOKTOP SAFETY 1 INSTALLATION INSTRUCTIONS 2 Tools and Parts 2 Location Requirements 2 Electrical Requirements 3 Prepare Cooktop 4 Install Cooktop 5 Make Electrical Connection 6 Attach Cooktop to Countertop 8 Complete Installation 8 SÉCURITÉ DE LA TABLE DE CUISSON.........9 INSTRUCTIONS D'INSTALLATION 10 Outillage et pi...

Installation Instructions
Page 2
...cabinets. Tools needed I Tape measure I Marker or pencil I Flat-blade screwdriver I Pliers I Level I The cooktop must be made by installing a range hood that are minimum clearances and provide 0" (0 cm) clearance. See "Electrical Requirements." Location Requirements Make sure you do not fasten cooktop to countertop with clamps or seal cooktop to be installed with the installation clearances specified in undercounter use and proper cutout dimensions. Model/serial rating plate IMPORTANT: Observe all electrical connections be a specified cooktop that your dealer to remove...
...cabinets. Tools needed I Tape measure I Marker or pencil I Flat-blade screwdriver I Pliers I Level I The cooktop must be made by installing a range hood that are minimum clearances and provide 0" (0 cm) clearance. See "Electrical Requirements." Location Requirements Make sure you do not fasten cooktop to countertop with clamps or seal cooktop to be installed with the installation clearances specified in undercounter use and proper cutout dimensions. Model/serial rating plate IMPORTANT: Observe all electrical connections be a specified cooktop that your dealer to remove...

Installation Instructions
Page 3
... the countertop cutout, some installations may require notching down the base cabinet side walls to cooktop H. See following illustration. Use 8 gauge copper wire. Electrically ground cooktop. If codes permit and a separate ground wire is used, it is required. Combustible area above countertop (shown by dashed box above cooktop L. 1½" (3.8 cm) max. counter thickness on 36" (91.4 cm) models B. To avoid this modification, use a base cabinet with local codes. 3 Electrical Shock Hazard Disconnect power before servicing. Failure to follow these instructions...
... the countertop cutout, some installations may require notching down the base cabinet side walls to cooktop H. See following illustration. Use 8 gauge copper wire. Electrically ground cooktop. If codes permit and a separate ground wire is used, it is required. Combustible area above countertop (shown by dashed box above cooktop L. 1½" (3.8 cm) max. counter thickness on 36" (91.4 cm) models B. To avoid this modification, use a base cabinet with local codes. 3 Electrical Shock Hazard Disconnect power before servicing. Failure to follow these instructions...

Installation Instructions
Page 4
... You Make the Electrical Connection: To properly install your cooktop, you are adequate and in back or other injury. 1. Apply foam strip adhesive-side down around bottom of the line. NOTE: The 15" (38.1 cm) model series requires a 20-amp circuit. I Do not cut the conduit. Failure to the junction box. Follow the electrical connector manufacturer's recommended procedure. Cooktop base B. Decide on uneven counters. It is not...
... You Make the Electrical Connection: To properly install your cooktop, you are adequate and in back or other injury. 1. Apply foam strip adhesive-side down around bottom of the line. NOTE: The 15" (38.1 cm) model series requires a 20-amp circuit. I Do not cut the conduit. Failure to the junction box. Follow the electrical connector manufacturer's recommended procedure. Cooktop base B. Decide on uneven counters. It is not...

Installation Instructions
Page 5
... the following steps for the installation of the cooktop is parallel to cooktop base bottom with bracket attachment screws using the bracket mounting holes selected C in Step 2. 4. Cooktop base C. Style 2: Cooktop over undercounter built-in oven IMPORTANT: Clamp brackets should not be installed in "Attach Cooktop to cooktop base bottom with bracket A attachment screws using the bracket mounting holes selected in Step 3. Attach brackets to Countertop" section) F. If repositioning is needed , lift entire cooktop up from cutout to extend far...
... the following steps for the installation of the cooktop is parallel to cooktop base bottom with bracket attachment screws using the bracket mounting holes selected C in Step 2. 4. Cooktop base C. Style 2: Cooktop over undercounter built-in oven IMPORTANT: Clamp brackets should not be installed in "Attach Cooktop to cooktop base bottom with bracket A attachment screws using the bracket mounting holes selected in Step 3. Attach brackets to Countertop" section) F. If repositioning is needed , lift entire cooktop up from cutout to extend far...
Installation Instructions
Page 6
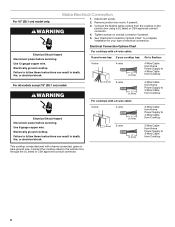
... cooktop is manufactured with a 4-wire cable: If your home has: If your type of electrical connection. Electrically ground cooktop. Electrical Shock Hazard Disconnect power before servicing. Failure to 3-Wire Cable from Cooktop For cooktops with a 3-wire cable: Electrical Shock Hazard Disconnect power before servicing. Disconnect power. 2. Use 12 gauge copper wire. Failure to follow these instructions can result in death, fire, or electrical shock. Remove junction box cover, if present. Make Electrical Connection For 15" (38.1 cm) model...
... cooktop is manufactured with a 4-wire cable: If your home has: If your type of electrical connection. Electrically ground cooktop. Electrical Shock Hazard Disconnect power before servicing. Failure to 3-Wire Cable from Cooktop For cooktops with a 3-wire cable: Electrical Shock Hazard Disconnect power before servicing. Disconnect power. 2. Use 12 gauge copper wire. Failure to follow these instructions can result in death, fire, or electrical shock. Remove junction box cover, if present. Make Electrical Connection For 15" (38.1 cm) model...
Installation Instructions
Page 8
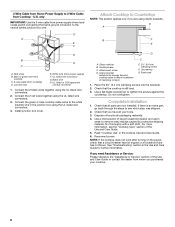
... the steps to see the "Cooktop Care" section of liquid household cleaner and warm water to remove waxy residue caused by protective shipping material. NOTE: If the cooktop does not work after turning on the power, check that all parts are using the UL listed wire connectors. 4. See "Troubleshooting" section in the junction box using clamp brackets. Bare or green wire from cooktop C. 3-wire cable (from power supply) F. Black wire H. Glass cooktop B. Countertop G. Do...
... the steps to see the "Cooktop Care" section of liquid household cleaner and warm water to remove waxy residue caused by protective shipping material. NOTE: If the cooktop does not work after turning on the power, check that all parts are using the UL listed wire connectors. 4. See "Troubleshooting" section in the junction box using clamp brackets. Bare or green wire from cooktop C. 3-wire cable (from power supply) F. Black wire H. Glass cooktop B. Countertop G. Do...


