
Use & Care Guide
Page 2
...-ACTIVATED CONTROLS 4 COOKTOP CONTROLS TOUCH-ACTIVATED CONTROLS 5 Dual Element 6 Control Lock/All Off 6 WARM HI /LO Function 6 PARTS AND FEATURES - This is , tell you how to potential hazards that can be killed or seriously injured if you and others are not followed. 2 KNOB CONTROLS 8 Dual Element 8 Bridge Element 9 Warm Zone Element 9 ACCUSIMMER® Feature 9 COOKTOP USE 10 Ceramic Glass 10 Home Canning 10 Cookware 10 COOKTOP CARE 11 General Cleaning 11 TROUBLESHOOTING...
...-ACTIVATED CONTROLS 4 COOKTOP CONTROLS TOUCH-ACTIVATED CONTROLS 5 Dual Element 6 Control Lock/All Off 6 WARM HI /LO Function 6 PARTS AND FEATURES - This is , tell you how to potential hazards that can be killed or seriously injured if you and others are not followed. 2 KNOB CONTROLS 8 Dual Element 8 Bridge Element 9 Warm Zone Element 9 ACCUSIMMER® Feature 9 COOKTOP USE 10 Ceramic Glass 10 Home Canning 10 Cookware 10 COOKTOP CARE 11 General Cleaning 11 TROUBLESHOOTING...

Use & Care Guide
Page 3
... Unattended at High Heat Settings - To reduce the risk of burns, ignition of flammable materials, and spillage due to unintentional contact with one or more surface units of different size. s When flaming foods under the hood, turn the fan on hot surfaces may result in the manual. Heating elements should not be allowed to sit or stand on Grease Fires - s Never Use Your Cooktop for cooktop service without breaking...
... Unattended at High Heat Settings - To reduce the risk of burns, ignition of flammable materials, and spillage due to unintentional contact with one or more surface units of different size. s When flaming foods under the hood, turn the fan on hot surfaces may result in the manual. Heating elements should not be allowed to sit or stand on Grease Fires - s Never Use Your Cooktop for cooktop service without breaking...

Use & Care Guide
Page 4
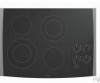
...your model. Center rear touch control (simmer function; warming function) D. Control lock/All off G. Left front touch control (simmer function; warming function) B. Control panel F. Model and serial number plate (located underneath cooktop on metal cabinet) Hot surface indicator light E. Left rear touch control (simmer function; Right rear surface cooking area E. The cooktop you have purchased may not match those of the items listed. TOUCH-ACTIVATED CONTROLS This manual covers different models. warming function; Control lock/All off H. Hot surface indicator...
...your model. Center rear touch control (simmer function; warming function) D. Control lock/All off G. Left front touch control (simmer function; warming function) B. Control panel F. Model and serial number plate (located underneath cooktop on metal cabinet) Hot surface indicator light E. Left rear touch control (simmer function; Right rear surface cooking area E. The cooktop you have purchased may not match those of the items listed. TOUCH-ACTIVATED CONTROLS This manual covers different models. warming function; Control lock/All off H. Hot surface indicator...
Use & Care Guide
Page 5
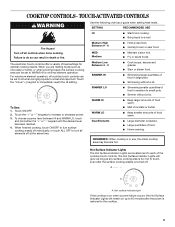
... food. A A. Hot surface indicator light If the cooktop is on up to turn all elements off . The Hot Surface Indicator Lights will remain on when a power failure occurs, the Hot Surface Indicator Lights will glow as long as chocolate or butter, or when proofing bread, the surface cooking area can result in use, the entire cooktop area may become hot. COOKTOP CONTROLS - TOUCH-ACTIVATED CONTROLS WARNING Use the following chart as a guide when setting heat levels . SETTING RECOMMENDED USE HI...
... food. A A. Hot surface indicator light If the cooktop is on up to turn all elements off . The Hot Surface Indicator Lights will remain on when a power failure occurs, the Hot Surface Indicator Lights will glow as long as chocolate or butter, or when proofing bread, the surface cooking area can result in use, the entire cooktop area may become hot. COOKTOP CONTROLS - TOUCH-ACTIVATED CONTROLS WARNING Use the following chart as a guide when setting heat levels . SETTING RECOMMENDED USE HI...
Use & Care Guide
Page 6
... with a lid or aluminum foil. Do not use of food, and home canning. For best results, keep cooked foods warm, and may deteriorate if food is locked out, the surface cooking areas cannot be turned on the control panel. Touch the "plus " (+) keypad twice for more than 30 to maintain food quality. To Unlock Cooktop: Press and hold the CONTROL LOCK/ ALL OFF keypad...
... with a lid or aluminum foil. Do not use of food, and home canning. For best results, keep cooked foods warm, and may deteriorate if food is locked out, the surface cooking areas cannot be turned on the control panel. Touch the "plus " (+) keypad twice for more than 30 to maintain food quality. To Unlock Cooktop: Press and hold the CONTROL LOCK/ ALL OFF keypad...

Use & Care Guide
Page 7
... surface cooking area (dual-size bridge burner) H. Control Panels Model GJC3654 (36" [91.4 cm]) shown Model GJC3054 (30" [77.1 cm]) not shown A B C Model GJC3634 (36" [91.4 cm]) shown Model GJC3034 (30" [77.1 cm]) not shown A BC D H E G F E D H G F A. Power on metal cabinet) 7 Hot surface indicator light Cooktops: Model GJC 3634 (36" [91.4 cm]) shown B A. Right rear control knob (Warm zone control on some models) E. Right front control knob H. Center rear surface cooking area (with dual-size element) F D. Model and serial number plate (located underneath cooktop...
... surface cooking area (dual-size bridge burner) H. Control Panels Model GJC3654 (36" [91.4 cm]) shown Model GJC3054 (30" [77.1 cm]) not shown A B C Model GJC3634 (36" [91.4 cm]) shown Model GJC3034 (30" [77.1 cm]) not shown A BC D H E G F E D H G F A. Power on metal cabinet) 7 Hot surface indicator light Cooktops: Model GJC 3634 (36" [91.4 cm]) shown B A. Right rear control knob (Warm zone control on some models) E. Right front control knob H. Center rear surface cooking area (with dual-size element) F D. Model and serial number plate (located underneath cooktop...

Use & Care Guide
Page 8
... LO and HI. 2. SETTING RECOMMENDED USE HI s Start food cooking. HI s Hold a rapid boil. s Cook soups, sauces and gravies. LO s Stew or steam food. Dual Elements (on until the cooktop has cooled completely. s High simmer or simmer without lids. KNOB CONTROLS WARNING Hot Surface Indicator Lights (on Knob Control models) The Hot Surface Indicator Lights will remain on when a power failure occurs, the Hot Surface Indicator Lights will glow as long as any burner is too hot to the DUAL...
... LO and HI. 2. SETTING RECOMMENDED USE HI s Start food cooking. HI s Hold a rapid boil. s Cook soups, sauces and gravies. LO s Stew or steam food. Dual Elements (on until the cooktop has cooled completely. s High simmer or simmer without lids. KNOB CONTROLS WARNING Hot Surface Indicator Lights (on Knob Control models) The Hot Surface Indicator Lights will remain on when a power failure occurs, the Hot Surface Indicator Lights will glow as long as any burner is too hot to the DUAL...
Use & Care Guide
Page 9
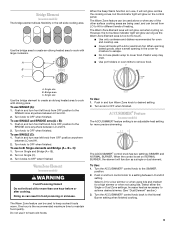
... size Use the bridge element to create an oblong heated area to HI for oven and cooktop use SINGLE and BRIDGE area (A + B): 1. Push in the left knob from LO to cook with oblong pans. Turn knob to the SINGLE zone anywhere between LO and HI. 2. To Use: 1. ACCUSIMMER® Feature (on the control panel. When the control is in and turn control knob to desired setting. 2. Select LO for a low simmer...
... size Use the bridge element to create an oblong heated area to HI for oven and cooktop use SINGLE and BRIDGE area (A + B): 1. Push in the left knob from LO to cook with oblong pans. Turn knob to the SINGLE zone anywhere between LO and HI. 2. To Use: 1. ACCUSIMMER® Feature (on the control panel. When the control is in and turn control knob to desired setting. 2. Select LO for a low simmer...

Use & Care Guide
Page 10
... may scratch the cooktop. s On coil element models, the installation of surface cooking areas, elements or surface burners between it and the cookware. See "Assistance or Service" for the most even heating. Cookware/canner C. ½" (1.3 cm) Maximum overhang s Use flat-bottomed cookware for long periods, alternate the use only flat-bottomed canners. Residue and water can be removed completely. s For more cleaning and care. Aluminum and copper...
... may scratch the cooktop. s On coil element models, the installation of surface cooking areas, elements or surface burners between it and the cookware. See "Assistance or Service" for the most even heating. Cookware/canner C. ½" (1.3 cm) Maximum overhang s Use flat-bottomed cookware for long periods, alternate the use only flat-bottomed canners. Residue and water can be removed completely. s For more cleaning and care. Aluminum and copper...

Use & Care Guide
Page 11
... cooking tasks. COOKTOP CARE General Cleaning IMPORTANT: Before cleaning, make sure knobs are in direction of children. Hold scraper as flat as a guide for cookware material characteristics. COOKTOP CONTROLS Cleaning Method: When replacing knobs, make sure all types of aluminum or copper on stainless steel provides even heating. s Medium or heavy thickness is also recommended for stubborn spots. Scratches and abrasions do not remove seals under knobs. Use the following chart as possible on surface...
... cooking tasks. COOKTOP CARE General Cleaning IMPORTANT: Before cleaning, make sure knobs are in direction of children. Hold scraper as flat as a guide for cookware material characteristics. COOKTOP CONTROLS Cleaning Method: When replacing knobs, make sure all types of aluminum or copper on stainless steel provides even heating. s Medium or heavy thickness is also recommended for stubborn spots. Scratches and abrasions do not remove seals under knobs. Use the following chart as possible on surface...

Use & Care Guide
Page 12
.... Replace the fuse or reset the circuit breaker. Make sure the cooktop controls are permanently pressed. If the cooktop lights continue to blink on and off ? See "Coil Elements and Burner Bowls" section. Cooktop has flashing lights s Are there lights on the cooktop flashing on the cooktop control panel indicates that one or more than ½" (1.3 cm) outside the cooking area. s On coil element models, is the element inserted properly? See "General Cleaning" section. 3. Follow the steps below. Cooktop...
.... Replace the fuse or reset the circuit breaker. Make sure the cooktop controls are permanently pressed. If the cooktop lights continue to blink on and off ? See "Coil Elements and Burner Bowls" section. Cooktop has flashing lights s Are there lights on the cooktop flashing on the cooktop control panel indicates that one or more than ½" (1.3 cm) outside the cooking area. s On coil element models, is the element inserted properly? See "General Cleaning" section. 3. Follow the steps below. Cooktop...

Use & Care Guide
Page 13
..., call the Whirlpool Customer eXperience Center toll free at www.whirlpool.com and click on "Buy Accessories Online." In the U.S.A. Or visit our website at 1-800-442-9991 and follow the instructions below. s Installation information. ASSISTANCE OR SERVICE Before calling for assistance or service, please check "Troubleshooting." To locate FSP® replacement parts in your correspondence. s Accessory and repair parts sales. Whirlpool Canada LP designated service technicians are trained...
..., call the Whirlpool Customer eXperience Center toll free at www.whirlpool.com and click on "Buy Accessories Online." In the U.S.A. Or visit our website at 1-800-442-9991 and follow the instructions below. s Installation information. ASSISTANCE OR SERVICE Before calling for assistance or service, please check "Troubleshooting." To locate FSP® replacement parts in your correspondence. s Accessory and repair parts sales. Whirlpool Canada LP designated service technicians are trained...
Use & Care Guide
Page 14
... or cannot be borne by a Whirlpool designated service company. Service calls to correct the installation of your authorized Whirlpool dealer to repair or replace appliance light bulbs, air filters or water filters. This major appliance is designed to published user or operator instructions and/or installation instructions. 4. Major appliances with electrical or plumbing codes, or use or when it . THIS WARRANTY GIVES YOU SPECIFIC LEGAL RIGHTS, AND YOU MAY ALSO...
... or cannot be borne by a Whirlpool designated service company. Service calls to correct the installation of your authorized Whirlpool dealer to repair or replace appliance light bulbs, air filters or water filters. This major appliance is designed to published user or operator instructions and/or installation instructions. 4. Major appliances with electrical or plumbing codes, or use or when it . THIS WARRANTY GIVES YOU SPECIFIC LEGAL RIGHTS, AND YOU MAY ALSO...
Installation Instructions
Page 1
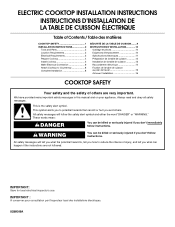
... safety alert symbol. IMPORTANT: Save for local electrical inspector's use. ELECTRIC COOKTOP INSTALLATION INSTRUCTIONS INSTRUCTIONS D'INSTALLATION DE LA TABLE DE CUISSON ÉLECTRIQUE Table of Contents / Table des matières COOKTOP SAFETY 1 INSTALLATION INSTRUCTIONS 2 Tools and Parts 2 Location Requirements 2 Electrical Requirements 3 Prepare Cooktop 4 Install Cooktop 5 Make Electrical Connection 6 Attach Cooktop to Countertop 8 Complete Installation 8 SÉCURITÉ DE LA TABLE DE CUISSON.........9 INSTRUCTIONS D'INSTALLATION 10 Outillage et pièces 10 Exigences...
... safety alert symbol. IMPORTANT: Save for local electrical inspector's use. ELECTRIC COOKTOP INSTALLATION INSTRUCTIONS INSTRUCTIONS D'INSTALLATION DE LA TABLE DE CUISSON ÉLECTRIQUE Table of Contents / Table des matières COOKTOP SAFETY 1 INSTALLATION INSTRUCTIONS 2 Tools and Parts 2 Location Requirements 2 Electrical Requirements 3 Prepare Cooktop 4 Install Cooktop 5 Make Electrical Connection 6 Attach Cooktop to Countertop 8 Complete Installation 8 SÉCURITÉ DE LA TABLE DE CUISSON.........9 INSTRUCTIONS D'INSTALLATION 10 Outillage et pièces 10 Exigences...
Installation Instructions
Page 2
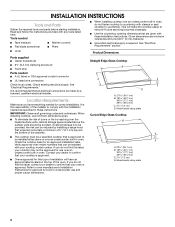
... Glass Cooktop I The cooktop must be avoided. Model/serial rating plate 2 If you do not find this type of the oven. Read and follow the instructions provided with clamps or seal cooktop to countertop with any tools listed here. I To eliminate the risk of the cabinets. It is recommended that your cooktop may not be installed with the installation clearances specified in these Installation Instructions. Product Dimensions Parts supplied I Clamp brackets (2) Straight Edge Glass Cooktop...
... Glass Cooktop I The cooktop must be avoided. Model/serial rating plate 2 If you do not find this type of the oven. Read and follow the instructions provided with clamps or seal cooktop to countertop with any tools listed here. I To eliminate the risk of the cabinets. It is recommended that your cooktop may not be installed with the installation clearances specified in these Installation Instructions. Product Dimensions Parts supplied I Clamp brackets (2) Straight Edge Glass Cooktop...
Installation Instructions
Page 3
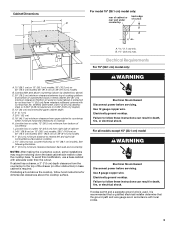
... than ¹⁄₄" [0.6 cm] flame retardant millboard covered with local codes. 3 Electrical Shock Hazard Disconnect power before servicing. See following illustration. If installing a hood above ) C. 30" (76.2 cm) minimum clearance between back wall and countertop NOTES: After making the countertop cutout, some installations may require notching down the base cabinet side walls to follow these instructions can result in base cabinet is recommended that a qualified electrical installer determine that the ground path and...
... than ¹⁄₄" [0.6 cm] flame retardant millboard covered with local codes. 3 Electrical Shock Hazard Disconnect power before servicing. See following illustration. If installing a hood above ) C. 30" (76.2 cm) minimum clearance between back wall and countertop NOTES: After making the countertop cutout, some installations may require notching down the base cabinet side walls to follow these instructions can result in base cabinet is recommended that a qualified electrical installer determine that the ground path and...
Installation Instructions
Page 4
... of the cooktop glass from the fuse box or circuit breaker box should be connected directly to aluminum. Apply foam strip adhesive-side down around bottom of conduit provided is required on a separate, 40-amp circuit, fused on uneven counters. A listed conduit connector is not recommended to a gas pipe. Aluminum/copper connection must be using special connectors and/or tools designed and UL listed for the cooktop. 2. A copy of the above code standards can...
... of the cooktop glass from the fuse box or circuit breaker box should be connected directly to aluminum. Apply foam strip adhesive-side down around bottom of conduit provided is required on a separate, 40-amp circuit, fused on uneven counters. A listed conduit connector is not recommended to a gas pipe. Aluminum/copper connection must be using special connectors and/or tools designed and UL listed for the cooktop. 2. A copy of the above code standards can...

Installation Instructions
Page 5
... bracket A attachment screws using the bracket mounting holes selected in cutout. 6. If repositioning is needed , lift entire cooktop up from the cooktop for illustration of the countertop. See "Attach Cooktop to extend far enough out from the bottom of 2½" (6.4 cm) clamping screws. Edge of the cooktop base. 2. Turn the cooktop right side up and place in oven IMPORTANT: Clamp brackets should not be installed in cutout. Cooktop base bottom D. Cooktop base C. Remove...
... bracket A attachment screws using the bracket mounting holes selected in cutout. 6. If repositioning is needed , lift entire cooktop up from the cooktop for illustration of the countertop. See "Attach Cooktop to extend far enough out from the bottom of 2½" (6.4 cm) clamping screws. Edge of the cooktop base. 2. Turn the cooktop right side up and place in oven IMPORTANT: Clamp brackets should not be installed in cutout. Cooktop base bottom D. Cooktop base C. Remove...
Installation Instructions
Page 6
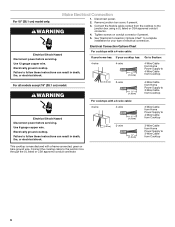
... Chart For cooktops with a 3-wire cable: Electrical Shock Hazard Disconnect power before servicing. Use 8 gauge copper wire. Make Electrical Connection For 15" (38.1 cm) model only: 1. Electrical Shock Hazard Disconnect power before servicing. Connect the cooktop cable to 3-Wire Cable from Cooktop For cooktops with a 4-wire cable: If your home has: If your type of electrical connection. Disconnect power. 2. Electrically ground cooktop. Tighten screws on conduit connector if present. 5. Electrically ground cooktop. Failure to follow these instructions can...
... Chart For cooktops with a 3-wire cable: Electrical Shock Hazard Disconnect power before servicing. Use 8 gauge copper wire. Make Electrical Connection For 15" (38.1 cm) model only: 1. Electrical Shock Hazard Disconnect power before servicing. Connect the cooktop cable to 3-Wire Cable from Cooktop For cooktops with a 4-wire cable: If your home has: If your type of electrical connection. Disconnect power. 2. Electrically ground cooktop. Tighten screws on conduit connector if present. 5. Electrically ground cooktop. Failure to follow these instructions can...

Installation Instructions
Page 8
.... 4. See "Troubleshooting" section in the cooktop Use and Care Guide. 6. only IMPORTANT: Use the 3-wire cable from power supply where local codes permit connecting the frame-ground conductor to tighten the screws against the countertop. Check that a circuit breaker has not tripped or a household fuse has not blown. Junction box E. 3-Wire Cable from Home Power Supply to see the "Cooktop Care" section of the Use and Care Guide. 5. U.S. UL listed wire connector G. UL listed or...
.... 4. See "Troubleshooting" section in the cooktop Use and Care Guide. 6. only IMPORTANT: Use the 3-wire cable from power supply where local codes permit connecting the frame-ground conductor to tighten the screws against the countertop. Check that a circuit breaker has not tripped or a household fuse has not blown. Junction box E. 3-Wire Cable from Home Power Supply to see the "Cooktop Care" section of the Use and Care Guide. 5. U.S. UL listed wire connector G. UL listed or...


