Use and Care Guide
Page 2
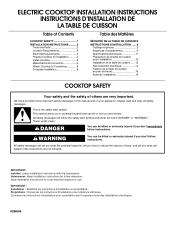
TABLE OF CONTENTS COOKTOP SAFETY 2 PARTS AND FEATURES - KNOB MODELS 7 COOKTOP CONTROLS - We have provided many important safety messages in this manual and on some models 10 Home Canning 10 Cookware 10 COOKTOP CARE 11 General Cleaning 11 TROUBLESHOOTING 11 ASSISTANCE ... 9 Warm Zone Element 9 ACCUSIMMER® Feature 9 COOKTOP USE 10 Ceramic Glass (on your appliance. TOUCH-ACTIVATED MODELS ........4 COOKTOP CONTROLS - TOUCH-ACTIVATED MODELS .........5 Dual Size Element 6 Control Lock/All Off 6 WARM HI/LO Function 6 PARTS AND FEATURES - This symbol alerts you to reduce the...
TABLE OF CONTENTS COOKTOP SAFETY 2 PARTS AND FEATURES - KNOB MODELS 7 COOKTOP CONTROLS - We have provided many important safety messages in this manual and on some models 10 Home Canning 10 Cookware 10 COOKTOP CARE 11 General Cleaning 11 TROUBLESHOOTING 11 ASSISTANCE ... 9 Warm Zone Element 9 ACCUSIMMER® Feature 9 COOKTOP USE 10 Ceramic Glass (on your appliance. TOUCH-ACTIVATED MODELS ........4 COOKTOP CONTROLS - TOUCH-ACTIVATED MODELS .........5 Dual Size Element 6 Control Lock/All Off 6 WARM HI/LO Function 6 PARTS AND FEATURES - This symbol alerts you to reduce the...
Use and Care Guide
Page 3
...foil to cover the surface unit heating element. Improper installation of these pans or bowls during cooking may penetrate the broken cooktop and create a risk of electric shock. Do not let potholder touch hot heating elements. s Use Proper Pan Size - All other glazed utensils are...fire. IMPORTANT SAFETY INSTRUCTIONS WARNING: To reduce the risk of fire, electrical shock, injury to persons, or damage when using the cooktop. They should be allowed to a qualified technician. Do not repair or replace any part of different size. To reduce the risk of burns, ignition of...
...foil to cover the surface unit heating element. Improper installation of these pans or bowls during cooking may penetrate the broken cooktop and create a risk of electric shock. Do not let potholder touch hot heating elements. s Use Proper Pan Size - All other glazed utensils are...fire. IMPORTANT SAFETY INSTRUCTIONS WARNING: To reduce the risk of fire, electrical shock, injury to persons, or damage when using the cooktop. They should be allowed to a qualified technician. Do not repair or replace any part of different size. To reduce the risk of burns, ignition of...
Use and Care Guide
Page 4
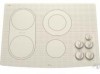
...function; Control panel F. Right front surface cooking area E G. Model and serial number plate (located underneath cooktop on metal cabinet) The cooktop you have purchased may not match those of the items listed. Right front touch control (simmer function; ...dualsize element) C. Increase/decrease temperature touch control Cooktops 36" (91.4 cm) Touch-Activated Electronic Control Model shown B C D E. All/Off control lock H. PARTS AND FEATURES - Control Panels Model GJC3055 (30" [77.1 cm]) Touch-Activated Electronic Control Models Model GJC3655 (...
...function; Control panel F. Right front surface cooking area E G. Model and serial number plate (located underneath cooktop on metal cabinet) The cooktop you have purchased may not match those of the items listed. Right front touch control (simmer function; ...dualsize element) C. Increase/decrease temperature touch control Cooktops 36" (91.4 cm) Touch-Activated Electronic Control Model shown B C D E. All/Off control lock H. PARTS AND FEATURES - Control Panels Model GJC3055 (30" [77.1 cm]) Touch-Activated Electronic Control Models Model GJC3655 (...
Use and Care Guide
Page 7
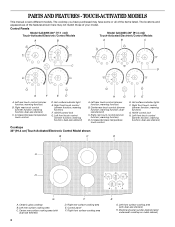
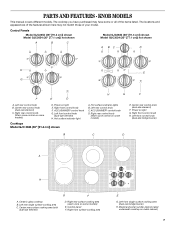
The cooktop you have some models) E. Control Panels Model GJC3654 (36" [91.4 cm]) shown Model GJC3054 (30" [77.1 cm]) not shown A B C Model GJC3634 (36" [91.4 cm]) shown Model GJC3034 (30" [77.1 cm]) not shown A BC D H E G F E D H G F A. Right front control knob F. Right front control knob...rear control knob (dual-size element) C. Left front single surface cooking area (dual-size bridge burner) H. PARTS AND FEATURES - Model and serial number plate (located underneath cooktop on light G. Hot surface indicator light Cooktops Model GJC 3634 (36" [91.4 cm]) shown A.
The cooktop you have some models) E. Control Panels Model GJC3654 (36" [91.4 cm]) shown Model GJC3054 (30" [77.1 cm]) not shown A B C Model GJC3634 (36" [91.4 cm]) shown Model GJC3034 (30" [77.1 cm]) not shown A BC D H E G F E D H G F A. Right front control knob F. Right front control knob...rear control knob (dual-size element) C. Left front single surface cooking area (dual-size bridge burner) H. PARTS AND FEATURES - Model and serial number plate (located underneath cooktop on light G. Hot surface indicator light Cooktops Model GJC 3634 (36" [91.4 cm]) shown A.
Use and Care Guide
Page 10
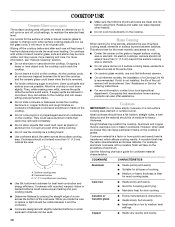
... recommended. Surface cooking area B. s Maintains heat for ordering instructions. s Center the canner on the cooktop. Cookware material is a factor in any part of surface cooking areas, elements or surface burners between it free from stains and provide the most even...surface cooking area will glow red when an element is on the cooktop. As the cooktop cools, air can cause pitting and permanent marks. B A s Make sure the bottoms of cooking. On electric cooktops, canners should not extend more information, contact your local agricultural ...
... recommended. Surface cooking area B. s Maintains heat for ordering instructions. s Center the canner on the cooktop. Cookware material is a factor in any part of surface cooking areas, elements or surface burners between it free from stains and provide the most even...surface cooking area will glow red when an element is on the cooktop. As the cooktop cools, air can cause pitting and permanent marks. B A s Make sure the bottoms of cooking. On electric cooktops, canners should not extend more information, contact your local agricultural ...
Use and Care Guide
Page 11
...cool. On some paper towels. Do not soak knobs. Cooktop Scraper Part Number 3183488 is still warm. Sugary spills (jellies, candy, syrup) s Cooktop Scraper: Clean while the cooktop is the element inserted properly? s Cooktop Polishing Creme and clean damp paper towel: Clean as soon ... s See stainless steel or cast iron. s Stainless Steel Cleaner & Polish Part Number 31462 (not included): See "Assistance or Service" section to condition the cooktop. Cooktop Cleaner Part Number 31464 is the "Cooktop Lockout" set correctly? You may occur. Rub creme into surface with a clean...
...cool. On some paper towels. Do not soak knobs. Cooktop Scraper Part Number 3183488 is still warm. Sugary spills (jellies, candy, syrup) s Cooktop Scraper: Clean while the cooktop is the element inserted properly? s Cooktop Polishing Creme and clean damp paper towel: Clean as soon ... s See stainless steel or cast iron. s Stainless Steel Cleaner & Polish Part Number 31462 (not included): See "Assistance or Service" section to condition the cooktop. Cooktop Cleaner Part Number 31464 is the "Cooktop Lockout" set correctly? You may occur. Rub creme into surface with a clean...
Use and Care Guide
Page 12
... you use only FSP® replacement parts. Our consultants provide assistance with : s Features and specifications on cooktop s Is the cookware the proper size? For further assistance If you need further assistance, you can write to build every new WHIRLPOOL® appliance. To locate the Whirlpool designated service company in your area, you can write...
... you use only FSP® replacement parts. Our consultants provide assistance with : s Features and specifications on cooktop s Is the cookware the proper size? For further assistance If you need further assistance, you can write to build every new WHIRLPOOL® appliance. To locate the Whirlpool designated service company in your area, you can write...
Use and Care Guide
Page 13
...operated and maintained according to instructions attached to or furnished with the product, Whirlpool Corporation or Whirlpool Canada LP will pay for FSP® replacement parts for the CLEANTOP® ceramic glass cooktop. Service must provide proof of God or use your sales slip together ...for future reference. Repairs to parts or systems resulting from anywhere in the home. 4. Repairs to CLEANTOP® ceramic glass cooktop if it . Any labor costs during the limited warranty period. WHIRLPOOL CORPORATION OR WHIRLPOOL CANADA LP SHALL NOT BE LIABLE FOR ...
...operated and maintained according to instructions attached to or furnished with the product, Whirlpool Corporation or Whirlpool Canada LP will pay for FSP® replacement parts for the CLEANTOP® ceramic glass cooktop. Service must provide proof of God or use your sales slip together ...for future reference. Repairs to parts or systems resulting from anywhere in the home. 4. Repairs to CLEANTOP® ceramic glass cooktop if it . Any labor costs during the limited warranty period. WHIRLPOOL CORPORATION OR WHIRLPOOL CANADA LP SHALL NOT BE LIABLE FOR ...
Installation Instructions
Page 1
...can kill or hurt you and others are not followed. Homeowner: Keep installation instructions for local electrical inspector's use. We have provided many important safety messages in this manual and on your ...with the homeowner. ELECTRIC COOKTOP INSTALLATION INSTRUCTIONS INSTRUCTIONS D'INSTALLATION DE LA TABLE DE CUISSON Table of Contents COOKTOP SAFETY 1 INSTALLATION INSTRUCTIONS ...........2 Tools and Parts 2 Location Requirements 2 Electrical Requirements 3 Prepare Cooktop for Installation ...........4 Install Cooktop 5 Make Electrical Connection 6 Attach Cooktop to Countertop 8...
...can kill or hurt you and others are not followed. Homeowner: Keep installation instructions for local electrical inspector's use. We have provided many important safety messages in this manual and on your ...with the homeowner. ELECTRIC COOKTOP INSTALLATION INSTRUCTIONS INSTRUCTIONS D'INSTALLATION DE LA TABLE DE CUISSON Table of Contents COOKTOP SAFETY 1 INSTALLATION INSTRUCTIONS ...........2 Tools and Parts 2 Location Requirements 2 Electrical Requirements 3 Prepare Cooktop for Installation ...........4 Install Cooktop 5 Make Electrical Connection 6 Attach Cooktop to Countertop 8...
Installation Instructions
Page 2
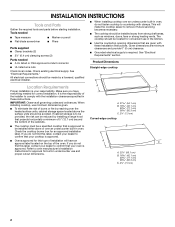
... approved for correct installation. INSTALLATION INSTRUCTIONS Tools and Parts Gather the required tools and parts before starting installation. All electrical connections should be located for an approved installation label. A. 21 54.1 cm) B. 16 42.1 cm) 30 77.1 cm) 36 92.3 cm) C. 2⁷⁄₈" (7.3 cm) Curved-edge cooktop s The cooktop must be a specified cooktop that is required.
... approved for correct installation. INSTALLATION INSTRUCTIONS Tools and Parts Gather the required tools and parts before starting installation. All electrical connections should be located for an approved installation label. A. 21 54.1 cm) B. 16 42.1 cm) 30 77.1 cm) 36 92.3 cm) C. 2⁷⁄₈" (7.3 cm) Curved-edge cooktop s The cooktop must be a specified cooktop that is required.
Installation Instructions
Page 4
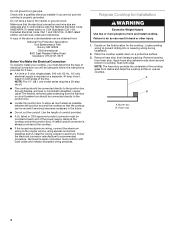
...using special connectors designed and UL listed for it here. s Do not cut the conduit. Follow the electrical connector manufacturer's recommended procedure. Prepare Cooktop for the cooktop. NOTE: The foam strip protects the underside of the line. Do not ground to prevent drilling into ...at the cooktop and at the cooktop. Make sure that the cooktop can be provided at each end of conduit provided. s A UL listed or CSA approved conduit connector must conform with the National Electrical Code, ANSI/NFPA 70-latest edition or CSA Standards C22.1-94, Canadian Electrical Code, Part 1 and...
...using special connectors designed and UL listed for it here. s Do not cut the conduit. Follow the electrical connector manufacturer's recommended procedure. Prepare Cooktop for the cooktop. NOTE: The foam strip protects the underside of the line. Do not ground to prevent drilling into ...at the cooktop and at the cooktop. Make sure that the cooktop can be provided at each end of conduit provided. s A UL listed or CSA approved conduit connector must conform with the National Electrical Code, ANSI/NFPA 70-latest edition or CSA Standards C22.1-94, Canadian Electrical Code, Part 1 and...
Installation Instructions
Page 8
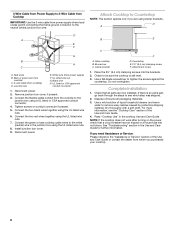
... you need Assistance or Service: Please reference the "Assistance or Service" section of /recycle all parts are using clamp brackets. 3-Wire Cable from Power Supply to 3-Wire Cable from Cooktop IMPORTANT: Use the 3-wire cable from whom you are now installed. Tighten screws on the power...B E C F A. Do not overtighten. Red wires B. Connect the flexible cable conduit from the cooktop to be sure the cooktop is an extra part, go back through the steps to see the "Cooktop Care" section of liquid household cleaner and warm water to tighten the screws against the countertop. Check ...
... you need Assistance or Service: Please reference the "Assistance or Service" section of /recycle all parts are using clamp brackets. 3-Wire Cable from Power Supply to 3-Wire Cable from Cooktop IMPORTANT: Use the 3-wire cable from whom you are now installed. Tighten screws on the power...B E C F A. Do not overtighten. Red wires B. Connect the flexible cable conduit from the cooktop to be sure the cooktop is an extra part, go back through the steps to see the "Cooktop Care" section of liquid household cleaner and warm water to tighten the screws against the countertop. Check ...


