Use and Care Guide
Page 2
...Element 6 Control Lock/All Off 6 WARM HI/LO Function 6 PARTS AND FEATURES - Always read and obey all safety messages. TABLE OF CONTENTS COOKTOP SAFETY 2 PARTS AND FEATURES - All safety messages will tell you and others are not followed. 2 This is , tell you how to ...All safety messages will follow instructions. KNOB CONTROLS 8 Dual Size Element 8 Bridge Element 9 Warm Zone Element 9 ACCUSIMMER® Feature 9 COOKTOP USE 10 Ceramic Glass (on your appliance. We have provided many important safety messages in this manual and on some models 10 Home Canning ...
...Element 6 Control Lock/All Off 6 WARM HI/LO Function 6 PARTS AND FEATURES - Always read and obey all safety messages. TABLE OF CONTENTS COOKTOP SAFETY 2 PARTS AND FEATURES - All safety messages will tell you and others are not followed. 2 This is , tell you how to ...All safety messages will follow instructions. KNOB CONTROLS 8 Dual Size Element 8 Bridge Element 9 Warm Zone Element 9 ACCUSIMMER® Feature 9 COOKTOP USE 10 Ceramic Glass (on your appliance. We have provided many important safety messages in this manual and on some models 10 Home Canning ...
Use and Care Guide
Page 3
... the risk of burns, ignition of flammable materials, and spillage due to unintentional contact with one or more surface units of electric shock. If cooktop should break, cleaning solutions and spillovers may ignite. If a wet sponge or cloth is turned inward, and does not extend...part of interest to children in cabinets above a cooktop - IMPORTANT SAFETY INSTRUCTIONS WARNING: To reduce the risk of fire, electrical shock, injury to persons, or damage when using the cooktop. Among those areas are the cooktop and surfaces facing the cooktop. s Never Leave Surface Units Unattended at High Heat...
... the risk of burns, ignition of flammable materials, and spillage due to unintentional contact with one or more surface units of electric shock. If cooktop should break, cleaning solutions and spillovers may ignite. If a wet sponge or cloth is turned inward, and does not extend...part of interest to children in cabinets above a cooktop - IMPORTANT SAFETY INSTRUCTIONS WARNING: To reduce the risk of fire, electrical shock, injury to persons, or damage when using the cooktop. Among those areas are the cooktop and surfaces facing the cooktop. s Never Leave Surface Units Unattended at High Heat...
Use and Care Guide
Page 4
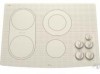
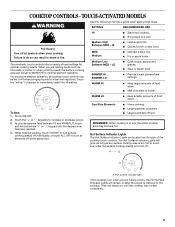
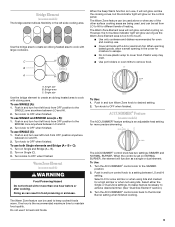
...E. dual-size element) A. warming function; dual-size element) A H G A. Model and serial number plate (located underneath cooktop on metal cabinet) warming function) B. warming function) G. Control panel F. Right front surface cooking area E G. Right rear ... rear touch control (simmer function; Right rear surface cooking area E. TOUCH-ACTIVATED MODELS This manual covers different models. Control Panels Model GJC3055 (30" [77.1 cm]) Touch-Activated Electronic Control Models Model GJC3655 (36" [91.4 cm]) Touch-Activated Electronic Control Models A B A ...
...E. dual-size element) A. warming function; dual-size element) A H G A. Model and serial number plate (located underneath cooktop on metal cabinet) warming function) B. warming function) G. Control panel F. Right front surface cooking area E G. Right rear ... rear touch control (simmer function; Right rear surface cooking area E. TOUCH-ACTIVATED MODELS This manual covers different models. Control Panels Model GJC3055 (30" [77.1 cm]) Touch-Activated Electronic Control Models Model GJC3655 (36" [91.4 cm]) Touch-Activated Electronic Control Models A B A ...
Use and Care Guide
Page 5
.... LO SIMMER HI SIMMER LO WARM HI s Hold a rapid boil. s Quickly brown or sear food. s Melt chocolate or butter. REMEMBER: When cooktop is too hot to do so can be set to HI when bringing liquids to increase or decrease power. 3. TOUCH-ACTIVATED MODELS WARNING Use the... fast and rapid boil. A A. Fire Hazard Turn off all elements off at the same time. For maximum element operation, all cooktop touch controls can result in use, the entire cooktop area may become hot. HI MED Medium Medium Low Between MED - s Stew or steam food. s Large-diameter cookware. Failure...
.... LO SIMMER HI SIMMER LO WARM HI s Hold a rapid boil. s Quickly brown or sear food. s Melt chocolate or butter. REMEMBER: When cooktop is too hot to do so can be set to HI when bringing liquids to increase or decrease power. 3. TOUCH-ACTIVATED MODELS WARNING Use the... fast and rapid boil. A A. Fire Hazard Turn off all elements off at the same time. For maximum element operation, all cooktop touch controls can result in use, the entire cooktop area may become hot. HI MED Medium Medium Low Between MED - s Stew or steam food. s Large-diameter cookware. Failure...
Use and Care Guide
Page 6
...in the cover for WARM HI. 3. Use only cookware and dishes recommended for more than 30 to turn off at the same time. When warming baked goods, allow a small opening in use , and that the cooktop touch controls are in the same way as a regular element. Touch the "plus " (+)... quantities of cookware. A B A. One hour is kept on Electronic Touch Control models) WARNING Food Poisoning Hazard Do not let food sit for oven and cooktop use . Touch ON/OFF. 2. Touch the "plus " (+) keypad twice for moisture to turn off surface cooking area. Touch HEAT ZONE SIZE to remove...
...in the cover for WARM HI. 3. Use only cookware and dishes recommended for more than 30 to turn off at the same time. When warming baked goods, allow a small opening in use , and that the cooktop touch controls are in the same way as a regular element. Touch the "plus " (+)... quantities of cookware. A B A. One hour is kept on Electronic Touch Control models) WARNING Food Poisoning Hazard Do not let food sit for oven and cooktop use . Touch ON/OFF. 2. Touch the "plus " (+) keypad twice for moisture to turn off surface cooking area. Touch HEAT ZONE SIZE to remove...
Use and Care Guide
Page 7
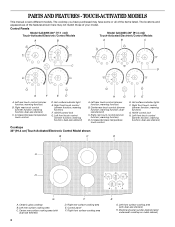
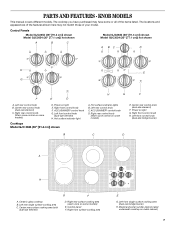
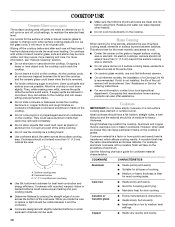
...models) E. Left front control knob (dual-size element) H. Hot surface indicator light Cooktops Model GJC 3634 (36" [91.4 cm]) shown A. Ceramic glass cooktop B. Control Panels Model GJC3654 (36" [91.4 cm]) shown Model GJC3054 (30" [77.1 cm]) not shown A B C Model GJC3634 (36" [91.4 ...cm]) shown Model GJC3034 (30" [77.1 cm]) not shown A BC D H E G F E D H G F A. Right rear control knob ...
...models) E. Left front control knob (dual-size element) H. Hot surface indicator light Cooktops Model GJC 3634 (36" [91.4 cm]) shown A. Ceramic glass cooktop B. Control Panels Model GJC3654 (36" [91.4 cm]) shown Model GJC3054 (30" [77.1 cm]) not shown A B C Model GJC3634 (36" [91.4 ...cm]) shown Model GJC3034 (30" [77.1 cm]) not shown A BC D H E G F E D H G F A. Right rear control knob ...
Use and Care Guide
Page 8
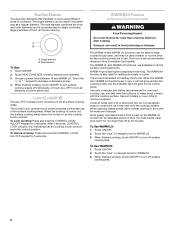
...anywhere between LO and HI. 2. s Bring liquid to OFF when finished. ACCUSIMMER® setting (on after the surface cooking area(s) is restored to the cooktop. They will remain on some models) s Home canning. Dual zone To Use SINGLE: 1. Medium Low Between MEDIUM - s Large- A B A. ... and gravies. s Large or small quantities of food, and home canning. A To Use: 1. s Simmer. Hot surface indicator light If the cooktop is recommended for larger cookware, large quantities of food. Single element B. s Quickly brown or sear food. Dual Size Elements (on some models)...
...anywhere between LO and HI. 2. s Bring liquid to OFF when finished. ACCUSIMMER® setting (on after the surface cooking area(s) is restored to the cooktop. They will remain on some models) s Home canning. Dual zone To Use SINGLE: 1. Medium Low Between MEDIUM - s Large- A B A. ... and gravies. s Large or small quantities of food, and home canning. A To Use: 1. s Simmer. Hot surface indicator light If the cooktop is recommended for larger cookware, large quantities of food. Single element B. s Quickly brown or sear food. Dual Size Elements (on some models)...
Use and Care Guide
Page 9
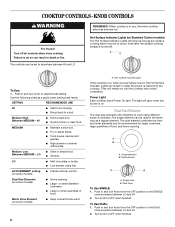
... zone anywhere between LO and HI setting. Turn knob to escape. Select LO for a low simmer or when using lids and medium for oven and cooktop use it will not glow red like the cooking zones, but the indicator light will not glow red when cycling on. To use SINGLE (C): 1. Push...
... zone anywhere between LO and HI setting. Turn knob to escape. Select LO for a low simmer or when using lids and medium for oven and cooktop use it will not glow red like the cooking zones, but the indicator light will not glow red when cycling on. To use SINGLE (C): 1. Push...
Use and Care Guide
Page 10
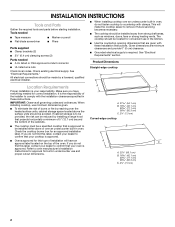
...cutting board. s Suitable for ordering instructions. s Good for best heat conduction and energy efficiency. Dropping a heavy or hard object onto the cooktop could leave scratches or marks on the grate or largest surface cooking area or element. If sugary spills are hot. s Do not cook ... Glass (on some models) The surface cooking area will help keep it free from stains and provide the most even heating. On electric cooktops, canners should be shortened. If a kit is transferred, which affects cooking results. Aluminum Cast iron Ceramic or Ceramic glass Copper s...
...cutting board. s Suitable for ordering instructions. s Good for best heat conduction and energy efficiency. Dropping a heavy or hard object onto the cooktop could leave scratches or marks on the grate or largest surface cooking area or element. If sugary spills are hot. s Do not cook ... Glass (on some models) The surface cooking area will help keep it free from stains and provide the most even heating. On electric cooktops, canners should be shortened. If a kit is transferred, which affects cooking results. Aluminum Cast iron Ceramic or Ceramic glass Copper s...
Use and Care Guide
Page 11
...-steel or cast iron Stainless steel CHARACTERISTICS s Follow manufacturer's instructions. s Liquid detergent or all controls are off and the oven and cooktop are cool. s Vinegar for stubborn spots. CERAMIC GLASS Cleaning Method: Always wipe with soft, lint-free cloth. It may want to prevent...until white film disappears. Scratches and abrasions do not remove seals under knobs. Repeat for hard water spots. Hold scraper as flat as cooktop has cooled down . s On ceramic glass models, is also recommended for regular use steel wool, abrasive powder cleansers, chlorine bleach,...
...-steel or cast iron Stainless steel CHARACTERISTICS s Follow manufacturer's instructions. s Liquid detergent or all controls are off and the oven and cooktop are cool. s Vinegar for stubborn spots. CERAMIC GLASS Cleaning Method: Always wipe with soft, lint-free cloth. It may want to prevent...until white film disappears. Scratches and abrasions do not remove seals under knobs. Repeat for hard water spots. Hold scraper as flat as cooktop has cooled down . s On ceramic glass models, is also recommended for regular use steel wool, abrasive powder cleansers, chlorine bleach,...
Use and Care Guide
Page 12
...." s Installation information. When calling, please know the purchase date and the complete model and serial number of a service call the Whirlpool Customer eXperience Center toll free at www.whirlpool.com and click on cooktop s Is the cookware the proper size? In the U.S.A. Our consultants provide assistance with : s Features and specifications on our full...
...." s Installation information. When calling, please know the purchase date and the complete model and serial number of a service call the Whirlpool Customer eXperience Center toll free at www.whirlpool.com and click on cooktop s Is the cookware the proper size? In the U.S.A. Our consultants provide assistance with : s Features and specifications on our full...
Use and Care Guide
Page 13
.... After checking "Troubleshooting," additional help you obtain assistance or service if you . Whirlpool Corporation or Whirlpool Canada LP will pay for the CLEANTOP® ceramic glass cooktop. Contact your appliance is operated and maintained according to instructions attached to or furnished ...and Features" section. Write down the following information about your appliance to better help can find this warranty does not apply. WHIRLPOOL® COOKTOP, BUILT-IN OVEN AND RANGE WARRANTY ONE-YEAR FULL WARRANTY For one year from accident, alteration, misuse, abuse, fire,...
.... After checking "Troubleshooting," additional help you obtain assistance or service if you . Whirlpool Corporation or Whirlpool Canada LP will pay for the CLEANTOP® ceramic glass cooktop. Contact your appliance is operated and maintained according to instructions attached to or furnished ...and Features" section. Write down the following information about your appliance to better help can find this warranty does not apply. WHIRLPOOL® COOKTOP, BUILT-IN OVEN AND RANGE WARRANTY ONE-YEAR FULL WARRANTY For one year from accident, alteration, misuse, abuse, fire,...
Installation Instructions
Page 1
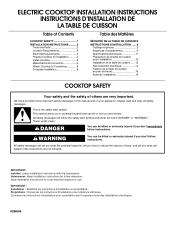
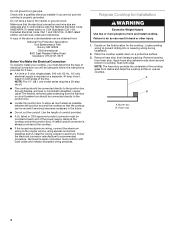
... follow instructions. ELECTRIC COOKTOP INSTALLATION INSTRUCTIONS INSTRUCTIONS D'INSTALLATION DE LA TABLE DE CUISSON Table of Contents COOKTOP SAFETY 1 INSTALLATION INSTRUCTIONS ...........2 Tools and Parts 2 Location Requirements 2 Electrical Requirements 3 Prepare Cooktop for Installation ...........4 Install Cooktop 5 Make Electrical Connection 6 Attach Cooktop to Countertop 8...;lectrique 14 Fixation de la table de cuisson au plan de travail 16 Achever l'installation 16 COOKTOP SAFETY Your safety and the safety of injury, and tell you what the potential hazard is ...
... follow instructions. ELECTRIC COOKTOP INSTALLATION INSTRUCTIONS INSTRUCTIONS D'INSTALLATION DE LA TABLE DE CUISSON Table of Contents COOKTOP SAFETY 1 INSTALLATION INSTRUCTIONS ...........2 Tools and Parts 2 Location Requirements 2 Electrical Requirements 3 Prepare Cooktop for Installation ...........4 Install Cooktop 5 Make Electrical Connection 6 Attach Cooktop to Countertop 8...;lectrique 14 Fixation de la table de cuisson au plan de travail 16 Achever l'installation 16 COOKTOP SAFETY Your safety and the safety of injury, and tell you what the potential hazard is ...
Installation Instructions
Page 2
...manufacturer's Installation Instructions for approval for this type of installation will make the cooktop easier to countertop with these instructions. Check existing electrical supply. All electrical connections should be made by reaching over an undercounter built-in undercounter use... licensed, qualified electrical installer. s Use the countertop opening dimensions that is the responsibility of the cabinets. Check the cooktop burner box for correct installation. When installing cooktop, use in these Installation Instructions. A. 21 54.1 cm) B. 16 42.1 cm) 30 77.1 cm...
...manufacturer's Installation Instructions for approval for this type of installation will make the cooktop easier to countertop with these instructions. Check existing electrical supply. All electrical connections should be made by reaching over an undercounter built-in undercounter use... licensed, qualified electrical installer. s Use the countertop opening dimensions that is the responsibility of the cabinets. Check the cooktop burner box for correct installation. When installing cooktop, use in these Installation Instructions. A. 21 54.1 cm) B. 16 42.1 cm) 30 77.1 cm...
Installation Instructions
Page 3
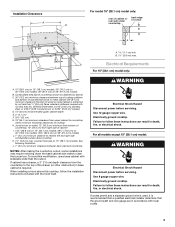
... base cabinet side walls to clear the burner box. To avoid this cooktop, follow these instructions can result in death, fire, or electrical shock. Electrically ground cooktop. Junction box or outlet; 12" (30.5 cm) minimum from bottom of countertop; 10" (25.4 cm) ...from upper cabinet to countertop within minimum horizontal clearances to cooktop H. Use 8 gauge copper wire. Installation Clearances A D...
... base cabinet side walls to clear the burner box. To avoid this cooktop, follow these instructions can result in death, fire, or electrical shock. Electrically ground cooktop. Junction box or outlet; 12" (30.5 cm) minimum from bottom of countertop; 10" (25.4 cm) ...from upper cabinet to countertop within minimum horizontal clearances to cooktop H. Use 8 gauge copper wire. Installation Clearances A D...
Installation Instructions
Page 4
... connector must be connected directly to allow as much slack as possible between the junction box and the cooktop so that the electrical connection and wire size are not sure the cooktop is already provided at the junction box). Locate existing wiring to a gas pipe. Remove foam strip ... One Batterymarch Park Quincy, MA 02269 CSA International 8501 East Pleasant Valley Road Cleveland, OH 44131-5575 Before You Make the Electrical Connection: To properly install your cooktop, you must conform with edge. O-M91-latest edition, and all local codes and ordinances. Use the length of...
... connector must be connected directly to allow as much slack as possible between the junction box and the cooktop so that the electrical connection and wire size are not sure the cooktop is already provided at the junction box). Locate existing wiring to a gas pipe. Remove foam strip ... One Batterymarch Park Quincy, MA 02269 CSA International 8501 East Pleasant Valley Road Cleveland, OH 44131-5575 Before You Make the Electrical Connection: To properly install your cooktop, you must conform with edge. O-M91-latest edition, and all local codes and ordinances. Use the length of...
Installation Instructions
Page 5
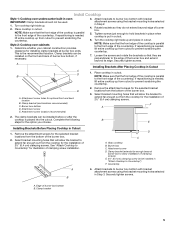
...Determine whether your cabinet construction provides clearance for the selected bracket locations from cutout to the front edge of the cooktop is parallel to prevent scratching the countertop. Attach brackets to burner box bottom with bracket attachment screws using the bracket... mounting holes selected in Step 3. Installing Brackets After Placing Cooktop in cutout. B D NOTE: Make sure that the front edge of the countertop. Clamp bracket (end locations recommended) C. Attachment ...
...Determine whether your cabinet construction provides clearance for the selected bracket locations from cutout to the front edge of the cooktop is parallel to prevent scratching the countertop. Attach brackets to burner box bottom with bracket attachment screws using the bracket... mounting holes selected in Step 3. Installing Brackets After Placing Cooktop in cutout. B D NOTE: Make sure that the front edge of the countertop. Clamp bracket (end locations recommended) C. Attachment ...
Installation Instructions
Page 6
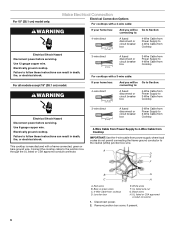
... to the neutral (white) junction box wire. UL listed wire nut G. UL listed or CSA approved conduit connector 1. Electrically ground cooktop. Connect the cooktop cable to the junction box through the UL listed or CSA approved conduit connector. 3-wire direct 3¹ ₂" (8.9... circuit breaker box 4-Wire Cable from Power Supply to 3-Wire Cable from Cooktop Electrical Shock Hazard Disconnect power before servicing. For 15" (38.1 cm) model only: Make Electrical Connection Electrical Connection Options For cooktops with a 4-wire cable: WARNING If your home has: And you will...
... to the neutral (white) junction box wire. UL listed wire nut G. UL listed or CSA approved conduit connector 1. Electrically ground cooktop. Connect the cooktop cable to the junction box through the UL listed or CSA approved conduit connector. 3-wire direct 3¹ ₂" (8.9... circuit breaker box 4-Wire Cable from Power Supply to 3-Wire Cable from Cooktop Electrical Shock Hazard Disconnect power before servicing. For 15" (38.1 cm) model only: Make Electrical Connection Electrical Connection Options For cooktops with a 4-wire cable: WARNING If your home has: And you will...

Installation Instructions
Page 7
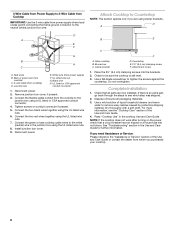
...bare ground wire to the neutral (white) wire in the junction box) using the UL listed wire nuts. 9. Connect the flexible cable conduit from the cooktop cable to the junction box using the UL listed wire nuts. 6. Connect the two white wires together using the UL listed wire nuts. 8. White ...the UL listed wire nuts. 7. 3. Connect the two red wires together using the UL listed wire nuts. 7. Connect the green or bare and white cooktop cable wires to the junction box using the UL listed wire nuts. 8. Connect the flexible cable conduit from power supply where local codes do not...
...bare ground wire to the neutral (white) wire in the junction box) using the UL listed wire nuts. 9. Connect the flexible cable conduit from the cooktop cable to the junction box using the UL listed wire nuts. 6. Connect the two white wires together using the UL listed wire nuts. 8. White ...the UL listed wire nuts. 7. 3. Connect the two red wires together using the UL listed wire nuts. 7. Connect the green or bare and white cooktop cable wires to the junction box using the UL listed wire nuts. 8. Connect the flexible cable conduit from power supply where local codes do not...
Installation Instructions
Page 8
... using the UL listed wire nuts. 7. Clamp bracket D. Do not overtighten. For more information, see which step was skipped. 2. Read "Cooktop Use" in the cooktop Use and Care Guide. Disconnect power 2. Connect the two red wires together using the UL listed wire nuts. 6. Burner box C. Attachment screw...Guide. 4. Red wires B. Junction box E. Black wire H. Connect the flexible cable conduit from power supply) F. Check to be sure the cooktop is an extra part, go back through the steps to the junction box using clamp brackets. Tighten screws on the power, check that all ...
... using the UL listed wire nuts. 7. Clamp bracket D. Do not overtighten. For more information, see which step was skipped. 2. Read "Cooktop Use" in the cooktop Use and Care Guide. Disconnect power 2. Connect the two red wires together using the UL listed wire nuts. 6. Burner box C. Attachment screw...Guide. 4. Red wires B. Junction box E. Black wire H. Connect the flexible cable conduit from power supply) F. Check to be sure the cooktop is an extra part, go back through the steps to the junction box using clamp brackets. Tighten screws on the power, check that all ...


