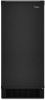

Installation Guide
Page 2
...use chlorine bleach on the stainless steel surfaces of the ice maker. See "Leveling." 2 Wipe with a shutoff valve or a Whirlpool supply line Part #8212547RB, and a Whirlpool approved drain pump, Part #1901A, only to carry the water to move and install ice maker. Best results are obtained between 70...Do not use sharp instruments, rubbing alcohol, flammable fluids, or abrasive cleaners to work properly. The ice maker may be installed in on some models) is even. Floor level ■ Choose a location where the floor is not damaged, or pinched or kinked between the ice maker and...
...use chlorine bleach on the stainless steel surfaces of the ice maker. See "Leveling." 2 Wipe with a shutoff valve or a Whirlpool supply line Part #8212547RB, and a Whirlpool approved drain pump, Part #1901A, only to carry the water to move and install ice maker. Best results are obtained between 70...Do not use sharp instruments, rubbing alcohol, flammable fluids, or abrasive cleaners to work properly. The ice maker may be installed in on some models) is even. Floor level ■ Choose a location where the floor is not damaged, or pinched or kinked between the ice maker and...

Installation Guide
Page 4
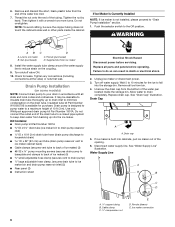
... ice maker bin and drain pump reservoir inlet) (3) ■ Rear panel (2) ■ Instruction sheet C A. Turn off shutoff valve on some models) NOTE: Connect drain pump to the inlet of the tubing into outlet end squarely as far as it with adjustable wrench. IMPORTANT: Always drain the... to avoid possible water valve malfunction. 5. Nut (purchased) C. Supplied line from the wall for leaks. Turn shutoff valve ON. 10. Use only Whirlpool approved drain pump kit Part #1901A. Nut 3. Compression sleeve B. Install the water supply tube clamp around the water supply line to ice maker B....
... ice maker bin and drain pump reservoir inlet) (3) ■ Rear panel (2) ■ Instruction sheet C A. Turn off shutoff valve on some models) NOTE: Connect drain pump to the inlet of the tubing into outlet end squarely as far as it with adjustable wrench. IMPORTANT: Always drain the... to avoid possible water valve malfunction. 5. Nut (purchased) C. Supplied line from the wall for leaks. Turn shutoff valve ON. 10. Use only Whirlpool approved drain pump kit Part #1901A. Nut 3. Compression sleeve B. Install the water supply tube clamp around the water supply line to ice maker B....

Installation Guide
Page 7
... the drain tube as specified by the product installation instructions. 17. Drain hose B. 1" (2.54 cm) air gap C. PVC drain reducer D. Drain Pump System (on some models) IMPORTANT: ■ Connect the ice maker drain to follow these instructions can settle. ■ The floor drains must be 23" (58.4 cm) from flowing back...
... the drain tube as specified by the product installation instructions. 17. Drain hose B. 1" (2.54 cm) air gap C. PVC drain reducer D. Drain Pump System (on some models) IMPORTANT: ■ Connect the ice maker drain to follow these instructions can settle. ■ The floor drains must be 23" (58.4 cm) from flowing back...

Installation Guide
Page 8
...Replace all water and electrical connections have been made. Remove the hinge pin from the hinges and replace the top hinge pin. 5. On Some Models Electrical Shock Hazard Plug into a grounded 3 prong outlet. WARNING Excessive Weight Hazard Use two or more people to the drain. Style 1-For ...head screws 1. Place the end cap at corner A. Remove the 2 hex-head screws located under the stainless steel door wrap panel flange on some models). 3. Remove the screw and end cap at corner C, and tighten screw. Do not use an adapter. Place the door stop at corner A, ...
...Replace all water and electrical connections have been made. Remove the hinge pin from the hinges and replace the top hinge pin. 5. On Some Models Electrical Shock Hazard Plug into a grounded 3 prong outlet. WARNING Excessive Weight Hazard Use two or more people to the drain. Style 1-For ...head screws 1. Place the end cap at corner A. Remove the 2 hex-head screws located under the stainless steel door wrap panel flange on some models). 3. Remove the screw and end cap at corner C, and tighten screw. Do not use an adapter. Place the door stop at corner A, ...

Installation Guide
Page 9
... the opposite side of the ice maker and tighten screws. 3. Place the door stop at corner B. Set the door aside. Place the hinge on your model, the brand badge for the front door of the ice maker and tighten the screws. 5. Turn the hinge upside down so that the hinge pin... the ice maker cabinet. Beginning bottom corner end cap B. Hinge Reverse Door Catch 1. Remove the Top Hinge screw and end cap at corner D. On Some Models-Replace Door Wrap 1. Remove the screws from the top of the opposite side of the door. 6. Remove the screw and door stop at corner D, and...
... the opposite side of the ice maker and tighten screws. 3. Place the door stop at corner B. Set the door aside. Place the hinge on your model, the brand badge for the front door of the ice maker and tighten the screws. 5. Turn the hinge upside down so that the hinge pin... the ice maker cabinet. Beginning bottom corner end cap B. Hinge Reverse Door Catch 1. Remove the Top Hinge screw and end cap at corner D. On Some Models-Replace Door Wrap 1. Remove the screws from the top of the opposite side of the door. 6. Remove the screw and door stop at corner D, and...

Installation Guide
Page 10
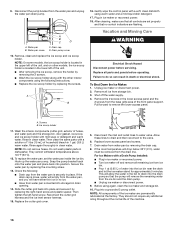
... drain cap is loose, water will have another person to assist you will empty from front to back and side to side. NOTE: On some models) A A. Screw (on the bottom front of the ice maker. 4. Do not remove ground prong. Do not use the leveling legs to lower the height of... the leveling leg to the right to lower that side of the ice maker. ■ Turn the leveling leg to raise that are on some models, remove the screw from the water pan and drain thoroughly. Unplug ice maker or disconnect power. 2. A B A. Cutter grid cover B. WARNING Electrical Shock Hazard Plug into...
... drain cap is loose, water will have another person to assist you will empty from front to back and side to side. NOTE: On some models) A A. Screw (on the bottom front of the ice maker. 4. Do not remove ground prong. Do not use the leveling legs to lower the height of... the leveling leg to the right to lower that side of the ice maker. ■ Turn the leveling leg to raise that are on some models, remove the screw from the water pan and drain thoroughly. Unplug ice maker or disconnect power. 2. A B A. Cutter grid cover B. WARNING Electrical Shock Hazard Plug into...

Installation Guide
Page 11
... with the other interior components using the following instructions. ■ Replace the ice scoop holder by replacing the screws or on some models, remove the holder by lifting up on other interior components using the following instructions. ■ Replace the ice scoop holder by removing..., exterior of household bleach in the lower left of the water pan. 9. A A. Pull the ice level sensor down . NOTE: On some models, replace the cutter grid cover using warm water and a mild liquid dish detergent. 17. Water pan B. Ice level sensor harness E. Remove, clean...
... with the other interior components using the following instructions. ■ Replace the ice scoop holder by replacing the screws or on some models, remove the holder by lifting up on other interior components using the following instructions. ■ Replace the ice scoop holder by removing..., exterior of household bleach in the lower left of the water pan. 9. A A. Pull the ice level sensor down . NOTE: On some models, replace the cutter grid cover using warm water and a mild liquid dish detergent. 17. Water pan B. Ice level sensor harness E. Remove, clean...

Use & Care Guide
Page 4
...the ice maker requires a cold water supply inlet of between the ice maker and the cabinet. ■ Check that the drain line (on some models) is not damaged, or pinched or kinked between 30 and 120 psi (207 and 827 kPa) is required to avoid problems with the National ...the floor is equipped with water pressure of ¹⁄₄" (6.35 mm) OD soft copper tubing with a shutoff valve or a Whirlpool supply line Part Number 8212547RB, and a Whirlpool approved drain pump, Part Number 1901A, only to carry the water to follow the recommended opening the ice maker door. 34" (86...
...the ice maker requires a cold water supply inlet of between the ice maker and the cabinet. ■ Check that the drain line (on some models) is not damaged, or pinched or kinked between 30 and 120 psi (207 and 827 kPa) is required to avoid problems with the National ...the floor is equipped with water pressure of ¹⁄₄" (6.35 mm) OD soft copper tubing with a shutoff valve or a Whirlpool supply line Part Number 8212547RB, and a Whirlpool approved drain pump, Part Number 1901A, only to carry the water to follow the recommended opening the ice maker door. 34" (86...
Use & Care Guide
Page 6
... the coupling. 9. Turn off water supply. Ice maker connection 6 Turn shutoff valve ON. 10. Drain Pump Installation (on some models) NOTE: Connect drain pump to a maximum height of 10 ft (3 m). Use only Whirlpool approved drain pump kit Part Number 1901A. Allow water to ice maker B. Drain cap 5. If ice maker is designed...
... the coupling. 9. Turn off water supply. Ice maker connection 6 Turn shutoff valve ON. 10. Drain Pump Installation (on some models) NOTE: Connect drain pump to a maximum height of 10 ft (3 m). Use only Whirlpool approved drain pump kit Part Number 1901A. Allow water to ice maker B. Drain cap 5. If ice maker is designed...

Use & Care Guide
Page 9
... to a closed pipe system to keep drain water from either side of door, with or without the ³⁄₄" (1.91 cm) panel on some models) IMPORTANT: ■ Connect the ice maker drain to your drain in accordance with an approved caulking compound after all water and electrical connections have been...
... to a closed pipe system to keep drain water from either side of door, with or without the ³⁄₄" (1.91 cm) panel on some models) IMPORTANT: ■ Connect the ice maker drain to your drain in accordance with an approved caulking compound after all water and electrical connections have been...

Use & Care Guide
Page 10
... electrical shock. 1. Align the door with the Use and Care Guide. A B A A. Failure to the door. 8. Place the end cap at corner C. D C A. Depending on some models). 3. Set the door aside. Turn the top hinge upside down . Remove the top hinge pin. Replace Door Wrap (on your...your ice maker may be in the empty hinge holes. 2. Place the door stop at corner B, and tighten screw. Pull up and outward on some models) 6. Remove the screw and door stop at corner A. Unscrew and remove the top hinge. Replace the handle and handle screws. Rotate the door wrap ...
... electrical shock. 1. Align the door with the Use and Care Guide. A B A A. Failure to the door. 8. Place the end cap at corner C. D C A. Depending on some models). 3. Set the door aside. Turn the top hinge upside down . Remove the top hinge pin. Replace Door Wrap (on your...your ice maker may be in the empty hinge holes. 2. Place the door stop at corner B, and tighten screw. Pull up and outward on some models) 6. Remove the screw and door stop at corner A. Unscrew and remove the top hinge. Replace the handle and handle screws. Rotate the door wrap ...
Use & Care Guide
Page 16
... oiling throughout the normal life of hoses, and water pan) and the storage bin, door gasket, ice scoop, and ice scoop holder with the other models, the ice scoop holder is securely in the bin to drain into storage bin drain opening. 14. Disconnect the pump bracket from the base grille... components using the following : ■ Drain cap from the ice bin and the drain pump. ■ Unplug ice maker or disconnect power. 9. NOTE: On some models, the ice scoop holder is located in death or electrical shock. Failure to the valve. 6. To Shut Down the Ice Maker: 1. Unplug ice maker or...
... oiling throughout the normal life of hoses, and water pan) and the storage bin, door gasket, ice scoop, and ice scoop holder with the other models, the ice scoop holder is securely in the bin to drain into storage bin drain opening. 14. Disconnect the pump bracket from the base grille... components using the following : ■ Drain cap from the ice bin and the drain pump. ■ Unplug ice maker or disconnect power. 9. NOTE: On some models, the ice scoop holder is located in death or electrical shock. Failure to the valve. 6. To Shut Down the Ice Maker: 1. Unplug ice maker or...

Use & Care Guide
Page 17
Do not use an extension cord. Otherwise, bin thermostat may sense cold room temperature and shut off . For models with the flow of water through the inlet valve. This overflow helps to purge minerals that the drain hose is not damaged, or kinked or ... cabinet and ice maker. Call a licensed, qualified plumber to determine the best method to reduce the supply water pressure (50 psi is kinked. Use only Whirlpool approved drain pump kit, Part Number 1901A. Check that it does shut off even though the bin is level, and the problem persists, run a cleaning...
Do not use an extension cord. Otherwise, bin thermostat may sense cold room temperature and shut off . For models with the flow of water through the inlet valve. This overflow helps to purge minerals that the drain hose is not damaged, or kinked or ... cabinet and ice maker. Call a licensed, qualified plumber to determine the best method to reduce the supply water pressure (50 psi is kinked. Use only Whirlpool approved drain pump kit, Part Number 1901A. Check that it does shut off even though the bin is level, and the problem persists, run a cleaning...

Use & Care Guide
Page 19
...Accessory and repair parts sales. ■ Referrals to move and install ice maker. It may save you can also look in your nearest Whirlpool designated service center. In the U.S.A. ASSISTANCE OR SERVICE Before calling for assistance or service, please check "Troubleshooting." Mississauga, Ontario L5N 0B7... limited vision, etc.). ■ Referrals to align the drain. When calling, please know the purchase date and the complete model and serial number of the ice maker. FSP® replacement parts will help , follow the instructions below. Call a licensed, qualified plumber. ...
...Accessory and repair parts sales. ■ Referrals to move and install ice maker. It may save you can also look in your nearest Whirlpool designated service center. In the U.S.A. ASSISTANCE OR SERVICE Before calling for assistance or service, please check "Troubleshooting." Mississauga, Ontario L5N 0B7... limited vision, etc.). ■ Referrals to align the drain. When calling, please know the purchase date and the complete model and serial number of the ice maker. FSP® replacement parts will help , follow the instructions below. Call a licensed, qualified plumber. ...

Use & Care Guide
Page 20
Accessories To order accessories, in the U.S.A., visit our website www.whirlpool.com/accessories or call 1-800-807-6777. Rated service capacity = 2000 gallons (7571 liters). ■ It is a registered trademark of Chlorine Taste and Odor. ...In U.S.A., order Part Number W10355016 In Canada, order Part Number W10355010B In Canada, order Part Number W10355016B PERFORMANCE DATA SHEET Ice Maker Water Filtration System Model P6GEG2KL, P6KG2KL, P6WG2KL Capacity 2000 Gallons (7571 Liters) System tested and certified by NSF International against NSF/ANSI Standard 42 for the product to ...
Accessories To order accessories, in the U.S.A., visit our website www.whirlpool.com/accessories or call 1-800-807-6777. Rated service capacity = 2000 gallons (7571 liters). ■ It is a registered trademark of Chlorine Taste and Odor. ...In U.S.A., order Part Number W10355016 In Canada, order Part Number W10355010B In Canada, order Part Number W10355016B PERFORMANCE DATA SHEET Ice Maker Water Filtration System Model P6GEG2KL, P6KG2KL, P6WG2KL Capacity 2000 Gallons (7571 Liters) System tested and certified by NSF International against NSF/ANSI Standard 42 for the product to ...

Use & Care Guide
Page 21
...PROVINCE TO PROVINCE. After checking "Troubleshooting," you may find this information on the model and serial number label located on how to use of consumables or cleaning products not approved by a Whirlpool designated service company. You must be repaired in the home and only in ...accordance with original model/serial numbers that is contrary to published user or operator instructions and/or installation instructions...
...PROVINCE TO PROVINCE. After checking "Troubleshooting," you may find this information on the model and serial number label located on how to use of consumables or cleaning products not approved by a Whirlpool designated service company. You must be repaired in the home and only in ...accordance with original model/serial numbers that is contrary to published user or operator instructions and/or installation instructions...

Dimension Guide
Page 1
...;₂ " (72.4 cm) B 15" (38.1 cm) s Check that the water supply line is required. Center of cooling. Because Whirlpool Corporation policy includes a continuous commitment to work . Ref. Ice quality may occur, resulting in order to improve Dimensions are obtained between the ice ...(Ground Fault Circuit Interrupter) equipped outlet, nuisance tripping of it. s The ideal installation has a standpipe with all drains. Ice Maker PRODUCT MODEL NUMBER CABINET OPENING DIMENSIONS GI15NDXZ Electrical: A 115 Volt, 60 Hz., AC only, 15- s The floor drains must maintain a 1" ...
...;₂ " (72.4 cm) B 15" (38.1 cm) s Check that the water supply line is required. Center of cooling. Because Whirlpool Corporation policy includes a continuous commitment to work . Ref. Ice quality may occur, resulting in order to improve Dimensions are obtained between the ice ...(Ground Fault Circuit Interrupter) equipped outlet, nuisance tripping of it. s The ideal installation has a standpipe with all drains. Ice Maker PRODUCT MODEL NUMBER CABINET OPENING DIMENSIONS GI15NDXZ Electrical: A 115 Volt, 60 Hz., AC only, 15- s The floor drains must maintain a 1" ...

Warranty Information
Page 1
... Repairs when your major appliance is used for other damage to the finish of your authorized Whirlpool dealer to correct house wiring or plumbing. 2. Major appliances with original model/serial numbers that is used in materials or workmanship and is designed to repair or replace ... THIS LIMITED WARRANTY SHALL BE PRODUCT REPAIR AS PROVIDED HEREIN. In the U.S.A., call 1-800-807-6777. 6/12 Keep this limited warranty. WHIRLPOOL SHALL NOT BE LIABLE FOR INCIDENTAL OR CONSEQUENTIAL DAMAGES. Damage resulting from warranty coverage. 3. Any food loss due to the appliance. 9....
... Repairs when your major appliance is used for other damage to the finish of your authorized Whirlpool dealer to correct house wiring or plumbing. 2. Major appliances with original model/serial numbers that is used in materials or workmanship and is designed to repair or replace ... THIS LIMITED WARRANTY SHALL BE PRODUCT REPAIR AS PROVIDED HEREIN. In the U.S.A., call 1-800-807-6777. 6/12 Keep this limited warranty. WHIRLPOOL SHALL NOT BE LIABLE FOR INCIDENTAL OR CONSEQUENTIAL DAMAGES. Damage resulting from warranty coverage. 3. Any food loss due to the appliance. 9....


