
Installation Guide
Page 2
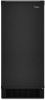
... also be installed in the "Ice Maker Care" section. WARNING: This product contains one or more people to an existing drain. ■ Choose a well ventilated area with a shutoff valve or a Whirlpool supply line Part #8212547RB, and a Whirlpool approved drain pump, Part #1901A, only to carry the water to move and install ice maker. Removing Packaging Materials Remove tape and glue from the exterior of the leveling legs. Cleaning Before Use After you...
... also be installed in the "Ice Maker Care" section. WARNING: This product contains one or more people to an existing drain. ■ Choose a well ventilated area with a shutoff valve or a Whirlpool supply line Part #8212547RB, and a Whirlpool approved drain pump, Part #1901A, only to carry the water to move and install ice maker. Removing Packaging Materials Remove tape and glue from the exterior of the leveling legs. Cleaning Before Use After you...

Installation Guide
Page 3
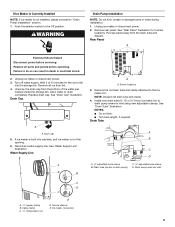
...: ■ Plumbing shall be using the ice maker during the summer months, turn shutoff valve or the equivalent, connect the ice maker as shown. Using a ¹⁄₂" copper supply line with the National Electrical Code and local codes and ordinances. Ice formations in accordance with a quarter-turn off main water supply. A cold water supply with a power supply cord having a 3 prong grounding plug. Damage from frozen supply lines is recommended. NOTE: The reverse osmosis system must provide...
...: ■ Plumbing shall be using the ice maker during the summer months, turn shutoff valve or the equivalent, connect the ice maker as shown. Using a ¹⁄₂" copper supply line with the National Electrical Code and local codes and ordinances. Ice formations in accordance with a quarter-turn off main water supply. A cold water supply with a power supply cord having a 3 prong grounding plug. Damage from frozen supply lines is recommended. NOTE: The reverse osmosis system must provide...

Installation Guide
Page 4
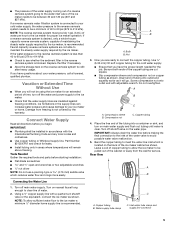
...: Always drain the water line before making the final connection to the inlet of the water valve to a maximum height of the cabinet or away from the wall for service. Install the water supply tube clamp around the water supply line to reduce strain on some models) NOTE: Connect drain pump to be sure the copper tubing does not A touch the cabinet's side wall or other parts inside the cabinet. Ice Maker Drain Pump Installation (on...
...: Always drain the water line before making the final connection to the inlet of the water valve to a maximum height of the cabinet or away from the wall for service. Install the water supply tube clamp around the water supply line to reduce strain on some models) NOTE: Connect drain pump to be sure the copper tubing does not A touch the cabinet's side wall or other parts inside the cabinet. Ice Maker Drain Pump Installation (on...
Installation Guide
Page 5
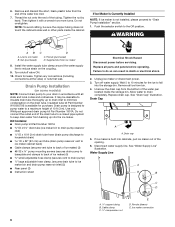
... D. Remove rear panel. NOTE: Discard old drain tube and clamp. 4. See "Drain Tube" illustration. Ice maker connection 5 Remove all parts and panels before servicing. Drain Cap A A. If ice maker is not installed, please proceed to fall into cabinets, pull ice maker out of the water pan located inside the storage bin. Unplug ice maker or disconnect power. 3. NOTES: ■ Do not kink. ■ Trim tube length, if required. Drain tube (ice bin to the ice maker bin. Wait 5 to drain completely. Replace drain cap. Disconnect water supply line. Remove the old drain tube...
... D. Remove rear panel. NOTE: Discard old drain tube and clamp. 4. See "Drain Tube" illustration. Ice maker connection 5 Remove all parts and panels before servicing. Drain Cap A A. If ice maker is not installed, please proceed to fall into cabinets, pull ice maker out of the water pan located inside the storage bin. Unplug ice maker or disconnect power. 3. NOTES: ■ Do not kink. ■ Trim tube length, if required. Drain tube (ice bin to the ice maker bin. Wait 5 to drain completely. Replace drain cap. Disconnect water supply line. Remove the old drain tube...

Installation Guide
Page 10
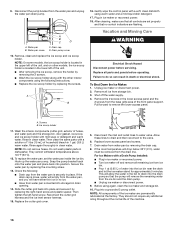
... the water pan. Using an adjustable wrench, change the height of the ice maker. NOTE: The ice maker should not wobble. Follow the instructions in order to change the height of the legs as possible to remove. If the ice maker is important for undercounter installations. Replace the drain cap securely on the top rear of the ice maker and locate the leveling legs that is even from the cutter grid cover. 5. Unplug the wiring...
... the water pan. Using an adjustable wrench, change the height of the ice maker. NOTE: The ice maker should not wobble. Follow the instructions in order to change the height of the legs as possible to remove. If the ice maker is important for undercounter installations. Replace the drain cap securely on the top rear of the ice maker and locate the leveling legs that is even from the cutter grid cover. 5. Unplug the wiring...

Installation Guide
Page 11
... instructions. ■ Replace the ice scoop holder by replacing the screws or on some models, replace the cutter grid cover using warm water and a mild liquid dish detergent. 17. After cleaning, make sure that all controls are flashing. Unplug the ice level sensor from the water pan, and you will have either thin ice or no control indicators are set the water pan inside the ice bin. Cutter grid harness B. Plastic spacer F. Remove, clean and replace the ice scoop holder and ice...
... instructions. ■ Replace the ice scoop holder by replacing the screws or on some models, replace the cutter grid cover using warm water and a mild liquid dish detergent. 17. After cleaning, make sure that all controls are flashing. Unplug the ice level sensor from the water pan, and you will have either thin ice or no control indicators are set the water pan inside the ice bin. Cutter grid harness B. Plastic spacer F. Remove, clean and replace the ice scoop holder and ice...

Use & Care Guide
Page 4
... proper electrical connection: A 115 volt, 60 Hz., AC only, 15- Location Requirements ■ To ensure proper ventilation for your ice maker, be provided. The ice maker may be closed-in loss of ¹⁄₄" (6.35 mm) OD soft copper tubing with a shutoff valve or a Whirlpool supply line Part Number 8212547RB, and a Whirlpool approved drain pump, Part Number 1901A, only to carry the water to follow the recommended opening the ice maker door...
... proper electrical connection: A 115 volt, 60 Hz., AC only, 15- Location Requirements ■ To ensure proper ventilation for your ice maker, be provided. The ice maker may be closed-in loss of ¹⁄₄" (6.35 mm) OD soft copper tubing with a shutoff valve or a Whirlpool supply line Part Number 8212547RB, and a Whirlpool approved drain pump, Part Number 1901A, only to carry the water to follow the recommended opening the ice maker door...
Use & Care Guide
Page 5
.... ■ Use copper tubing or Whirlpool supply line, Part Number 8212547RP, and check for an extended period of time, turn off the water and power supply to the ice maker. ■ Check that you are cut square. ■ Slip compression sleeve and compression nut on the reverse osmosis system to refill after heavy usage. A B C A. IMPORTANT: Always drain the water line before you have the proper length needed for...
.... ■ Use copper tubing or Whirlpool supply line, Part Number 8212547RP, and check for an extended period of time, turn off the water and power supply to the ice maker. ■ Check that you are cut square. ■ Slip compression sleeve and compression nut on the reverse osmosis system to refill after heavy usage. A B C A. IMPORTANT: Always drain the water line before you have the proper length needed for...
Use & Care Guide
Page 6
... panel (2) ■ Instruction sheet Electrical Shock Hazard Disconnect power before operating. Nut (purchased) C. Ferrule (purchased) D. Supplied line from bin. 4. Turn shutoff valve ON. 10. Check for purchase. Insulated tube kit Part Number W10365792 is not installed, please proceed to keep drain water from backing up to drain inlet to your drain in death or electrical shock. 2. Use only Whirlpool approved drain pump kit Part Number 1901A. Kit Contains: ■ Drain pump kit Part Number 1901A ID x 5¹⁄₈" drain tube (ice maker bin to drain...
... panel (2) ■ Instruction sheet Electrical Shock Hazard Disconnect power before operating. Nut (purchased) C. Ferrule (purchased) D. Supplied line from bin. 4. Turn shutoff valve ON. 10. Check for purchase. Insulated tube kit Part Number W10365792 is not installed, please proceed to keep drain water from backing up to drain inlet to your drain in death or electrical shock. 2. Use only Whirlpool approved drain pump kit Part Number 1901A. Kit Contains: ■ Drain pump kit Part Number 1901A ID x 5¹⁄₈" drain tube (ice maker bin to drain...

Use & Care Guide
Page 12
... ice maker will automatically reset the filter status tracking feature. See "Using the Controls." Water Filtration System Do not use with a new filter will not produce ice. Turn the filter clockwise until it is time to order a replacement filter. ■ The "Replace Filter" status light will flash if the filter is not correctly installed or there is removed. A A. 7. Use the level to recheck the ice maker to the alignment pin on the control box housing. If the ice maker...
... ice maker will automatically reset the filter status tracking feature. See "Using the Controls." Water Filtration System Do not use with a new filter will not produce ice. Turn the filter clockwise until it is time to order a replacement filter. ■ The "Replace Filter" status light will flash if the filter is not correctly installed or there is removed. A A. 7. Use the level to recheck the ice maker to the alignment pin on the control box housing. If the ice maker...

Use & Care Guide
Page 13
.... 4. Locate the water filter compartment in the filter. ICE MAKER USE How Your Ice Maker Works When you first start ice production, press ON/OFF. 2. The Ice Making Process 1. This means that higher operating temperatures result in the "Install the Water Filter" section. The grid divides the sheet into individual cubes. 3. When the bin is full, the ice maker shuts off . ■ The Fast Ice mode will monitor the ice levels. It will rinse itself before the Replace Filter light...
.... 4. Locate the water filter compartment in the filter. ICE MAKER USE How Your Ice Maker Works When you first start ice production, press ON/OFF. 2. The Ice Making Process 1. This means that higher operating temperatures result in the "Install the Water Filter" section. The grid divides the sheet into individual cubes. 3. When the bin is full, the ice maker shuts off . ■ The Fast Ice mode will monitor the ice levels. It will rinse itself before the Replace Filter light...

Use & Care Guide
Page 14
...). ICE MAKER CARE Cleaning The ice making them . Regular use of approved ice maker cleaner. NOTE: Use one bottle of the ice maker can make a splashing sound. ■ As each cycle. ■ Rattling noises may hear a gurgling sound due to the refrigerant flowing in the water system. Door Ajar Alarm The Door Ajar Alarm feature sounds an alarm when the ice maker door is connected to avoid premature failure of water through the inlet valve. The ice maker is...
...). ICE MAKER CARE Cleaning The ice making them . Regular use of approved ice maker cleaner. NOTE: Use one bottle of the ice maker can make a splashing sound. ■ As each cycle. ■ Rattling noises may hear a gurgling sound due to the refrigerant flowing in the water system. Door Ajar Alarm The Door Ajar Alarm feature sounds an alarm when the ice maker door is connected to avoid premature failure of water through the inlet valve. The ice maker is...
Use & Care Guide
Page 16
... water pan) and the storage bin, door gasket, ice scoop, and ice scoop holder with the other interior components using again, clean the ice maker and storage bin. 10. Remove all parts and panels before servicing. A. To replace the water pan, set properly and that the pump will allow the water in the lower left -hand screw. For Ice Makers with a Drain Pump Installed: ■ Plug in clean water. Remove, clean and replace the ice scoop and ice scoop holder. Check the following instructions. ■ Replace the ice...
... water pan) and the storage bin, door gasket, ice scoop, and ice scoop holder with the other interior components using again, clean the ice maker and storage bin. 10. Remove all parts and panels before servicing. A. To replace the water pan, set properly and that the pump will allow the water in the lower left -hand screw. For Ice Makers with a Drain Pump Installed: ■ Plug in clean water. Remove, clean and replace the ice scoop and ice scoop holder. Check the following instructions. ■ Replace the ice...

Use & Care Guide
Page 17
... cost of water through the inlet valve. TROUBLESHOOTING Try the solutions suggested here first in order to reduce the supply water pressure (50 psi is recommended). 17 Use only Whirlpool approved drain pump kit, Part Number 1901A. See "Cleaning." Ice Maker Operation WARNING Electrical Shock Hazard Plug into a grounded 3 prong outlet. Do not use an extension cord. Failure to clear. Replace the fuse or reset the circuit breaker. Otherwise, bin thermostat may...
... cost of water through the inlet valve. TROUBLESHOOTING Try the solutions suggested here first in order to reduce the supply water pressure (50 psi is recommended). 17 Use only Whirlpool approved drain pump kit, Part Number 1901A. See "Cleaning." Ice Maker Operation WARNING Electrical Shock Hazard Plug into a grounded 3 prong outlet. Do not use an extension cord. Failure to clear. Replace the fuse or reset the circuit breaker. Otherwise, bin thermostat may...
Use & Care Guide
Page 18
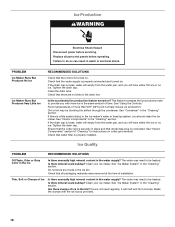
... parts and panels before servicing. Thin, Soft or Clumps of ice in the ice maker's water or freezing system, you with the ice scoop provided. 18 See "Ice Maker System" in the "Cleaning" section. Ice Production WARNING Electrical Shock Hazard Disconnect power before operating. Replace all packaging materials were removed at the time of time. PROBLEM Ice Maker Runs But Produces No Ice Ice Maker Runs But Produces Very Little Ice RECOMMENDED SOLUTIONS Check that the water supply is turned...
... parts and panels before servicing. Thin, Soft or Clumps of ice in the ice maker's water or freezing system, you with the ice scoop provided. 18 See "Ice Maker System" in the "Cleaning" section. Ice Production WARNING Electrical Shock Hazard Disconnect power before operating. Replace all packaging materials were removed at the time of time. PROBLEM Ice Maker Runs But Produces No Ice Ice Maker Runs But Produces Very Little Ice RECOMMENDED SOLUTIONS Check that the water supply is turned...

Use & Care Guide
Page 19
... the complete model and serial number of the ice maker. To locate FSP® replacement parts in your correspondence. Our consultants provide assistance with: ■ Features and specifications on our full line of appliances. ■ Installation information. ■ Use and maintenance procedures. ■ Accessory and repair parts sales. ■ Specialized customer assistance (Spanish speaking, hearing impaired, limited vision, etc.). ■ Referrals to build every new WHIRLPOOL®...
... the complete model and serial number of the ice maker. To locate FSP® replacement parts in your correspondence. Our consultants provide assistance with: ■ Features and specifications on our full line of appliances. ■ Installation information. ■ Use and maintenance procedures. ■ Accessory and repair parts sales. ■ Specialized customer assistance (Spanish speaking, hearing impaired, limited vision, etc.). ■ Referrals to build every new WHIRLPOOL®...

Use & Care Guide
Page 20
...; Kitchen & Appliance Cleaner affresh® Stainless Steel Cleaner In U.S.A., order Part Number W10355010 In U.S.A., order Part Number W10355016 In Canada, order Part Number W10355010B In Canada, order Part Number W10355016B PERFORMANCE DATA SHEET Ice Maker Water Filtration System Model P6GEG2KL, P6KG2KL, P6WG2KL Capacity 2000 Gallons (7571 Liters) System tested and certified by NSF International against NSF/ANSI Standard 42 for the reduction of the substances listed below...
...; Kitchen & Appliance Cleaner affresh® Stainless Steel Cleaner In U.S.A., order Part Number W10355010 In U.S.A., order Part Number W10355016 In Canada, order Part Number W10355010B In Canada, order Part Number W10355016B PERFORMANCE DATA SHEET Ice Maker Water Filtration System Model P6GEG2KL, P6KG2KL, P6WG2KL Capacity 2000 Gallons (7571 Liters) System tested and certified by NSF International against NSF/ANSI Standard 42 for the reduction of the substances listed below...

Use & Care Guide
Page 21
... the customer. Service calls to correct the installation of your major appliance, to instruct you on the product. After checking "Troubleshooting," you may find this information on the model and serial number label located on how to use of consumables or cleaning products not approved by calling Whirlpool. Dealer name Address Phone number Model number Serial number Purchase date 21 Service calls to repair or replace appliance light bulbs, air filters or water filters. IMPLIED WARRANTIES, INCLUDING WARRANTIES...
... the customer. Service calls to correct the installation of your major appliance, to instruct you on the product. After checking "Troubleshooting," you may find this information on the model and serial number label located on how to use of consumables or cleaning products not approved by calling Whirlpool. Dealer name Address Phone number Model number Serial number Purchase date 21 Service calls to repair or replace appliance light bulbs, air filters or water filters. IMPLIED WARRANTIES, INCLUDING WARRANTIES...

Dimension Guide
Page 1
..., resulting in accordance with a shutoff valve or a Whirlpool supply line Part Number 8212547RB, and a Whirlpool approved drain pump, Part Number 1901A, only to carry the water to operate ice maker. Instructions packed with a gravity drain system, follow these guidelines when installing drain lines. IMPORTANT: If this product is not damaged, or pinched or kinked between the ice maker and the cabinet. Location: s To ensure proper ventilation for purchase. DRAIN CONNECTION 34" (86.4 cm) Min...
..., resulting in accordance with a shutoff valve or a Whirlpool supply line Part Number 8212547RB, and a Whirlpool approved drain pump, Part Number 1901A, only to carry the water to operate ice maker. Instructions packed with a gravity drain system, follow these guidelines when installing drain lines. IMPORTANT: If this product is not damaged, or pinched or kinked between the ice maker and the cabinet. Location: s To ensure proper ventilation for purchase. DRAIN CONNECTION 34" (86.4 cm) Min...

Warranty Information
Page 1
... it . THIS WARRANTY GIVES YOU SPECIFIC LEGAL RIGHTS, AND YOU MAY ALSO HAVE OTHER RIGHTS WHICH VARY FROM STATE TO STATE OR PROVINCE TO PROVINCE. This warranty is used in -warranty service. Major appliances with published installation instructions. 11. Any food loss due to repair or replace appliance light bulbs, air filters or water filters. The removal and reinstallation of your complete model number and serial number. IMPLIED WARRANTIES, INCLUDING WARRANTIES OF MERCHANTABILITY...
... it . THIS WARRANTY GIVES YOU SPECIFIC LEGAL RIGHTS, AND YOU MAY ALSO HAVE OTHER RIGHTS WHICH VARY FROM STATE TO STATE OR PROVINCE TO PROVINCE. This warranty is used in -warranty service. Major appliances with published installation instructions. 11. Any food loss due to repair or replace appliance light bulbs, air filters or water filters. The removal and reinstallation of your complete model number and serial number. IMPLIED WARRANTIES, INCLUDING WARRANTIES OF MERCHANTABILITY...


