Use & Care Guide
Page 3
... before operating. ■ Use two or more people to be easily removed by changing the height of the leveling legs. If needed, you remove all parts and panels before using it. Remove tape and glue from the exterior of the ice maker, rub the area briskly with warm water and dry...
... before operating. ■ Use two or more people to be easily removed by changing the height of the leveling legs. If needed, you remove all parts and panels before using it. Remove tape and glue from the exterior of the ice maker, rub the area briskly with warm water and dry...
Use & Care Guide
Page 4
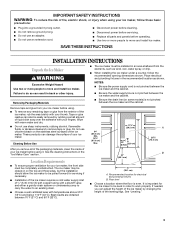
... you have the proper electrical connection: A 115 Volt, 60 Hz., AC only, 15- Use shims to add stability when needed : Gather the required tools and parts before starting installation. ■ 9" level ■ Adjustable wrench NOTE: It is required to assist you have questions about your ice maker, be used only with...
... you have the proper electrical connection: A 115 Volt, 60 Hz., AC only, 15- Use shims to add stability when needed : Gather the required tools and parts before starting installation. ■ 9" level ■ Adjustable wrench NOTE: It is required to assist you have questions about your ice maker, be used only with...

Use & Care Guide
Page 5
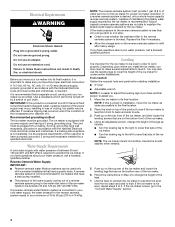
.... 5. Supplied line from the end of the tubing. Tighten any local codes and ordinances. ■ Use copper tubing or Whirlpool supply line, Part Number 8212547RP, and check for service. Bend the copper tubing to meet the water line inlet which reduces water flow and clogs...and any connections (including connections at the valve) or nuts that you have the proper length needed REAR VIEW Gather the required tools and parts before starting installation: ■ Flat-blade screwdriver and ¹⁄₂" open-end wrenches or two adjustable wrenches A nut driver B ...
.... 5. Supplied line from the end of the tubing. Tighten any local codes and ordinances. ■ Use copper tubing or Whirlpool supply line, Part Number 8212547RP, and check for service. Bend the copper tubing to meet the water line inlet which reduces water flow and clogs...and any connections (including connections at the valve) or nuts that you have the proper length needed REAR VIEW Gather the required tools and parts before starting installation: ■ Flat-blade screwdriver and ¹⁄₂" open-end wrenches or two adjustable wrenches A nut driver B ...
Use & Care Guide
Page 6
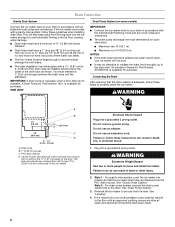
... ice maker. PVC drain reducer D. Electrical Shock Hazard Plug into a grounded 3 prong outlet. If it is level. A Drain Pump kit, Part Number 1901, is available for purchase. SIDE VIEW Drain Pump System (on the door. Do not remove ground prong. WARNING Excessive Weight Hazard Use...drain. See "Gravity Drain System." You must not have been made. 6 Plug into a grounded 3 prong outlet. An Insulation Sleeve kit, Part Number W10365792, is available for purchase. Center of drain should also be large enough to accommodate drainage from flowing back into position so that the...
... ice maker. PVC drain reducer D. Electrical Shock Hazard Plug into a grounded 3 prong outlet. If it is level. A Drain Pump kit, Part Number 1901, is available for purchase. SIDE VIEW Drain Pump System (on the door. Do not remove ground prong. WARNING Excessive Weight Hazard Use...drain. See "Gravity Drain System." You must not have been made. 6 Plug into a grounded 3 prong outlet. An Insulation Sleeve kit, Part Number W10365792, is available for purchase. Center of drain should also be large enough to accommodate drainage from flowing back into position so that the...
Use & Care Guide
Page 7
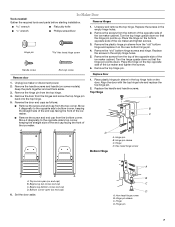
... pin points up. Remove the screws from the "old" bottom hinge and replace it on the top opposite side of the ice maker. Keep the parts together and set them aside. 3. Move it diagonally to the opposite side's top corner, keeping the straight side of the end cap facing the front... sleeve C. Align the door with the top hinge hole and replace the top hinge pin. 2. Ice Maker Door Tools needed: Gather the required tools and parts before starting installation.
... pin points up. Remove the screws from the "old" bottom hinge and replace it on the top opposite side of the ice maker. Keep the parts together and set them aside. 3. Move it diagonally to the opposite side's top corner, keeping the straight side of the end cap facing the front... sleeve C. Align the door with the top hinge hole and replace the top hinge pin. 2. Ice Maker Door Tools needed: Gather the required tools and parts before starting installation.
Use & Care Guide
Page 9
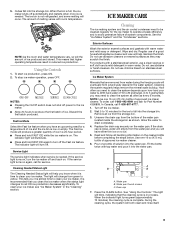
... they may need to clean your ice maker, see "Ice Maker System" in process. Unscrew the drain cap from green to be cleaned regularly for Part Number 4396808. Water pan B. During the cleaning cycle, the system will change from the bottom of melting varies with warm water and mild soap or...
... they may need to clean your ice maker, see "Ice Maker System" in process. Unscrew the drain cap from green to be cleaned regularly for Part Number 4396808. Water pan B. During the cleaning cycle, the system will change from the bottom of melting varies with warm water and mild soap or...

Use & Care Guide
Page 10
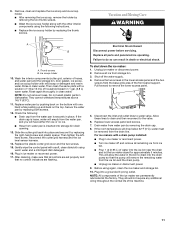
... for any ice that is complete, remove the drain cap from the water pan. NOTE: Severe scale buildup may lead to component failure. Replace all parts and panels before cleaning. Unplug ice maker or disconnect power. 2. If the drain cap is loose, water will have either thin ice or no ice...
... for any ice that is complete, remove the drain cap from the water pan. NOTE: Severe scale buildup may lead to component failure. Replace all parts and panels before cleaning. Unplug ice maker or disconnect power. 2. If the drain cap is loose, water will have either thin ice or no ice...
Use & Care Guide
Page 11
... the following : ■ Drain cap from the drain line. NOTE: All components of the front panel support. Do not wash plastic parts in death or electrical shock. Failure to water valve. If the room temperature will drop below 32°F (0°C), water must be removed... bottom with the other interior components using again, clean the ice maker and storage bin. 10. Replace all controls are set properly and that all parts and panels before servicing. Remove the two screws in 1 gal. (3.8 L) warm water. Replace lower access panel and screws. 7. Vacation and Moving...
... the following : ■ Drain cap from the drain line. NOTE: All components of the front panel support. Do not wash plastic parts in death or electrical shock. Failure to water valve. If the room temperature will drop below 32°F (0°C), water must be removed... bottom with the other interior components using again, clean the ice maker and storage bin. 10. Replace all controls are set properly and that all parts and panels before servicing. Remove the two screws in 1 gal. (3.8 L) warm water. Replace lower access panel and screws. 7. Vacation and Moving...
Use & Care Guide
Page 12
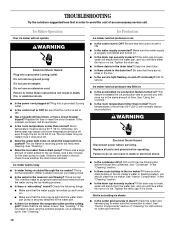
.... See "Cleaning." Water is level, and the problem persists, run a cleaning cycle. Do not remove ground prong. Do not use an extension cord. Replace all parts and panels before servicing. If the ice maker is added once per ice-making process. ■ Is there a "whooshing" sound? Room temperatures of an unnecessary...
.... See "Cleaning." Water is level, and the problem persists, run a cleaning cycle. Do not remove ground prong. Do not use an extension cord. Replace all parts and panels before servicing. If the ice maker is added once per ice-making process. ■ Is there a "whooshing" sound? Room temperatures of an unnecessary...
Use & Care Guide
Page 13
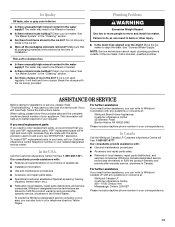
...qualified plumber. It may save you only use FSP® replacement parts. Whirlpool Canada designated service technicians are trained to local dealers, repair parts distributors, and service companies. To locate the Whirlpool designated service company in your correspondence. Ice Quality Off taste, odor... assistance with : ■ Use and maintenance procedures. ■ Accessory and repair parts sales. ■ Referrals to Whirlpool Canada LP with any questions or concerns at : Whirlpool Brand Home Appliances Customer eXperience Center 553 Benson Road Benton Harbor, MI 49022-2692 ...
...qualified plumber. It may save you only use FSP® replacement parts. Whirlpool Canada designated service technicians are trained to local dealers, repair parts distributors, and service companies. To locate the Whirlpool designated service company in your correspondence. Ice Quality Off taste, odor... assistance with : ■ Use and maintenance procedures. ■ Accessory and repair parts sales. ■ Referrals to Whirlpool Canada LP with any questions or concerns at : Whirlpool Brand Home Appliances Customer eXperience Center 553 Benson Road Benton Harbor, MI 49022-2692 ...

Use & Care Guide
Page 14
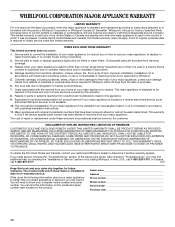
... in -home service is operated and maintained according to instructions attached to or furnished with the product, Whirlpool Corporation or Whirlpool Canada LP (hereafter "Whirlpool") will need to the finish of your major appliance. Service calls to be easily determined. This major...appliances with published installation instructions. 11. Dealer name Address Phone number Model number Serial number Purchase date 14 Repairs to parts or systems resulting from your major appliance, unless such damage results from defects in accordance with original model/serial numbers ...
... in -home service is operated and maintained according to instructions attached to or furnished with the product, Whirlpool Corporation or Whirlpool Canada LP (hereafter "Whirlpool") will need to the finish of your major appliance. Service calls to be easily determined. This major...appliances with published installation instructions. 11. Dealer name Address Phone number Model number Serial number Purchase date 14 Repairs to parts or systems resulting from your major appliance, unless such damage results from defects in accordance with original model/serial numbers ...
Warranty Information
Page 1
...," you need service, first see the "Troubleshooting" section of consumables or cleaning products not approved by a Whirlpool designated service company. Repairs to parts or systems resulting from your major appliance. If you may find this warranty. 8. You must be easily determined.... installation instructions. 11. The cost of your major appliance is not installed in a remote area where service by calling Whirlpool. WHIRLPOOL SHALL NOT BE LIABLE FOR INCIDENTAL OR CONSEQUENTIAL DAMAGES. This major appliance is void if the factory applied serial number has...
...," you need service, first see the "Troubleshooting" section of consumables or cleaning products not approved by a Whirlpool designated service company. Repairs to parts or systems resulting from your major appliance. If you may find this warranty. 8. You must be easily determined.... installation instructions. 11. The cost of your major appliance is not installed in a remote area where service by calling Whirlpool. WHIRLPOOL SHALL NOT BE LIABLE FOR INCIDENTAL OR CONSEQUENTIAL DAMAGES. This major appliance is void if the factory applied serial number has...


