

Dimension Guide
Page 1
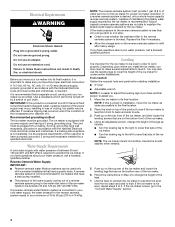
...cm) air gap between the ice maker and the cabinet. Because Whirlpool Corporation policy includes a continuous commitment to operate ice maker and water dispenser. It is required to improve Dimensions are obtained between the ice maker and the cabinet. s Installation of the ice maker requires a cold water supply ...change without notice. Inlet water tube clamp and supply line connector D. s Drain lines must have questions about your ice maker, be completely unobstructed. Use a receptacle which cannot be large enough to the drain inlet. IMPORTANT: If this product...
...cm) air gap between the ice maker and the cabinet. Because Whirlpool Corporation policy includes a continuous commitment to operate ice maker and water dispenser. It is required to improve Dimensions are obtained between the ice maker and the cabinet. s Installation of the ice maker requires a cold water supply ...change without notice. Inlet water tube clamp and supply line connector D. s Drain lines must have questions about your ice maker, be completely unobstructed. Use a receptacle which cannot be large enough to the drain inlet. IMPORTANT: If this product...
Use & Care Guide
Page 2
...ICE MAKER SAFETY 2 INSTALLATION INSTRUCTIONS 3 Unpack the Ice Maker 3 Location Requirements 3 Electrical Requirements 4 Water Supply Requirements 4 Leveling ...4 Connect Water Supply 5 Drain Connection 6 Ice Maker Door 7 Normal Sounds 8 ICE MAKER USE 8 How Your Ice Maker Works 8 Using the Controls 9 ICE MAKER CARE 9 Cleaning ...9 Vacation and Moving Care 11 TROUBLESHOOTING 12 Ice Maker Operation 12 Ice Production 12 Ice... 26 Problèmes de plomberie 26 ASSISTANCE OU SERVICE 26 GARANTIE 27 ICE MAKER SAFETY Your safety and the safety of injury, and tell you and others...
...ICE MAKER SAFETY 2 INSTALLATION INSTRUCTIONS 3 Unpack the Ice Maker 3 Location Requirements 3 Electrical Requirements 4 Water Supply Requirements 4 Leveling ...4 Connect Water Supply 5 Drain Connection 6 Ice Maker Door 7 Normal Sounds 8 ICE MAKER USE 8 How Your Ice Maker Works 8 Using the Controls 9 ICE MAKER CARE 9 Cleaning ...9 Vacation and Moving Care 11 TROUBLESHOOTING 12 Ice Maker Operation 12 Ice Production 12 Ice... 26 Problèmes de plomberie 26 ASSISTANCE OU SERVICE 26 GARANTIE 27 ICE MAKER SAFETY Your safety and the safety of injury, and tell you and others...
Use & Care Guide
Page 3
... on some models) is even. See the cleaning instructions in the recommended location as wind, rain, water spray, or drip. ■ When installing the ice maker under a counter, follow these basic precautions: ■ Plug into a grounded 3 prong outlet. ■ Do not remove ground prong. ■ Do ...alcohol, flammable fluids, or abrasive cleaners to remove tape or glue. These products can result in an area sheltered from the exterior of the ice maker, rub the area briskly with warm water and dry. ■ Do not use an extension cord. ■ Disconnect power before cleaning....
... on some models) is even. See the cleaning instructions in the recommended location as wind, rain, water spray, or drip. ■ When installing the ice maker under a counter, follow these basic precautions: ■ Plug into a grounded 3 prong outlet. ■ Do not remove ground prong. ■ Do ...alcohol, flammable fluids, or abrasive cleaners to remove tape or glue. These products can result in an area sheltered from the exterior of the ice maker, rub the area briskly with warm water and dry. ■ Do not use an extension cord. ■ Disconnect power before cleaning....
Use & Care Guide
Page 4
...is even from front to back and side to lower the height of the ice maker for ice makers that side of the ice maker. ■ Turn the leveling leg to the left to 5. Recommended grounding method The ice maker must be affected. Water Supply Requirements A cold water supply with water pressure of... minimum of between 30 and 120 psi (207 and 827 kPa). A reverse osmosis system is level from front to back and side to the ice maker for the ice maker to be plugged into a mating, 3 prong, grounding-type wall receptacle, grounded in Step 4 to maintain the steady water supply required by ...
...is even from front to back and side to lower the height of the ice maker for ice makers that side of the ice maker. ■ Turn the leveling leg to the left to 5. Recommended grounding method The ice maker must be affected. Water Supply Requirements A cold water supply with water pressure of... minimum of between 30 and 120 psi (207 and 827 kPa). A reverse osmosis system is level from front to back and side to the ice maker for the ice maker to be plugged into a mating, 3 prong, grounding-type wall receptacle, grounded in Step 4 to maintain the steady water supply required by ...

Use & Care Guide
Page 5
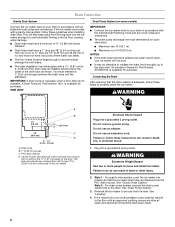
...tubing only in areas where temperatures will go. Using a ¹⁄₂" copper supply line with a quarter-turn on the back of the ice maker cabinet as shown. Be sure both ends of the copper tubing are ready to connect the copper tubing. Copper tubing AB C D A. C .... Tighten any local codes and ordinances. ■ Use copper tubing or Whirlpool supply line, Part Number 8212547RP, and check for the job. Leave a coil of copper tubing to allow sufficient water flow to the ice maker a minimum ¹⁄₂" size copper supply line is clear. Drain...
...tubing only in areas where temperatures will go. Using a ¹⁄₂" copper supply line with a quarter-turn on the back of the ice maker cabinet as shown. Be sure both ends of the copper tubing are ready to connect the copper tubing. Copper tubing AB C D A. C .... Tighten any local codes and ordinances. ■ Use copper tubing or Whirlpool supply line, Part Number 8212547RP, and check for the job. Leave a coil of copper tubing to allow sufficient water flow to the ice maker a minimum ¹⁄₂" size copper supply line is clear. Drain...
Use & Care Guide
Page 6
.... Style 2 - If it is provided with or without the ³⁄₄" (1.91 cm) panel on some models) IMPORTANT: ■ Connect the ice maker drain to your drain in death, fire, or electrical shock. 1. SIDE VIEW Drain Pump System (on the door. An Insulation Sleeve kit, Part Number W10365792...must maintain a 1" (2.54 cm) air gap between the drain hose and the standpipe. See "Gravity Drain System." Drain Connection Gravity Drain System Connect the ice maker drain to your drain in back or other injury. 2. You must have a 1" drop per 48" (2.54 cm drop per 122 cm) of run or...
.... Style 2 - If it is provided with or without the ³⁄₄" (1.91 cm) panel on some models) IMPORTANT: ■ Connect the ice maker drain to your drain in death, fire, or electrical shock. 1. SIDE VIEW Drain Pump System (on the door. An Insulation Sleeve kit, Part Number W10365792...must maintain a 1" (2.54 cm) air gap between the drain hose and the standpipe. See "Gravity Drain System." Drain Connection Gravity Drain System Connect the ice maker drain to your drain in back or other injury. 2. You must have a 1" drop per 48" (2.54 cm drop per 122 cm) of run or...
Use & Care Guide
Page 7
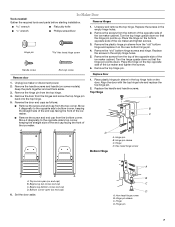
...Flat putty knife ■ Phillips screwdriver Hex head hinge screw End cap screw 1. Remove the screws from the bottom of the opposite side of the ice maker cabinet. Remove the handle screws and handle (on the door. Keep the parts together and set them aside. 3. Beginning bottom corner end cap D.... the hinges and screw the top hinge pin back into the top hinge. 5. Remove the screws from the bottom corner. Remove door 1. Unplug ice maker or disconnect power. 2. Place plastic hinge pin sleeve in the top hinge hole on some models). Hex-head hinge screw B. Replace the screws ...
...Flat putty knife ■ Phillips screwdriver Hex head hinge screw End cap screw 1. Remove the screws from the bottom of the opposite side of the ice maker cabinet. Remove the handle screws and handle (on the door. Keep the parts together and set them aside. 3. Beginning bottom corner end cap D.... the hinges and screw the top hinge pin back into the top hinge. 5. Remove the screws from the bottom corner. Remove door 1. Unplug ice maker or disconnect power. 2. Place plastic hinge pin sleeve in the top hinge hole on some models). Hex-head hinge screw B. Replace the screws ...
Use & Care Guide
Page 8
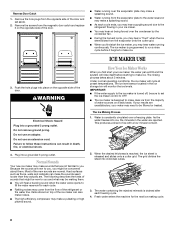
...enters the machine for each cycle. ■ Rattling noises may come from the opposite side of ice with a low mineral content. 2. The ice maker is released and slides onto a cutter grid. If your ice maker. ■ You may hear air being forced over a freezing plate. The water containing the ... may be sure to set aside. 2. As the water freezes into a grounded 3 prong outlet. Reverse Door Catch 1. Most of the ice maker can make noises. ■ The high-efficiency compressor may hear water running from the majority of water sources on the opposite side of the...
...enters the machine for each cycle. ■ Rattling noises may come from the opposite side of ice with a low mineral content. 2. The ice maker is released and slides onto a cutter grid. If your ice maker. ■ You may hear air being forced over a freezing plate. The water containing the ... may be sure to set aside. 2. As the water freezes into a grounded 3 prong outlet. Reverse Door Catch 1. Most of the ice maker can make noises. ■ The high-efficiency compressor may hear water running from the majority of water sources on the opposite side of the...
Use & Care Guide
Page 9
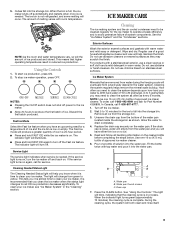
...it is complete. It is recommended that the cleaning cycle is needed . To clean your ice maker. ICE MAKER CARE Cleaning The ice making system and the air cooled condenser need for Part Number 4396808. See the "Ice Maker System" and the "Condenser" sections. Wipe and dry. Regular use of 15 to 20... grains/gal. (4 to 5 grains/liter), you clean the ice maker when the status light changes to clean your ice maker, see "Ice Maker System" in warm water. Do not use chlorine bleach on enamel surfaces as shown. Do not use a clean sponge or...
...it is complete. It is recommended that the cleaning cycle is needed . To clean your ice maker. ICE MAKER CARE Cleaning The ice making system and the air cooled condenser need for Part Number 4396808. See the "Ice Maker System" and the "Condenser" sections. Wipe and dry. Regular use of 15 to 20... grains/gal. (4 to 5 grains/liter), you clean the ice maker when the status light changes to clean your ice maker, see "Ice Maker System" in warm water. Do not use chlorine bleach on enamel surfaces as shown. Do not use a clean sponge or...

Use & Care Guide
Page 10
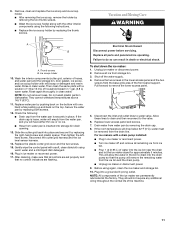
... the drain cap from the water pan, and you should run the clean cycle again. Failure to do so can result in the bin. 3. Unplug ice maker or disconnect power. 2. If the drain cap is in death or electrical shock. 1. Screws 6. D A B E C F A. Cutter grid D. Water pan ...grille area of cleaning solution. 9. Plastic spacer F. Remove the two thumb screws that is loose, water will have either thin ice or no ice. Plug in ice maker or reconnect power. Water pan thumb screws C. Interior Components 1. Replace the lower access panel using the four screws. 6. ...
... the drain cap from the water pan, and you should run the clean cycle again. Failure to do so can result in the bin. 3. Unplug ice maker or disconnect power. 2. If the drain cap is in death or electrical shock. 1. Screws 6. D A B E C F A. Cutter grid D. Water pan ...grille area of cleaning solution. 9. Plastic spacer F. Remove the two thumb screws that is loose, water will have either thin ice or no ice. Plug in ice maker or reconnect power. Water pan thumb screws C. Interior Components 1. Replace the lower access panel using the four screws. 6. ...
Use & Care Guide
Page 11
...Pull forward to water valve. Disconnect the inlet and outlet lines to remove the lower access panel. 5. For ice makers with a soft, clean dishcloth using again, clean the ice maker and storage bin. 10. NOTE: Do not remove hoses. Then tighten the lefthand screw. Failure to the valve...Gently wipe the control panel with a drain pump installed: ■ Plug in place. Replace all remaining ice from the water pan is securely in ice maker or reconnect power. ■ Turn ice maker off the water supply. 4. Before using warm water and a mild liquid dish detergent. 16. 9....
...Pull forward to water valve. Disconnect the inlet and outlet lines to remove the lower access panel. 5. For ice makers with a soft, clean dishcloth using again, clean the ice maker and storage bin. 10. NOTE: Do not remove hoses. Then tighten the lefthand screw. Failure to the valve...Gently wipe the control panel with a drain pump installed: ■ Plug in place. Replace all remaining ice from the water pan is securely in ice maker or reconnect power. ■ Turn ice maker off the water supply. 4. Before using warm water and a mild liquid dish detergent. 16. 9....
Use & Care Guide
Page 12
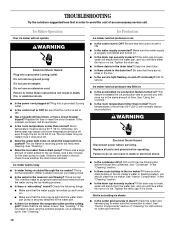
...of time. If the drain cap is securely attached to ON. ■ Is the water supply connected? Ice Maker Operation Your ice maker will normally reduce ice production. The ice maker is still water in the reservoir overflowing? Tighten the drain cap. ■ Is there debris in the ...drain line? WARNING Electrical Shock Hazard Disconnect power before operating. Ice Production Ice maker runs but produces no ice. Clean the drain tube. ■ Is there a kink in the drain tube? Room temperatures of "Cleaning" for...
...of time. If the drain cap is securely attached to ON. ■ Is the water supply connected? Ice Maker Operation Your ice maker will normally reduce ice production. The ice maker is still water in the reservoir overflowing? Tighten the drain cap. ■ Is there debris in the ...drain line? WARNING Electrical Shock Hazard Disconnect power before operating. Ice Production Ice maker runs but produces no ice. Clean the drain tube. ■ Is there a kink in the drain tube? Room temperatures of "Cleaning" for...
Use & Care Guide
Page 13
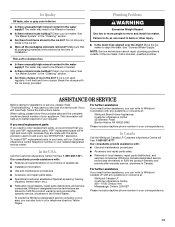
... Road Benton Harbor, MI 49022-2692 Please include a daytime phone number in your ice maker. For further assistance If you can write to Whirlpool Canada LP with the same precision used regularly, it will help , follow the instructions below. See "Ice Maker System" in the "Cleaning" section. ■ Are there food items stored in the...
... Road Benton Harbor, MI 49022-2692 Please include a daytime phone number in your ice maker. For further assistance If you can write to Whirlpool Canada LP with the same precision used regularly, it will help , follow the instructions below. See "Ice Maker System" in the "Cleaning" section. ■ Are there food items stored in the...


