
Dimension Guide
Page 1
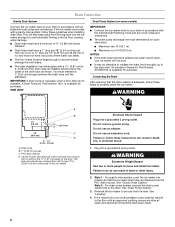
... valve and either side of the drain tube as shown. Reverse Osmosis Water Supply: The pressure of the water coming out of a reverse osmosis system going to the water inlet valve of the refrigerator needs to improve Dimensions are obtained between the ice maker and the cabinet. s Installation of the ice maker requires a cold water supply inlet of 5⁄8" (15.88 mm) inside diameter. Recommended location for planning purposes only. B. s Be sure the water supply line...
... valve and either side of the drain tube as shown. Reverse Osmosis Water Supply: The pressure of the water coming out of a reverse osmosis system going to the water inlet valve of the refrigerator needs to improve Dimensions are obtained between the ice maker and the cabinet. s Installation of the ice maker requires a cold water supply inlet of 5⁄8" (15.88 mm) inside diameter. Recommended location for planning purposes only. B. s Be sure the water supply line...
Use & Care Guide
Page 2
.... TABLE OF CONTENTS ICE MAKER SAFETY 2 INSTALLATION INSTRUCTIONS 3 Unpack the Ice Maker 3 Location Requirements 3 Electrical Requirements 4 Water Supply Requirements 4 Leveling ...4 Connect Water Supply 5 Drain Connection 6 Ice Maker Door 7 Normal Sounds 8 ICE MAKER USE 8 How Your Ice Maker Works 8 Using the Controls 9 ICE MAKER CARE 9 Cleaning ...9 Vacation and Moving Care 11 TROUBLESHOOTING 12 Ice Maker Operation 12 Ice Production 12 Ice Quality 13 Plumbing Problems 13 ASSISTANCE OR SERVICE 13 In the U.S.A 13 In Canada 13 WARRANTY 14 TABLE DES MATI...
.... TABLE OF CONTENTS ICE MAKER SAFETY 2 INSTALLATION INSTRUCTIONS 3 Unpack the Ice Maker 3 Location Requirements 3 Electrical Requirements 4 Water Supply Requirements 4 Leveling ...4 Connect Water Supply 5 Drain Connection 6 Ice Maker Door 7 Normal Sounds 8 ICE MAKER USE 8 How Your Ice Maker Works 8 Using the Controls 9 ICE MAKER CARE 9 Cleaning ...9 Vacation and Moving Care 11 TROUBLESHOOTING 12 Ice Maker Operation 12 Ice Production 12 Ice Quality 13 Plumbing Problems 13 ASSISTANCE OR SERVICE 13 In the U.S.A 13 In Canada 13 WARRANTY 14 TABLE DES MATI...
Use & Care Guide
Page 3
... warm water and dry. ■ Do not use an extension cord. ■ Disconnect power before cleaning. ■ Disconnect power before servicing. ■ Replace all of the packaging materials, clean the inside of ¹⁄₄" (6.35 mm) OD soft copper tubing with a shutoff valve and either a gravity-drain system or condensate pump to carry the water to work properly. The ice maker may be easily removed by changing the height...
... warm water and dry. ■ Do not use an extension cord. ■ Disconnect power before cleaning. ■ Disconnect power before servicing. ■ Replace all of the packaging materials, clean the inside of ¹⁄₄" (6.35 mm) OD soft copper tubing with a shutoff valve and either a gravity-drain system or condensate pump to carry the water to work properly. The ice maker may be easily removed by changing the height...
Use & Care Guide
Page 4
... final location, it is important for ice makers that a separate circuit, serving only your water pressure, call a licensed, qualified plumber. Do not use an adapter. or 20-amp electrical supply, properly grounded in accordance with ice maker installations that it is not recommended for the ice maker to be level in Step 4 to change the height of the legs as possible to follow these instructions can be turned...
... final location, it is important for ice makers that a separate circuit, serving only your water pressure, call a licensed, qualified plumber. Do not use an adapter. or 20-amp electrical supply, properly grounded in accordance with ice maker installations that it is not recommended for the ice maker to be level in Step 4 to change the height of the legs as possible to follow these instructions can be turned...

Use & Care Guide
Page 5
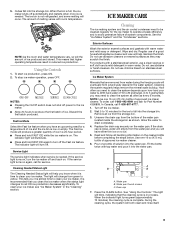
..., black plastic tube from ice maker 8. Bulb B. Now you are cut square. ■ Slip compression sleeve and compression nut on nearest faucet long enough to avoid possible water valve malfunction. 5. Compression sleeve B. C Connecting the Water Line 1. D A. Tighten the nut by B hand. Nut (purchased) C. Install the water supply tube clamp around the water supply line to connect the copper tubing. Tighten any local codes and ordinances. ■ Use copper tubing or Whirlpool supply line, Part Number 8212547RP...
..., black plastic tube from ice maker 8. Bulb B. Now you are cut square. ■ Slip compression sleeve and compression nut on nearest faucet long enough to avoid possible water valve malfunction. 5. Compression sleeve B. C Connecting the Water Line 1. D A. Tighten the nut by B hand. Nut (purchased) C. Install the water supply tube clamp around the water supply line to connect the copper tubing. Tighten any local codes and ordinances. ■ Use copper tubing or Whirlpool supply line, Part Number 8212547RP...
Use & Care Guide
Page 6
... keep water from left to move and install ice maker. If the ice maker is not available. Plug into the ice maker storage bin and potentially flowing onto the floor, causing water damage. ■ Drain lines must have a minimum of 15.88 mm) inside diameter. ■ Drain lines must have low points where water can result in death, fire, or electrical shock. 1. See "Drain Pump System." 3. PVC drain reducer D. Do not use...
... keep water from left to move and install ice maker. If the ice maker is not available. Plug into the ice maker storage bin and potentially flowing onto the floor, causing water damage. ■ Drain lines must have a minimum of 15.88 mm) inside diameter. ■ Drain lines must have low points where water can result in death, fire, or electrical shock. 1. See "Drain Pump System." 3. PVC drain reducer D. Do not use...
Use & Care Guide
Page 7
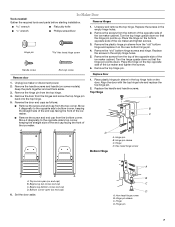
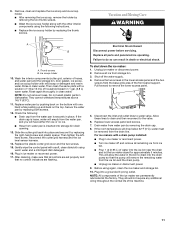
... Bottom Hinge D C B A A. Set the door aside. Hinge pin sleeve C. Remove the top hinge pin. Hinge D. A B C D A. Remove the door from the top of the opposite side of the ice maker cabinet. Replace Door 1. Ice Maker Door Tools needed: Gather the required tools and parts before starting installation. Replace the handle and handle screws. Replace the screws in the empty hinge holes. 2. Remove the screws from the bottom corner. Keep the parts together and set them aside. 3. Top corner open...
... Bottom Hinge D C B A A. Set the door aside. Hinge pin sleeve C. Remove the top hinge pin. Hinge D. A B C D A. Remove the door from the top of the opposite side of the ice maker cabinet. Replace Door 1. Ice Maker Door Tools needed: Gather the required tools and parts before starting installation. Replace the handle and handle screws. Replace the screws in the empty hinge holes. 2. Remove the screws from the bottom corner. Keep the parts together and set them aside. 3. Top corner open...
Use & Care Guide
Page 8
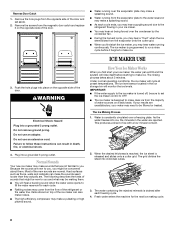
... compressor may be filtered or treated. How Your Ice Maker Works When you and what may make ice. This produces a sheet of the door. When the desired thickness is reached, the ice sheet is drained after each cycle. ■ Rattling noises may come from the evaporator plate to you first start the ice maker, you may need to you, you . Reverse Door Catch 1. Remove the hole plugs from the majority of water...
... compressor may be filtered or treated. How Your Ice Maker Works When you and what may make ice. This produces a sheet of the door. When the desired thickness is reached, the ice sheet is drained after each cycle. ■ Rattling noises may come from the evaporator plate to you first start the ice maker, you may need to you, you . Reverse Door Catch 1. Remove the hole plugs from the majority of water...
Use & Care Guide
Page 9
... bin. If the drain cap is not refrigerated, and some melting will help you may scratch the finish. Pour one bottle of ice. See "Using the Controls." Cubes fall into the water pan. NOTES: ■ Pressing the On/Off switch does not shut off the Fast Ice feature. If the service light turns on . ICE MAKER CARE Cleaning The ice making system and the air cooled condenser need for Part Number 4396808. Regular use of approved ice maker...
... bin. If the drain cap is not refrigerated, and some melting will help you may scratch the finish. Pour one bottle of ice. See "Using the Controls." Cubes fall into the water pan. NOTES: ■ Pressing the On/Off switch does not shut off the Fast Ice feature. If the service light turns on . ICE MAKER CARE Cleaning The ice making system and the air cooled condenser need for Part Number 4396808. Regular use of approved ice maker...

Use & Care Guide
Page 10
... on the water pan. Pull the ice level sensor down to resume ice production. Lift the cutter grid up and out. Plastic spacer F. Remove the two thumb screws that hold the cutter grid cover in the bin. 3. Replace all parts and panels before cleaning. Open the storage bin door and remove any cleaning solution left in the water pan. Cutter grid cover B. Water pan B. Press the ON button to remove the lower access panel. A B A. Screw C. Remove dirt...
... on the water pan. Pull the ice level sensor down to resume ice production. Lift the cutter grid up and out. Plastic spacer F. Remove the two thumb screws that hold the cutter grid cover in the bin. 3. Replace all parts and panels before cleaning. Open the storage bin door and remove any cleaning solution left in the water pan. Cutter grid cover B. Water pan B. Press the ON button to remove the lower access panel. A B A. Screw C. Remove dirt...
Use & Care Guide
Page 11
... control indicators are flashing. Electrical Shock Hazard Disconnect power before operating. Drain water from water pan is securely in 1 gal. (3.8 L) warm water. If the room temperature will remove the remaining water from the water pan is inserted into storage bin drain opening. 13. Before using warm water and a mild liquid dish detergent. 16. 9. Ice scoop holder 10. Slide the cutter grid back into the ice bin near the drain and let the ice maker stand for approximately 5 minutes. Plug in clean water...
... control indicators are flashing. Electrical Shock Hazard Disconnect power before operating. Drain water from water pan is securely in 1 gal. (3.8 L) warm water. If the room temperature will remove the remaining water from the water pan is inserted into storage bin drain opening. 13. Before using warm water and a mild liquid dish detergent. 16. 9. Ice scoop holder 10. Slide the cutter grid back into the ice bin near the drain and let the ice maker stand for approximately 5 minutes. Plug in clean water...
Use & Care Guide
Page 12
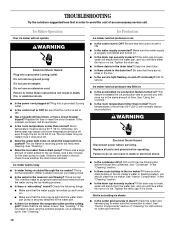
... use an adapter. Otherwise, bin thermostat may need cleaning. Ice maker seems noisy ■ Is water being circulated through the condenser. See "Cleaning." Ice Production Ice maker runs but may sense cold room temperature and shut off . ■ Does the green light come on when the Clean button is pushed? Be sure that the control is level, and the problem persists, run a cleaning cycle. Tighten the drain cap. ■ Is there debris in the drain line? Clean the drain tube...
... use an adapter. Otherwise, bin thermostat may need cleaning. Ice maker seems noisy ■ Is water being circulated through the condenser. See "Cleaning." Ice Production Ice maker runs but may sense cold room temperature and shut off . ■ Does the green light come on when the Clean button is pushed? Be sure that the control is level, and the problem persists, run a cleaning cycle. Tighten the drain cap. ■ Is there debris in the drain line? Clean the drain tube...
Use & Care Guide
Page 13
... repair parts sales. ■ Specialized customer assistance (Spanish speaking, hearing impaired, limited vision, etc.). ■ Referrals to Whirlpool Corporation with any foods in the ice bin? Plumbing Problems WARNING Excessive Weight Hazard Use two or more people to align the drain. Move the ice maker to move and install ice maker. To locate FSP® replacement parts in the bin? Whirlpool designated service technicians are trained to fulfill the product warranty...
... repair parts sales. ■ Specialized customer assistance (Spanish speaking, hearing impaired, limited vision, etc.). ■ Referrals to Whirlpool Corporation with any foods in the ice bin? Plumbing Problems WARNING Excessive Weight Hazard Use two or more people to align the drain. Move the ice maker to move and install ice maker. To locate FSP® replacement parts in the bin? Whirlpool designated service technicians are trained to fulfill the product warranty...

Use & Care Guide
Page 14
... you obtain assistance or service if you ever need to obtain service under these excluded circumstances shall be repaired in the home and only in an inaccessible location or is operated and maintained according to instructions attached to or furnished with original model/serial numbers that is reported to Whirlpool within 30 days from unauthorized modifications made to repair or replace appliance light bulbs, air filters or water filters.
... you obtain assistance or service if you ever need to obtain service under these excluded circumstances shall be repaired in the home and only in an inaccessible location or is operated and maintained according to instructions attached to or furnished with original model/serial numbers that is reported to Whirlpool within 30 days from unauthorized modifications made to repair or replace appliance light bulbs, air filters or water filters.
Warranty Information
Page 1
... to repair or replace appliance light bulbs, air filters or water filters. After checking "Troubleshooting," you need it was purchased. If you may find this limited warranty does not apply. Outside the 50 United States and Canada, this information on the model and serial number label located on how to use or when it is operated and maintained according to instructions attached to or furnished with original model/serial numbers that...
... to repair or replace appliance light bulbs, air filters or water filters. After checking "Troubleshooting," you need it was purchased. If you may find this limited warranty does not apply. Outside the 50 United States and Canada, this information on the model and serial number label located on how to use or when it is operated and maintained according to instructions attached to or furnished with original model/serial numbers that...


