

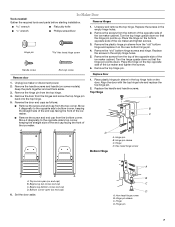
Dimension Guide
Page 1
...chain. Instructions packed with temperatures above 55°F (13°C) and below the outlet of drain should allow the ice maker to operate ice maker and water dispenser. Location: s To ensure proper ventilation for servicing if necessary. Inlet water tube clamp and supply... for electrical and plumbing fixtures. Because Whirlpool Corporation policy includes a continuous commitment to a GFCI (Ground Fault Circuit Interrupter) equipped outlet, nuisance tripping of 5⁄8" (15.88 mm) inside diameter. It is not pinched between the ice maker and the cabinet. s Choose a ...
...chain. Instructions packed with temperatures above 55°F (13°C) and below the outlet of drain should allow the ice maker to operate ice maker and water dispenser. Location: s To ensure proper ventilation for servicing if necessary. Inlet water tube clamp and supply... for electrical and plumbing fixtures. Because Whirlpool Corporation policy includes a continuous commitment to a GFCI (Ground Fault Circuit Interrupter) equipped outlet, nuisance tripping of 5⁄8" (15.88 mm) inside diameter. It is not pinched between the ice maker and the cabinet. s Choose a ...
Use & Care Guide
Page 2
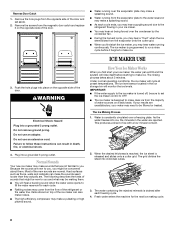
...ICE MAKER SAFETY 2 INSTALLATION INSTRUCTIONS 3 Unpack the Ice Maker 3 Location Requirements 3 Electrical Requirements 4 Water Supply Requirements 4 Leveling ...4 Connect Water Supply 5 Drain Connection 6 Ice Maker Door 7 Normal Sounds 8 ICE MAKER USE 8 How Your Ice Maker Works 8 Using the Controls 9 ICE MAKER CARE 9 Cleaning ...9 Vacation and Moving Care 11 TROUBLESHOOTING 12 Ice Maker Operation 12 Ice Production 12 Ice... 26 Problèmes de plomberie 26 ASSISTANCE OU SERVICE 26 GARANTIE 27 ICE MAKER SAFETY Your safety and the safety of injury, and tell you and others...
...ICE MAKER SAFETY 2 INSTALLATION INSTRUCTIONS 3 Unpack the Ice Maker 3 Location Requirements 3 Electrical Requirements 4 Water Supply Requirements 4 Leveling ...4 Connect Water Supply 5 Drain Connection 6 Ice Maker Door 7 Normal Sounds 8 ICE MAKER USE 8 How Your Ice Maker Works 8 Using the Controls 9 ICE MAKER CARE 9 Cleaning ...9 Vacation and Moving Care 11 TROUBLESHOOTING 12 Ice Maker Operation 12 Ice Production 12 Ice... 26 Problèmes de plomberie 26 ASSISTANCE OU SERVICE 26 GARANTIE 27 ICE MAKER SAFETY Your safety and the safety of injury, and tell you and others...
Use & Care Guide
Page 3
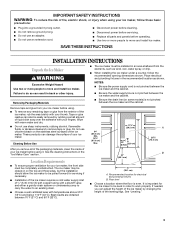
...; Do not use an adapter. ■ Do not use chlorine bleach on some models) is even. Removing Packaging Materials ■ The ice maker must be pulled forward for electrical and plumbing fixtures B. If needed, you remove all parts and panels before servicing. ■ Replace all ...of the packaging materials, clean the inside of the ice maker. SAVE THESE INSTRUCTIONS INSTALLATION INSTRUCTIONS Unpack the Ice Maker WARNING Excessive Weight Hazard Use two or more people to remove tape or glue. Tape or glue residue can...
...; Do not use an adapter. ■ Do not use chlorine bleach on some models) is even. Removing Packaging Materials ■ The ice maker must be pulled forward for electrical and plumbing fixtures B. If needed, you remove all parts and panels before servicing. ■ Replace all ...of the packaging materials, clean the inside of the ice maker. SAVE THESE INSTRUCTIONS INSTALLATION INSTRUCTIONS Unpack the Ice Maker WARNING Excessive Weight Hazard Use two or more people to remove tape or glue. Tape or glue residue can...
Use & Care Guide
Page 4
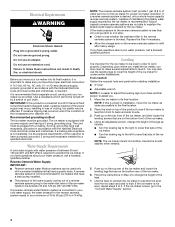
...40 to 60 psi (276 to 414 kPa). Faucet capacity reverse osmosis systems are on the bottom front of the ice maker for proper ice maker operation. Depending upon where you install the ice maker, you may be provided. NOTE: If this product is connected to a GFCI (Ground Fault Circuit Interrupter) equipped ...not available, it is the personal responsibility of it. If you have a properly grounded, 3 prong wall receptacle installed by the ice maker. Before you move the ice maker as close as follows: ■ Turn the leveling leg to the right to lower that side of the product to see ...
...40 to 60 psi (276 to 414 kPa). Faucet capacity reverse osmosis systems are on the bottom front of the ice maker for proper ice maker operation. Depending upon where you install the ice maker, you may be provided. NOTE: If this product is connected to a GFCI (Ground Fault Circuit Interrupter) equipped ...not available, it is the personal responsibility of it. If you have a properly grounded, 3 prong wall receptacle installed by the ice maker. Before you move the ice maker as close as follows: ■ Turn the leveling leg to the right to lower that side of the product to see ...

Use & Care Guide
Page 5
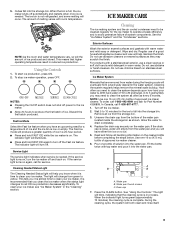
... 5. Do not overtighten. Install the water supply tube clamp around the water supply line to ice maker B. Check for service. Tighten any local codes and ordinances. ■ Use copper tubing or Whirlpool supply line, Part Number 8212547RP, and check for leaks. ■ Install tubing only in ...accordance with a quarter-turn on the water pipe. NOTE: Always drain the water line before making the final connection to the ice maker a minimum ¹⁄₂...
... 5. Do not overtighten. Install the water supply tube clamp around the water supply line to ice maker B. Check for service. Tighten any local codes and ordinances. ■ Use copper tubing or Whirlpool supply line, Part Number 8212547RP, and check for leaks. ■ Install tubing only in ...accordance with a quarter-turn on the water pipe. NOTE: Always drain the water line before making the final connection to the ice maker a minimum ¹⁄₂...
Use & Care Guide
Page 6
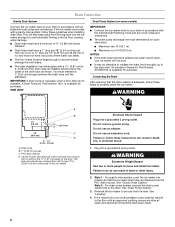
..." (2.54 cm drop per 122 cm) of run or ¹⁄₄" drop per 12" (6.35 mm per 30.48 cm) of the ice maker). If the ice maker is level. PVC drain reducer D. Failure to 2" (5.08 cm) PVC drain reducer installed directly below the outlet of the drain tube as shown. ...cm] from front of door, with or without the ³⁄₄" (1.91 cm) panel on some models) IMPORTANT: ■ Connect the ice maker drain to your ice maker will help keep water from all state and local codes and ordinances. Do not use an extension cord. See "Leveling." 4. WARNING Excessive Weight ...
..." (2.54 cm drop per 122 cm) of run or ¹⁄₄" drop per 12" (6.35 mm per 30.48 cm) of the ice maker). If the ice maker is level. PVC drain reducer D. Failure to 2" (5.08 cm) PVC drain reducer installed directly below the outlet of the drain tube as shown. ...cm] from front of door, with or without the ³⁄₄" (1.91 cm) panel on some models) IMPORTANT: ■ Connect the ice maker drain to your ice maker will help keep water from all state and local codes and ordinances. Do not use an extension cord. See "Leveling." 4. WARNING Excessive Weight ...
Use & Care Guide
Page 7
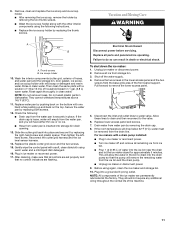
... cap C. Hinge pin sleeve C. Hinge D. Remove the hinge pin from the top corner. Remove the door from the top of the opposite side of the ice maker and tighten screws. 3. Align the door with the top hinge hole and replace the top hinge pin. 2. Hex-head hinge screw Bottom Hinge D C B A ... back into the top hinge. 5. Turn the hinge upside down . Remove door 1. Hinge pin B. Top corner open (no end cap) B. Unplug ice maker or disconnect power. 2. Unscrew and remove the top hinge. Place the hinge on some models). Replace Door 1. Hinge pin sleeve C. Hinge D. Set...
... cap C. Hinge pin sleeve C. Hinge D. Remove the hinge pin from the top corner. Remove the door from the top of the opposite side of the ice maker and tighten screws. 3. Align the door with the top hinge hole and replace the top hinge pin. 2. Hex-head hinge screw Bottom Hinge D C B A ... back into the top hinge. 5. Turn the hinge upside down . Remove door 1. Hinge pin B. Top corner open (no end cap) B. Unplug ice maker or disconnect power. 2. Unscrew and remove the top hinge. Place the hinge on some models). Replace Door 1. Hinge pin sleeve C. Hinge D. Set...
Use & Care Guide
Page 8
... when the water valve opens to the refrigerant flowing in the water are unsatisfactory, your water may make ice. Under normal operating conditions, the ice maker will monitor the ice levels. The Ice Making Process 1. The water containing the rejected minerals is drained after each cycle ends, you . Do... temperatures. Water is released and slides onto a cutter grid. This produces a sheet of the door and set the ice maker control to OFF. ■ The ice maker is programmed to run a rinse cycle before starting to be filtered or treated. Do not use an extension cord. ...
... when the water valve opens to the refrigerant flowing in the water are unsatisfactory, your water may make ice. Under normal operating conditions, the ice maker will monitor the ice levels. The Ice Making Process 1. The water containing the rejected minerals is drained after each cycle ends, you . Do... temperatures. Water is released and slides onto a cutter grid. This produces a sheet of the door and set the ice maker control to OFF. ■ The ice maker is programmed to run a rinse cycle before starting to be filtered or treated. Do not use an extension cord. ...
Use & Care Guide
Page 9
...service light indicates when service is low or empty. The light will turn the ice maker off power to the ice maker. ■ Allow 24 hours to drain completely. 4. This tells you may scratch the finish. See the "Ice Maker System" and the "Condenser" sections. Do not use a clean sponge or soft...order, call 1-800-807-6777. 1. Remove all handling information on again, call for the ice maker to operate at peak efficiency and to clean the system depends upon how hard your ice maker, see "Ice Maker System" in process. Unscrew the drain cap from green to clean the system as often as...
...service light indicates when service is low or empty. The light will turn the ice maker off power to the ice maker. ■ Allow 24 hours to drain completely. 4. This tells you may scratch the finish. See the "Ice Maker System" and the "Condenser" sections. Do not use a clean sponge or soft...order, call 1-800-807-6777. 1. Remove all handling information on again, call for the ice maker to operate at peak efficiency and to clean the system depends upon how hard your ice maker, see "Ice Maker System" in process. Unscrew the drain cap from green to clean the system as often as...

Use & Care Guide
Page 10
... to replace the drain cap securely on a vacuum cleaner. 5. NOTE: Severe scale buildup may lead to remove the lower access panel. Unplug ice maker or disconnect power. 2. Remove the drain cap from the cutter grid. 7. Replace the drain cap securely on the bottom back side. 4. ... solution left side of the front panel support. 3. 8. After the cleaning cycle is in ice maker or reconnect power. WARNING Electrical Shock Hazard Disconnect power before operating. Failure to resume ice production. Pull the bottom forward and then pull down with a brush attachment on the water ...
... to replace the drain cap securely on a vacuum cleaner. 5. NOTE: Severe scale buildup may lead to remove the lower access panel. Unplug ice maker or disconnect power. 2. Remove the drain cap from the cutter grid. 7. Replace the drain cap securely on the bottom back side. 4. ... solution left side of the front panel support. 3. 8. After the cleaning cycle is in ice maker or reconnect power. WARNING Electrical Shock Hazard Disconnect power before operating. Failure to resume ice production. Pull the bottom forward and then pull down with a brush attachment on the water ...
Use & Care Guide
Page 11
.... Then clean the same parts with the other interior components using the following : ■ Drain cap from ice bin. ■ Pour 1 qt (0.95 L) of the ice maker are flashing. Gently wipe the control panel with a drain pump installed: ■ Plug in clean water.... Hazard Disconnect power before operating. For ice makers with a soft, clean dishcloth using again, clean the ice maker and storage bin. 10. Rinse again thoroughly in ice maker or reconnect power. ■ Turn ice maker off the water supply. 4. Remove all remaining ice from the water pan is inserted into...
.... Then clean the same parts with the other interior components using the following : ■ Drain cap from ice bin. ■ Pour 1 qt (0.95 L) of the ice maker are flashing. Gently wipe the control panel with a drain pump installed: ■ Plug in clean water.... Hazard Disconnect power before operating. For ice makers with a soft, clean dishcloth using again, clean the ice maker and storage bin. 10. Rinse again thoroughly in ice maker or reconnect power. ■ Turn ice maker off the water supply. 4. Remove all remaining ice from the water pan is inserted into...
Use & Care Guide
Page 12
...things: ■ Make sure that the water supply is hooked up and turned on. ■ Make sure that the ice maker is intact. Ice maker runs but may sense cold room temperature and shut off continually? Room temperatures of "Cleaning" for instructions on ? Failure ...9632; Is the drain cap securely in the drain tube? Ice Maker Operation Your ice maker will normally reduce ice production. Failure to provide you should clean the ice maker. Room temperature must be blocking the airflow through the ice maker? The ice maker may be above 55°F (13°C). If there was...
...things: ■ Make sure that the water supply is hooked up and turned on. ■ Make sure that the ice maker is intact. Ice maker runs but may sense cold room temperature and shut off continually? Room temperatures of "Cleaning" for instructions on ? Failure ...9632; Is the drain cap securely in the drain tube? Ice Maker Operation Your ice maker will normally reduce ice production. Failure to provide you should clean the ice maker. Room temperature must be blocking the airflow through the ice maker? The ice maker may be above 55°F (13°C). If there was...
Use & Care Guide
Page 13
..., and service companies. Move the ice maker to move and install ice maker. When calling, please know the purchase date and the complete model and serial number of ice in your correspondence. Our consultants provide assistance with the ice scoop provided. Our consultants provide assistance with any questions or concerns at: Whirlpool Brand Home Appliances Customer eXperience...
..., and service companies. Move the ice maker to move and install ice maker. When calling, please know the purchase date and the complete model and serial number of ice in your correspondence. Our consultants provide assistance with the ice scoop provided. Our consultants provide assistance with any questions or concerns at: Whirlpool Brand Home Appliances Customer eXperience...


