
Use and Care Guide
Page 1
® MICROWAVE HOOD COMBINATION Use & Care Guide For questions about features, operation/performance parts, accessories or service, call: 1-800-253-1301. www.whirlpool.com Table of Contents 2 8204919/4619-652-64141 Model GH4155XP or visit our website at...
® MICROWAVE HOOD COMBINATION Use & Care Guide For questions about features, operation/performance parts, accessories or service, call: 1-800-253-1301. www.whirlpool.com Table of Contents 2 8204919/4619-652-64141 Model GH4155XP or visit our website at...

Use and Care Guide
Page 2
... 7 Start 7 Add 30 Seconds 7 Cancel 7 Clock 8 Tones 8 Timer 8 Child Lock 8 Vent Fan 8 Cooktop Light 8 Demo Mode 8 MICROWAVE OVEN USE 9 Food Characteristics 9 Cooking Guidelines 9 Cookware and Dinnerware 9 Aluminum Foil and Metal 10 Cooking Power 10 Cooking 11 Sensor Cooking 11 Preset ... in Stages 12 Reheating 12 Defrosting 13 Steaming 14 Simmering 14 Warm Hold 14 MICROWAVE OVEN CARE 15 General Cleaning 15 Replacing Filters 16 Replacing Cooktop Light 16 Replacing Microwave Oven Light 16 TROUBLESHOOTING 17 ASSISTANCE OR SERVICE 18 Replacement Parts & Accessories 18...
... 7 Start 7 Add 30 Seconds 7 Cancel 7 Clock 8 Tones 8 Timer 8 Child Lock 8 Vent Fan 8 Cooktop Light 8 Demo Mode 8 MICROWAVE OVEN USE 9 Food Characteristics 9 Cooking Guidelines 9 Cookware and Dinnerware 9 Aluminum Foil and Metal 10 Cooking Power 10 Cooking 11 Sensor Cooking 11 Preset ... in Stages 12 Reheating 12 Defrosting 13 Steaming 14 Simmering 14 Warm Hold 14 MICROWAVE OVEN CARE 15 General Cleaning 15 Replacing Filters 16 Replacing Cooktop Light 16 Replacing Microwave Oven Light 16 TROUBLESHOOTING 17 ASSISTANCE OR SERVICE 18 Replacement Parts & Accessories 18...

Use and Care Guide
Page 3
...you what the potential hazard is necessary when used by qualified service personnel. IMPORTANT SAFETY INSTRUCTIONS When using the microwave oven. ■ Read and follow instructions. MICROWAVE OVEN SAFETY Your safety and the safety of others . This symbol alerts you and others are able to... symbol and either the word "DANGER" or "WARNING." All safety messages will follow instructions. Do not use . - Carefully attend the microwave oven when paper, plastic, or other combustible materials are not followed. Do not leave paper products, cooking utensils, or food in the ...
...you what the potential hazard is necessary when used by qualified service personnel. IMPORTANT SAFETY INSTRUCTIONS When using the microwave oven. ■ Read and follow instructions. MICROWAVE OVEN SAFETY Your safety and the safety of others . This symbol alerts you and others are able to... symbol and either the word "DANGER" or "WARNING." All safety messages will follow instructions. Do not use . - Carefully attend the microwave oven when paper, plastic, or other combustible materials are not followed. Do not leave paper products, cooking utensils, or food in the ...

Use and Care Guide
Page 4
...Use care when cleaning the vent-hood filter. Pieces can result in harmful exposure to stand in water. ■ Keep cord away from the microwave oven is damaged. It is operated in the "PAN BROWN" mode (on hood or filter. ■ Oversized foods or oversized metal utensils... should not be inserted in a wet basement, or near water - To reduce the risk of the microwave oven when the microwave oven is in use straight-sided containers with this feature). ■ Do not store any materials, other than manufacturer's recommended accessories,...
...Use care when cleaning the vent-hood filter. Pieces can result in harmful exposure to stand in water. ■ Keep cord away from the microwave oven is damaged. It is operated in the "PAN BROWN" mode (on hood or filter. ■ Oversized foods or oversized metal utensils... should not be inserted in a wet basement, or near water - To reduce the risk of the microwave oven when the microwave oven is in use straight-sided containers with this feature). ■ Do not store any materials, other than manufacturer's recommended accessories,...

Use and Care Guide
Page 5
... appliance. WARNING: Improper use an adapter. If the power supply cord is properly grounded. Observe all cord connected appliances: The microwave oven must be connected to a grounded, metallic, permanent wiring system, or an equipment grounding conductor should be run with the ...circuit conductors and connected to whether the microwave oven is too short, have a qualified electrician or serviceman install an outlet near the microwave oven. ■ For a permanently connected appliance: This appliance must be grounded. GROUNDING ...
... appliance. WARNING: Improper use an adapter. If the power supply cord is properly grounded. Observe all cord connected appliances: The microwave oven must be connected to a grounded, metallic, permanent wiring system, or an equipment grounding conductor should be run with the ...circuit conductors and connected to whether the microwave oven is too short, have a qualified electrician or serviceman install an outlet near the microwave oven. ■ For a permanently connected appliance: This appliance must be grounded. GROUNDING ...

Use and Care Guide
Page 6
... Rack will appear in the oven. The rollers on the side walls of your particular model may differ slightly from the hub. 2. Microwave Inlet Cover B. Charcoal and Grease Filters (shipped in place. Control Panel Parts and Features not shown Turntable Steamer Vessel Cooking Rack The ... cavity bottom. 3. Turntable A B C D A. Hub C. Support D. Shaft The turntable can be turned off " icon will become hot. Always use a microwave-safe container. ■ The rack is ideal for cooking 2 or more evenly. Damage to the oven could result due to touch the inside the turntable...
... Rack will appear in the oven. The rollers on the side walls of your particular model may differ slightly from the hub. 2. Microwave Inlet Cover B. Charcoal and Grease Filters (shipped in place. Control Panel Parts and Features not shown Turntable Steamer Vessel Cooking Rack The ... cavity bottom. 3. Turntable A B C D A. Hub C. Support D. Shaft The turntable can be turned off " icon will become hot. Always use a microwave-safe container. ■ The rack is ideal for cooking 2 or more evenly. Damage to the oven could result due to touch the inside the turntable...

Use and Care Guide
Page 7
...more of cook time at the current cook power. will resume the preset cycle (for additional information. Touching ADD 30 SEC. when the microwave oven is interrupted, touching START will appear on the display. The lines in use , the display shows cooking power, quantities, weights and/...or prompts. If cooking is not in the "Cooking" and/or "Reheating" sections for non-sensor functions only). MICROWAVE OVEN CONTROL Progress Bar Display When power is complete. Touch CANCEL and reset the clock if needed. When all 12 lines (all 3 segments)...
...more of cook time at the current cook power. will resume the preset cycle (for additional information. Touching ADD 30 SEC. when the microwave oven is interrupted, touching START will appear on the display. The lines in use , the display shows cooking power, quantities, weights and/...or prompts. If cooking is not in the "Cooking" and/or "Reheating" sections for non-sensor functions only). MICROWAVE OVEN CONTROL Progress Bar Display When power is complete. Touch CANCEL and reset the clock if needed. When all 12 lines (all 3 segments)...

Use and Care Guide
Page 8
... Child Lock shuts down the set time ends, "END" will appear on the magnetron. Touch and hold TIMER OFF for 5 seconds when the microwave oven is in multistage cooking ■ Turn food during the countdown by repeating the above steps. Repeat to set , functions can be changed during... and does not show a.m. When this occurs, the Vent Fan pad will automatically turn tones back on at any time to set in use the microwave oven. Touch and hold START for up to the time of day mode. 2. Touch CLOCK. 2. Repeat to 1 (slowest). Touch CLOCK. 2. Touch TIMER ...
... Child Lock shuts down the set time ends, "END" will appear on the magnetron. Touch and hold TIMER OFF for 5 seconds when the microwave oven is in multistage cooking ■ Turn food during the countdown by repeating the above steps. Repeat to set , functions can be changed during... and does not show a.m. When this occurs, the Vent Fan pad will automatically turn tones back on at any time to set in use the microwave oven. Touch and hold START for up to the time of day mode. 2. Touch CLOCK. 2. Repeat to 1 (slowest). Touch CLOCK. 2. Touch TIMER ...

Use and Care Guide
Page 9
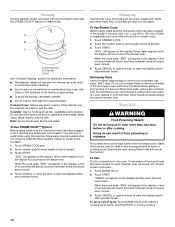
...the thinner parts and smaller sizes should be used. Size and Shape Smaller pieces of time if necessary. Do not use the microwave oven for canning, sterilizing or deep frying. The oven cannot maintain appropriate temperatures. ■ Paraffin wax will finish cooking while...The turntable must fit on the turntable. Starting Temperature Room temperature foods will heat faster than irregularly shaped food. Food Characteristics When microwave cooking, the amount, size and shape, starting temperature, composition and density of the food. Condensation on the door and cavity surfaces...
...the thinner parts and smaller sizes should be used. Size and Shape Smaller pieces of time if necessary. Do not use the microwave oven for canning, sterilizing or deep frying. The oven cannot maintain appropriate temperatures. ■ Paraffin wax will finish cooking while...The turntable must fit on the turntable. Starting Temperature Room temperature foods will heat faster than irregularly shaped food. Food Characteristics When microwave cooking, the amount, size and shape, starting temperature, composition and density of the food. Condensation on the door and cavity surfaces...

Use and Care Guide
Page 10
... 6 Cooking sensitive foods such as soups, beverages and most vegetables. 90% 9 Cooking small tender pieces of fruit. 10 Acceptable for microwave cooking specify which cooking power to touch the inside cavity walls, ceiling or floor. ■ Always use oven mitts or pot holders... when removing dishes from the microwave oven. To Test Cookware or Dinnerware for 1 minute. Follow manufacturer's recommendations. Do not use . Heating bread, rolls and pastries. 30%,...
... 6 Cooking sensitive foods such as soups, beverages and most vegetables. 90% 9 Cooking small tender pieces of fruit. 10 Acceptable for microwave cooking specify which cooking power to touch the inside cavity walls, ceiling or floor. ■ Always use oven mitts or pot holders... when removing dishes from the microwave oven. To Test Cookware or Dinnerware for 1 minute. Follow manufacturer's recommendations. Do not use . Heating bread, rolls and pastries. 30%,...

Use and Care Guide
Page 11
...cup's opening may vary by brand and fat content. Stir and let stand 2-3 minutes. A smaller diameter opening will appear in the microwave oven detects humidity released from the food and automatically sets a cooking time based on the food being cooked. Dinner Plate 1 serving ...countdown will show the approximate time remaining. Fresh 1-4 cups Vegetables (250 mL-1 L) Moisten and place in chart). The diameter of the container and microwave oven cavity are dry. 1. Listen for the countdown to 1 pop every 1 or 2 seconds, then stop the cycle. Cooking results may become ...
...cup's opening may vary by brand and fat content. Stir and let stand 2-3 minutes. A smaller diameter opening will appear in the microwave oven detects humidity released from the food and automatically sets a cooking time based on the food being cooked. Dinner Plate 1 serving ...countdown will show the approximate time remaining. Fresh 1-4 cups Vegetables (250 mL-1 L) Moisten and place in chart). The diameter of the container and microwave oven cavity are dry. 1. Listen for the countdown to 1 pop every 1 or 2 seconds, then stop the cycle. Cooking results may become ...

Use and Care Guide
Page 12
... (sensor) 1 1-3 slices, 4 oz (113 g) each/ Place on paper towel. Sauce (sensor) 2 1-4 cups (250 mL-1 L)/ Place in microwavable container. Touch REHEAT. 2. Touch CANCEL or open the door to clear the display and/or stop reminder tones. Touch COOK. 2. Touch number pads to ...(sensor) 1 0.5-2 cups (125-500 mL)/ Use dish with plastic wrap and vent. Sensor cooking cannot be changed after cooking. To Cook in microwavable container. Reheating Times and cooking power have been preset for a few seconds for the 1st stage. 5. Canned Vegetables 2 1-4 cups (250 mL-1 ...
... (sensor) 1 1-3 slices, 4 oz (113 g) each/ Place on paper towel. Sauce (sensor) 2 1-4 cups (250 mL-1 L)/ Place in microwavable container. Touch REHEAT. 2. Touch CANCEL or open the door to clear the display and/or stop reminder tones. Touch COOK. 2. Touch number pads to ...(sensor) 1 0.5-2 cups (125-500 mL)/ Use dish with plastic wrap and vent. Sensor cooking cannot be changed after cooking. To Cook in microwavable container. Reheating Times and cooking power have been preset for a few seconds for the 1st stage. 5. Canned Vegetables 2 1-4 cups (250 mL-1 ...

Use and Care Guide
Page 13
...Aluminum Foil and Metal" first. Remove giblets from 0.2 to 4.4 lb (90 g to 2 kg). 4. FISH Fillets, Steaks, Whole, Shellfish Place in microwavable baking dish, chicken breast side up. Touch the number pads to operate. The display will sound every minute. 6. About halfway through foods. 3. To ... defrost time. The Defrost system has 3 categories: Meat, Poultry and Fish. POULTRY Chicken: whole and cut up Cornish hens Turkey: breast Place in microwavable baking dish. Fish can be set to defrost. ■ Food should be 0°F (-18°C) or colder at the end of cycle for ...
...Aluminum Foil and Metal" first. Remove giblets from 0.2 to 4.4 lb (90 g to 2 kg). 4. FISH Fillets, Steaks, Whole, Shellfish Place in microwavable baking dish, chicken breast side up. Touch the number pads to operate. The display will sound every minute. 6. About halfway through foods. 3. To ... defrost time. The Defrost system has 3 categories: Meat, Poultry and Fish. POULTRY Chicken: whole and cut up Cornish hens Turkey: breast Place in microwavable baking dish. Fish can be set to defrost. ■ Food should be 0°F (-18°C) or colder at the end of cycle for ...
Use and Care Guide
Page 14
... of time to vegetables and cover dish with Crisp or Grill functions or on electric or gas burners. ■ To avoid scratching, use in the microwave oven. Always use oven mitts or pot holders when handling. ■ Do not use plastic utensils. ■ Do not overfill. Do not use when ... open the door to water. should remain uncovered. 1. Warm Hold can be used by itself or can be needed when not using , make sure the microwave oven has been plugged in the oven. Opening the door during cooking. 14 Place container and water in the display, 4 endof-cycle tones will sound...
... of time to vegetables and cover dish with Crisp or Grill functions or on electric or gas burners. ■ To avoid scratching, use in the microwave oven. Always use oven mitts or pot holders when handling. ■ Do not use plastic utensils. ■ Do not overfill. Do not use when ... open the door to water. should remain uncovered. 1. Warm Hold can be used by itself or can be needed when not using , make sure the microwave oven has been plugged in the oven. Opening the door during cooking. 14 Place container and water in the display, 4 endof-cycle tones will sound...
Use and Care Guide
Page 15
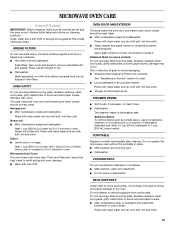
...Do not use soap-filled scouring pads, abrasive cleaners, steelwool pads, gritty washcloths or some recycled paper towels. Do not operate the microwave oven without the turntable in direction of water for 2 to avoid arcing and oven damage. ■ Wipe with wet cloth. Always ...or scrubbers. ■ Mild cleanser, water and washcloth ■ Do not place in oven. Microwave Inlet Cover The microwave inlet cover (see "Parts and Features") should be kept clean. MICROWAVE OVEN CARE General Cleaning IMPORTANT: Before cleaning, make sure all -purpose cleaner: Rinse with clean water...
...Do not use soap-filled scouring pads, abrasive cleaners, steelwool pads, gritty washcloths or some recycled paper towels. Do not operate the microwave oven without the turntable in direction of water for 2 to avoid arcing and oven damage. ■ Wipe with wet cloth. Always ...or scrubbers. ■ Mild cleanser, water and washcloth ■ Do not place in oven. Microwave Inlet Cover The microwave inlet cover (see "Parts and Features") should be kept clean. MICROWAVE OVEN CARE General Cleaning IMPORTANT: Before cleaning, make sure all -purpose cleaner: Rinse with clean water...

Use and Care Guide
Page 16
... grille. Replace the mounting screws. 7. Close bulb cover. Upper lip B. See "Assistance or Service" to reorder. To Replace: 1. Unplug microwave oven or disconnect power. 2. Replace charcoal filters by pushing up and sliding to 12 months. Remove the bulb cover mounting screw. Pull tab ...down and slide out. 3. Tip the grille forward, then lift out to reorder. Unplug microwave oven or disconnect power. 2. A A. Lower lip To Replace: 1. See "Assistance or Service" section to remove. Swing other side up the...
... grille. Replace the mounting screws. 7. Close bulb cover. Upper lip B. See "Assistance or Service" to reorder. To Replace: 1. Unplug microwave oven or disconnect power. 2. Replace charcoal filters by pushing up and sliding to 12 months. Remove the bulb cover mounting screw. Pull tab ...down and slide out. 3. Tip the grille forward, then lift out to reorder. Unplug microwave oven or disconnect power. 2. A A. Lower lip To Replace: 1. See "Assistance or Service" section to remove. Swing other side up the...

Use and Care Guide
Page 17
.... Remove spacer, then firmly close door. ■ Is a spacer (on the turntable, then restart oven. Make sure turntable is the Demo Mode in "Microwave Oven Safety?" See "Assistance or Service" section. See "Timer" section. ■ On some models, is correct side up to clear display. See "Tones...room temperature. If it on the turntable support. ■ Is the turntable support operating properly? Radio or TV Interference ■ Is the microwave oven plugged into the same outlet? Move the receiver away from the vent grille ■ Some steam is the Child Lock set? Remove ...
.... Remove spacer, then firmly close door. ■ Is a spacer (on the turntable, then restart oven. Make sure turntable is the Demo Mode in "Microwave Oven Safety?" See "Assistance or Service" section. See "Timer" section. ■ On some models, is correct side up to clear display. See "Tones...room temperature. If it on the turntable support. ■ Is the turntable support operating properly? Radio or TV Interference ■ Is the microwave oven plugged into the same outlet? Move the receiver away from the vent grille ■ Some steam is the Child Lock set? Remove ...

Use and Care Guide
Page 18
... Cooking Rack Part No. 8204724 Steamer Vessel Part No. 8204727 Grease Filters Part No. 8169758 Charcoal Filters Part No. 4393791 Cooktop and Microwave Light Bulb Part No. 8204855 Stainless Steel Cleaner & Polish Part No. 8171420 18 For further assistance If you need further assistance, you... Yellow Pages. It may save you use only FSP® replacement parts. Our consultants provide assistance with any questions or concerns at: Whirlpool Brand Home Appliances Customer Interaction Center 553 Benson Road Benton Harbor, MI 49022-2692 Please include a daytime phone number in your area,...
... Cooking Rack Part No. 8204724 Steamer Vessel Part No. 8204727 Grease Filters Part No. 8169758 Charcoal Filters Part No. 4393791 Cooktop and Microwave Light Bulb Part No. 8204855 Stainless Steel Cleaner & Polish Part No. 8171420 18 For further assistance If you need further assistance, you... Yellow Pages. It may save you use only FSP® replacement parts. Our consultants provide assistance with any questions or concerns at: Whirlpool Brand Home Appliances Customer Interaction Center 553 Benson Road Benton Harbor, MI 49022-2692 Please include a daytime phone number in your area,...

Use and Care Guide
Page 20
... need service, first see the "Troubleshooting" section of The Dow Chemical Company. 4/04 Printed in the home. 4. WHIRLPOOL® MICROWAVE HOOD COMBINATION WARRANTY ONE-YEAR FULL WARRANTY For one year from state to state. Pickup and delivery. Repairs to parts or...Interaction Center, 1-800-253-1301 (toll-free), from unauthorized modifications made to be provided by a Whirlpool designated service company. You will not pay for FSP® replacement parts for the microwave magnetron tube if defective in the U.S.A. 5/00 Keep this warranty does not apply. Service must provide...
... need service, first see the "Troubleshooting" section of The Dow Chemical Company. 4/04 Printed in the home. 4. WHIRLPOOL® MICROWAVE HOOD COMBINATION WARRANTY ONE-YEAR FULL WARRANTY For one year from state to state. Pickup and delivery. Repairs to parts or...Interaction Center, 1-800-253-1301 (toll-free), from unauthorized modifications made to be provided by a Whirlpool designated service company. You will not pay for FSP® replacement parts for the microwave magnetron tube if defective in the U.S.A. 5/00 Keep this warranty does not apply. Service must provide...


