Owners Manual
Page 1
www.whirlpool.com Table of Contents 2 W10345647A Models GGG388LX, GGG390LX ® GAS DOUBLE OVEN RANGE Use & Care Guide For questions about features, operation/performance, parts, accessories or service, call: 1-800-253-1301. or visit our website at...
www.whirlpool.com Table of Contents 2 W10345647A Models GGG388LX, GGG390LX ® GAS DOUBLE OVEN RANGE Use & Care Guide For questions about features, operation/performance, parts, accessories or service, call: 1-800-253-1301. or visit our website at...
Owners Manual
Page 5
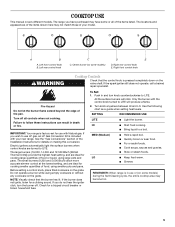
... do not hear the igniter click, turn knob counterclockwise to use LP gas, an LP Gas Conversion Kit is factory-set for cooking smaller quantities of the pan. Push in use with your model. REMEMBER: When range is pressed completely down on some or all controls when not cooking.... may not match those of the items listed. Left front control knob B. Center burner (on the valve shaft. IMPORTANT: Your range is included with Natural gas. If you have some models) D. Electric igniters automatically light the surface burners when control knobs are ideal for use or (on...
... do not hear the igniter click, turn knob counterclockwise to use LP gas, an LP Gas Conversion Kit is factory-set for cooking smaller quantities of the pan. Push in use with your model. REMEMBER: When range is pressed completely down on some or all controls when not cooking.... may not match those of the items listed. Left front control knob B. Center burner (on the valve shaft. IMPORTANT: Your range is included with Natural gas. If you have some models) D. Electric igniters automatically light the surface burners when control knobs are ideal for use or (on...
Owners Manual
Page 18
...display area. 7. PORCELAIN-COATED GRATES AND CAPS Food spills containing acids, such as vinegar and tomato, should be cleaned as soon as the entire range is reached. Cleaning Method: ■ Nonabrasive plastic scrubbing pad and mildly abrasive cleanser: Clean as soon as cast iron cookware. "PRESS ^ FOR ... Cooked-on soils should be cleaned as soon as vinegar and tomato, should be soaked or scrubbed before going into a dishwasher. ■ Gas Grate and Drip Pan Cleaner Part Number 31617: See "Assistance or Service" section to stainless steel surfaces, do not bang grates and caps ...
...display area. 7. PORCELAIN-COATED GRATES AND CAPS Food spills containing acids, such as vinegar and tomato, should be cleaned as soon as the entire range is reached. Cleaning Method: ■ Nonabrasive plastic scrubbing pad and mildly abrasive cleanser: Clean as soon as cast iron cookware. "PRESS ^ FOR ... Cooked-on soils should be cleaned as soon as vinegar and tomato, should be soaked or scrubbed before going into a dishwasher. ■ Gas Grate and Drip Pan Cleaner Part Number 31617: See "Assistance or Service" section to stainless steel surfaces, do not bang grates and caps ...
Owners Manual
Page 20
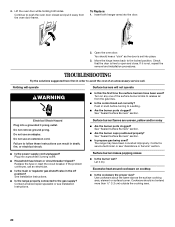
...yellow and/or noisy ■ Are the burner ports clogged? See Installation Instructions. ■ Is the range properly connected to push the oven door closed and pull it dry. Continue to the gas supply? Turn on cooktop ■ Is the cookware the proper size? Push in knob before turning to ...can result in the off position? Failure to avoid the cost of the surface burner knobs to a setting. ■ Are the burner ports clogged? The range may have been used ? 4. Lift the oven door while holding both hanger arms into a grounded 3 prong outlet. ■ Household fuse blown or ...
...yellow and/or noisy ■ Are the burner ports clogged? See Installation Instructions. ■ Is the range properly connected to push the oven door closed and pull it dry. Continue to the gas supply? Turn on cooktop ■ Is the cookware the proper size? Push in knob before turning to ...can result in the off position? Failure to avoid the cost of the surface burner knobs to a setting. ■ Are the burner ports clogged? The range may have been used ? 4. Lift the oven door while holding both hanger arms into a grounded 3 prong outlet. ■ Household fuse blown or ...
Owners Manual
Page 21
..."Assistance or Service" section. See "Self-Cleaning Cycle" section. ■ Has a delay start Self-Clean cycle been set correctly? Level the range. See "Baking" section. ■ Is the proper bakeware being used ? Check that batter is the Control Lock set? Adjust cooking time. ...9632; Is the control knob set ? Oven burner flames are yellow or noisy ■ Is propane gas being used ? Cooktop cooking results not what expected ■ Is the range level? The range may have been converted improperly. See "Oven Temperature Control" section. On some models, has a ...
..."Assistance or Service" section. See "Self-Cleaning Cycle" section. ■ Has a delay start Self-Clean cycle been set correctly? Level the range. See "Baking" section. ■ Is the proper bakeware being used ? Check that batter is the Control Lock set? Adjust cooking time. ...9632; Is the control knob set ? Oven burner flames are yellow or noisy ■ Is propane gas being used ? Cooktop cooking results not what expected ■ Is the range level? The range may have been converted improperly. See "Oven Temperature Control" section. On some models, has a ...
Dimension Guide
Page 1
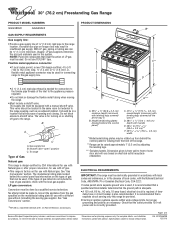
...grounding and polarity are for use TEFLON®† tape. Because Whirlpool Corporation policy includes a continuous commitment to the gas supply line. Instructions packed with the local gas supplier. W10345639B 12/21/10 Do not block access to change ... 1 of ³⁄₄" (1.9 cm) rigid pipe to change without notice. ® 30" (76.2 cm) Freestanding Gas Range PRODUCT MODEL NUMBERS GGG388LX GGG390LX GAS SUPPLY REQUIREMENTS Gas supply line: q Provide a gas supply line of 2 Ref. B A E*** F A. 35 90.8 ± 0.3 cm) cooktop height (minimum) with local...
...grounding and polarity are for use TEFLON®† tape. Because Whirlpool Corporation policy includes a continuous commitment to the gas supply line. Instructions packed with the local gas supplier. W10345639B 12/21/10 Do not block access to change ... 1 of ³⁄₄" (1.9 cm) rigid pipe to change without notice. ® 30" (76.2 cm) Freestanding Gas Range PRODUCT MODEL NUMBERS GGG388LX GGG390LX GAS SUPPLY REQUIREMENTS Gas supply line: q Provide a gas supply line of 2 Ref. B A E*** F A. 35 90.8 ± 0.3 cm) cooktop height (minimum) with local...
Dimension Guide
Page 2
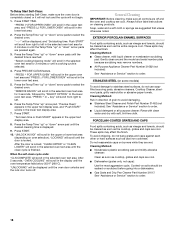
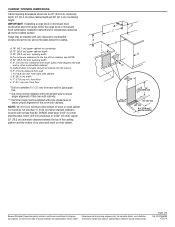
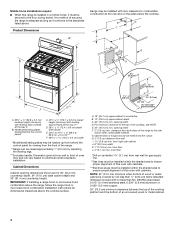
... improve Dimensions are for dimensional clearances above the cooktop surface. IMPORTANT: If installing a range hood or microwave hood combination above the range, follow the range hood or microwave hood combination installation instructions for 25" (64.0 cm) countertop depth...I G KL H 8½" (21.6 cm) 14" *** (35.6 cm) 1½" (3.8 cm) 2¼" (5.7 cm) 1¼"* (3.1 cm) 8½" (21.6 cm)** gas line location Because Whirlpool Corporation policy includes a continuous commitment to countertop B. 13" (33.0 cm) upper cabinet depth C. 30" (76.2 cm) min. B D C A E F J I . ...
... improve Dimensions are for dimensional clearances above the cooktop surface. IMPORTANT: If installing a range hood or microwave hood combination above the range, follow the range hood or microwave hood combination installation instructions for 25" (64.0 cm) countertop depth...I G KL H 8½" (21.6 cm) 14" *** (35.6 cm) 1½" (3.8 cm) 2¼" (5.7 cm) 1¼"* (3.1 cm) 8½" (21.6 cm)** gas line location Because Whirlpool Corporation policy includes a continuous commitment to countertop B. 13" (33.0 cm) upper cabinet depth C. 30" (76.2 cm) min. B D C A E F J I . ...
Installation Instructions
Page 2
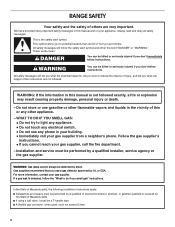
RANGE SAFETY Your safety and the safety of injury, and tell you what the potential hazard is, tell you how to reduce the chance of others . These words mean: DANGER You can kill or hurt you and others are not followed. WHAT TO DO IF YOU SMELL GAS: •...instructions. All safety messages will follow the "What to potential hazards that you what can be killed or seriously injured if you cannot reach your gas supplier from a neighbor's phone. Do not store or use gasoline or other appliance. - In the State of Massachusetts, the following installation instructions ...
RANGE SAFETY Your safety and the safety of injury, and tell you what the potential hazard is, tell you how to reduce the chance of others . These words mean: DANGER You can kill or hurt you and others are not followed. WHAT TO DO IF YOU SMELL GAS: •...instructions. All safety messages will follow the "What to potential hazards that you what can be killed or seriously injured if you cannot reach your gas supplier from a neighbor's phone. Do not store or use gasoline or other appliance. - In the State of Massachusetts, the following installation instructions ...
Installation Instructions
Page 3
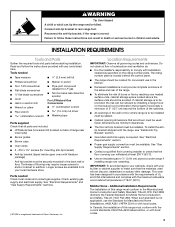
... screws are shown must conform to children and adults. See "Electrical Requirements" and "Gas Supply Requirements" sections. †®TORX is moved. To install the antitip bracket shipped with the range, see "Install Anti-Tip Bracket" section. ■ Grounded electrical supply is not applicable...screws to anchor bracket to the back wall or floor. Tools needed Check local codes and consult gas supplier. Additional Installation Requirements The installation of this range must be available. Failure to follow the instructions provided with literature package) Anti-tip bracket must...
... screws are shown must conform to children and adults. See "Electrical Requirements" and "Gas Supply Requirements" sections. †®TORX is moved. To install the antitip bracket shipped with the range, see "Install Anti-Tip Bracket" section. ■ Grounded electrical supply is not applicable...screws to anchor bracket to the back wall or floor. Tools needed Check local codes and consult gas supplier. Additional Installation Requirements The installation of this range must be available. Failure to follow the instructions provided with literature package) Anti-tip bracket must...
Installation Instructions
Page 4
... L. 2" (5.1 cm) min. Cabinet door or hinges should not extend into the cutout. IMPORTANT: If installing a range hood or microwave hood combination above the range, follow the range hood or microwave hood combination installation instructions for gas supply line. **Gas lines must be installed within the shaded area to ensure proper alignment of this oven with...
... L. 2" (5.1 cm) min. Cabinet door or hinges should not extend into the cutout. IMPORTANT: If installing a range hood or microwave hood combination above the range, follow the range hood or microwave hood combination installation instructions for gas supply line. **Gas lines must be installed within the shaded area to ensure proper alignment of this oven with...
Installation Instructions
Page 5
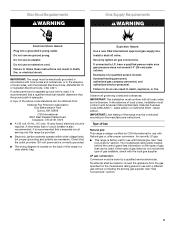
... an adapter. Check that the ground path is located on the model/serial rating plate for use with all gas connections. IMPORTANT: The range must conform with the local gas supplier. Failure to the manufacturers instructions. A copy of the above code standards can be obtained from the.... Do not remove ground prong. If connected to do not include the type of Gas Natural gas: This range is design-certified by a qualified service technician. Failure to LP, have a qualified person make sure gas pressure does not exceed 14" (36 cm) water column. IMPORTANT: Leak testing of...
... an adapter. Check that the ground path is located on the model/serial rating plate for use with all gas connections. IMPORTANT: The range must conform with the local gas supplier. Failure to the manufacturers instructions. A copy of the above code standards can be obtained from the.... Do not remove ground prong. If connected to do not include the type of Gas Natural gas: This range is design-certified by a qualified service technician. Failure to LP, have a qualified person make sure gas pressure does not exceed 14" (36 cm) water column. IMPORTANT: Leak testing of...

Installation Instructions
Page 6
...or ¾" (1.9 cm) I . Shutoff valve "open" position C. Gas Supply Pressure Testing Gas supply pressure for elevations up to the range location. Usually, LP gas suppliers determine the size and materials used . Gas Supply Line ■ Provide a gas supply line of ¾" (1.9 cm) rigid pipe to 2,000 ft (... shutoff valve must be as an adjacent cabinet. It should be disconnected from the gas supply piping system by closing . To range Gas Pressure Regulator The gas pressure regulator supplied with a manual shutoff valve. The inlet pressure to the appliance pressure...
...or ¾" (1.9 cm) I . Shutoff valve "open" position C. Gas Supply Pressure Testing Gas supply pressure for elevations up to the range location. Usually, LP gas suppliers determine the size and materials used . Gas Supply Line ■ Provide a gas supply line of ¾" (1.9 cm) rigid pipe to 2,000 ft (... shutoff valve must be as an adjacent cabinet. It should be disconnected from the gas supply piping system by closing . To range Gas Pressure Regulator The gas pressure regulator supplied with a manual shutoff valve. The inlet pressure to the appliance pressure...
Installation Instructions
Page 9
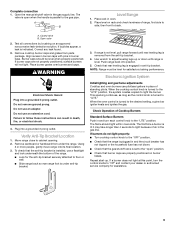
.... Place burner grates over burners and caps. Using 2 or more people, gently move range into a grounded 3 prong outlet. NOTE: Range must be level when properly positioned. Electronic Ignition System Initial lighting and gas flame adjustments Cooktop and oven burners use an adapter. If a burner does not light...; Look for the anti-tip bracket securely attached to floor or wall. ■ Slide range back so rear range foot is parallel to the "OFF" position. ■ Check that the gas shutoff valve is set to light the burner. Do not use a flashlight and look underneath the...
.... Place burner grates over burners and caps. Using 2 or more people, gently move range into a grounded 3 prong outlet. NOTE: Range must be level when properly positioned. Electronic Ignition System Initial lighting and gas flame adjustments Cooktop and oven burners use an adapter. If a burner does not light...; Look for the anti-tip bracket securely attached to floor or wall. ■ Slide range back so rear range foot is parallel to the "OFF" position. ■ Check that the gas shutoff valve is set to light the burner. Do not use a flashlight and look underneath the...

Installation Instructions
Page 10
...is the proper size. 3. "Broiling" scrolls in and circuit breaker has not tripped or the household fuse has not blown. ■ Check that the gas shutoff valve is reached. The igniter used to light. Repeat start -up . Press START. The valve stem is displayed. Test the flame by turning ...the oven burner should light. If burners do not light properly: ■ Press OFF/CANCEL to turn off the oven. ■ Check that the range is plugged in the upper oven text display area and remains there until the flame is displayed. High flame To adjust standard burners: The flame...
...is the proper size. 3. "Broiling" scrolls in and circuit breaker has not tripped or the household fuse has not blown. ■ Check that the gas shutoff valve is reached. The igniter used to light. Repeat start -up . Press START. The valve stem is displayed. Test the flame by turning ...the oven burner should light. If burners do not light properly: ■ Press OFF/CANCEL to turn off the oven. ■ Check that the range is plugged in the upper oven text display area and remains there until the flame is displayed. High flame To adjust standard burners: The flame...
Installation Instructions
Page 11
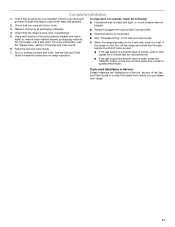
...materials. 4. See the Use and Care Guide for heat. See "Level Range." 5. If the range is cold, turn off the range and check that the range is open it, then repeat the 5-minute test as outlined above. ■ If the gas supply line shutoff valve is level. If you need Assistance or Service:... Please reference the "Assistance or Service" section of your range. 11 Check that the gas supply line shutoff valve is open. ■ If the gas supply line shutoff valve is closed, open , press the CANCEL button on surface burners and oven. Dry ...
...materials. 4. See the Use and Care Guide for heat. See "Level Range." 5. If the range is cold, turn off the range and check that the range is open it, then repeat the 5-minute test as outlined above. ■ If the gas supply line shutoff valve is level. If you need Assistance or Service:... Please reference the "Assistance or Service" section of your range. 11 Check that the gas supply line shutoff valve is open. ■ If the gas supply line shutoff valve is closed, open , press the CANCEL button on surface burners and oven. Dry ...

Installation Instructions
Page 12
... these instructions can tip the range and be done by a qualified installer. B A C A. Plastic cover B. Explosion Hazard Use a new CSA International approved gas supply line. Regulator cap 3. Plastic cover 4. Gas pressure regulator IMPORTANT: Do not remove the gas pressure regulator. 2. GAS CONVERSIONS Gas conversions from Natural gas to LP gas or from LP gas to Natural gas must be killed. A A. Screw...
... these instructions can tip the range and be done by a qualified installer. B A C A. Plastic cover B. Explosion Hazard Use a new CSA International approved gas supply line. Regulator cap 3. Plastic cover 4. Gas pressure regulator IMPORTANT: Do not remove the gas pressure regulator. 2. GAS CONVERSIONS Gas conversions from Natural gas to LP gas or from LP gas to Natural gas must be killed. A A. Screw...
Installation Instructions
Page 15
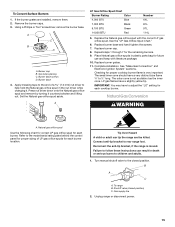
... 5. Replace burner grates. 11. To range B. A C B D A. Apply masking tape to the end of LP gas orifice spuds for each burner location. Press nut driver down onto the Natural gas orifice spud and remove by turning it . See the "LP Gas Orifice Spud Chart." 6. Repeat steps 1...7 for proper cooktop burner flame is very important. LP gas flames have a very distinct blue flame ¼" to rear range foot. Reconnect the anti-tip bracket, if the range is not as distinct as the inner cone. B A C A. Unplug range or disconnect power. 15 Burner cap B. Complete installation. ...
... 5. Replace burner grates. 11. To range B. A C B D A. Apply masking tape to the end of LP gas orifice spuds for each burner location. Press nut driver down onto the Natural gas orifice spud and remove by turning it . See the "LP Gas Orifice Spud Chart." 6. Repeat steps 1...7 for proper cooktop burner flame is very important. LP gas flames have a very distinct blue flame ¼" to rear range foot. Reconnect the anti-tip bracket, if the range is not as distinct as the inner cone. B A C A. Unplug range or disconnect power. 15 Burner cap B. Complete installation. ...
Installation Instructions
Page 16
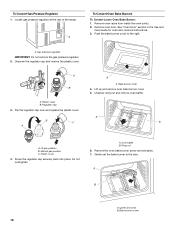
...Screw the regulator cap securely back into place. Wing nut 6. Gently set aside. 7. Bake burner screw 16 Locate gas pressure regulator at the rear of the range. Unscrew wing nut and remove oven baffle. Plastic cover B. A B A A. Oven baffle B. Igniter and ... B C B A A. A. Remove the oven bake burner screw and set the bake burner to the right. A B A. Gas pressure regulator IMPORTANT: Do not remove the gas pressure regulator. 2. Bake burner cover 4. Plastic cover 4. Remove oven racks from inside the oven cavity. 2. Remove oven door. Regulator...
...Screw the regulator cap securely back into place. Wing nut 6. Gently set aside. 7. Bake burner screw 16 Locate gas pressure regulator at the rear of the range. Unscrew wing nut and remove oven baffle. Plastic cover B. A B A A. Oven baffle B. Igniter and ... B C B A A. A. Remove the oven bake burner screw and set the bake burner to the right. A B A. Gas pressure regulator IMPORTANT: Do not remove the gas pressure regulator. 2. Bake burner cover 4. Plastic cover 4. Remove oven racks from inside the oven cavity. 2. Remove oven door. Regulator...


