Owners Manual
Page 1
or visit our website at... www.whirlpool.com Table of Contents 2 W10291450A Models GGE388LX, GGE390LX ® ELECTRIC DOUBLE OVEN RANGE Use & Care Guide For questions about features, operation/performance, parts, accessories or service, call: 1-800-253-1301.
or visit our website at... www.whirlpool.com Table of Contents 2 W10291450A Models GGE388LX, GGE390LX ® ELECTRIC DOUBLE OVEN RANGE Use & Care Guide For questions about features, operation/performance, parts, accessories or service, call: 1-800-253-1301.
Owners Manual
Page 2
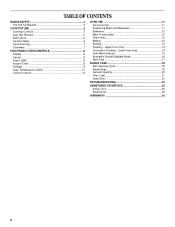
Upper Oven Only 14 Convection Cooking - TABLE OF CONTENTS RANGE SAFETY 3 The Anti-Tip Bracket 3 COOKTOP USE 5 Cooktop Controls 5 Dual Size Element 5 Warm Zone 6 Ceramic Glass 6 Home Canning 7 Cookware 7 ELECTRONIC OVEN CONTROLS 8 Display 8 Cancel 8 Oven ... 12 Oven Vents 12 Baking 12 Broiling 13 Toasting - Lower Oven Only 14 Hold Warm Feature 15 Automatic Shutoff/Sabbath Mode 16 Start Time 17 RANGE CARE 18 Self-Cleaning Cycle 18 SteamClean 19 General Cleaning 20 Oven Light 21 Oven Door 21 TROUBLESHOOTING 22 ASSISTANCE OR SERVICE 23 In the...
Upper Oven Only 14 Convection Cooking - TABLE OF CONTENTS RANGE SAFETY 3 The Anti-Tip Bracket 3 COOKTOP USE 5 Cooktop Controls 5 Dual Size Element 5 Warm Zone 6 Ceramic Glass 6 Home Canning 7 Cookware 7 ELECTRONIC OVEN CONTROLS 8 Display 8 Cancel 8 Oven ... 12 Oven Vents 12 Baking 12 Broiling 13 Toasting - Lower Oven Only 14 Hold Warm Feature 15 Automatic Shutoff/Sabbath Mode 16 Start Time 17 RANGE CARE 18 Self-Cleaning Cycle 18 SteamClean 19 General Cleaning 20 Oven Light 21 Oven Door 21 TROUBLESHOOTING 22 ASSISTANCE OR SERVICE 23 In the...
Owners Manual
Page 3
...others are not followed. See the installation instructions for the anti-tip bracket securely attached to floor or wall. • Slide range back so rear range foot is under anti-tip bracket. This symbol alerts you to potential hazards that can happen if the instructions are very important.... The Anti-Tip Bracket The range will tell you what can kill or hurt you don't immediately follow instructions. Always read and obey all safety messages. All safety ...
...others are not followed. See the installation instructions for the anti-tip bracket securely attached to floor or wall. • Slide range back so rear range foot is under anti-tip bracket. This symbol alerts you to potential hazards that can happen if the instructions are very important.... The Anti-Tip Bracket The range will tell you what can kill or hurt you don't immediately follow instructions. Always read and obey all safety messages. All safety ...

Owners Manual
Page 4
...in burns from steam. Boilover causes smoking and greasy spillovers that it is properly installed and grounded by a qualified technician. ■ Never Use the Range for a good seal. If a wet sponge or cloth is in injury. ■ Keep Oven Vent Ducts Unobstructed. ■ Placement of oven ...spillage due to cool. Grease should be positioned so that may result in Manual. ■ Before Self-Cleaning the Oven - Be sure the range is turned inward, and does not extend over adjacent surface units. ■ Do Not Soak Removable Heating Elements - Select utensils having flat bottoms...
...in burns from steam. Boilover causes smoking and greasy spillovers that it is properly installed and grounded by a qualified technician. ■ Never Use the Range for a good seal. If a wet sponge or cloth is in injury. ■ Keep Oven Vent Ducts Unobstructed. ■ Placement of oven ...spillage due to cool. Grease should be positioned so that may result in Manual. ■ Before Self-Cleaning the Oven - Be sure the range is turned inward, and does not extend over adjacent surface units. ■ Do Not Soak Removable Heating Elements - Select utensils having flat bottoms...
Owners Manual
Page 5
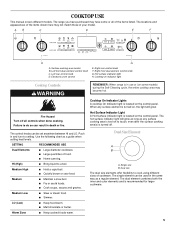
... setting. Medium ■ Maintain a slow boil. ■ Fry or sauté foods. ■ Cook soups, sauces and gravies. REMEMBER: When range is located on some or all controls when done cooking. The single element can be set anywhere between HI and LO. The locations and appearances...surface cooking area(s) is turned on indicator light Cooktop Controls WARNING Fire Hazard Turn off . COOKTOP USE This manual covers different models. The range you have purchased may not match those of food. ■ Home canning. Surface cooking area locator B. Left front duel element control ...
... setting. Medium ■ Maintain a slow boil. ■ Fry or sauté foods. ■ Cook soups, sauces and gravies. REMEMBER: When range is located on some or all controls when done cooking. The single element can be set anywhere between HI and LO. The locations and appearances...surface cooking area(s) is turned on indicator light Cooktop Controls WARNING Fire Hazard Turn off . COOKTOP USE This manual covers different models. The range you have purchased may not match those of food. ■ Home canning. Surface cooking area locator B. Left front duel element control ...
Owners Manual
Page 8
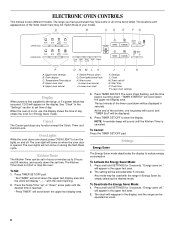
...H. See "Clock" in use, the display shows the time of the items listed. When the oven is not in the "Settings" section to the range, or if a power failure has occurred, 12:00 will scroll down . The oven lights will sound until the desired time is in Energy Saver by...Press TIMER SET/OFF to reduce energy consumption. The Energy Saver mode deactivates the display to clear the display. The setting will display "--:--" with the range in Energy Saver mode. The colon stops flashing, and the time begins counting down the upper text display area and the clock will be displayed...
...H. See "Clock" in use, the display shows the time of the items listed. When the oven is not in the "Settings" section to the range, or if a power failure has occurred, 12:00 will scroll down . The oven lights will sound until the desired time is in Energy Saver by...Press TIMER SET/OFF to reduce energy consumption. The Energy Saver mode deactivates the display to clear the display. The setting will display "--:--" with the range in Energy Saver mode. The colon stops flashing, and the time begins counting down the upper text display area and the clock will be displayed...
Owners Manual
Page 17
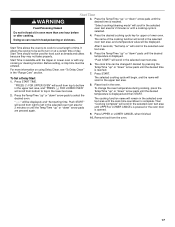
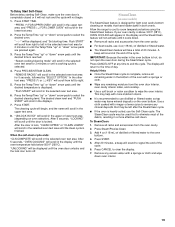
... food such as breads and cakes because they may not bake properly. Start Time is reached. After 3 seconds, "Set temp or" will remain in the "Range Care" section. Press the Temp/Time "up " or "down " arrow pads until the desired time is available with the Upper or Lower oven or with...
... food such as breads and cakes because they may not bake properly. Start Time is reached. After 3 seconds, "Set temp or" will remain in the "Range Care" section. Press the Temp/Time "up " or "down " arrow pads until the desired time is available with the Upper or Lower oven or with...
Owners Manual
Page 18
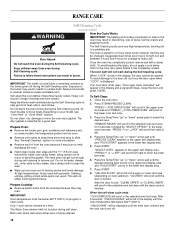
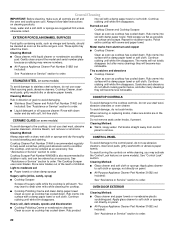
... during self clean. Heavy soil results in the upper or lower text area (depending on oven selection). "SELECT LEVEL" appears in the oven may melt. RANGE CARE Self-Cleaning Cycle (on some birds is preset for a 3 hour clean cycle; The oven is extremely sensitive to slide. IMPORTANT: The health of some...
... during self clean. Heavy soil results in the upper or lower text area (depending on oven selection). "SELECT LEVEL" appears in the oven may melt. RANGE CARE Self-Cleaning Cycle (on some birds is preset for a 3 hour clean cycle; The oven is extremely sensitive to slide. IMPORTANT: The health of some...
Owners Manual
Page 19
.... 8. "Push START" will appear in both ovens. After the door is lock, "CLEAN UPPER" or "CLEAN LOWER" will take a total of the cycle. 6. Allow the range to cool to left after the SteamClean cycle. ■ If the oven is above 100°F (38°C), OVEN COOLING will scroll in the displays...
.... 8. "Push START" will appear in both ovens. After the door is lock, "CLEAN UPPER" or "CLEAN LOWER" will take a total of the cycle. 6. Allow the range to cool to left after the SteamClean cycle. ■ If the oven is above 100°F (38°C), OVEN COOLING will scroll in the displays...
Owners Manual
Page 20
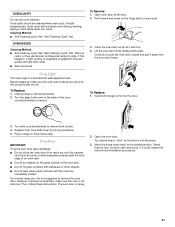
... creme into surface with a clean, wet cloth or sponge and dry thoroughly to condition the cooktop, and can be cleaned as soon as the entire range is recommended regularly to help avoid scratches, pitting and abrasions and to avoid streaking and staining. Scratches and abrasions do not use abrasive cleaners, steel...
... creme into surface with a clean, wet cloth or sponge and dry thoroughly to condition the cooktop, and can be cleaned as soon as the entire range is recommended regularly to help avoid scratches, pitting and abrasions and to avoid streaking and staining. Scratches and abrasions do not use abrasive cleaners, steel...
Owners Manual
Page 21
... Self-Cleaning cycle: See "Self-Cleaning Cycle" first. Turn the glass bulb cover in range or reconnect power. Lift the oven door while holding both hanger arms into place. 3. Turn...The oven door is not, repeat the removal and installation procedures. 21 Unplug range or disconnect power. 2. Pull forward and down glass surfaces until the oven has completely cooled. To Replace: 1.... For normal range use oven cleaners. Open the oven door. If it is heavy. 2. OVEN RACKS Cleaning Method: ...
... Self-Cleaning cycle: See "Self-Cleaning Cycle" first. Turn the glass bulb cover in range or reconnect power. Lift the oven door while holding both hanger arms into place. 3. Turn...The oven door is not, repeat the removal and installation procedures. 21 Unplug range or disconnect power. 2. Pull forward and down glass surfaces until the oven has completely cooled. To Replace: 1.... For normal range use oven cleaners. Open the oven door. If it is heavy. 2. OVEN RACKS Cleaning Method: ...
Owners Manual
Page 22
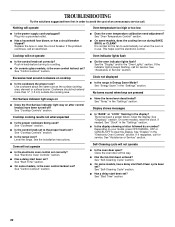
...during BAKE, BROIL or CLEAN? Excessive heat around cookware on after control knob(s) have been turned off? See "Cooktop Controls" section. Level the range. See "Electronic Oven Controls" section. ■ Has a delay start been set ? See "Control Lockout" section. Oven indicator lights flash &#...Does the Hot Surface indicator light stay on cooktop ■ Is the cookware the proper size? See "Cooktop Controls" section. ■ Is the range level? See the Installation Instructions. See "Energy Saver" in the "Settings" section. ■ Is the display showing a letter followed by a ...
...during BAKE, BROIL or CLEAN? Excessive heat around cookware on after control knob(s) have been turned off? See "Cooktop Controls" section. Level the range. See "Electronic Oven Controls" section. ■ Has a delay start been set ? See "Control Lockout" section. Oven indicator lights flash &#...Does the Hot Surface indicator light stay on cooktop ■ Is the cookware the proper size? See "Cooktop Controls" section. ■ Is the range level? See the Installation Instructions. See "Energy Saver" in the "Settings" section. ■ Is the display showing a letter followed by a ...
Owners Manual
Page 23
...9632; Is the range level? Use aluminum foil to your nearest Whirlpool designated service center. It may save you the cost of the crust and/or reduce baking temperature. If you need replacement parts If you use only FSP® replacement parts. Whirlpool designated service technicians are... need further assistance, you can write to order replacement parts, we recommend that batter is level in your area, you still need to Whirlpool Corporation with : ■ Features and specifications on our full line of your appliance. See "Positioning Racks and Bakeware" section. ■...
...9632; Is the range level? Use aluminum foil to your nearest Whirlpool designated service center. It may save you the cost of the crust and/or reduce baking temperature. If you need replacement parts If you use only FSP® replacement parts. Whirlpool designated service technicians are... need further assistance, you can write to order replacement parts, we recommend that batter is level in your area, you still need to Whirlpool Corporation with : ■ Features and specifications on our full line of your appliance. See "Positioning Racks and Bakeware" section. ■...
Dimension Guide
Page 1
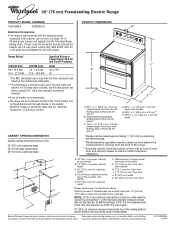
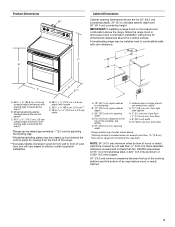
...33.0 cm) upper cabinet depth C. 30" (76.2 cm) min. U.S.A Only" section. For complete details, see the following Range Rating chart). Specifications subject to change without notice. If local codes do not permit ground through flexible or nonmetallic sheathed, copper or ...opening width F. Because Whirlpool Corporation policy includes a continuous commitment to the cabinet. Use a 3-wire, UL listed, 40- ® 30" (76 cm) Freestanding Electric Range PRODUCT MODEL NUMBERS GGE388LX GGE390LX PRODUCT DIMENSIONS B** Electrical Connection: q This range is manufactured with ...
...33.0 cm) upper cabinet depth C. 30" (76.2 cm) min. U.S.A Only" section. For complete details, see the following Range Rating chart). Specifications subject to change without notice. If local codes do not permit ground through flexible or nonmetallic sheathed, copper or ...opening width F. Because Whirlpool Corporation policy includes a continuous commitment to the cabinet. Use a 3-wire, UL listed, 40- ® 30" (76 cm) Freestanding Electric Range PRODUCT MODEL NUMBERS GGE388LX GGE390LX PRODUCT DIMENSIONS B** Electrical Connection: q This range is manufactured with ...
Installation Instructions
Page 1
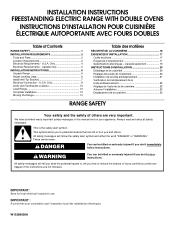
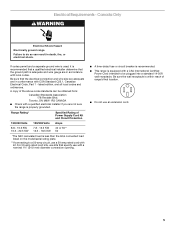
...inspector's use. IMPORTANT : À conserver pour consultation par l'inspecteur local des installations électriques. Canada Only 5 INSTALLATION INSTRUCTIONS 6 Unpack Range 6 Adjust Leveling Legs 6 Install Anti-Tip Bracket 7 Electrical Connection - These words mean: DANGER You can be killed or seriously injured if... you don't immediately follow instructions. W10289536A U.S.A. Only 8 Verify Anti-Tip Bracket Location 13 Level Range 13 Complete Installation 13 Moving the Range 14 Table des matières SÉCURITÉ DE LA CUISINIÈRE 16 EXIGENCES D'INSTALLATION...
...inspector's use. IMPORTANT : À conserver pour consultation par l'inspecteur local des installations électriques. Canada Only 5 INSTALLATION INSTRUCTIONS 6 Unpack Range 6 Adjust Leveling Legs 6 Install Anti-Tip Bracket 7 Electrical Connection - These words mean: DANGER You can be killed or seriously injured if... you don't immediately follow instructions. W10289536A U.S.A. Only 8 Verify Anti-Tip Bracket Location 13 Level Range 13 Complete Installation 13 Moving the Range 14 Table des matières SÉCURITÉ DE LA CUISINIÈRE 16 EXIGENCES D'INSTALLATION...
Installation Instructions
Page 2
... screwdriver 3.2 mm) drill bit Parts supplied Check that projects horizontally a minimum of 5" (12.7 cm) beyond the bottom of securing the range is the installer's responsibility to be used in the kitchen. ■ To eliminate the risk of 194°F (90°C). The cord... complies with installation clearances specified on the model/serial rating plate. If cabinet storage is located behind the control panel. ■ The range should be securely mounted to terminal block) ■ 3 - See "Electrical Requirements" section. INSTALLATION REQUIREMENTS Tools and Parts Gather the ...
... screwdriver 3.2 mm) drill bit Parts supplied Check that projects horizontally a minimum of 5" (12.7 cm) beyond the bottom of securing the range is the installer's responsibility to be used in the kitchen. ■ To eliminate the risk of 194°F (90°C). The cord... complies with installation clearances specified on the model/serial rating plate. If cabinet storage is located behind the control panel. ■ The range should be securely mounted to terminal block) ■ 3 - See "Electrical Requirements" section. INSTALLATION REQUIREMENTS Tools and Parts Gather the ...
Installation Instructions
Page 3
...not slide all the way in * B. Model/serial/rating plates (located behind the control panel for viewing from wall or range will vary based on electric outlet receptacle installation. opening dimensions shown are for dimensional clearances above . *Nothing located in shaded areas... legs. **Model/serial/rating plates may be rotated up from floor Proper positioning of an unprotected wood or metal cabinet. 3 D. opening width F. A freestanding range may be installed next to countertop B. 13" (33.0 cm) upper cabinet depth C. 30" (76.2 cm) min. from floor J. 8" (20.3 cm...
...not slide all the way in * B. Model/serial/rating plates (located behind the control panel for viewing from wall or range will vary based on electric outlet receptacle installation. opening dimensions shown are for dimensional clearances above . *Nothing located in shaded areas... legs. **Model/serial/rating plates may be rotated up from floor Proper positioning of an unprotected wood or metal cabinet. 3 D. opening width F. A freestanding range may be installed next to countertop B. 13" (33.0 cm) upper cabinet depth C. 30" (76.2 cm) min. from floor J. 8" (20.3 cm...
Installation Instructions
Page 4
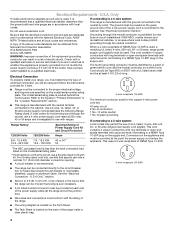
... listed, 40- If local codes do not permit ground through the neutral conductor is properly grounded. This uses a 3-wire receptacle of the range inside a clear plastic bag. 3-wire receptacle (10-50R) 4 See "Electrical Connection Section." and recreational vehicles, or an area where local... cord contains 3 copper conductors with ring terminals or open -end spade terminals with the ground connected to a 4-wire system: This range is recommended that a qualified electrical installer determine that specify use with local codes. See the "Electrical Connection - A copy of electrical...
... listed, 40- If local codes do not permit ground through the neutral conductor is properly grounded. This uses a 3-wire receptacle of the range inside a clear plastic bag. 3-wire receptacle (10-50R) 4 See "Electrical Connection Section." and recreational vehicles, or an area where local... cord contains 3 copper conductors with ring terminals or open -end spade terminals with the ground connected to a 4-wire system: This range is recommended that a qualified electrical installer determine that specify use with local codes. See the "Electrical Connection - A copy of electrical...
Installation Instructions
Page 5
... use with a nominal 1³⁄₈" (34.9 mm) diameter connection opening. ■ A time-delay fuse or circuit breaker is recommended. ■ This range is equipped with a CSA International Certified Power Cord intended to be obtained from: Canadian Standards Association 178 Rexdale Blvd. For 50-amp rated cord kits... so can be plugged into a standard 14-50R wall receptacle. Be sure that the electrical connection and wire size are not sure the range is within reach of Power Supply Cord Kit and Circuit Protection Amps 40 or 50** 50 *The NEC calculated load is adequate and wire...
... use with a nominal 1³⁄₈" (34.9 mm) diameter connection opening. ■ A time-delay fuse or circuit breaker is recommended. ■ This range is equipped with a CSA International Certified Power Cord intended to be obtained from: Canadian Standards Association 178 Rexdale Blvd. For 50-amp rated cord kits... so can be plugged into a standard 14-50R wall receptacle. Be sure that the electrical connection and wire size are not sure the range is within reach of Power Supply Cord Kit and Circuit Protection Amps 40 or 50** 50 *The NEC calculated load is adequate and wire...

Installation Instructions
Page 6
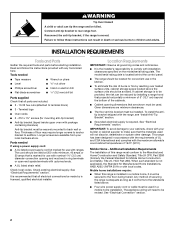
...these instructions can result in death or serious burns to a standing position. Failure to move and install range. NOTE: If height adjustment is made when range is adequate clearance under range. 2. Before sliding range into a standing position, put a sheet of cardboard or hardboard in front of 5.0 mm) is...Failure to do so can result in back or other 2 corners. Place them lengthwise on the floor behind the range to support the range when it on 2 legs after the range has been placed back to children and adults. 2. Pull cardboard bottom firmly to the correct height. WARNING Tip...
...these instructions can result in death or serious burns to a standing position. Failure to move and install range. NOTE: If height adjustment is made when range is adequate clearance under range. 2. Before sliding range into a standing position, put a sheet of cardboard or hardboard in front of 5.0 mm) is...Failure to do so can result in back or other 2 corners. Place them lengthwise on the floor behind the range to support the range when it on 2 legs after the range has been placed back to children and adults. 2. Pull cardboard bottom firmly to the correct height. WARNING Tip...


