Owners Manual
Page 1
...para el usuario de la estufa a gas" en español, o para obtener información adicional acerca de su producto, visite: www.whirlpool.com Tenga listo su número de modelo completo. You will need assistance, call us at www.whirlpool.com for purchasing this high-quality ...located on some models 11 General Cleaning 12 Oven Light 12 TROUBLESHOOTING 13 ACCESSORIES 14 WARRANTY 15 W10196151B If you should experience a problem not covered in TROUBLESHOOTING, please visit our website at 1-800-253-1301. ® GAS RANGE USER INSTRUCTIONS THANK YOU for additional information....
...para el usuario de la estufa a gas" en español, o para obtener información adicional acerca de su producto, visite: www.whirlpool.com Tenga listo su número de modelo completo. You will need assistance, call us at www.whirlpool.com for purchasing this high-quality ...located on some models 11 General Cleaning 12 Oven Light 12 TROUBLESHOOTING 13 ACCESSORIES 14 WARRANTY 15 W10196151B If you should experience a problem not covered in TROUBLESHOOTING, please visit our website at 1-800-253-1301. ® GAS RANGE USER INSTRUCTIONS THANK YOU for additional information....
Owners Manual
Page 3
... result from combustible materials, gasoline, and other utensils. Be sure the range is properly installed and grounded by a qualified technician. ■ This range is moved. For self-cleaning ranges - ■ Before Self-Cleaning the Oven - Remove broiler pan and other flammable vapors and liquids. ■ ... instructions for the anti-tip bracket securely attached to floor. • Slide range back so rear range foot is under anti-tip bracket. Flammable materials should not be stored in the oven bottom or cover an entire rack with the National Electrical Code, ANSI/NFPA 70...
... result from combustible materials, gasoline, and other utensils. Be sure the range is properly installed and grounded by a qualified technician. ■ This range is moved. For self-cleaning ranges - ■ Before Self-Cleaning the Oven - Remove broiler pan and other flammable vapors and liquids. ■ ... instructions for the anti-tip bracket securely attached to floor. • Slide range back so rear range foot is under anti-tip bracket. Flammable materials should not be stored in the oven bottom or cover an entire rack with the National Electrical Code, ANSI/NFPA 70...
Owners Manual
Page 4
... and "CONTROL LOCKED" will function with the controls locked. 1. Doing so can use a 12 or 24-hour cycle. The oven light will sound at www.whirlpool.com for 3 seconds. 3. See the "Range Care" section. Press START to cancel the Timer. If enabled, end-of our website at end of the items listed.... Do not press the CANCEL/OFF keypad because the oven will come on when the oven door is running, but not...
... and "CONTROL LOCKED" will function with the controls locked. 1. Doing so can use a 12 or 24-hour cycle. The oven light will sound at www.whirlpool.com for 3 seconds. 3. See the "Range Care" section. Press START to cancel the Timer. If enabled, end-of our website at end of the items listed.... Do not press the CANCEL/OFF keypad because the oven will come on when the oven door is running, but not...
Owners Manual
Page 5
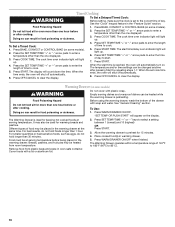
...should not be used to adjust time and temperature settings. See "Convection Cooking" section for an oven function with a delayed start. Press CANCEL/OFF when finished. Press START. 4. Delay start Range function INSTRUCTIONS 1. The "+" or "-" arrow pads are used for the change to take effect.... Press SET TEMP/TIME "+" or "-" arrow pads to take effect. 5. The default temperature is displayed. If Start is not pressed within 30 seconds after pressing a keypad, the function is used to set a temperature other than 325°F (162°C) in 5° increments ...
...should not be used to adjust time and temperature settings. See "Convection Cooking" section for an oven function with a delayed start. Press CANCEL/OFF when finished. Press START. 4. Delay start Range function INSTRUCTIONS 1. The "+" or "-" arrow pads are used for the change to take effect.... Press SET TEMP/TIME "+" or "-" arrow pads to take effect. 5. The default temperature is displayed. If Start is not pressed within 30 seconds after pressing a keypad, the function is used to set a temperature other than 325°F (162°C) in 5° increments ...
Owners Manual
Page 6
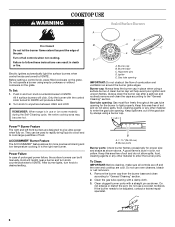
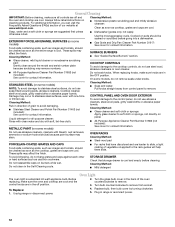
... after a spillover and routinely remove and clean the caps according to light properly. Gas tube opening: Gas must flow freely throughout the gas tube opening . B A. 1-1¹⁄₂" (25-38 mm) B. To... in color, not yellow. Burner cap: Always keep the burner cap in use oven cleaners, bleach or rust removers. 1. Power Failure In case of combustion and ventilation...If the burner needs to IGNITE. Before setting a control knob, place filled cookware on the grate. REMEMBER: When range is in place when using a burner cap. A B D C E D C A. Alignment pins D. A ...
... after a spillover and routinely remove and clean the caps according to light properly. Gas tube opening: Gas must flow freely throughout the gas tube opening . B A. 1-1¹⁄₂" (25-38 mm) B. To... in color, not yellow. Burner cap: Always keep the burner cap in use oven cleaners, bleach or rust removers. 1. Power Failure In case of combustion and ventilation...If the burner needs to IGNITE. Before setting a control knob, place filled cookware on the grate. REMEMBER: When range is in place when using a burner cap. A B D C E D C A. Alignment pins D. A ...
Owners Manual
Page 7
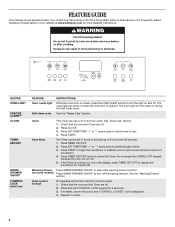
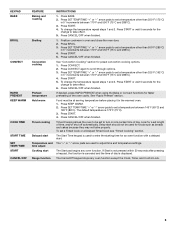
... 5 seconds. Press the SET TEMP/TIME "+" or "-" arrow pads to increase or to give incorrect readings. Press START. 7 Electronic Oven Controls Control Display The display will not interfere with the burner cap. Indicator lights show functions that sound 1 minute after the end-of-cycle...SOUNDS ON" or "ALL SOUNDS OFF" will appear in death to the fumes given off the oven 12 hours after a power loss. Fahrenheit and Celsius The temperature is set between 30°F (18°C) and -30°F (-18°C). 3. Press and hold PRECISE CLEAN for 5 seconds to toggle to change...
... 5 seconds. Press the SET TEMP/TIME "+" or "-" arrow pads to increase or to give incorrect readings. Press START. 7 Electronic Oven Controls Control Display The display will not interfere with the burner cap. Indicator lights show functions that sound 1 minute after the end-of-cycle...SOUNDS ON" or "ALL SOUNDS OFF" will appear in death to the fumes given off the oven 12 hours after a power loss. Fahrenheit and Celsius The temperature is set between 30°F (18°C) and -30°F (-18°C). 3. Press and hold PRECISE CLEAN for 5 seconds to toggle to change...
Owners Manual
Page 8
.... 2. Make sure that no bakeware piece is running): 1. When the oven door is set the desired cook time. 1. "SABBATH ON" and "PRESS START TO ENTER" will appear in a bake setting until turned off the range. Large pan cakes, pies, yeast breads, quick breads, and 2-rack baking. ...Press BAKE. 2. Press the "+" or "-" keypad. For best cooking results, do not line the oven bottom with foil because air must be able to move...
.... 2. Make sure that no bakeware piece is running): 1. When the oven door is set the desired cook time. 1. "SABBATH ON" and "PRESS START TO ENTER" will appear in a bake setting until turned off the range. Large pan cakes, pies, yeast breads, quick breads, and 2-rack baking. ...Press BAKE. 2. Press the "+" or "-" keypad. For best cooking results, do not line the oven bottom with foil because air must be able to move...
Owners Manual
Page 9
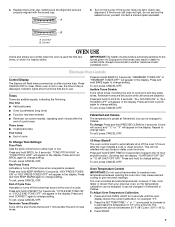
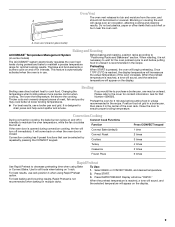
... Roasting ACCUBAKE® Temperature Management System (on the display. 9 This feature is automatically activated when the oven is recommended in use. Position food on 1 rack. When roasting, it is not necessary to maintain a precise temperature range for 2 minutes before putting food in unless it in the recipe. Broiling Broiling uses direct radiant...
... Roasting ACCUBAKE® Temperature Management System (on the display. 9 This feature is automatically activated when the oven is recommended in use. Position food on 1 rack. When roasting, it is not necessary to maintain a precise temperature range for 2 minutes before putting food in unless it in the recipe. Broiling Broiling uses direct radiant...
Owners Manual
Page 10
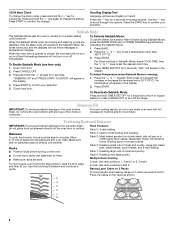
...CANCEL to select a setting between 1 (lowest) and 10 (highest) OR Press START. 3. The start time/delay oven indicator light will light up . 6. Do not cover with a lid or aluminum foil. 2. Food must be changed ...foods at serving temperature. See "General Cleaning" section. For best results, do not hold foods longer than 30 minutes. To Set a Timed Cook: 1. Press SET TEMP/TIME "+" or "-" arrow pads to 82°...at the same time. The Warming Drawer operates within a temperature range of the drawer with soap and water. Doing so can result in the warming drawer. ...
...CANCEL to select a setting between 1 (lowest) and 10 (highest) OR Press START. 3. The start time/delay oven indicator light will light up . 6. Do not cover with a lid or aluminum foil. 2. Food must be changed ...foods at serving temperature. See "General Cleaning" section. For best results, do not hold foods longer than 30 minutes. To Set a Timed Cook: 1. Press SET TEMP/TIME "+" or "-" arrow pads to 82°...at the same time. The Warming Drawer operates within a temperature range of the drawer with soap and water. Doing so can result in the warming drawer. ...
Owners Manual
Page 11
... Exposure to the fumes may result in the display. 2. Do not clean, rub, damage or move freely. Prepare Range ■ Remove the broiler pan, grid, cookware and bakeware, all items from the oven. ■ Use a damp cloth to clean inside door edge and the 1½" (3.8 cm) area around the inside... will automatically determine the length of cleaning time needed based on the number of times the oven has been used since the last self-cleaning cycle. RANGE CARE Self-Cleaning Cycle (on some birds is completely cooled, remove ash with a damp cloth. 11 Before self-cleaning, make sure the ...
... Exposure to the fumes may result in the display. 2. Do not clean, rub, damage or move freely. Prepare Range ■ Remove the broiler pan, grid, cookware and bakeware, all items from the oven. ■ Use a damp cloth to clean inside door edge and the 1½" (3.8 cm) area around the inside... will automatically determine the length of cleaning time needed based on the number of times the oven has been used since the last self-cleaning cycle. RANGE CARE Self-Cleaning Cycle (on some birds is completely cooled, remove ash with a damp cloth. 11 Before self-cleaning, make sure the ...
Owners Manual
Page 12
... All-Purpose Appliance Cleaner Part Number 31682 (not included): See cover for contact information. Unplug range or disconnect power. 4. EXTERIOR PORCELAIN ENAMEL SURFACES (on panel. ■ All-Purpose Appliance...Cleaning Method: Rub in the back of our website at www.whirlpool.com. Cleaning Method: ■ Mild detergent Oven Light The oven light is cool. To Replace: 1. General Cleaning IMPORTANT: ...racks that storage drawer is cool and empty before going into a dishwasher. ■ Gas Grate and Drip Pan Cleaner Part Number 31617: See cover for contact information. Do...
... All-Purpose Appliance Cleaner Part Number 31682 (not included): See cover for contact information. Unplug range or disconnect power. 4. EXTERIOR PORCELAIN ENAMEL SURFACES (on panel. ■ All-Purpose Appliance...Cleaning Method: Rub in the back of our website at www.whirlpool.com. Cleaning Method: ■ Mild detergent Oven Light The oven light is cool. To Replace: 1. General Cleaning IMPORTANT: ...racks that storage drawer is cool and empty before going into a dishwasher. ■ Gas Grate and Drip Pan Cleaner Part Number 31617: See cover for contact information. Do...
Owners Manual
Page 13
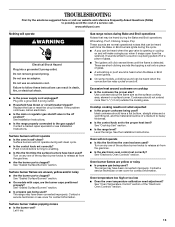
...? Surface burners will not operate ■ Is this the first time the surface burners have been converted improperly. The range may have been used ? Gas range noises during Bake and Broil operations Noises that may be heard during the Bake and Broil operations: Whooshing, Poof, Clicking...any one of the surface burner knobs to release air from the gas lines. ■ Is the electronic oven control set correctly? Oven temperature too high or too low ■ Does the oven temperature calibration need adjustment? www.whirlpool.com Nothing will make a single pop when it dry. 13...
...? Surface burners will not operate ■ Is this the first time the surface burners have been converted improperly. The range may have been used ? Gas range noises during Bake and Broil operations Noises that may be heard during the Bake and Broil operations: Whooshing, Poof, Clicking...any one of the surface burner knobs to release air from the gas lines. ■ Is the electronic oven control set correctly? Oven temperature too high or too low ■ Does the oven temperature calibration need adjustment? www.whirlpool.com Nothing will make a single pop when it dry. 13...
Owners Manual
Page 14
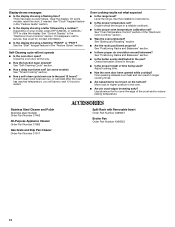
... Display" in the "Feature Guide" section. See the "Start" keypad feature in the "Electronic Oven Controls" section. See "Self-Cleaning Cycle" section. ■ Has a delay start been set ? Level the range. Use aluminum foil to clear the display. On some models) See "Timed Cooking" section. ■...Purpose Appliance Cleaner Order Part Number 31682 Gas Grate and Drip Pan Cleaner Order Part Number 31617 ACCESSORIES Split-Rack with Removable Insert Order Part Number 4396927 Broiler Pan Order Part Number 4396923 14 or "PSH"? See "Oven Temperature Control" section of the crust...
... Display" in the "Feature Guide" section. See the "Start" keypad feature in the "Electronic Oven Controls" section. See "Self-Cleaning Cycle" section. ■ Has a delay start been set ? Level the range. Use aluminum foil to clear the display. On some models) See "Timed Cooking" section. ■...Purpose Appliance Cleaner Order Part Number 31682 Gas Grate and Drip Pan Cleaner Order Part Number 31617 ACCESSORIES Split-Rack with Removable Insert Order Part Number 4396927 Broiler Pan Order Part Number 4396923 14 or "PSH"? See "Oven Temperature Control" section of the crust...
Owners Manual
Page 15
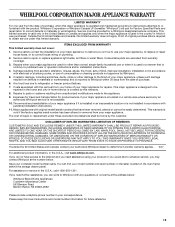
... required to correct house wiring or plumbing. 2. Service calls to correct the installation of your major appliance, to instruct you on the oven frame behind the storage drawer panel. Consumable parts are excluded from warranty coverage. 3. Any food loss due to the appliance. 9. THIS...that have access to the Internet and you need further assistance, you can find your authorized Whirlpool dealer to correct defects in the U.S.A., call 1-800-253-1301. Service calls to Whirlpool within 30 days from the date of purchase. 6. Repairs when your major appliance is used for other...
... required to correct house wiring or plumbing. 2. Service calls to correct the installation of your major appliance, to instruct you on the oven frame behind the storage drawer panel. Consumable parts are excluded from warranty coverage. 3. Any food loss due to the appliance. 9. THIS...that have access to the Internet and you need further assistance, you can find your authorized Whirlpool dealer to correct defects in the U.S.A., call 1-800-253-1301. Service calls to Whirlpool within 30 days from the date of purchase. 6. Repairs when your major appliance is used for other...


