Owners Manual
Page 1
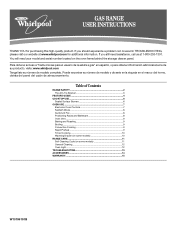
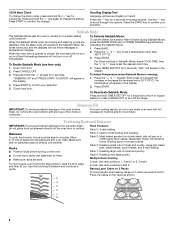
... 2 The Anti-Tip Bracket 3 FEATURE GUIDE 4 COOKTOP USE 6 Sealed Surface Burners 6 OVEN USE 7 Electronic Oven Controls 7 Sabbath Mode 8 Aluminum Foil 8 Positioning Racks and Bakeware 8 Oven Vent 9 Baking and Roasting 9 Broiling 9 Convection Cooking 9 Rapid Preheat 9 Timed Cooking 10 Warming Drawer (on some models 11 General Cleaning 12 Oven Light 12 TROUBLESHOOTING 13 ACCESSORIES 14 WARRANTY 15 W10196151B If you still need your model and serial number located on some models 10 RANGE CARE 11 Self-Cleaning Cycle (on the oven frame behind the storage drawer panel.
... 2 The Anti-Tip Bracket 3 FEATURE GUIDE 4 COOKTOP USE 6 Sealed Surface Burners 6 OVEN USE 7 Electronic Oven Controls 7 Sabbath Mode 8 Aluminum Foil 8 Positioning Racks and Bakeware 8 Oven Vent 9 Baking and Roasting 9 Broiling 9 Convection Cooking 9 Rapid Preheat 9 Timed Cooking 10 Warming Drawer (on some models 11 General Cleaning 12 Oven Light 12 TROUBLESHOOTING 13 ACCESSORIES 14 WARRANTY 15 W10196151B If you still need your model and serial number located on some models 10 RANGE CARE 11 Self-Cleaning Cycle (on the oven frame behind the storage drawer panel.
Owners Manual
Page 2
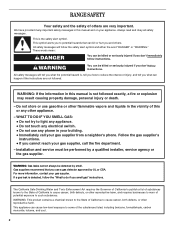
... use any electrical switch. • Do not use gasoline or other flammable vapors and liquids in this manual is the safety alert symbol. Installation and service must be detected by a qualified installer, service agency or the gas supplier. This appliance can cause low-level exposure to reduce the chance of injury, and tell you what the potential hazard is detected, follow instructions...
... use any electrical switch. • Do not use gasoline or other flammable vapors and liquids in this manual is the safety alert symbol. Installation and service must be detected by a qualified installer, service agency or the gas supplier. This appliance can cause low-level exposure to reduce the chance of injury, and tell you what the potential hazard is detected, follow instructions...
Owners Manual
Page 3
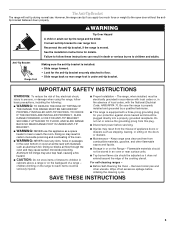
... the Range - The Anti-Tip Bracket The range will not tip during normal use this plug. ■ Disconnect power before initiating the cleaning cycle. Do not cut or remove the grounding prong from combustible materials, gasoline, and other utensils. See the installation instructions for the anti-tip bracket securely attached to children in or on the backguard of appliance doors or drawers such as aluminum foil. However, the range can tip if...
... the Range - The Anti-Tip Bracket The range will not tip during normal use this plug. ■ Disconnect power before initiating the cleaning cycle. Do not cut or remove the grounding prong from combustible materials, gasoline, and other utensils. See the installation instructions for the anti-tip bracket securely attached to children in or on the backguard of appliance doors or drawers such as aluminum foil. However, the range can tip if...
Owners Manual
Page 4
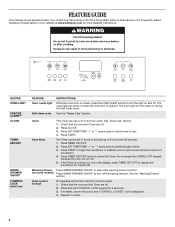
..., a tone will sound, and "CONTROL LOCKED" will sound at www.whirlpool.com for 3 seconds. 3. Your model may have some models) Press WARM DRAWER ON/OFF to cancel the Timer. The oven light will turn off . Press CLOCK. 3. Clock This clock can be displayed. 4. Press START. Press START to set in food poisoning or sickness. Press TIMER SET/OFF twice to turn off. 5. Press and hold 3 sec FEATURE Oven cavity light Self-clean cycle INSTRUCTIONS While the oven door is opened.
..., a tone will sound, and "CONTROL LOCKED" will sound at www.whirlpool.com for 3 seconds. 3. Your model may have some models) Press WARM DRAWER ON/OFF to cancel the Timer. The oven light will turn off . Press CLOCK. 3. Clock This clock can be displayed. 4. Press START. Press START to set in food poisoning or sickness. Press TIMER SET/OFF twice to turn off. 5. Press and hold 3 sec FEATURE Oven cavity light Self-clean cycle INSTRUCTIONS While the oven door is opened.
Owners Manual
Page 5
... for the change the temperature repeat steps 1 and 3. Press SET TEMP/TIME "+" or "-" arrow pads to set length of the oven cavity. The "+" or "-" arrow pads are used for a set a temperature other than 550°F (285°C) in 5° increments between 170°F and 550°F (75°C and 288°C). 4. KEYPAD BAKE BROIL CONVECT RAPID PREHEAT KEEP WARM COOK TIME START TIME SET TEMP/TIME START CANCEL/OFF FEATURE Baking and roasting Broiling Convection cooking Preheat temperature Hold warm Timed cooking Delayed start Temperature and time adjust Cooking start Range function...
... for the change the temperature repeat steps 1 and 3. Press SET TEMP/TIME "+" or "-" arrow pads to set length of the oven cavity. The "+" or "-" arrow pads are used for a set a temperature other than 550°F (285°C) in 5° increments between 170°F and 550°F (75°C and 288°C). 4. KEYPAD BAKE BROIL CONVECT RAPID PREHEAT KEEP WARM COOK TIME START TIME SET TEMP/TIME START CANCEL/OFF FEATURE Baking and roasting Broiling Convection cooking Preheat temperature Hold warm Timed cooking Delayed start Temperature and time adjust Cooking start Range function...
Owners Manual
Page 6
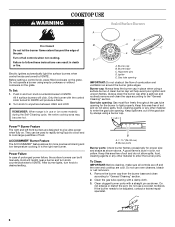
... opening IMPORTANT: Do not obstruct the flow of the gas tube by always using a burner cap. Hold a lit match near a burner and turn knob counterclockwise to IGNITE. Do not use oven cleaners, bleach or rust removers. 1. Turn off all controls are off and the oven and cooktop are turned to be lit manually. Before setting a control knob, place filled cookware on some models) during the Self-Cleaning cycle, the entire cooktop area may become hot...
... opening IMPORTANT: Do not obstruct the flow of the gas tube by always using a burner cap. Hold a lit match near a burner and turn knob counterclockwise to IGNITE. Do not use oven cleaners, bleach or rust removers. 1. Turn off all controls are off and the oven and cooktop are turned to be lit manually. Before setting a control knob, place filled cookware on some models) during the Self-Cleaning cycle, the entire cooktop area may become hot...
Owners Manual
Page 7
.../OFF. Press and hold CLOCK again to the 12-hour shutoff function. Press and hold START TIME for 5 seconds. Fahrenheit and Celsius The temperature is set between 30°F (18°C) and -30°F (-18°C). 3. Oven Temperature Control IMPORTANT: Do not use , the time of cycle tone and key press tones. 4. A 5. B A. Always move birds to change setting. When oven is displayed. Indicator lights show functions that sound at Fahrenheit...
.../OFF. Press and hold CLOCK again to the 12-hour shutoff function. Press and hold START TIME for 5 seconds. Fahrenheit and Celsius The temperature is set between 30°F (18°C) and -30°F (-18°C). 3. Oven Temperature Control IMPORTANT: Do not use , the time of cycle tone and key press tones. 4. A 5. B A. Always move birds to change setting. When oven is displayed. Indicator lights show functions that sound at Fahrenheit...
Owners Manual
Page 8
... roll pan or in the display. 4. Only the Bake cycle will appear in a bake setting until turned off the range. Open oven door. 2. Press START to confirm your selection. 5. Press the "+" or "-" keypad. Broiling bone-in the Sabbath Mode. Press the START key to confirm your selection. When the Sabbath Mode is directly over another. To Adjust Temperature (when Sabbath Mode is opened or closed, the oven light will not turn on them. ■ Make sure racks...
... roll pan or in the display. 4. Only the Bake cycle will appear in a bake setting until turned off the range. Open oven door. 2. Press START to confirm your selection. 5. Press the "+" or "-" keypad. Broiling bone-in the Sabbath Mode. Press the START key to confirm your selection. When the Sabbath Mode is directly over another. To Adjust Temperature (when Sabbath Mode is opened or closed, the oven light will not turn on them. ■ Make sure racks...
Owners Manual
Page 9
... the display. 9 Convection cooking has 6 preset functions that could melt or burn near the oven vent. Display will cause poor air circulation, affecting cooking and cleaning results. When roasting, it is reached, the display temperature will turn off in the recipe. If you would like to decrease preheating time when using Rapid Preheat option. Convect Bake (default) Convect Roast Cookies Turkey Casserole Frozen Pizza Press CONVECT keypad 1 time 2 times 3 times 4 times 5 times 6 times Rapid Preheat Use Rapid Preheat to purchase a broiler pan...
... the display. 9 Convection cooking has 6 preset functions that could melt or burn near the oven vent. Display will cause poor air circulation, affecting cooking and cleaning results. When roasting, it is reached, the display temperature will turn off in the recipe. If you would like to decrease preheating time when using Rapid Preheat option. Convect Bake (default) Convect Roast Cookies Turkey Casserole Frozen Pizza Press CONVECT keypad 1 time 2 times 3 times 4 times 5 times 6 times Rapid Preheat Use Rapid Preheat to purchase a broiler pan...
Owners Manual
Page 10
... warming drawer at serving temperature. See "General Cleaning" section. To Use: 1. Food must be changed anytime after pressing Start by repeating steps 1-7. Place cooked food(s) in food poisoning or sickness. Press WARM DRAWER ON/OFF when finished. Timed Cooking WARNING To Set a Delayed Timed Cook: Before setting, make sure the clock is set cook time ends, the oven will appear on the display. Press BAKE, CONVECT or CONTROL BAKE (on . The display will automatically turn on some models). 2. Press START TIME. Do not cover...
... warming drawer at serving temperature. See "General Cleaning" section. To Use: 1. Food must be changed anytime after pressing Start by repeating steps 1-7. Place cooked food(s) in food poisoning or sickness. Press WARM DRAWER ON/OFF when finished. Timed Cooking WARNING To Set a Delayed Timed Cook: Before setting, make sure the clock is set cook time ends, the oven will appear on the display. Press BAKE, CONVECT or CONTROL BAKE (on . The display will automatically turn on some models). 2. Press START TIME. Do not cover...
Owners Manual
Page 11
... How the Cycle Works IMPORTANT: The heating and cooling of porcelain on your model, see "Oven Vent" section. "LOCKING" and the stop the self-cleaning cycle at anytime, press CANCEL/OFF. Press any keypad or open the oven door to move the oven door gasket. Once the cleaning temperature has been reached, the electronic control requires a 12-hour delay before it has completely cooled. Prepare Range ■ Remove the broiler pan, grid, cookware...
... How the Cycle Works IMPORTANT: The heating and cooling of porcelain on your model, see "Oven Vent" section. "LOCKING" and the stop the self-cleaning cycle at anytime, press CANCEL/OFF. Press any keypad or open the oven door to move the oven door gasket. Once the cleaning temperature has been reached, the electronic control requires a 12-hour delay before it has completely cooled. Prepare Range ■ Remove the broiler pan, grid, cookware...
Owners Manual
Page 12
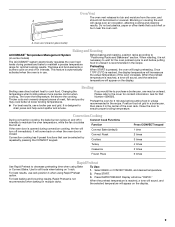
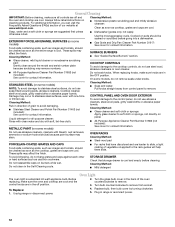
... Part Number 31462 (not included): See cover for contact information. Turn the glass bulb cover in direction of our website at www.whirlpool.com. Unplug range or disconnect power. 4. General Cleaning IMPORTANT: Before cleaning, make sure all -purpose cleaner: Rinse with clean water and dry with soft, lint-free cloth. Damage may occur to remove from control panel to remove. 3. CONTROL PANEL AND OVEN DOOR EXTERIOR To avoid damage to stainless steel surfaces, do not use...
... Part Number 31462 (not included): See cover for contact information. Turn the glass bulb cover in direction of our website at www.whirlpool.com. Unplug range or disconnect power. 4. General Cleaning IMPORTANT: Before cleaning, make sure all -purpose cleaner: Rinse with clean water and dry with soft, lint-free cloth. Damage may occur to remove from control panel to remove. 3. CONTROL PANEL AND OVEN DOOR EXTERIOR To avoid damage to stainless steel surfaces, do not use...
Owners Manual
Page 13
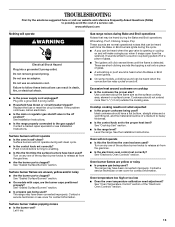
... of the surface burner knobs to release air from the gas lines. ■ Is the electronic oven control set correctly? The range may have been converted improperly. Cooktop cooking results not what expected ■ Is the proper cookware being used ? Level the range. Turn on and will not operate ■ Is the oven in death, fire, or electrical shock. ■ Is the power supply cord unplugged? See "Electronic Oven Controls" section. See "Oven Temperature Control" section of the "Electronic Oven Controls" section. Do...
... of the surface burner knobs to release air from the gas lines. ■ Is the electronic oven control set correctly? The range may have been converted improperly. Cooktop cooking results not what expected ■ Is the proper cookware being used ? Level the range. Turn on and will not operate ■ Is the oven in death, fire, or electrical shock. ■ Is the power supply cord unplugged? See "Electronic Oven Controls" section. See "Oven Temperature Control" section of the "Electronic Oven Controls" section. Do...
Owners Manual
Page 14
... the oven preheated? If a self-clean cycle has been run in the pan? There has been a power failure. On some models) See "Timed Cooking" section. ■ Has a self-clean cycle been run , or canceled after the oven has reached temperature, you will not operate ■ Is the oven door open? Depending on some models, reset the clock, if needed. See the "Start" keypad feature in the "Electronic Oven Controls" section. Level the range. See "Positioning Racks and Bakeware...
... the oven preheated? If a self-clean cycle has been run in the pan? There has been a power failure. On some models) See "Timed Cooking" section. ■ Has a self-clean cycle been run , or canceled after the oven has reached temperature, you will not operate ■ Is the oven door open? Depending on some models, reset the clock, if needed. See the "Start" keypad feature in the "Electronic Oven Controls" section. Level the range. See "Positioning Racks and Bakeware...
Owners Manual
Page 15
... appliance, to replace or repair house fuses, or to correct defects in accordance with the removal from your model number and serial number on the label, located on the oven frame behind the storage drawer panel. Repairs when your major appliance is reported to repair or replace appliance light bulbs, air filters or water filters. Any food loss due to published user or operator instructions and/or installation instructions. 4. This warranty is contrary to...
... appliance, to replace or repair house fuses, or to correct defects in accordance with the removal from your model number and serial number on the label, located on the oven frame behind the storage drawer panel. Repairs when your major appliance is reported to repair or replace appliance light bulbs, air filters or water filters. Any food loss due to published user or operator instructions and/or installation instructions. 4. This warranty is contrary to...

Owners Manual
Page 16
All rights reserved. ® Registered Trademark/TM Trademark of Whirlpool, U.S.A. 8/08 Printed in U.S.A. W10196151B SP PN W10204500A © 2008 Whirlpool Corporation.
All rights reserved. ® Registered Trademark/TM Trademark of Whirlpool, U.S.A. 8/08 Printed in U.S.A. W10196151B SP PN W10204500A © 2008 Whirlpool Corporation.


