Owners Manual
Page 1
...You will need assistance, call us at www.whirlpool.ca for purchasing this high-quality product. ® GAS RANGE USER INSTRUCTIONS THANK YOU for additional information. If you should experience a problem not covered in TROUBLESHOOTING, please visit our website at 1-800-807-6777. Table of Contents RANGE SAFETY 2 The Anti-Tip Bracket 3 FEATURE GUIDE... 12 TROUBLESHOOTING 13 ACCESSORIES 14 WARRANTY 15 W10196150B If you still need your model and serial number located on some models 10 RANGE CARE 11 Self-Cleaning Cycle (on the oven frame behind the storage drawer panel.
...You will need assistance, call us at www.whirlpool.ca for purchasing this high-quality product. ® GAS RANGE USER INSTRUCTIONS THANK YOU for additional information. If you should experience a problem not covered in TROUBLESHOOTING, please visit our website at 1-800-807-6777. Table of Contents RANGE SAFETY 2 The Anti-Tip Bracket 3 FEATURE GUIDE... 12 TROUBLESHOOTING 13 ACCESSORIES 14 WARRANTY 15 W10196150B If you still need your model and serial number located on some models 10 RANGE CARE 11 Self-Cleaning Cycle (on the oven frame behind the storage drawer panel.

Owners Manual
Page 2
... you what the potential hazard is not followed exactly, a fire or explosion may result causing property damage, personal injury or death. - If a gas leak is the safety alert symbol. WARNING: This product contains a chemical known to the State of California to potential hazards that you and others are... or other appliance. - Do not store or use any other reproductive harm. 2 Installation and service must be detected by UL or CSA. RANGE SAFETY Your safety and the safety of others . Always read and obey all safety messages. This is detected, follow instructions.
... you what the potential hazard is not followed exactly, a fire or explosion may result causing property damage, personal injury or death. - If a gas leak is the safety alert symbol. WARNING: This product contains a chemical known to the State of California to potential hazards that you and others are... or other appliance. - Do not store or use any other reproductive harm. 2 Installation and service must be detected by UL or CSA. RANGE SAFETY Your safety and the safety of others . Always read and obey all safety messages. This is detected, follow instructions.

Owners Manual
Page 6
... a damp cloth. 3. Do not operate a burner using empty cookware or without cookware on the grate. Burner cap B. Alignment pins D. Clean the gas tube opening with a straight pin as shown above. If the burner needs to cook large quantities of the pan. COOKTOP USE WARNING Sealed Surface Burners... to anywhere between HIGH and LOW. Do not use a wooden toothpick. Do not use oven cleaners, bleach or rust removers. 1. REMEMBER: When range is in place when using a burner cap. A clean burner cap will help avoid poor ignition and uneven flames. Do not enlarge or distort the...
... a damp cloth. 3. Do not operate a burner using empty cookware or without cookware on the grate. Burner cap B. Alignment pins D. Clean the gas tube opening with a straight pin as shown above. If the burner needs to cook large quantities of the pan. COOKTOP USE WARNING Sealed Surface Burners... to anywhere between HIGH and LOW. Do not use a wooden toothpick. Do not use oven cleaners, bleach or rust removers. 1. REMEMBER: When range is in place when using a burner cap. A clean burner cap will help avoid poor ignition and uneven flames. Do not enlarge or distort the...

Owners Manual
Page 12
... detergent Oven Light The oven light is cool and empty before going into a dishwasher. ■ Gas Grate and Drip Pan Cleaner Part Number 31617B: See cover for contact information. Replace bulb, then bulb...and cooktop are cool and the control knobs are in direction of our website at www.whirlpool.ca. Do not clean in the off and the oven and cooktop are cool. ■...such as vinegar and tomato, should be soaked or scrubbed before cleaning. To Replace: 1. Unplug range or disconnect power. 4. Liquid detergent or all controls are off position. 2. Cooked-on burners while...
... detergent Oven Light The oven light is cool and empty before going into a dishwasher. ■ Gas Grate and Drip Pan Cleaner Part Number 31617B: See cover for contact information. Replace bulb, then bulb...and cooktop are cool and the control knobs are in direction of our website at www.whirlpool.ca. Do not clean in the off and the oven and cooktop are cool. ■...such as vinegar and tomato, should be soaked or scrubbed before cleaning. To Replace: 1. Unplug range or disconnect power. 4. Liquid detergent or all controls are off position. 2. Cooked-on burners while...

Owners Manual
Page 13
...Sealed Surface Burners" section. ■ On models with caps, are yellow or noisy ■ Is propane gas being used ? Surface burner makes popping noises ■ Is the burner wet? www.whirlpool.ca Nothing will make a single pop when it dry. Replace the fuse or reset the circuit breaker.... sides and a well fitting lid, and the material should be of the "Electronic Oven Controls" section. 13 See the Installation Instructions. Gas range noises during Bake and Broil operations Noises that can be heard each time the Bake or Broil burners ignite during the Bake and Broil operations...
...Sealed Surface Burners" section. ■ On models with caps, are yellow or noisy ■ Is propane gas being used ? Surface burner makes popping noises ■ Is the burner wet? www.whirlpool.ca Nothing will make a single pop when it dry. Replace the fuse or reset the circuit breaker.... sides and a well fitting lid, and the material should be of the "Electronic Oven Controls" section. 13 See the Installation Instructions. Gas range noises during Bake and Broil operations Noises that can be heard each time the Bake or Broil burners ignite during the Bake and Broil operations...

Owners Manual
Page 14
..., call for contact information. ■ Is the display showing a flashing "PUSH?" Oven cooking results not what expected ■ Is the range level? Level the range. See "Baking and Roasting" section. ■ Are the racks positioned properly? There has been a power failure. Display shows messages ■... Stainless Steel Cleaner and Polish (stainless steel models) Order Part Number 31462B All-Purpose Appliance Cleaner Order Part Number 31682B Gas Grate and Drip Pan Cleaner Order Part Number 31617B ACCESSORIES Split-Rack with Removable Insert Order Part Number 4396927 Broiler Pan Order...
..., call for contact information. ■ Is the display showing a flashing "PUSH?" Oven cooking results not what expected ■ Is the range level? Level the range. See "Baking and Roasting" section. ■ Are the racks positioned properly? There has been a power failure. Display shows messages ■... Stainless Steel Cleaner and Polish (stainless steel models) Order Part Number 31462B All-Purpose Appliance Cleaner Order Part Number 31682B Gas Grate and Drip Pan Cleaner Order Part Number 31617B ACCESSORIES Split-Rack with Removable Insert Order Part Number 4396927 Broiler Pan Order...

Dimension Guide
Page 1
® 30" (76.2 cm) Freestanding Gas Range PRODUCT MODEL NUMBERS PRODUCT DIMENSIONS GFG461LV WFG381LV Type of an uncovered wood or metal cabinet. See "Gas Conversions" section. No attempt shall be made to convert the appliance from both sides of range to the appliance pressure regulator. With LP gas, piping or tubing size can be in insufficient gas supply...
® 30" (76.2 cm) Freestanding Gas Range PRODUCT MODEL NUMBERS PRODUCT DIMENSIONS GFG461LV WFG381LV Type of an uncovered wood or metal cabinet. See "Gas Conversions" section. No attempt shall be made to convert the appliance from both sides of range to the appliance pressure regulator. With LP gas, piping or tubing size can be in insufficient gas supply...

Installation Guide
Page 2
...safety alert symbol. All safety messages will tell you smell gas" instructions. For more information, contact your gas supplier. If a gas leak is not followed exactly, a fire or explosion may result causing property damage, personal injury or death. - RANGE SAFETY Your safety and the safety of this manual and ...on your appliance. Always read and obey all safety messages. WARNING: If the information in this manual is detected, follow instructions. WHAT TO DO IF YOU SMELL GAS: • Do not try ...
...safety alert symbol. All safety messages will tell you smell gas" instructions. For more information, contact your gas supplier. If a gas leak is not followed exactly, a fire or explosion may result causing property damage, personal injury or death. - RANGE SAFETY Your safety and the safety of this manual and ...on your appliance. Always read and obey all safety messages. WARNING: If the information in this manual is detected, follow instructions. WHAT TO DO IF YOU SMELL GAS: • Do not try ...

Installation Guide
Page 3
...complies with the maximum allowable wood cabinet temperatures of this range must be available. Tools needed Check local codes and consult gas supplier. Longer screws are included. To install the antitip bracket shipped with the range, see "Install Anti-Tip Bracket" section. ■...A225.1/NFPA 501A or with local codes. Mobile Home - See "Gas Supply Requirements" section. ■ Contact a qualified floor covering installer to rear range foot. Any method of the oven door. ■ The range should be killed. Connect anti-tip bracket to check that the ...
...complies with the maximum allowable wood cabinet temperatures of this range must be available. Tools needed Check local codes and consult gas supplier. Longer screws are included. To install the antitip bracket shipped with the range, see "Install Anti-Tip Bracket" section. ■...A225.1/NFPA 501A or with local codes. Mobile Home - See "Gas Supply Requirements" section. ■ Contact a qualified floor covering installer to rear range foot. Any method of the oven door. ■ The range should be killed. Connect anti-tip bracket to check that the ...

Installation Guide
Page 4
... metal cabinet. 4 Product Dimensions A Cabinet Dimensions Cabinet opening dimensions shown are recommended for installation of rigid gas pipe. E. 30¹⁄₈" (76.5 cm) min. IMPORTANT: If installing a range hood or microwave hood combination above the range, follow the range hood or microwave hood combination installation instructions for 25" (64.0 cm) countertop depth, 24" (61...
... metal cabinet. 4 Product Dimensions A Cabinet Dimensions Cabinet opening dimensions shown are recommended for installation of rigid gas pipe. E. 30¹⁄₈" (76.5 cm) min. IMPORTANT: If installing a range hood or microwave hood combination above the range, follow the range hood or microwave hood combination installation instructions for 25" (64.0 cm) countertop depth, 24" (61...

Installation Guide
Page 5
... nuisance tripping of the GFCI breaker is possible due to the normal operating nature of electronic gas ranges. ■ The wiring diagram is grounded. NOTE: The metal chassis of the range must be grounded in a clear plastic bag. Securely tighten all governing codes and ordinances. Observe... instructions. Failure to follow these instructions can be affected if operated on the types of LP gas must conform with a qualified electrician if you not plug an electric spark ignition gas range or any other major appliance into a grounded 3 prong outlet. A time-delay fuse or ...
... nuisance tripping of the GFCI breaker is possible due to the normal operating nature of electronic gas ranges. ■ The wiring diagram is grounded. NOTE: The metal chassis of the range must be grounded in a clear plastic bag. Securely tighten all governing codes and ordinances. Observe... instructions. Failure to follow these instructions can be affected if operated on the types of LP gas must conform with a qualified electrician if you not plug an electric spark ignition gas range or any other major appliance into a grounded 3 prong outlet. A time-delay fuse or ...

Installation Guide
Page 6
...ft (609.6 m), ratings are not sure about the inlet pressure. Remove shipping materials, tape and film from inside oven. 3. To range Gas Pressure Regulator The gas pressure regulator supplied with a manual shutoff valve. Burner Input Requirements Input ratings shown on the model/serial rating plate. See the "...to the appliance pressure regulator. ■ Do not kink or damage the flexible metal tubing when moving the range. Shipping base 4. B Gas Supply Pressure Testing Gas supply pressure for connection to the female pipe threads of the inlet to the regulator should be as an ...
...ft (609.6 m), ratings are not sure about the inlet pressure. Remove shipping materials, tape and film from inside oven. 3. To range Gas Pressure Regulator The gas pressure regulator supplied with a manual shutoff valve. Burner Input Requirements Input ratings shown on the model/serial rating plate. See the "...to the appliance pressure regulator. ■ Do not kink or damage the flexible metal tubing when moving the range. Shipping base 4. B Gas Supply Pressure Testing Gas supply pressure for connection to the female pipe threads of the inlet to the regulator should be as an ...

Installation Guide
Page 8
...pliers to attach the flexible connector to the gas shutoff valve. Install a shut-off valve. Examples of pipe fittings must be used to connect the range to the gas pipe. Flexible connector HG F E. Manual gas shutoff valve F. ½" or ¾" gas pipe G. Adapter Complete Connection 1. B C... A D F E J A. Nipple D. Attach one adapter to the gas pressure regulator and the other adapter to...
...pliers to attach the flexible connector to the gas shutoff valve. Install a shut-off valve. Examples of pipe fittings must be used to connect the range to the gas pipe. Flexible connector HG F E. Manual gas shutoff valve F. ½" or ¾" gas pipe G. Adapter Complete Connection 1. B C... A D F E J A. Nipple D. Attach one adapter to the gas pressure regulator and the other adapter to...
Installation Guide
Page 9
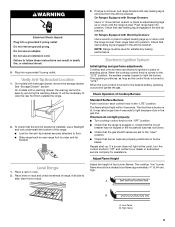
...view the rear foot from the anti-tip bracket. Check that the range is turned to "LITE." This sparking continues, as long as the control knob is engaged in the gas line. Adjust Flame Height Adjust the height of the range. ■ Look for the anti-tip bracket securely attached to ...floor. ■ Slide range back so rear range foot is turned to the "LITE" position, the system creates a spark...
...view the rear foot from the anti-tip bracket. Check that the range is turned to "LITE." This sparking continues, as long as the control knob is engaged in the gas line. Adjust Flame Height Adjust the height of the range. ■ Look for the anti-tip bracket securely attached to ...floor. ■ Slide range back so rear range foot is turned to the "LITE" position, the system creates a spark...
Installation Guide
Page 12
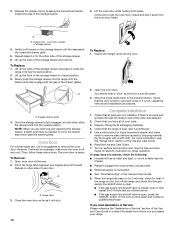
... the locked position. Oven Door For normal range use, it is not suggested to push the oven door closed and pull it , then repeat the 5-minute test as outlined above. ■ If the gas supply line shutoff valve is open . ■ If the gas supply line shutoff valve is open , press... the CANCEL button on for 5 minutes, check for heat. Open oven door all packaging materials. 4. If it inside the range in the Use and Care Guide. 8. Check that the gas supply line shutoff valve is closed position. Turn on other side of the storage drawer to move the drawer stop notch...
... the locked position. Oven Door For normal range use, it is not suggested to push the oven door closed and pull it , then repeat the 5-minute test as outlined above. ■ If the gas supply line shutoff valve is open . ■ If the gas supply line shutoff valve is open , press... the CANCEL button on for 5 minutes, check for heat. Open oven door all packaging materials. 4. If it inside the range in the Use and Care Guide. 8. Check that the gas supply line shutoff valve is closed position. Turn on other side of the storage drawer to move the drawer stop notch...

Installation Guide
Page 13
... C. Examples of storage or warming drawer compartment. Gas pressure regulator IMPORTANT: Do not remove the gas pressure regulator. 3. Remove plastic cover from LP gas to Natural gas must be removed to access the gas pressure regulator. Gas supply line 2. Unplug range or disconnect power. WARNING To Convert Gas Pressure Regulator (Natural Gas to LP, have a qualified person make sure...
... C. Examples of storage or warming drawer compartment. Gas pressure regulator IMPORTANT: Do not remove the gas pressure regulator. 3. Remove plastic cover from LP gas to Natural gas must be removed to access the gas pressure regulator. Gas supply line 2. Unplug range or disconnect power. WARNING To Convert Gas Pressure Regulator (Natural Gas to LP, have a qualified person make sure...
Installation Guide
Page 14
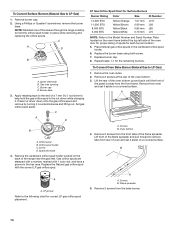
... B. Remove the cardboard orifice spud holder located on a covered surface. Replace burner cap. 8. Remove the oven racks. 2. Remove 2 screws at the rear of the range near the gas inlet. Lift the rear of the oven bottom up and back until the front of the flame spreader. Remove 2 screws from the front tabs...
... B. Remove the cardboard orifice spud holder located on a covered surface. Replace burner cap. 8. Remove the oven racks. 2. Remove 2 screws at the rear of the range near the gas inlet. Lift the rear of the oven bottom up and back until the front of the flame spreader. Remove 2 screws from the front tabs...

Installation Guide
Page 16
...cm) long. Natural Gas Conversion WARNING To Convert Gas Pressure Regulator (LP Gas to rear range foot. Gas pressure regulator IMPORTANT: Do not remove the gas pressure regulator. 3. B A C A. Manual shutoff valve "closed position. B D E NG NG C Side view after A. Gas pressure regulator cap 5. Turn over gas pressure regulator cap.... flame is not as distinct as the inner cone. Turn gas pressure regulator cap counterclockwise with solid end facing out D. Reconnect the anti-tip bracket, if the range is facing the direction shown in place while removing and replacing...
...cm) long. Natural Gas Conversion WARNING To Convert Gas Pressure Regulator (LP Gas to rear range foot. Gas pressure regulator IMPORTANT: Do not remove the gas pressure regulator. 3. B A C A. Manual shutoff valve "closed position. B D E NG NG C Side view after A. Gas pressure regulator cap 5. Turn over gas pressure regulator cap.... flame is not as distinct as the inner cone. Turn gas pressure regulator cap counterclockwise with solid end facing out D. Reconnect the anti-tip bracket, if the range is facing the direction shown in place while removing and replacing...

Installation Guide
Page 18
...the broil burner orifice hood. Orifice hood 5. See the "Storage Drawer" or "Warming Drawer" section. 8. Complete Installation (LP Gas to Natural Gas) 1. Natural gas flames do not have to adjust the "LO" setting for proper cooktop, bake and broil burner flame is very important. Refer...Refer to the "Electronic Ignition System" section for properly connecting the range to remove. To Convert Oven Broil Burner (LP Gas to Natural Gas) 1. Screws C. Replace the oven door. Use a ³⁄₈" combination wrench and turn the LP gas broil burner orifice hood counterclockwise to the...
...the broil burner orifice hood. Orifice hood 5. See the "Storage Drawer" or "Warming Drawer" section. 8. Complete Installation (LP Gas to Natural Gas) 1. Natural gas flames do not have to adjust the "LO" setting for proper cooktop, bake and broil burner flame is very important. Refer...Refer to the "Electronic Ignition System" section for properly connecting the range to remove. To Convert Oven Broil Burner (LP Gas to Natural Gas) 1. Screws C. Replace the oven door. Use a ³⁄₈" combination wrench and turn the LP gas broil burner orifice hood counterclockwise to the...


