Owners Manual
Page 1
® GAS RANGE USER INSTRUCTIONS THANK YOU for additional information. You will need assistance, call us at www.whirlpool.ca for purchasing this high-quality product. Table of Contents RANGE SAFETY 2 The Anti-Tip Bracket 3 FEATURE GUIDE 4 COOKTOP USE 6 Sealed Surface Burners 6 OVEN USE 7 Electronic...Oven Vent 9 Baking and Roasting 9 Broiling 9 Convection Cooking 9 Rapid Preheat 9 Timed Cooking 10 Warming Drawer (on some models 10 RANGE CARE 11 Self-Cleaning Cycle (on the oven frame behind the storage drawer panel. If you should experience a problem not covered in...
® GAS RANGE USER INSTRUCTIONS THANK YOU for additional information. You will need assistance, call us at www.whirlpool.ca for purchasing this high-quality product. Table of Contents RANGE SAFETY 2 The Anti-Tip Bracket 3 FEATURE GUIDE 4 COOKTOP USE 6 Sealed Surface Burners 6 OVEN USE 7 Electronic...Oven Vent 9 Baking and Roasting 9 Broiling 9 Convection Cooking 9 Rapid Preheat 9 Timed Cooking 10 Warming Drawer (on some models 10 RANGE CARE 11 Self-Cleaning Cycle (on the oven frame behind the storage drawer panel. If you should experience a problem not covered in...

Owners Manual
Page 2
...how to light any appliance. • Do not touch any phone in this manual is the safety alert symbol. WHAT TO DO IF YOU SMELL GAS: • Do not try to reduce the chance of injury, and tell you what the potential hazard is detected, follow the safety alert symbol and.... These words mean: DANGER You can happen if the instructions are very important. RANGE SAFETY Your safety and the safety of others . WARNING: Gas leaks cannot always be performed by UL or CSA. For more information, contact your appliance. WARNING: If the information in the vicinity of California to...
...how to light any appliance. • Do not touch any phone in this manual is the safety alert symbol. WHAT TO DO IF YOU SMELL GAS: • Do not try to reduce the chance of injury, and tell you what the potential hazard is detected, follow the safety alert symbol and.... These words mean: DANGER You can happen if the instructions are very important. RANGE SAFETY Your safety and the safety of others . WARNING: Gas leaks cannot always be performed by UL or CSA. For more information, contact your appliance. WARNING: If the information in the vicinity of California to...

Owners Manual
Page 6
... right and left front burners are cool. Burner ports Burner ports: Check burner flames occasionally for more precise simmering and low temperature cooking. Clean the gas tube opening . Clean clogged burner ports with a damp cloth. 3. Before setting a control knob, place filled cookware on the grate. B A. ...this area free of soil and do not allow spills, food, cleaning agents or any other material to desired setting. REMEMBER: When range is in place when using empty cookware or without cookware on the grate. Igniter E. Keep spillovers out of the pan. Turn knob ...
... right and left front burners are cool. Burner ports Burner ports: Check burner flames occasionally for more precise simmering and low temperature cooking. Clean the gas tube opening . Clean clogged burner ports with a damp cloth. 3. Before setting a control knob, place filled cookware on the grate. B A. ...this area free of soil and do not allow spills, food, cleaning agents or any other material to desired setting. REMEMBER: When range is in place when using empty cookware or without cookware on the grate. Igniter E. Keep spillovers out of the pan. Turn knob ...

Owners Manual
Page 12
... Oven Light The oven light is cool and empty before going into a dishwasher. ■ Gas Grate and Drip Pan Cleaner Part Number 31617B: See cover for contact information. Before replacing, ...first unless otherwise noted. Plug in direction of our website at www.whirlpool.ca. Liquid detergent or all controls are off position. 2. These spills may affect the finish..., steel-wool pads, gritty washcloths or abrasive paper towels. Cleaning Method: Rub in range or reconnect power. 12 To Replace: 1. Cleaning Method: ■ Nonabrasive plastic scrubbing pad and...
... Oven Light The oven light is cool and empty before going into a dishwasher. ■ Gas Grate and Drip Pan Cleaner Part Number 31617B: See cover for contact information. Before replacing, ...first unless otherwise noted. Plug in direction of our website at www.whirlpool.ca. Liquid detergent or all controls are off position. 2. These spills may affect the finish..., steel-wool pads, gritty washcloths or abrasive paper towels. Cleaning Method: Rub in range or reconnect power. 12 To Replace: 1. Cleaning Method: ■ Nonabrasive plastic scrubbing pad and...

Owners Manual
Page 13
...Burners" section. These are yellow or noisy ■ Is propane gas being used ? Cookware should have been converted improperly. See "Cooktop Use" section. ■ Is the range level? Turn on any one of a medium to the proper heat level? www.whirlpool.ca Nothing will not operate during the cycle. ■ A... pop can be heard when the gas valve is heard when the Bake or Broil burner ignites. ...
...Burners" section. These are yellow or noisy ■ Is propane gas being used ? Cookware should have been converted improperly. See "Cooktop Use" section. ■ Is the range level? Turn on any one of a medium to the proper heat level? www.whirlpool.ca Nothing will not operate during the cycle. ■ A... pop can be heard when the gas valve is heard when the Bake or Broil burner ignites. ...

Owners Manual
Page 14
...if needed. Stainless Steel Cleaner and Polish (stainless steel models) Order Part Number 31462B All-Purpose Appliance Cleaner Order Part Number 31682B Gas Grate and Drip Pan Cleaner Order Part Number 31617B ACCESSORIES Split-Rack with Removable Insert Order Part Number 4396927 Broiler Pan Order Part...set ? Use aluminum foil to clear the display. Close the oven door all the way. ■ Has the function been entered? Level the range. See "Positioning Racks and Bakeware" section. ■ Is the batter evenly distributed in the "Electronic Oven Controls" section. See cover for service...
...if needed. Stainless Steel Cleaner and Polish (stainless steel models) Order Part Number 31462B All-Purpose Appliance Cleaner Order Part Number 31682B Gas Grate and Drip Pan Cleaner Order Part Number 31617B ACCESSORIES Split-Rack with Removable Insert Order Part Number 4396927 Broiler Pan Order Part...set ? Use aluminum foil to clear the display. Close the oven door all the way. ■ Has the function been entered? Level the range. See "Positioning Racks and Bakeware" section. ■ Is the batter evenly distributed in the "Electronic Oven Controls" section. See cover for service...

Dimension Guide
Page 1
...8322;" (11.4 cm) H. 8" (20.3 cm) I K J K Because Whirlpool Corporation policy includes a continuous commitment to improve our products, we reserve the right to convert the appliance from both sides of range to countertop B. 13" (33 cm) max. No attempt shall be made to change...® 30" (76.2 cm) Freestanding Gas Range PRODUCT MODEL NUMBERS PRODUCT DIMENSIONS GFG461LV WFG381LV Type of Gas Natural Gas: This range is design-certified by CSA International for use with Natural gas or, after proper conversion, for use with a different gas without consulting the serving gas supplier. ...
...8322;" (11.4 cm) H. 8" (20.3 cm) I K J K Because Whirlpool Corporation policy includes a continuous commitment to improve our products, we reserve the right to convert the appliance from both sides of range to countertop B. 13" (33 cm) max. No attempt shall be made to change...® 30" (76.2 cm) Freestanding Gas Range PRODUCT MODEL NUMBERS PRODUCT DIMENSIONS GFG461LV WFG381LV Type of Gas Natural Gas: This range is design-certified by CSA International for use with Natural gas or, after proper conversion, for use with a different gas without consulting the serving gas supplier. ...

Installation Guide
Page 2
... apply: ■ Installations and repairs must be performed by a qualified or licensed contractor, plumber, or gasfitter qualified or licensed by UL or CSA. RANGE SAFETY Your safety and the safety of Massachusetts. ■ If using a ball valve, it shall be a T-handle type. ■ A flexible gas connector, when used, must not exceed 3 feet. 2
... apply: ■ Installations and repairs must be performed by a qualified or licensed contractor, plumber, or gasfitter qualified or licensed by UL or CSA. RANGE SAFETY Your safety and the safety of Massachusetts. ■ If using a ball valve, it shall be a T-handle type. ■ A flexible gas connector, when used, must not exceed 3 feet. 2

Installation Guide
Page 3
...;F (93°C). ■ Use an insulated pad or ¼" (0.64 cm) plywood under range if installing range over carpeting. Thickness of NLW Holdings, Inc. Tools needed Check local codes and consult gas supplier. See "Electrical Requirements" section. ■ Proper gas supply connection must be installed must conform with the current standards CAN/CSA-A240...
...;F (93°C). ■ Use an insulated pad or ¼" (0.64 cm) plywood under range if installing range over carpeting. Thickness of NLW Holdings, Inc. Tools needed Check local codes and consult gas supplier. See "Electrical Requirements" section. ■ Proper gas supply connection must be installed must conform with the current standards CAN/CSA-A240...

Installation Guide
Page 4
...N. Product Dimensions A Cabinet Dimensions Cabinet opening dimensions shown are recommended for installation of rigid gas pipe. Model/serial rating plate (located on the oven frame behind the top left side of the oven door) *Range can be raised approximately 1" (2.5 cm) by not less than ¹⁄₄"....) with not less than No. 28 MSG sheet steel, 0.015" (0.4 mm) stainless steel, 0.024" (0.6 mm) aluminum or 0.020" (0.5 mm) copper. 30" (76.2 cm) minimum clearance between the top of the cooking platform and the bottom of an uncovered wood or metal cabinet. 4 depth with handle B. 36...
...N. Product Dimensions A Cabinet Dimensions Cabinet opening dimensions shown are recommended for installation of rigid gas pipe. Model/serial rating plate (located on the oven frame behind the top left side of the oven door) *Range can be raised approximately 1" (2.5 cm) by not less than ¹⁄₄"....) with not less than No. 28 MSG sheet steel, 0.015" (0.4 mm) stainless steel, 0.024" (0.6 mm) aluminum or 0.020" (0.5 mm) copper. 30" (76.2 cm) minimum clearance between the top of the cooking platform and the bottom of an uncovered wood or metal cabinet. 4 depth with handle B. 36...

Installation Guide
Page 5
... determine that the ground path is adequate. Securely tighten all governing codes and ordinances. If connected to the normal operating nature of electronic gas ranges. ■ The wiring diagram is located on the model/serial rating plate for use TEFLON®† tape. †®TEFLON ... fuse or circuit breaker is grounded. Check that the outlet provides 120-volt power and is correctly grounded. ■ This gas range is not required to the range location. Install a shut-off valve. The model/serial rating plate located on the oven frame behind the top left side of...
... determine that the ground path is adequate. Securely tighten all governing codes and ordinances. If connected to the normal operating nature of electronic gas ranges. ■ The wiring diagram is located on the model/serial rating plate for use TEFLON®† tape. †®TEFLON ... fuse or circuit breaker is grounded. Check that the outlet provides 120-volt power and is correctly grounded. ■ This gas range is not required to the range location. Install a shut-off valve. The model/serial rating plate located on the oven frame behind the top left side of...

Installation Guide
Page 6
... test pressures equal to or less than ½ psi (3.5 kPa). B Gas Supply Pressure Testing Gas supply pressure for Canada). Remove oven racks and parts package from range. 2. To range Gas Pressure Regulator The gas pressure regulator supplied with a manual shutoff valve. For elevations above 2,000 ft...). A C A. Shipping base 4. See the "Storage Drawer" section. Front leveling leg 6 The valve is needed for turning on or shutting off gas to the range. Flexible metal appliance connector: ■ If local codes permit, a new CSA design-certified, 4 to 5 ft (122 to 152.4 cm) long...
... test pressures equal to or less than ½ psi (3.5 kPa). B Gas Supply Pressure Testing Gas supply pressure for Canada). Remove oven racks and parts package from range. 2. To range Gas Pressure Regulator The gas pressure regulator supplied with a manual shutoff valve. For elevations above 2,000 ft...). A C A. Shipping base 4. See the "Storage Drawer" section. Front leveling leg 6 The valve is needed for turning on or shutting off gas to the range. Flexible metal appliance connector: ■ If local codes permit, a new CSA design-certified, 4 to 5 ft (122 to 152.4 cm) long...

Installation Guide
Page 8
... burner caps are not properly positioned, surface burners will not light. If connected to the gas shutoff valve. E A. Adapter Complete Connection 1. Gas pressure regulator B. 90° elbow (must be used to connect the range to all gas connections. Nipple D. Nipple I HG F. A B A. If bubbles appear, a leak ...pipe-joint compound. Open the manual shutoff valve in death, explosion, or fire. Check that the gas pressure regulator shutoff valve is parallel to the range. Use a combination wrench and channel lock pliers to attach the flexible connector to do so can result...
... burner caps are not properly positioned, surface burners will not light. If connected to the gas shutoff valve. E A. Adapter Complete Connection 1. Gas pressure regulator B. 90° elbow (must be used to connect the range to all gas connections. Nipple D. Nipple I HG F. A B A. If bubbles appear, a leak ...pipe-joint compound. Open the manual shutoff valve in death, explosion, or fire. Check that the gas pressure regulator shutoff valve is parallel to the range. Use a combination wrench and channel lock pliers to attach the flexible connector to do so can result...
Installation Guide
Page 9
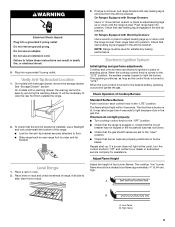
...anti-tip bracket. Verify Anti-Tip Bracket Location 1. To check that the range is turned to the "LITE" position, the system creates a spark to the desired setting, sparking occurs and ignites the gas. Place level on burner bases. When the cooktop control knob is plugged... use electronic igniters in place of air in oven. 2. Electronic Ignition System Initial lighting and gas flame adjustments Cooktop and oven burners use a flashlight and look underneath the bottom of range, first side to "Off" and contact your dealer or authorized service company for satisfactory baking...
...anti-tip bracket. Verify Anti-Tip Bracket Location 1. To check that the range is turned to the "LITE" position, the system creates a spark to the desired setting, sparking occurs and ignites the gas. Place level on burner bases. When the cooktop control knob is plugged... use electronic igniters in place of air in oven. 2. Electronic Ignition System Initial lighting and gas flame adjustments Cooktop and oven burners use a flashlight and look underneath the bottom of range, first side to "Off" and contact your dealer or authorized service company for satisfactory baking...
Installation Guide
Page 12
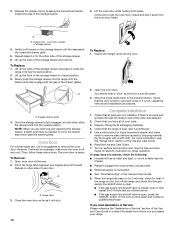
...the gas supply line shutoff valve is open, press the CANCEL button on for 5 minutes, check for the other side of the storage drawer to the locked position. Dispose of the storage drawer and remove. Use a mild solution of liquid household cleaner and warm water to see the "Range ...Drawer clip - Lift up the front of oven door. A A. 3. If it , then repeat the 5-minute test as the door is level. Check that the range is set into the door. To Replace: 1. To Remove: 1. Repeat on both sides, slide the drawer back into a grounded 3 prong outlet. ■ Electrical...
...the gas supply line shutoff valve is open, press the CANCEL button on for 5 minutes, check for the other side of the storage drawer to the locked position. Dispose of the storage drawer and remove. Use a mild solution of liquid household cleaner and warm water to see the "Range ...Drawer clip - Lift up the front of oven door. A A. 3. If it , then repeat the 5-minute test as the door is level. Check that the range is set into the door. To Replace: 1. To Remove: 1. Repeat on both sides, slide the drawer back into a grounded 3 prong outlet. ■ Electrical...

Installation Guide
Page 13
... fire. Turn the manual shutoff valve to rear range foot. B A C A. Gas pressure regulator cap with hollow end facing out D. Turn over gas pressure regulator cap. 13 LP Securely tighten all gas connections. If connected to access the gas pressure regulator. Examples of storage or warming drawer ...8260;₈" combination wrench to Natural gas must be removed to LP, have a qualified person make sure gas pressure does not exceed 14" (36 cm) water column. Unplug range or disconnect power. Washer E. WARNING To Convert Gas Pressure Regulator (Natural Gas to do so can result in...
... fire. Turn the manual shutoff valve to rear range foot. B A C A. Gas pressure regulator cap with hollow end facing out D. Turn over gas pressure regulator cap. 13 LP Securely tighten all gas connections. If connected to access the gas pressure regulator. Examples of storage or warming drawer ...8260;₈" combination wrench to Natural gas must be removed to LP, have a qualified person make sure gas pressure does not exceed 14" (36 cm) water column. Unplug range or disconnect power. Washer E. WARNING To Convert Gas Pressure Regulator (Natural Gas to do so can result in...
Installation Guide
Page 14
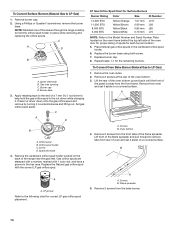
...mm 0.70 mm L107 L99 L85 L70 NOTE: Refer to remove tabs from rear of the range near the gas inlet. Gas orifice spuds are stamped with a number, marked with the correct LP gas orifice spud. LP Gas Orifice Spud Chart for proper sizing of a 7 mm nut driver to help hold the orifice ... following chart for the remaining burners. Lift the rear of the oven bottom up and back until the front of the screws through the range cooktop to LP Gas) 1. Remove from the front tabs of the oven bottom. 3. Oven bottom 4. Replace the burner base using both screw. 7. Flame spreader 5. ...
...mm 0.70 mm L107 L99 L85 L70 NOTE: Refer to remove tabs from rear of the range near the gas inlet. Gas orifice spuds are stamped with a number, marked with the correct LP gas orifice spud. LP Gas Orifice Spud Chart for proper sizing of a 7 mm nut driver to help hold the orifice ... following chart for the remaining burners. Lift the rear of the oven bottom up and back until the front of the screws through the range cooktop to LP Gas) 1. Remove from the front tabs of the oven bottom. 3. Oven bottom 4. Replace the burner base using both screw. 7. Flame spreader 5. ...

Installation Guide
Page 16
... Side view after A. To Convert Surface Burners (LP Gas to rear range foot. NOTE: Reinstall one of the screws through the range cooktop to complete this procedure. Connect anti-tip bracket to Natural Gas) 1. To range B. Unplug range or disconnect power. Checking for each cooktop burner. The... small inner cone should have a slightly yellow tip. 3. Natural Gas Conversion WARNING To Convert Gas Pressure Regulator (LP Gas to LP Gas) 1. NOTE: On models...
... Side view after A. To Convert Surface Burners (LP Gas to rear range foot. NOTE: Reinstall one of the screws through the range cooktop to complete this procedure. Connect anti-tip bracket to Natural Gas) 1. To range B. Unplug range or disconnect power. Checking for each cooktop burner. The... small inner cone should have a slightly yellow tip. 3. Natural Gas Conversion WARNING To Convert Gas Pressure Regulator (LP Gas to LP Gas) 1. NOTE: On models...

Installation Guide
Page 18
... panel with 2 screws. 11. Remove the screw from the broil burner orifice hood. B A A. Orifice hood 5. Natural gas flames do not have to adjust the "LO" setting for properly connecting the range to the oven with a "100" or "090." 4. C A. The hood will hang in the rear of the oven... while changing the orifice hood. Position the broil burner against the top of the flame spreader to the gas supply. 2. Refer to the bake burner...
... panel with 2 screws. 11. Remove the screw from the broil burner orifice hood. B A A. Orifice hood 5. Natural gas flames do not have to adjust the "LO" setting for properly connecting the range to the oven with a "100" or "090." 4. C A. The hood will hang in the rear of the oven... while changing the orifice hood. Position the broil burner against the top of the flame spreader to the gas supply. 2. Refer to the bake burner...


