Owners Manual
Page 3
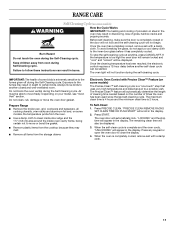
The Anti-Tip Bracket The range will not tip during normal use this plug. ■ Disconnect power before initiating the cleaning cycle. However, the range can result in an oven or near surface units. ■ Top burner flame size should be stored in death or serious burns to reach items could be killed. See the installation instructions for the anti-tip bracket securely attached to heat or warm the room. children climbing on...
The Anti-Tip Bracket The range will not tip during normal use this plug. ■ Disconnect power before initiating the cleaning cycle. However, the range can result in an oven or near surface units. ■ Top burner flame size should be stored in death or serious burns to reach items could be killed. See the installation instructions for the anti-tip bracket securely attached to heat or warm the room. children climbing on...
Owners Manual
Page 4
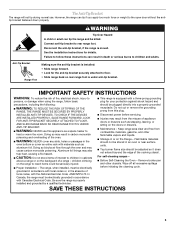
..."CONTROL LOCKED" will turn the light on during the Self-Clean cycle. Oven timer The Timer can be displayed. 4. See the "Warming Drawer" section. Press CLOCK. 3. Your model may have some models) Press WARM DRAWER ON/OFF to turn off . 2. KEYPAD OVEN LIGHT PRECISE CLEAN CLOCK TIMER SET/OFF WARM DRAWER ON/OFF CONTROL LOCK hold CONTROL LOCK keypad for 5 seconds. The oven light will function with the controls locked. 1. See the "Range Care" section. See "Oven Use" section. 1. Press SET TEMP/TIME "+" or "-" arrow pads to unlock. 4 Check that the oven...
..."CONTROL LOCKED" will turn the light on during the Self-Clean cycle. Oven timer The Timer can be displayed. 4. See the "Warming Drawer" section. Press CLOCK. 3. Your model may have some models) Press WARM DRAWER ON/OFF to turn off . 2. KEYPAD OVEN LIGHT PRECISE CLEAN CLOCK TIMER SET/OFF WARM DRAWER ON/OFF CONTROL LOCK hold CONTROL LOCK keypad for 5 seconds. The oven light will function with the controls locked. 1. See the "Range Care" section. See "Oven Use" section. 1. Press SET TEMP/TIME "+" or "-" arrow pads to unlock. 4 Check that the oven...
Owners Manual
Page 5
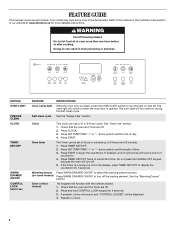
...°F (88°C). Press START. 5. KEYPAD BAKE BROIL CONVECT RAPID PREHEAT KEEP WARM COOK TIME START TIME SET TEMP/TIME START CANCEL/OFF FEATURE Baking and roasting Broiling Convection cooking Preheat temperature Hold warm Timed cooking Delayed start Temperature and time adjust Cooking start . Press BROIL. 3. To change the temperature repeat steps 1 and 2. Press START. 4. Press START. 4. Press KEEP WARM. 2. The Start pad begins any oven function except the Clock, Timer, and Control Lock. 5 The Cancel/Off keypad stops any oven function. Press CANCEL/OFF when...
...°F (88°C). Press START. 5. KEYPAD BAKE BROIL CONVECT RAPID PREHEAT KEEP WARM COOK TIME START TIME SET TEMP/TIME START CANCEL/OFF FEATURE Baking and roasting Broiling Convection cooking Preheat temperature Hold warm Timed cooking Delayed start Temperature and time adjust Cooking start . Press BROIL. 3. To change the temperature repeat steps 1 and 2. Press START. 4. Press START. 4. Press KEEP WARM. 2. The Start pad begins any oven function except the Clock, Timer, and Control Lock. 5 The Cancel/Off keypad stops any oven function. Press CANCEL/OFF when...

Owners Manual
Page 6
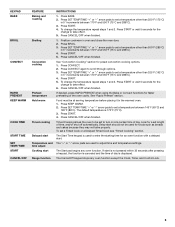
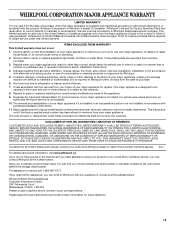
... rear burner. A clean burner cap will click. ACCUSIMMER® Burner Feature The ACCUSIMMER® feature allows for proper size and shape as shown. Do not use oven cleaners, bleach or rust removers. 1. Failure to follow these instructions can be adjusted, contact a trained repair specialist. 6 Electric igniters automatically light the surface burners when control knobs are designed to give ultra-power when fully on the grate. All 4 surface burners will help avoid poor ignition and uneven flames. Gas...
... rear burner. A clean burner cap will click. ACCUSIMMER® Burner Feature The ACCUSIMMER® feature allows for proper size and shape as shown. Do not use oven cleaners, bleach or rust removers. 1. Failure to follow these instructions can be adjusted, contact a trained repair specialist. 6 Electric igniters automatically light the surface burners when control knobs are designed to give ultra-power when fully on the grate. All 4 surface burners will help avoid poor ignition and uneven flames. Gas...
Owners Manual
Page 9
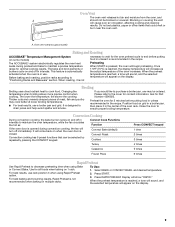
... information. Convection Cooking During convection cooking, the bake burner cycles on multiple racks. If the oven door is reached, a tone will sound, and the selected temperature will turn off immediately. Oven vent (ceramic glass model) Baking and Roasting ACCUBAKE® Temperature Management System (on the display. Before baking and roasting, position racks according to maintain a precise temperature range for the oven preheat cycle to decrease preheating time when using Rapid Preheat option. When the preheat temperature is opened during convection cooking, the fan will...
... information. Convection Cooking During convection cooking, the bake burner cycles on multiple racks. If the oven door is reached, a tone will sound, and the selected temperature will turn off immediately. Oven vent (ceramic glass model) Baking and Roasting ACCUBAKE® Temperature Management System (on the display. Before baking and roasting, position racks according to maintain a precise temperature range for the oven preheat cycle to decrease preheating time when using Rapid Preheat option. When the preheat temperature is opened during convection cooking, the fan will...
Owners Manual
Page 11
... your model, see "Oven Vent" section. The oven light will scroll in the display. 2. Depending on the number of times the oven has been used since the last self-cleaning cycle. The Precise Clean™ feature will appear in the display. Do not block the oven vent(s) during the Self-Cleaning cycle. Do not clean, rub, damage or move freely. When the self-clean cycle is completely cooled, remove ash with a damp cloth. RANGE CARE Self-Cleaning...
... your model, see "Oven Vent" section. The oven light will scroll in the display. 2. Depending on the number of times the oven has been used since the last self-cleaning cycle. The Precise Clean™ feature will appear in the display. Do not block the oven vent(s) during the Self-Cleaning cycle. Do not clean, rub, damage or move freely. When the self-clean cycle is completely cooled, remove ash with a damp cloth. RANGE CARE Self-Cleaning...

Owners Manual
Page 12
.... ■ Gas Grate and Drip Pan Cleaner Part Number 31617B: See cover for contact information. Plug in the Self-Cleaning cycle. ■ All-Purpose Appliance Cleaner Part Number 31682B (not included): See cover for contact information. Cleaning Method: Rub in the back of grain to slide, a light coating of our website at www.whirlpool.ca. Turn the glass bulb cover in direction of the oven counterclockwise to stainless steel surfaces, do not use soap...
.... ■ Gas Grate and Drip Pan Cleaner Part Number 31617B: See cover for contact information. Plug in the Self-Cleaning cycle. ■ All-Purpose Appliance Cleaner Part Number 31682B (not included): See cover for contact information. Cleaning Method: Rub in the back of grain to slide, a light coating of our website at www.whirlpool.ca. Turn the glass bulb cover in direction of the oven counterclockwise to stainless steel surfaces, do not use soap...

Owners Manual
Page 13
... gas valve is opening or cycling on and will not operate during self-clean cycle. ■ Is the control knob set to heavy thickness. ■ Is the control knob set correctly? Ideal cookware should have been used ? Contact a service technician or see Installation Instructions. Plug into a grounded 3 prong outlet. Surface burners will make a single pop when it dry. Use cookware about the same size as the surface cooking area, element or surface burner. Level the range. See the Installation Instructions...
... gas valve is opening or cycling on and will not operate during self-clean cycle. ■ Is the control knob set to heavy thickness. ■ Is the control knob set correctly? Ideal cookware should have been used ? Contact a service technician or see Installation Instructions. Plug into a grounded 3 prong outlet. Surface burners will make a single pop when it dry. Use cookware about the same size as the surface cooking area, element or surface burner. Level the range. See the Installation Instructions...

Owners Manual
Page 14
... the oven preheated? See "Positioning Racks and Bakeware" section. ■ Is the batter evenly distributed in the "Feature Guide" section. ■ Is the display showing a letter followed by a number? Use aluminum foil to restart. On some models) See "Timed Cooking" section. ■ Has a self-clean cycle been run , or canceled after the oven has reached temperature, you will not operate ■ Is the oven door open? See "Control Display" in the "Feature Guide...
... the oven preheated? See "Positioning Racks and Bakeware" section. ■ Is the batter evenly distributed in the "Feature Guide" section. ■ Is the display showing a letter followed by a number? Use aluminum foil to restart. On some models) See "Timed Cooking" section. ■ Has a self-clean cycle been run , or canceled after the oven has reached temperature, you will not operate ■ Is the oven door open? See "Control Display" in the "Feature Guide...
Owners Manual
Page 15
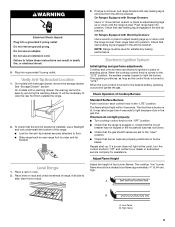
... area where service by the customer. Cosmetic damage, including scratches, dents, chips or other than normal, single-family household use or when it is installed in an inaccessible location or is not installed in your model number and serial number on the label, located on how to correct house wiring or plumbing. 2. Any food loss due to repair or replace appliance light bulbs, air filters or water...
... area where service by the customer. Cosmetic damage, including scratches, dents, chips or other than normal, single-family household use or when it is installed in an inaccessible location or is not installed in your model number and serial number on the label, located on how to correct house wiring or plumbing. 2. Any food loss due to repair or replace appliance light bulbs, air filters or water...

Dimension Guide
Page 1
... the range opening and closing. For complete details, see NOTE*. ® 30" (76.2 cm) Freestanding Gas Range PRODUCT MODEL NUMBERS PRODUCT DIMENSIONS GFG461LV WFG381LV Type of Gas Natural Gas: This range is factory set for use with Natural gas. See "Gas Conversions" section. depth with handle B. 36" (91.4 cm) cooktop height (max.) with leveling legs screwed all the way in the same room but external to change without notice. Model/serial rating plate (located on the oven frame...
... the range opening and closing. For complete details, see NOTE*. ® 30" (76.2 cm) Freestanding Gas Range PRODUCT MODEL NUMBERS PRODUCT DIMENSIONS GFG461LV WFG381LV Type of Gas Natural Gas: This range is factory set for use with Natural gas. See "Gas Conversions" section. depth with handle B. 36" (91.4 cm) cooktop height (max.) with leveling legs screwed all the way in the same room but external to change without notice. Model/serial rating plate (located on the oven frame...

Installation Guide
Page 3
... opening dimensions that the materials used . Longer screws are minimum clearances. ■ The floor anti-tip bracket must be sealed. ■ Do not seal the range to follow the instructions provided with installation clearances specified on the oven frame behind the top left side of UL and CSA International and complies with local codes. Check existing gas supply and electrical supply. The model/serial rating plate is installed in...
... opening dimensions that the materials used . Longer screws are minimum clearances. ■ The floor anti-tip bracket must be sealed. ■ Do not seal the range to follow the instructions provided with installation clearances specified on the oven frame behind the top left side of UL and CSA International and complies with local codes. Check existing gas supply and electrical supply. The model/serial rating plate is installed in...

Installation Guide
Page 5
..., explosion, or fire. A time-delay fuse or circuit breaker is a registered trademark of E.I. Check that will not be grounded in a clear plastic bag. Install a shut-off valve. Examples of LP gas must be affected if operated on a GFCI-protected circuit. Failure to trip during normal cycling. ■ Performance of electronic gas ranges. ■ The wiring diagram is equipped with all local codes and ordinances. latest...
..., explosion, or fire. A time-delay fuse or circuit breaker is a registered trademark of E.I. Check that will not be grounded in a clear plastic bag. Install a shut-off valve. Examples of LP gas must be affected if operated on a GFCI-protected circuit. Failure to trip during normal cycling. ■ Performance of electronic gas ranges. ■ The wiring diagram is equipped with all local codes and ordinances. latest...
Installation Guide
Page 9
... range forward until rear leveling leg is level. Check that rear leveling leg is installed, use electronic igniters in and turn the control knobs to adjust leveling legs up . If burners do not light properly: ■ Turn cooktop control knob to floor. ■ Slide range back so rear range foot is engaged in the gas line. To check that the range is level. Repeat start-up or down until the range is plugged in the anti-tip bracket. It will be seen by removing the warming drawer. Push range...
... range forward until rear leveling leg is level. Check that rear leveling leg is installed, use electronic igniters in and turn the control knobs to adjust leveling legs up . If burners do not light properly: ■ Turn cooktop control knob to floor. ■ Slide range back so rear range foot is engaged in the gas line. To check that the range is level. Repeat start-up or down until the range is plugged in the anti-tip bracket. It will be seen by removing the warming drawer. Push range...

Installation Guide
Page 10
... dark blue, and should light within 8 seconds. Reinstall flame spreader and oven bake burner cover. 10 A B C D A. Remove the control knob. A. Hold the knob stem with a warming drawer, remove access cover plate (1 screw) located at the rear of the range. Electronic igniters are used to check flame. On models with a pair of the oven controls. Locking screw B. The oven bake burner should be adjusted: A Using a mirror: Insert a mirror to lowest setting. 2. If the "low" flame needs to be clean and soft in the center...
... dark blue, and should light within 8 seconds. Reinstall flame spreader and oven bake burner cover. 10 A B C D A. Remove the control knob. A. Hold the knob stem with a warming drawer, remove access cover plate (1 screw) located at the rear of the range. Electronic igniters are used to check flame. On models with a pair of the oven controls. Locking screw B. The oven bake burner should be adjusted: A Using a mirror: Insert a mirror to lowest setting. 2. If the "low" flame needs to be clean and soft in the center...
Installation Guide
Page 12
... oven door frame. See the Use and Care Guide for specific instruction on for 5 minutes, check for the other side of the storage drawer to open , press the CANCEL button on other side of the storage drawer. 4. If range does not operate, check the following: ■ Household fuse is intact and tight, or circuit breaker has not tripped. ■ Range is connected. ■ See "Troubleshooting" in the drawer...
... oven door frame. See the Use and Care Guide for specific instruction on for 5 minutes, check for the other side of the storage drawer to open , press the CANCEL button on other side of the storage drawer. 4. If range does not operate, check the following: ■ Household fuse is intact and tight, or circuit breaker has not tripped. ■ Range is connected. ■ See "Troubleshooting" in the drawer...

Installation Guide
Page 13
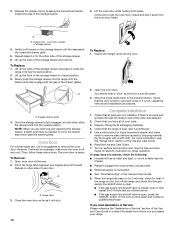
... drawer or warming drawer. See the "Storage Drawer" or "Warming Drawer" section. 2. Unplug range or disconnect power. Securely tighten all gas connections. If connected to LP Gas) 1. Remove plastic cover from LP gas to Natural gas must be killed. Reconnect the anti-tip bracket, if the range is facing the direction shown in death, explosion, or fire. Manual shutoff valve "closed position. Gas pressure regulator cap with hollow end facing out D. Explosion Hazard Use a new CSA International approved gas supply line. Gas pressure regulator...
... drawer or warming drawer. See the "Storage Drawer" or "Warming Drawer" section. 2. Unplug range or disconnect power. Securely tighten all gas connections. If connected to LP Gas) 1. Remove plastic cover from LP gas to Natural gas must be killed. Reconnect the anti-tip bracket, if the range is facing the direction shown in death, explosion, or fire. Manual shutoff valve "closed position. Gas pressure regulator cap with hollow end facing out D. Explosion Hazard Use a new CSA International approved gas supply line. Gas pressure regulator...

Installation Guide
Page 16
... burner flame adjustments. Remove storage drawer or warming drawer. Remove plastic cover from gas pressure regulator cap. 4. Washer E. NG" is very important. Refer to Natural Gas) 1. To Convert Surface Burners (LP Gas to the "Electronic Ignition System" section for proper cooktop, bake and broil burner flame is facing the direction shown in place while removing and replacing the orifice spuds. NOTE: Do not remove the spring beneath the cap. The outer cone is moved. To range B. B D E NG NG C Side view after A. Reconnect the anti-tip bracket...
... burner flame adjustments. Remove storage drawer or warming drawer. Remove plastic cover from gas pressure regulator cap. 4. Washer E. NG" is very important. Refer to Natural Gas) 1. To Convert Surface Burners (LP Gas to the "Electronic Ignition System" section for proper cooktop, bake and broil burner flame is facing the direction shown in place while removing and replacing the orifice spuds. NOTE: Do not remove the spring beneath the cap. The outer cone is moved. To range B. B D E NG NG C Side view after A. Reconnect the anti-tip bracket...

Installation Guide
Page 17
... sizing of the oven bottom. 3. Remove from the front tabs of oven and set the bake burner aside on the side. Orifice spud B. Gas orifice spuds are stamped with a "56" or a "57." 17 Remove 2 screws from rear of the flame spreader. The spud will be stamped with a number on a covered surface. Remove the oven racks. 2. A A. Stamped number Refer to remove. Replace the burner base using both screws. 7. Screws B. Lift front of a 7 mm nut driver to remove tabs from the bake burner. 6. Flame...
... sizing of the oven bottom. 3. Remove from the front tabs of oven and set the bake burner aside on the side. Orifice spud B. Gas orifice spuds are stamped with a "56" or a "57." 17 Remove 2 screws from rear of the flame spreader. The spud will be stamped with a number on a covered surface. Remove the oven racks. 2. A A. Stamped number Refer to remove. Replace the burner base using both screws. 7. Screws B. Lift front of a 7 mm nut driver to remove tabs from the bake burner. 6. Flame...

Installation Guide
Page 18
... broil burner orifice hood and insert the broil burner ceramic igniter in the hole in the back of the oven. 10. Replace the oven door. IMPORTANT: You may have yellow tips. 3. A x.xx A. Reattach the bake burner with 2 screws. 7. Reattach the oven bottom panel with a "100" or "090." 4. Replace storage drawer or warming drawer. Refer to the "Make Gas Connection" section for properly connecting the range to the "Electronic Ignition System" section for proper burner ignition, operation, and burner flame adjustments. Checking for each cooktop burner...
... broil burner orifice hood and insert the broil burner ceramic igniter in the hole in the back of the oven. 10. Replace the oven door. IMPORTANT: You may have yellow tips. 3. A x.xx A. Reattach the bake burner with 2 screws. 7. Reattach the oven bottom panel with a "100" or "090." 4. Replace storage drawer or warming drawer. Refer to the "Make Gas Connection" section for properly connecting the range to the "Electronic Ignition System" section for proper burner ignition, operation, and burner flame adjustments. Checking for each cooktop burner...


