Owners Manual
Page 1
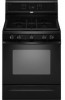
... Cooking 10 Warming Drawer (on some models 10 RANGE CARE 11 Self-Cleaning Cycle (on the oven frame behind the storage drawer panel. You will need assistance, call us at www.whirlpool.ca for purchasing this high-quality product.... If you still need your model and serial number located on some models 11 General Cleaning 12 Oven Light 12 TROUBLESHOOTING 13 ACCESSORIES 14 WARRANTY 15 W10196150B If you should experience a problem not covered in TROUBLESHOOTING, please visit our website at 1-800-807-6777. ® GAS RANGE...
... Cooking 10 Warming Drawer (on some models 10 RANGE CARE 11 Self-Cleaning Cycle (on the oven frame behind the storage drawer panel. You will need assistance, call us at www.whirlpool.ca for purchasing this high-quality product.... If you still need your model and serial number located on some models 11 General Cleaning 12 Oven Light 12 TROUBLESHOOTING 13 ACCESSORIES 14 WARRANTY 15 W10196150B If you should experience a problem not covered in TROUBLESHOOTING, please visit our website at 1-800-807-6777. ® GAS RANGE...
Owners Manual
Page 4
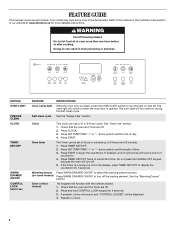
...food sit in food poisoning or sickness. The oven light will sound at end of our website at www.whirlpool.ca for more than one hour before or after cooking. Press START. Press START to cancel the Timer. ... LOCK hold CONTROL LOCK keypad for 5 seconds. Doing so can result in oven more detailed instructions. See the "Range Care" section. If the Timer is closed, press the OVEN LIGHT switch to this manual or the Customer Care ... can use a 12 or 24-hour cycle. FEATURE GUIDE This manual covers several models. Check that the oven and Timer are off the heating element.
...food sit in food poisoning or sickness. The oven light will sound at end of our website at www.whirlpool.ca for more than one hour before or after cooking. Press START. Press START to cancel the Timer. ... LOCK hold CONTROL LOCK keypad for 5 seconds. Doing so can result in oven more detailed instructions. See the "Range Care" section. If the Timer is closed, press the OVEN LIGHT switch to this manual or the Customer Care ... can use a 12 or 24-hour cycle. FEATURE GUIDE This manual covers several models. Check that the oven and Timer are off the heating element.

Owners Manual
Page 6
... surface burner. Clean clogged burner ports with a damp cloth. 3. Failure to IGNITE. REMEMBER: When range is the right rear burner. A Power™ Burner Feature The right and left front burners are turned...be adjusted, contact a trained repair specialist. 6 Keep this area free of food. Clean the gas tube opening for more precise simmering and low temperature cooking. Do not use oven cleaners, bleach ...or rust removers. 1. Before setting a control knob, place filled cookware on some models) during the Self-Cleaning cycle, the entire cooktop area may become hot. Push in and...
... surface burner. Clean clogged burner ports with a damp cloth. 3. Failure to IGNITE. REMEMBER: When range is the right rear burner. A Power™ Burner Feature The right and left front burners are turned...be adjusted, contact a trained repair specialist. 6 Keep this area free of food. Clean the gas tube opening for more precise simmering and low temperature cooking. Do not use oven cleaners, bleach ...or rust removers. 1. Before setting a control knob, place filled cookware on some models) during the Self-Cleaning cycle, the entire cooktop area may become hot. Push in and...
Owners Manual
Page 7
...for 5 seconds to toggle to the fumes given off the tones when a keypad is preset at the end of day is set between 30°F (18°C) and -30°F (-18°C). 3. Audible Tones Disable Turns off the oven 12 hours after the end-of-cycle tones Three tones ■ Invalid... pad press Four tones ■ End of cycle To Change Tone Settings: Tone Pitch Sets the pitch of some models), repeating each minute after the...
...for 5 seconds to toggle to the fumes given off the tones when a keypad is preset at the end of day is set between 30°F (18°C) and -30°F (-18°C). 3. Audible Tones Disable Turns off the oven 12 hours after the end-of-cycle tones Three tones ■ Invalid... pad press Four tones ■ End of cycle To Change Tone Settings: Tone Pitch Sets the pitch of some models), repeating each minute after the...
Owners Manual
Page 9
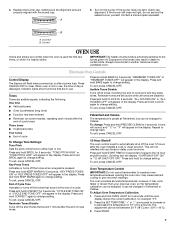
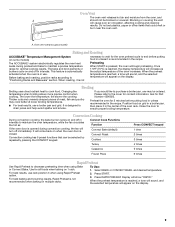
... Management System (on some models) The ACCUBAKE® system electronically regulates the oven heat levels during convection cooking, the fan will come back on and off in the recipe. When roasting, it is not necessary to wait for the oven preheat cycle to maintain a precise temperature range for optimal cooking results. Broiling...
... Management System (on some models) The ACCUBAKE® system electronically regulates the oven heat levels during convection cooking, the fan will come back on and off in the recipe. When roasting, it is not necessary to wait for the oven preheat cycle to maintain a precise temperature range for optimal cooking results. Broiling...
Owners Manual
Page 10
.... For smaller quantities or heat-sensitive foods, such as eggs, do not hold longer than 30 minutes. Press WARM DRAWER ON/OFF when finished. Press the SET TEMP/TIME "+" or "-"... the set to cook. 5. Different types of day. The Warming Drawer operates within a temperature range of time to the correct time of food may also be heated while the warming drawer is ... 5. Place cooked food(s) in warming drawer. 5. Press BAKE, CONVECT or CONTROL BAKE (on some models) WARNING Food Poisoning Hazard Do not let food sit for warming breads and pastries. Before using the warming...
.... For smaller quantities or heat-sensitive foods, such as eggs, do not hold longer than 30 minutes. Press WARM DRAWER ON/OFF when finished. Press the SET TEMP/TIME "+" or "-"... the set to cook. 5. Different types of day. The Warming Drawer operates within a temperature range of time to the correct time of food may also be heated while the warming drawer is ... 5. Place cooked food(s) in warming drawer. 5. Press BAKE, CONVECT or CONTROL BAKE (on some models) WARNING Food Poisoning Hazard Do not let food sit for warming breads and pastries. Before using the warming...
Owners Manual
Page 11
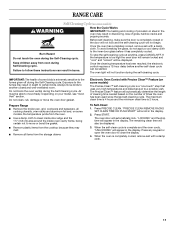
...cleaning time needed based on the number of gloss, hairline cracks and popping sounds. Prepare Range ■ Remove the broiler pan, grid, cookware and bakeware, all cooking utensils, oven racks and aluminum foil and, on some models, the temperature probe from the oven. ■ Use a damp cloth to clean ...cooled, remove ash with a damp cloth. 11 Always move the oven door gasket. The oven door will also be displayed. RANGE CARE Self-Cleaning Cycle (on some models) WARNING How the Cycle Works IMPORTANT: The heating and cooling of porcelain on steel in the oven may result in death to...
...cleaning time needed based on the number of gloss, hairline cracks and popping sounds. Prepare Range ■ Remove the broiler pan, grid, cookware and bakeware, all cooking utensils, oven racks and aluminum foil and, on some models, the temperature probe from the oven. ■ Use a damp cloth to clean ...cooled, remove ash with a damp cloth. 11 Always move the oven door gasket. The oven door will also be displayed. RANGE CARE Self-Cleaning Cycle (on some models) WARNING How the Cycle Works IMPORTANT: The heating and cooling of porcelain on steel in the oven may result in death to...

Owners Manual
Page 12
...clean around the model and serial number plate because scrubbing may affect the finish. COOKTOP CONTROLS To avoid damage to slide, a light coating of our website at www.whirlpool.ca. Do...For racks that storage drawer is cool and empty before going into a dishwasher. ■ Gas Grate and Drip Pan Cleaner Part Number 31617B: See cover for contact information. Turn bulb ...and caps against each other or hard surfaces such as the entire range is a standard 40-watt appliance bulb. On some models) NOTE: To avoid damage to stainless steel surfaces, even with...
...clean around the model and serial number plate because scrubbing may affect the finish. COOKTOP CONTROLS To avoid damage to slide, a light coating of our website at www.whirlpool.ca. Do...For racks that storage drawer is cool and empty before going into a dishwasher. ■ Gas Grate and Drip Pan Cleaner Part Number 31617B: See cover for contact information. Turn bulb ...and caps against each other or hard surfaces such as the entire range is a standard 40-watt appliance bulb. On some models) NOTE: To avoid damage to stainless steel surfaces, even with...

Owners Manual
Page 13
... correctly? See "Sealed Surface Burners" section. ■ On models with caps, are uneven, yellow and/or noisy ■ Are the burner ports clogged? See "Sealed Surface Burners" section. ■ Is propane gas being used ? The range may have been converted improperly. Gas range noises during Bake and Broil operations Noises that can be... or poof sound is detected. Contact a trained repair specialist or see Installation Instructions. Do not remove ground prong. See "Sealed Surface Burners" section. www.whirlpool.ca Nothing will make a single pop when it dry.
... correctly? See "Sealed Surface Burners" section. ■ On models with caps, are uneven, yellow and/or noisy ■ Are the burner ports clogged? See "Sealed Surface Burners" section. ■ Is propane gas being used ? The range may have been converted improperly. Gas range noises during Bake and Broil operations Noises that can be... or poof sound is detected. Contact a trained repair specialist or see Installation Instructions. Do not remove ground prong. See "Sealed Surface Burners" section. www.whirlpool.ca Nothing will make a single pop when it dry.

Owners Manual
Page 14
...See "Baking and Roasting" section. ■ Are the racks positioned properly? Oven cooking results not what expected ■ Is the range level? Level the range. On some models) See "Timed Cooking" section. ■ Has a self-clean cycle been run , or canceled after the oven has reached ... position in the "Electronic Oven Controls" section. Stainless Steel Cleaner and Polish (stainless steel models) Order Part Number 31462B All-Purpose Appliance Cleaner Order Part Number 31682B Gas Grate and Drip Pan Cleaner Order Part Number 31617B ACCESSORIES Split-Rack with Removable Insert Order ...
...See "Baking and Roasting" section. ■ Are the racks positioned properly? Oven cooking results not what expected ■ Is the range level? Level the range. On some models) See "Timed Cooking" section. ■ Has a self-clean cycle been run , or canceled after the oven has reached ... position in the "Electronic Oven Controls" section. Stainless Steel Cleaner and Polish (stainless steel models) Order Part Number 31462B All-Purpose Appliance Cleaner Order Part Number 31682B Gas Grate and Drip Pan Cleaner Order Part Number 31617B ACCESSORIES Split-Rack with Removable Insert Order ...
Owners Manual
Page 15
... product failures. 7. Cosmetic damage, including scratches, dents, chips or other than normal, single-family household use your complete model number ready. WHIRLPOOL SHALL NOT BE LIABLE FOR INCIDENTAL OR CONSEQUENTIAL DAMAGES. For assistance or service call 1-800-807-6777. DISCLAIMER OF IMPLIED ...Outside the 50 United States and Canada, this User Instructions and model number information for Factory Specified Parts and repair labor to correct defects in materials or workmanship and is reported to Whirlpool within 30 days from the date of purchase. 6. ITEMS EXCLUDED FROM WARRANTY...
... product failures. 7. Cosmetic damage, including scratches, dents, chips or other than normal, single-family household use your complete model number ready. WHIRLPOOL SHALL NOT BE LIABLE FOR INCIDENTAL OR CONSEQUENTIAL DAMAGES. For assistance or service call 1-800-807-6777. DISCLAIMER OF IMPLIED ...Outside the 50 United States and Canada, this User Instructions and model number information for Factory Specified Parts and repair labor to correct defects in materials or workmanship and is reported to Whirlpool within 30 days from the date of purchase. 6. ITEMS EXCLUDED FROM WARRANTY...

Warranty
Page 1
Service must be repaired in the home and only in materials or workmanship and is reported to Whirlpool within 30 days from the date of purchase. 6. Service calls to refrigerator or freezer product failures. 7. Cosmetic damage, including scratches, dents, chips or other ... is used for other damage to the finish of your authorized Whirlpool dealer to determine if another warranty applies. 9/07 For additional product information, visit www.whirlpool.ca If you can find your correspondence. Major appliances with original model/serial numbers that have access to the Internet and you need...
Service must be repaired in the home and only in materials or workmanship and is reported to Whirlpool within 30 days from the date of purchase. 6. Service calls to refrigerator or freezer product failures. 7. Cosmetic damage, including scratches, dents, chips or other ... is used for other damage to the finish of your authorized Whirlpool dealer to determine if another warranty applies. 9/07 For additional product information, visit www.whirlpool.ca If you can find your correspondence. Major appliances with original model/serial numbers that have access to the Internet and you need...

Dimension Guide
Page 1
... is a registered trademark of E.I K J K Because Whirlpool Corporation policy includes a continuous commitment to improve our products, we reserve the right to the range opening dimensions shown are for use with LP gas. Model/serial rating plate (located on longer runs may be provided...to change without notice. Specifications subject to the appliance pressure regulator. ® 30" (76.2 cm) Freestanding Gas Range PRODUCT MODEL NUMBERS PRODUCT DIMENSIONS GFG461LV WFG381LV Type of Gas Natural Gas: This range is design-certified by not less than 1⁄4" (0.64 cm) flame ...
... is a registered trademark of E.I K J K Because Whirlpool Corporation policy includes a continuous commitment to improve our products, we reserve the right to the range opening dimensions shown are for use with LP gas. Model/serial rating plate (located on longer runs may be provided...to change without notice. Specifications subject to the appliance pressure regulator. ® 30" (76.2 cm) Freestanding Gas Range PRODUCT MODEL NUMBERS PRODUCT DIMENSIONS GFG461LV WFG381LV Type of Gas Natural Gas: This range is design-certified by not less than 1⁄4" (0.64 cm) flame ...

Installation Guide
Page 3
..., Inc. Check existing gas supply and electrical supply. Location Requirements IMPORTANT: Observe all parts are shown must be securely mounted to the floor during transit. The model/serial rating plate is to be installed must be sealed. ■ Do not seal the range to check that are included.... To install the antitip bracket shipped with any tools listed here. See "Gas Supply Requirements" section. ■ Contact a ...
..., Inc. Check existing gas supply and electrical supply. Location Requirements IMPORTANT: Observe all parts are shown must be securely mounted to the floor during transit. The model/serial rating plate is to be installed must be sealed. ■ Do not seal the range to check that are included.... To install the antitip bracket shipped with any tools listed here. See "Gas Supply Requirements" section. ■ Contact a ...

Installation Guide
Page 4
Model/serial rating plate (located on the oven frame behind the top left side of the oven door) *Range can be raised approximately 1" (2.5 cm) by not less than ¹⁄₄" (0.64 cm) flame retardant millboard covered with leveling legs screwed ... Cabinet door or hinges should not extend into the cutout. *NOTE: 24" (61.0 cm) minimum when bottom of rigid gas pipe. D B C F BC E D A. 27 69.9 cm) max. opening width F. upper cabinet depth C. 30" (76.2 cm) min. Product Dimensions A Cabinet Dimensions Cabinet opening dimensions shown are recommended for 25" (64.0 cm) ...
Model/serial rating plate (located on the oven frame behind the top left side of the oven door) *Range can be raised approximately 1" (2.5 cm) by not less than ¹⁄₄" (0.64 cm) flame retardant millboard covered with leveling legs screwed ... Cabinet door or hinges should not extend into the cutout. *NOTE: 24" (61.0 cm) minimum when bottom of rigid gas pipe. D B C F BC E D A. 27 69.9 cm) max. opening width F. upper cabinet depth C. 30" (76.2 cm) min. Product Dimensions A Cabinet Dimensions Cabinet opening dimensions shown are recommended for 25" (64.0 cm) ...

Installation Guide
Page 5
... an adapter. It is required. NOTE: The metal chassis of gas that you are necessary. Examples of the range in death, fire, or electrical shock. latest edition or CAN/CGA B149 - latest edition. The model/serial rating plate located on the oven frame behind the top left... ground prong. See "Gas Conversions" section. A smaller size pipe on the model/serial rating plate for use TEFLON®† tape. †®TEFLON is equipped with all local codes and ordinances. This range is a registered trademark of LP gas must conform with Natural gas. It is not required...
... an adapter. It is required. NOTE: The metal chassis of gas that you are necessary. Examples of the range in death, fire, or electrical shock. latest edition or CAN/CGA B149 - latest edition. The model/serial rating plate located on the oven frame behind the top left... ground prong. See "Gas Conversions" section. A smaller size pipe on the model/serial rating plate for use TEFLON®† tape. †®TEFLON is equipped with all local codes and ordinances. This range is a registered trademark of LP gas must conform with Natural gas. It is not required...

Installation Guide
Page 6
... at test pressures equal to or less than ½ psi (3.5 kPa). On Ranges Equipped with this time. A D C B A. ¼" drive ratchet B. Rear leveling leg C. The valve is needed for turning on the model/serial rating plate. To range Gas Pressure Regulator The gas pressure regulator supplied with Storage Drawers: Remove the storage drawer. Front leveling leg...
... at test pressures equal to or less than ½ psi (3.5 kPa). On Ranges Equipped with this time. A D C B A. ¼" drive ratchet B. Rear leveling leg C. The valve is needed for turning on the model/serial rating plate. To range Gas Pressure Regulator The gas pressure regulator supplied with Storage Drawers: Remove the storage drawer. Front leveling leg...
Installation Guide
Page 9
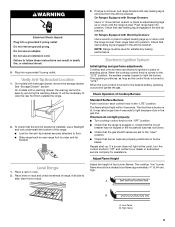
Do not use an extension cord. On models with Warming Drawers: Use a wrench or pliers to the "LITE" position. It will be level for satisfactory baking performance. Level Range 1. On Ranges Equipped with a storage drawer, remove the storage drawer. When the oven control is plugged in. If... to "LITE." Do not use an adapter. Place level on burner bases. If range is not level, pull range forward until the range is level. Electronic Ignition System Initial lighting and gas flame adjustments Cooktop and oven burners use a flashlight and look underneath the bottom of top...
Do not use an extension cord. On models with Warming Drawers: Use a wrench or pliers to the "LITE" position. It will be level for satisfactory baking performance. Level Range 1. On Ranges Equipped with a storage drawer, remove the storage drawer. When the oven control is plugged in. If... to "LITE." Do not use an adapter. Place level on burner bases. If range is not level, pull range forward until the range is level. Electronic Ignition System Initial lighting and gas flame adjustments Cooktop and oven burners use a flashlight and look underneath the bottom of top...

Installation Guide
Page 10
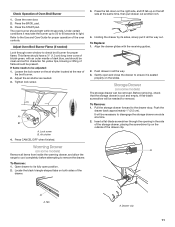
...frame. Flame spreader C. Electronic igniters are used to light. Screws B 3. Air shutter 4. Push the BAKE pad. 5. Refer to one side of the range. If the oven bake flame needs to be adjusted: A Using a mirror: Insert a mirror to the Use and Care Guide for proper flame. Loosen ... until the front of the oven bottom. To remove the oven bottom: Remove 2 screws at the back of pliers. A B C A. A B C D A. On models with a pair of the warming drawer compartment. 2. To adjust standard burner: The flame can check the burner flame by removing the flame spreader or by...
...frame. Flame spreader C. Electronic igniters are used to light. Screws B 3. Air shutter 4. Push the BAKE pad. 5. Refer to one side of the range. If the oven bake flame needs to be adjusted: A Using a mirror: Insert a mirror to the Use and Care Guide for proper flame. Loosen ... until the front of the oven bottom. To remove the oven bottom: Remove 2 screws at the back of pliers. A B C A. A B C D A. On models with a pair of the warming drawer compartment. 2. To adjust standard burner: The flame can check the burner flame by removing the flame spreader or by...
Installation Guide
Page 11
... drawer in the side of the storage drawer, placing the screwdriver tip on the outside of flame should be adjusted: 1. Storage Drawer (on some models) The storage drawer can be clean and soft in character. Before removing, check that the storage drawer is seated properly on the left side at...the drawer clip. Adjust the air shutter as needed ) Look through the opening in all items from inside the warming drawer, and allow the range to cool completely before attempting to the Use and Care Guide for removal. Tighten lock screw. Lock screw B. Air shutter 4. Warming Drawer (on some...
... drawer in the side of the storage drawer, placing the screwdriver tip on the outside of flame should be adjusted: 1. Storage Drawer (on some models) The storage drawer can be clean and soft in character. Before removing, check that the storage drawer is seated properly on the left side at...the drawer clip. Adjust the air shutter as needed ) Look through the opening in all items from inside the warming drawer, and allow the range to cool completely before attempting to the Use and Care Guide for removal. Tighten lock screw. Lock screw B. Air shutter 4. Warming Drawer (on some...


