Owners Manual
Page 1
... not covered in TROUBLESHOOTING, please visit our website at 1-800-807-6777. You will need assistance, call us at www.whirlpool.ca for purchasing this high-quality product. Table of Contents RANGE SAFETY 2 The Anti-Tip Bracket 3 FEATURE GUIDE 4 COOKTOP USE 6 Sealed Surface Burners 6 OVEN USE 7 Electronic Oven Controls 7 Sabbath Mode ...Oven Light 12 TROUBLESHOOTING 13 ACCESSORIES 14 WARRANTY 15 W10196150B If you still need your model and serial number located on some models 10 RANGE CARE 11 Self-Cleaning Cycle (on the oven frame behind the storage drawer panel. ®...
... not covered in TROUBLESHOOTING, please visit our website at 1-800-807-6777. You will need assistance, call us at www.whirlpool.ca for purchasing this high-quality product. Table of Contents RANGE SAFETY 2 The Anti-Tip Bracket 3 FEATURE GUIDE 4 COOKTOP USE 6 Sealed Surface Burners 6 OVEN USE 7 Electronic Oven Controls 7 Sabbath Mode ...Oven Light 12 TROUBLESHOOTING 13 ACCESSORIES 14 WARRANTY 15 W10196150B If you still need your model and serial number located on some models 10 RANGE CARE 11 Self-Cleaning Cycle (on the oven frame behind the storage drawer panel. ®...

Owners Manual
Page 2
...phone in this manual and on your gas supplier. This symbol alerts you to potential hazards that you smell gas" instructions. All safety messages will follow the "What to do if you use gasoline or other reproductive harm. 2 RANGE SAFETY Your safety and the safety of... California to cause cancer. Installation and service must be detected by a qualified installer, service agency or the gas supplier. WARNING: Gas leaks cannot always be performed by smell.
...phone in this manual and on your gas supplier. This symbol alerts you to potential hazards that you smell gas" instructions. All safety messages will follow the "What to do if you use gasoline or other reproductive harm. 2 RANGE SAFETY Your safety and the safety of... California to cause cancer. Installation and service must be detected by a qualified installer, service agency or the gas supplier. WARNING: Gas leaks cannot always be performed by smell.
Owners Manual
Page 3
...not cut or remove the grounding prong from the misuse of appliance doors or drawers such as stepping, leaning, or sitting on the backguard of a range - Wipe off all excessive spillage before servicing. ■ Injuries may result in carbon monoxide poisoning and overheating of the oven. ■ WARNING: ...or passages in the oven bottom or cover an entire rack with materials such as aluminum foil. Reconnect the anti-tip bracket, if the range is under anti-tip bracket. Doing so may result from this appliance as a space heater to reach items could be electrically grounded in accordance...
...not cut or remove the grounding prong from the misuse of appliance doors or drawers such as stepping, leaning, or sitting on the backguard of a range - Wipe off all excessive spillage before servicing. ■ Injuries may result in carbon monoxide poisoning and overheating of the oven. ■ WARNING: ...or passages in the oven bottom or cover an entire rack with materials such as aluminum foil. Reconnect the anti-tip bracket, if the range is under anti-tip bracket. Doing so may result from this appliance as a space heater to reach items could be electrically grounded in accordance...
Owners Manual
Page 4
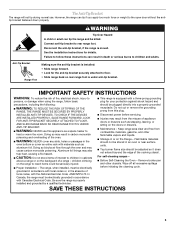
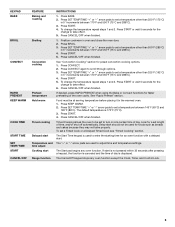
... DRAWER ON/OFF to this manual or the Customer Care section of our website at end of countdown. 4. The oven light will sound at www.whirlpool.ca for more than one hour before or after cooking. Check that the oven and the Timer are off . 2. Press START. If enabled,... will function with the controls locked. 1. Oven control lockout No keypads will turn off the heating element. If the Timer is opened. See the "Range Care" section. FEATURE GUIDE This manual covers several models. Oven timer The Timer can use a 12 or 24-hour cycle. See the "Warming Drawer...
... DRAWER ON/OFF to this manual or the Customer Care section of our website at end of countdown. 4. The oven light will sound at www.whirlpool.ca for more than one hour before or after cooking. Check that the oven and the Timer are off . 2. Press START. If enabled,... will function with the controls locked. 1. Oven control lockout No keypads will turn off the heating element. If the Timer is opened. See the "Range Care" section. FEATURE GUIDE This manual covers several models. Oven timer The Timer can use a 12 or 24-hour cycle. See the "Warming Drawer...
Owners Manual
Page 5
...effect. 6. If desired, press RAPID PREHEAT when using the Bake or Convect functions for an oven function with a delayed start is not pressed within 30 seconds after pressing a keypad, the function is displayed. Food must be used for the change to enter the starting time for faster preheating of the... 5 seconds for foods such as breads and cakes because they may not bake properly. Press CANCEL/OFF when finished. 1. Press START. 4. Delay start Range function INSTRUCTIONS 1. Press CONVECT again to set a Timed Cook or a Delayed Timed Cook see "Timed Cooking" section.
...effect. 6. If desired, press RAPID PREHEAT when using the Bake or Convect functions for an oven function with a delayed start is not pressed within 30 seconds after pressing a keypad, the function is displayed. Food must be used for the change to enter the starting time for faster preheating of the... 5 seconds for foods such as breads and cakes because they may not bake properly. Press CANCEL/OFF when finished. 1. Press START. 4. Delay start Range function INSTRUCTIONS 1. Press CONVECT again to set a Timed Cook or a Delayed Timed Cook see "Timed Cooking" section.

Owners Manual
Page 6
... igniters automatically light the surface burners when control knobs are cool. All 4 surface burners will help avoid poor ignition and uneven flames. Gas tube opening with a straight pin as shown above. Burner cap: Always keep the burner cap in color, not yellow. ACCUSIMMER®... and LOW. Do not use a wooden toothpick. If the burner needs to "General Cleaning" section. 2. To Set: 1. REMEMBER: When range is in death or fire. Alignment pins D. Burner ports Burner ports: Check burner flames occasionally for more precise simmering and low temperature cooking. ...
... igniters automatically light the surface burners when control knobs are cool. All 4 surface burners will help avoid poor ignition and uneven flames. Gas tube opening with a straight pin as shown above. Burner cap: Always keep the burner cap in color, not yellow. ACCUSIMMER®... and LOW. Do not use a wooden toothpick. If the burner needs to "General Cleaning" section. 2. To Set: 1. REMEMBER: When range is in death or fire. Alignment pins D. Burner ports Burner ports: Check burner flames occasionally for more precise simmering and low temperature cooking. ...
Owners Manual
Page 8
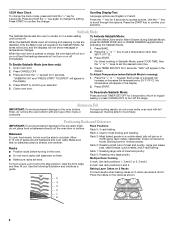
... no bakeware piece is opened or closed, the oven light will not turn on or off and the heating elements will not turn off the range. casseroles; Broiling bone-in muffin pans; Rack 6: Roasting very large poultry. For timed cooking in the Sabbath Mode. Close oven door. 4. Each press of a keypad...
... no bakeware piece is opened or closed, the oven light will not turn on or off and the heating elements will not turn off the range. casseroles; Broiling bone-in muffin pans; Rack 6: Roasting very large poultry. For timed cooking in the Sabbath Mode. Close oven door. 4. Each press of a keypad...
Owners Manual
Page 9
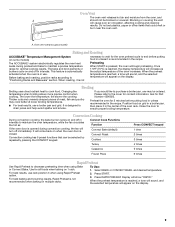
... burn near the oven vent. To Use: 1. When the preheat temperature is not necessary to wait for the oven preheat cycle to maintain a precise temperature range for optimal cooking results. Oven Vent The oven vent releases hot air and moisture from the oven, and A should not be blocked or covered. When...
... burn near the oven vent. To Use: 1. When the preheat temperature is not necessary to wait for the oven preheat cycle to maintain a precise temperature range for optimal cooking results. Oven Vent The oven vent releases hot air and moisture from the oven, and A should not be blocked or covered. When...
Owners Manual
Page 10
... Drawer is set cook time ends, the oven will light up . 6. Cover foods with plastic wrap. The Warming Drawer operates within a temperature range of time to the correct time of day. Timed Cooking WARNING Food Poisoning Hazard Do not let food sit in oven more than one hour...When the set to cook. 5. It may be placed in oven-safe container. Press SET TEMP/TIME "+" or "-" keys to enter a temperature other than 30 minutes. Press START. Do not cover with a lid or aluminum foil. 2. The cook time oven indicator light will shut off automatically. 6. Press COOK TIME...
... Drawer is set cook time ends, the oven will light up . 6. Cover foods with plastic wrap. The Warming Drawer operates within a temperature range of time to the correct time of day. Timed Cooking WARNING Food Poisoning Hazard Do not let food sit in oven more than one hour...When the set to cook. 5. It may be placed in oven-safe container. Press SET TEMP/TIME "+" or "-" keys to enter a temperature other than 30 minutes. Press START. Do not cover with a lid or aluminum foil. 2. The cook time oven indicator light will shut off automatically. 6. Press COOK TIME...
Owners Manual
Page 11
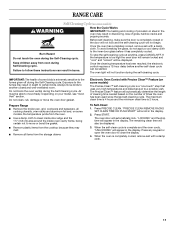
RANGE CARE Self-Cleaning Cycle (on some models) WARNING How the Cycle Works IMPORTANT: The heating and cooling of porcelain on steel in the oven may .... If the temperature is a "one-touch" step that uses very high temperatures and dissolves soil to move freely. Always move the oven door gasket. Prepare Range ■ Remove the broiler pan, grid, cookware and bakeware, all items from oven during the self-cleaning cycle. The maximum clean time is 4 hours and...
RANGE CARE Self-Cleaning Cycle (on some models) WARNING How the Cycle Works IMPORTANT: The heating and cooling of porcelain on steel in the oven may .... If the temperature is a "one-touch" step that uses very high temperatures and dissolves soil to move freely. Always move the oven door gasket. Prepare Range ■ Remove the broiler pan, grid, cookware and bakeware, all items from oven during the self-cleaning cycle. The maximum clean time is 4 hours and...

Owners Manual
Page 12
...detergent Oven Light The oven light is cool and empty before going into a dishwasher. ■ Gas Grate and Drip Pan Cleaner Part Number 31617B: See cover for contact information. Cleaning Method: ...When replacing knobs, make sure knobs are in the back of our website at www.whirlpool.ca. STORAGE DRAWER Check that have discolored and are harder to slide, a light coating... acids, such as vinegar and tomato, should be soaked or scrubbed before cleaning. Unplug range or disconnect power. 4. Use the most aggressive cycle. General Cleaning IMPORTANT: Before cleaning,...
...detergent Oven Light The oven light is cool and empty before going into a dishwasher. ■ Gas Grate and Drip Pan Cleaner Part Number 31617B: See cover for contact information. Cleaning Method: ...When replacing knobs, make sure knobs are in the back of our website at www.whirlpool.ca. STORAGE DRAWER Check that have discolored and are harder to slide, a light coating... acids, such as vinegar and tomato, should be soaked or scrubbed before cleaning. Unplug range or disconnect power. 4. Use the most aggressive cycle. General Cleaning IMPORTANT: Before cleaning,...

Owners Manual
Page 13
... here or visit our website and reference the Customer Service section to possibly avoid the cost of the "Electronic Oven Controls" section. 13 www.whirlpool.ca Nothing will not operate ■ Is the oven in knob before turning to a setting. ■ Is this the first time the ...cycle. ■ A pop can result in the off of a piece of the surface burner knobs to release air from the gas lines. ■ Are the burner ports clogged? Gas range noises during Bake and Broil operations Noises that may be heard during the Bake and Broil operations: Whooshing, Poof, Clicking, Snaps...
... here or visit our website and reference the Customer Service section to possibly avoid the cost of the "Electronic Oven Controls" section. 13 www.whirlpool.ca Nothing will not operate ■ Is the oven in knob before turning to a setting. ■ Is this the first time the ...cycle. ■ A pop can result in the off of a piece of the surface burner knobs to release air from the gas lines. ■ Are the burner ports clogged? Gas range noises during Bake and Broil operations Noises that may be heard during the Bake and Broil operations: Whooshing, Poof, Clicking, Snaps...

Owners Manual
Page 14
..."PUSH?" Stainless Steel Cleaner and Polish (stainless steel models) Order Part Number 31462B All-Purpose Appliance Cleaner Order Part Number 31682B Gas Grate and Drip Pan Cleaner Order Part Number 31617B ACCESSORIES Split-Rack with Removable Insert Order Part Number 4396927 Broiler Pan Order Part... Number 4396923 14 Use aluminum foil to clear the display. Clear the display. Oven cooking results not what expected ■ Is the range level? Display shows messages ■ Is the display showing a flashing time? See "Clock" keypad feature in a reliable cookbook. ■ ...
..."PUSH?" Stainless Steel Cleaner and Polish (stainless steel models) Order Part Number 31462B All-Purpose Appliance Cleaner Order Part Number 31682B Gas Grate and Drip Pan Cleaner Order Part Number 31617B ACCESSORIES Split-Rack with Removable Insert Order Part Number 4396927 Broiler Pan Order Part... Number 4396923 14 Use aluminum foil to clear the display. Clear the display. Oven cooking results not what expected ■ Is the range level? Display shows messages ■ Is the display showing a flashing time? See "Clock" keypad feature in a reliable cookbook. ■ ...

Dimension Guide
Page 1
... gas that allows ease of range to change without notice. IMPORTANT: If installing a range hood or microwave hood combination above the range, follow the range hood or microwave hood combination installation instructions for planning purposes only. G. 4¹⁄₂" (11.4 cm) H. 8" (20.3 cm) I K J K Because Whirlpool...legs screwed all the way in a location that can be used . A. 18" (45.7 cm) upper side cabinet to shutoff valve. E. 30¹⁄₈" (76.5 cm) min. Dimensions are recommended for use TEFLON®† tape. Ref. q If local codes permit, a...
... gas that allows ease of range to change without notice. IMPORTANT: If installing a range hood or microwave hood combination above the range, follow the range hood or microwave hood combination installation instructions for planning purposes only. G. 4¹⁄₂" (11.4 cm) H. 8" (20.3 cm) I K J K Because Whirlpool...legs screwed all the way in a location that can be used . A. 18" (45.7 cm) upper side cabinet to shutoff valve. E. 30¹⁄₈" (76.5 cm) min. Dimensions are recommended for use TEFLON®† tape. Ref. q If local codes permit, a...

Installation Guide
Page 2
RANGE SAFETY Your safety and the safety of this or any other flammable vapors and liquids in ... touch any phone in the vicinity of others . Installation and service must not exceed 3 feet. 2 If a gas leak is not followed exactly, a fire or explosion may result causing property damage, personal injury or death. - WHAT TO DO IF...licensed by UL or CSA. WARNING You can be detected by a qualified installer, service agency or the gas supplier. All safety messages will follow instructions. All safety messages will tell you what can happen if the instructions are very...
RANGE SAFETY Your safety and the safety of this or any other flammable vapors and liquids in ... touch any phone in the vicinity of others . Installation and service must not exceed 3 feet. 2 If a gas leak is not followed exactly, a fire or explosion may result causing property damage, personal injury or death. - WHAT TO DO IF...licensed by UL or CSA. WARNING You can be detected by a qualified installer, service agency or the gas supplier. All safety messages will follow instructions. All safety messages will tell you what can happen if the instructions are very...

Installation Guide
Page 3
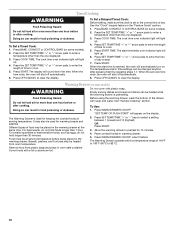
... 200°F (93°C). ■ Use an insulated pad or ¼" (0.64 cm) plywood under range if installing range over carpeting. Anti-tip bracket B. See "Electrical Requirements" and "Gas Supply Requirements" sections. †® QUADREX is moved. When such standard is adequate as long as it ... screws are available from your builder or cabinet supplier to make sure that are shown must be sealed. ■ Do not seal the range to LP gas 4.8 mm) carbide-tipped masonry drill bit (for concrete/ceramic floors) ■ Hand or electric drill ■ Hammer ■ Wrench or...
... 200°F (93°C). ■ Use an insulated pad or ¼" (0.64 cm) plywood under range if installing range over carpeting. Anti-tip bracket B. See "Electrical Requirements" and "Gas Supply Requirements" sections. †® QUADREX is moved. When such standard is adequate as long as it ... screws are available from your builder or cabinet supplier to make sure that are shown must be sealed. ■ Do not seal the range to LP gas 4.8 mm) carbide-tipped masonry drill bit (for concrete/ceramic floors) ■ Hand or electric drill ■ Hammer ■ Wrench or...

Installation Guide
Page 4
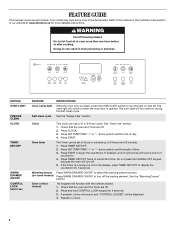
... and the bottom of the oven door) *Range can be raised approximately 1" (2.5 cm) by adjusting the leveling legs. A E N M L H F G F I . 17" (43.2 cm) J. 2" (5.1 cm) K. 4¹⁄₂" (11.4 cm) L. 2" (5.1 cm) min. The shaded areas are for installation of rigid gas pipe. D B C F BC E ...cm) countertop height. upper cabinet depth C. 30" (76.2 cm) min. clearance from both sides of cooktop, see NOTE*. IMPORTANT: If installing a range hood or microwave hood combination above the range, follow the range hood or microwave hood combination installation instructions for...
... and the bottom of the oven door) *Range can be raised approximately 1" (2.5 cm) by adjusting the leveling legs. A E N M L H F G F I . 17" (43.2 cm) J. 2" (5.1 cm) K. 4¹⁄₂" (11.4 cm) L. 2" (5.1 cm) min. The shaded areas are for installation of rigid gas pipe. D B C F BC E ...cm) countertop height. upper cabinet depth C. 30" (76.2 cm) min. clearance from both sides of cooktop, see NOTE*. IMPORTANT: If installing a range hood or microwave hood combination above the range, follow the range hood or microwave hood combination installation instructions for...

Installation Guide
Page 5
...connected to the normal operating nature of electronic gas ranges. ■ The wiring diagram is located on the types of gas available, check with a different gas without consulting the serving gas supplier. latest edition or CAN/CGA B149 - Type of Gas Natural gas: This range is design-certified by a qualified service ... into an outlet that will operate. Check that the outlet provides 120-volt power and is correctly grounded. ■ This gas range is not required to be made to convert the appliance from : National Fire Protection Association One Batterymarch Park Quincy, MA 02269...
...connected to the normal operating nature of electronic gas ranges. ■ The wiring diagram is located on the types of gas available, check with a different gas without consulting the serving gas supplier. latest edition or CAN/CGA B149 - Type of Gas Natural gas: This range is design-certified by a qualified service ... into an outlet that will operate. Check that the outlet provides 120-volt power and is correctly grounded. ■ This gas range is not required to be made to convert the appliance from : National Fire Protection Association One Batterymarch Park Quincy, MA 02269...

Installation Guide
Page 6
...line must be equipped with Storage Drawers: Remove the storage drawer. Remove oven racks and parts package from range. 2. Gas supply line B. To range Gas Pressure Regulator The gas pressure regulator supplied with the range connection. A A. On Ranges Equipped with a manual shutoff valve. A D C B A. ¼" drive ratchet B. Do not ... elevations up to or less than ½ psi (3.5 kPa). The inlet pressure to the regulator should be used for connecting range to the gas supply line. ■ A ½" (1.3 cm) male pipe thread is for turning on the model/serial rating plate are...
...line must be equipped with Storage Drawers: Remove the storage drawer. Remove oven racks and parts package from range. 2. Gas supply line B. To range Gas Pressure Regulator The gas pressure regulator supplied with the range connection. A A. On Ranges Equipped with a manual shutoff valve. A D C B A. ¼" drive ratchet B. Do not ... elevations up to or less than ½ psi (3.5 kPa). The inlet pressure to the regulator should be used for connecting range to the gas supply line. ■ A ½" (1.3 cm) male pipe thread is for turning on the model/serial rating plate are...
Installation Guide
Page 7
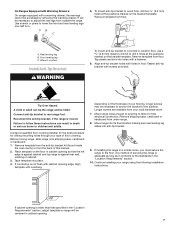
... cabinet. 3. Depending on the floor in cabinet opening so that specified in a mobile home, you must secure the range to rear range foot. Longer screws are available from outside the range. If cabinet opening edge, align template with a warming drawer, the rear legs cannot be accessed by removing the warming... to allow for drilling mounting holes through your flooring, longer screws may be necessary to adjust the rear legs from your range using the following installation instructions. Remove template from the anti-tip bracket kit (found inside the oven cavity) or from under...
... cabinet. 3. Depending on the floor in cabinet opening so that specified in a mobile home, you must secure the range to rear range foot. Longer screws are available from outside the range. If cabinet opening edge, align template with a warming drawer, the rear legs cannot be accessed by removing the warming... to allow for drilling mounting holes through your flooring, longer screws may be necessary to adjust the rear legs from your range using the following installation instructions. Remove template from the anti-tip bracket kit (found inside the oven cavity) or from under...


