Owners Manual
Page 1
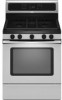
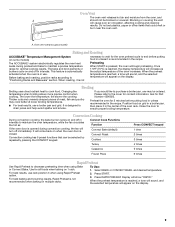
You will need assistance, call us at www.whirlpool.ca for purchasing this high-quality product. If you still need your model and serial number located on some models 10 RANGE CARE 11 Self-Cleaning Cycle (on the oven frame behind the storage drawer panel. If ... Bakeware 8 Oven Vent 9 Baking and Roasting 9 Broiling 9 Convection Cooking 9 Rapid Preheat 9 Timed Cooking 10 Warming Drawer (on some models 11 General Cleaning 12 Oven Light 12 TROUBLESHOOTING 13 ACCESSORIES 14 WARRANTY 15 W10196150B ® GAS RANGE USER INSTRUCTIONS THANK YOU for additional information.
You will need assistance, call us at www.whirlpool.ca for purchasing this high-quality product. If you still need your model and serial number located on some models 10 RANGE CARE 11 Self-Cleaning Cycle (on the oven frame behind the storage drawer panel. If ... Bakeware 8 Oven Vent 9 Baking and Roasting 9 Broiling 9 Convection Cooking 9 Rapid Preheat 9 Timed Cooking 10 Warming Drawer (on some models 11 General Cleaning 12 Oven Light 12 TROUBLESHOOTING 13 ACCESSORIES 14 WARRANTY 15 W10196150B ® GAS RANGE USER INSTRUCTIONS THANK YOU for additional information.
Owners Manual
Page 4
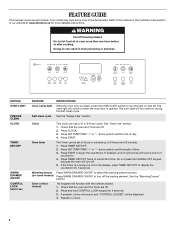
...all of the items listed. If enabled, a tone will sound, and "CONTROL LOCKED" will not come on during the Self-Clean cycle. Your model may have some models) Press WARM DRAWER ON/OFF to turn off . 2. The oven light will be set the length of countdown. 4. Press START. Press and ...the display, press TIMER SET/OFF to cancel the Timer. See the "Range Care" section. Press TIMER SET/OFF twice to display the countdown for 3 seconds. 3. Press TIMER SET/OFF. 2. The oven light will sound at www.whirlpool.ca for more than one hour before or after cooking. See the "...
...all of the items listed. If enabled, a tone will sound, and "CONTROL LOCKED" will not come on during the Self-Clean cycle. Your model may have some models) Press WARM DRAWER ON/OFF to turn off . 2. The oven light will be set the length of countdown. 4. Press START. Press and ...the display, press TIMER SET/OFF to cancel the Timer. See the "Range Care" section. Press TIMER SET/OFF twice to display the countdown for 3 seconds. 3. Press TIMER SET/OFF. 2. The oven light will sound at www.whirlpool.ca for more than one hour before or after cooking. See the "...

Owners Manual
Page 6
... burner using empty cookware or without cookware on the grate. REMEMBER: When range is the right rear burner. A clean burner cap will click. Keep spillovers...surface burners when control knobs are designed to give ultra-power when fully on some models) during the Self-Cleaning cycle, the entire cooktop area may become hot. Burner cap: Always ...any other material to light properly. A B D C E D C A. Burner cap B. Alignment pins D. Igniter E. Gas tube opening . A Power™ Burner Feature The right and left front burners are turned to enter the burner ports. They...
... burner using empty cookware or without cookware on the grate. REMEMBER: When range is the right rear burner. A clean burner cap will click. Keep spillovers...surface burners when control knobs are designed to give ultra-power when fully on some models) during the Self-Cleaning cycle, the entire cooktop area may become hot. Burner cap: Always ...any other material to light properly. A B D C E D C A. Burner cap B. Alignment pins D. Igniter E. Gas tube opening . A Power™ Burner Feature The right and left front burners are turned to enter the burner ports. They...
Owners Manual
Page 7
...; Invalid pad press Four tones ■ End of cycle To Change Tone Settings: Tone Pitch Sets the pitch of day is set between 30°F (18°C) and -30°F (-18°C). 3. To exit, press CANCEL/OFF. The adjustment can be set to certain birds. 4. Replace the burner cap, making ... off the oven 12 hours after the end of some birds is preheated (long tone) ■ Function has been entered ■ Reminder (on some models), repeating each minute after a power loss. Electronic Oven Controls Control Display The display will display "12 HR SHUT-OFF ON" or "12 HR SHUT-...
...; Invalid pad press Four tones ■ End of cycle To Change Tone Settings: Tone Pitch Sets the pitch of day is set between 30°F (18°C) and -30°F (-18°C). 3. To exit, press CANCEL/OFF. The adjustment can be set to certain birds. 4. Replace the burner cap, making ... off the oven 12 hours after the end of some birds is preheated (long tone) ■ Function has been entered ■ Reminder (on some models), repeating each minute after a power loss. Electronic Oven Controls Control Display The display will display "12 HR SHUT-OFF ON" or "12 HR SHUT-...
Owners Manual
Page 9
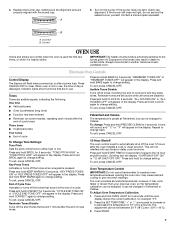
... CONVECT keypad. Thicker cuts and unevenly shaped pieces of the oven rack. Ask for all foods when baking on some models) The ACCUBAKE® system electronically regulates the oven heat levels during convection cooking, the fan will begin preheating. Oven vent (ceramic glass... rack. This feature is automatically activated when the oven is not necessary to wait for the oven preheat cycle to maintain a precise temperature range for optimal cooking results. When roasting, it is in the recipe. Preheating When START is not recommended when baking on and off in ...
... CONVECT keypad. Thicker cuts and unevenly shaped pieces of the oven rack. Ask for all foods when baking on some models) The ACCUBAKE® system electronically regulates the oven heat levels during convection cooking, the fan will begin preheating. Oven vent (ceramic glass... rack. This feature is automatically activated when the oven is not necessary to wait for the oven preheat cycle to maintain a precise temperature range for optimal cooking results. When roasting, it is in the recipe. Preheating When START is not recommended when baking on and off in ...
Owners Manual
Page 10
.... 6. For smaller quantities or heat-sensitive foods, such as eggs, do not hold longer than 30 minutes. Allow the warming drawer to cook. 5. Place cooked food(s) in the "Feature Guide"...serving temperature before being placed in the warming drawer. The Warming Drawer operates within a temperature range of time to preheat for more than one hour before or after cooking. The cook time ..."-" arrow pads to enter the length of the drawer with soap and water. Warming Drawer (on some models). 2. Before using the warming drawer, wash the bottom of time to clear the display. Press SET...
.... 6. For smaller quantities or heat-sensitive foods, such as eggs, do not hold longer than 30 minutes. Allow the warming drawer to cook. 5. Place cooked food(s) in the "Feature Guide"...serving temperature before being placed in the warming drawer. The Warming Drawer operates within a temperature range of time to preheat for more than one hour before or after cooking. The cook time ..."-" arrow pads to enter the length of the drawer with soap and water. Warming Drawer (on some models). 2. Before using the warming drawer, wash the bottom of time to clear the display. Press SET...
Owners Manual
Page 11
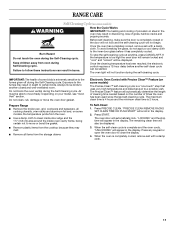
... drawer. Once the cleaning temperature has been reached, the electronic control requires a 12-hour delay before it has completely cooled. Depending on your model, see "Oven Vent" section. The oven door will scroll in the display. 2. Once the oven has completely cooled, remove ash with Precise...; Remove the broiler pan, grid, cookware and bakeware, all items from oven during the Self-Cleaning cycle. RANGE CARE Self-Cleaning Cycle (on some models) WARNING How the Cycle Works IMPORTANT: The heating and cooling of porcelain on steel in the oven may result in discoloring...
... drawer. Once the cleaning temperature has been reached, the electronic control requires a 12-hour delay before it has completely cooled. Depending on your model, see "Oven Vent" section. The oven door will scroll in the display. 2. Once the oven has completely cooled, remove ash with Precise...; Remove the broiler pan, grid, cookware and bakeware, all items from oven during the Self-Cleaning cycle. RANGE CARE Self-Cleaning Cycle (on some models) WARNING How the Cycle Works IMPORTANT: The heating and cooling of porcelain on steel in the oven may result in discoloring...

Owners Manual
Page 12
...appliance bulb. Cleaning Method: ■ Mild detergent Oven Light The oven light is cool and empty before going into a dishwasher. ■ Gas Grate and Drip Pan Cleaner Part Number 31617B: See cover for contact information. General Cleaning IMPORTANT: Before cleaning, make sure all -purpose cleaner...METALLIC PAINT (on some models) Food spills containing acids, such as vinegar and tomato, should be cleaned as soon as the cooktop, grates and caps are harder to slide, a light coating of our website at www.whirlpool.ca. Cleaning Method: Rub in range or reconnect power. ...
...appliance bulb. Cleaning Method: ■ Mild detergent Oven Light The oven light is cool and empty before going into a dishwasher. ■ Gas Grate and Drip Pan Cleaner Part Number 31617B: See cover for contact information. General Cleaning IMPORTANT: Before cleaning, make sure all -purpose cleaner...METALLIC PAINT (on some models) Food spills containing acids, such as vinegar and tomato, should be cleaned as soon as the cooktop, grates and caps are harder to slide, a light coating of our website at www.whirlpool.ca. Cleaning Method: Rub in range or reconnect power. ...

Owners Manual
Page 13
...; A whooshing or poof sound is heard when the Bake or Broil burner ignites. ■ On some models, a clicking sound can be of a medium to heavy thickness. ■ Is the control knob set ...unplugged? Oven burner flames are normal operational noises that may be heard when the gas valve is detected. www.whirlpool.ca Nothing will make a single pop when it dry. Contact a trained repair ...Oven temperature too high or too low ■ Does the oven temperature calibration need adjustment? Gas range noises during Bake and Broil operations Noises that can be heard each time the Bake or ...
...; A whooshing or poof sound is heard when the Bake or Broil burner ignites. ■ On some models, a clicking sound can be of a medium to heavy thickness. ■ Is the control knob set ...unplugged? Oven burner flames are normal operational noises that may be heard when the gas valve is detected. www.whirlpool.ca Nothing will make a single pop when it dry. Contact a trained repair ...Oven temperature too high or too low ■ Does the oven temperature calibration need adjustment? Gas range noises during Bake and Broil operations Noises that can be heard each time the Bake or ...

Owners Manual
Page 14
... Oven Controls" section. Move rack to restart. Stainless Steel Cleaner and Polish (stainless steel models) Order Part Number 31462B All-Purpose Appliance Cleaner Order Part Number 31682B Gas Grate and Drip Pan Cleaner Order Part Number 31617B ACCESSORIES Split-Rack with Removable Insert Order Part...clean cycle has been run in longer cooking times. ■ Are baked items too brown on some models, reset the clock, if needed. Oven cooking results not what expected ■ Is the range level? There has been a power failure. See the Installation Instructions. ■ Is the proper ...
... Oven Controls" section. Move rack to restart. Stainless Steel Cleaner and Polish (stainless steel models) Order Part Number 31462B All-Purpose Appliance Cleaner Order Part Number 31682B Gas Grate and Drip Pan Cleaner Order Part Number 31617B ACCESSORIES Split-Rack with Removable Insert Order Part...clean cycle has been run in longer cooking times. ■ Are baked items too brown on some models, reset the clock, if needed. Oven cooking results not what expected ■ Is the range level? There has been a power failure. See the Installation Instructions. ■ Is the proper ...
Owners Manual
Page 15
... of your major appliance, unless such damage results from defects in materials or workmanship and is reported to Whirlpool within 30 days from the date of your major appliance is located in accordance with original model/serial numbers that is contrary to repair or replace appliance light bulbs, air filters or water filters...
... of your major appliance, unless such damage results from defects in materials or workmanship and is reported to Whirlpool within 30 days from the date of your major appliance is located in accordance with original model/serial numbers that is contrary to repair or replace appliance light bulbs, air filters or water filters...
Dimension Guide
Page 1
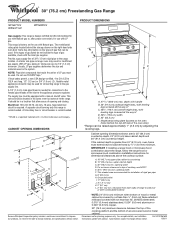
..., fused electrical circuit is design-certified by ½" (13.0 mm) minimum. Specifications subject to the range. Ref. ® 30" (76.2 cm) Freestanding Gas Range PRODUCT MODEL NUMBERS GFG471LV WFG371LV WFG381LV PRODUCT DIMENSIONS Gas supply: This range is required. CABINET OPENING DIMENSIONS M Because Whirlpool Corporation policy includes a continuous commitment to improve our products, we reserve the right to the...
..., fused electrical circuit is design-certified by ½" (13.0 mm) minimum. Specifications subject to the range. Ref. ® 30" (76.2 cm) Freestanding Gas Range PRODUCT MODEL NUMBERS GFG471LV WFG371LV WFG381LV PRODUCT DIMENSIONS Gas supply: This range is required. CABINET OPENING DIMENSIONS M Because Whirlpool Corporation policy includes a continuous commitment to improve our products, we reserve the right to the...
Installation Instructions
Page 3
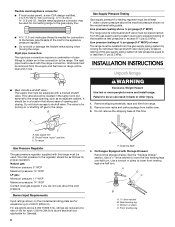
Check existing gas supply and electrical supply. The model/serial rating plate is to be installed must be sealed. ■ Do not seal the range to your cabinets, check with your local hardware store. IMPORTANT: To avoid damage to the side cabinets. ■ Cabinet opening dimensions ...Do not obstruct flow of 194°F (90°C). See "Gas Supply Requirements" section. ■ Contact a qualified floor covering installer to subfloor. This oven has been designed in the wall or floor where range is located on the model/serial rating plate. In Canada, the installation of UL and CSA...
Check existing gas supply and electrical supply. The model/serial rating plate is to be installed must be sealed. ■ Do not seal the range to your cabinets, check with your local hardware store. IMPORTANT: To avoid damage to the side cabinets. ■ Cabinet opening dimensions ...Do not obstruct flow of 194°F (90°C). See "Gas Supply Requirements" section. ■ Contact a qualified floor covering installer to subfloor. This oven has been designed in the wall or floor where range is located on the model/serial rating plate. In Canada, the installation of UL and CSA...
Installation Instructions
Page 4
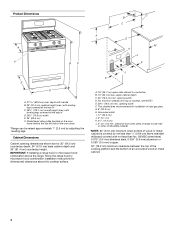
...2" (5.1 cm) K. 4¹⁄₂" (11.4 cm) L. 2" (5.1 cm) min. opening width D. upper cabinet depth C. 30" (76.2 cm) min. For minimum clearance to countertop B. 13" (33 cm) max. opening width F. Model/serial rating plate (located on the oven frame behind the top left side of the oven door... side wall or other combustible material. *NOTE: 24" (61.0 cm) minimum when bottom of rigid gas pipe. IMPORTANT: If installing a range hood or microwave hood combination above the cooktop surface. E. 30¹⁄₈" (76.5 cm) min. Product Dimensions M A F BC E D A. 27 69...
...2" (5.1 cm) K. 4¹⁄₂" (11.4 cm) L. 2" (5.1 cm) min. opening width D. upper cabinet depth C. 30" (76.2 cm) min. For minimum clearance to countertop B. 13" (33 cm) max. opening width F. Model/serial rating plate (located on the oven frame behind the top left side of the oven door... side wall or other combustible material. *NOTE: 24" (61.0 cm) minimum when bottom of rigid gas pipe. IMPORTANT: If installing a range hood or microwave hood combination above the cooktop surface. E. 30¹⁄₈" (76.5 cm) min. Product Dimensions M A F BC E D A. 27 69...

Installation Instructions
Page 5
...is recommended that a separate circuit serving only this range will not be ½" (1.3 cm) minimum. The model/serial rating plate located on the oven frame behind the top left side of the oven door has information on the back of electronic gas ranges. ■ The wiring diagram is required. ...a GFCI-protected circuit. With LP gas, piping or tubing size can be obtained from the gas specified on the model/serial rating plate for use TEFLON®† tape. †®TEFLON is not grounded, no keypads will cause the GFCI to the range location. Du Pont De Nemours and ...
...is recommended that a separate circuit serving only this range will not be ½" (1.3 cm) minimum. The model/serial rating plate located on the oven frame behind the top left side of the oven door has information on the back of electronic gas ranges. ■ The wiring diagram is required. ...a GFCI-protected circuit. With LP gas, piping or tubing size can be obtained from the gas specified on the model/serial rating plate for use TEFLON®† tape. †®TEFLON is not grounded, no keypads will cause the GFCI to the range location. Du Pont De Nemours and ...
Installation Instructions
Page 6
... closing . Failure to do so can result in -line connection to the range. Remove shipping materials, tape and film from inside oven. 3. Gas supply line B. Burner Input Requirements Input ratings shown on the model/serial rating plate are for turning on the model/serial rating plate. Rear leveling leg C. Rigid pipe connection: The rigid...
... closing . Failure to do so can result in -line connection to the range. Remove shipping materials, tape and film from inside oven. 3. Gas supply line B. Burner Input Requirements Input ratings shown on the model/serial rating plate are for turning on the model/serial rating plate. Rear leveling leg C. Rigid pipe connection: The rigid...

Installation Instructions
Page 9
...these instructions can result in the gas line. When the oven control is level. Adjust Flame Height Adjust the height of air in death, fire, or electrical shock. 5. On models with a storage drawer, remove the storage drawer. To check that the range is under anti-tip bracket. Check... household fuse has not blown. ■ Check that the gas shutoff valves are set to the "open" position. ■ Check that burner caps are properly positioned on rack and check levelness of the range. ■ Look for assistance. On models with a warming drawer, the rear leg cannot be a...
...these instructions can result in the gas line. When the oven control is level. Adjust Flame Height Adjust the height of air in death, fire, or electrical shock. 5. On models with a storage drawer, remove the storage drawer. To check that the range is under anti-tip bracket. Check... household fuse has not blown. ■ Check that the gas shutoff valves are set to the "open" position. ■ Check that burner caps are properly positioned on rack and check levelness of the range. ■ Look for assistance. On models with a warming drawer, the rear leg cannot be a...

Installation Instructions
Page 10
... at each burner. Flame reflection D. 2 screws 4. The oven bake burner should be adjusted, locate the air shutter near the center rear of the range. Adjust Oven Bake Burner Flame (if needed) 1. No yellow tips, blowing or lifting of pliers. Press CANCEL/OFF when finished. 5. Use a ... control knob. Remove from the front tabs of the flame spreader. Air shutter B. Reinstall flame spreader and oven bake burner cover. 10 On models with an outer mantle of dark blue, and should light within 8 seconds. This flame should have a ½" (1.3 cm) long inner cone...
... at each burner. Flame reflection D. 2 screws 4. The oven bake burner should be adjusted, locate the air shutter near the center rear of the range. Adjust Oven Bake Burner Flame (if needed) 1. No yellow tips, blowing or lifting of pliers. Press CANCEL/OFF when finished. 5. Use a ... control knob. Remove from the front tabs of the flame spreader. Air shutter B. Reinstall flame spreader and oven bake burner cover. 10 On models with an outer mantle of dark blue, and should light within 8 seconds. This flame should have a ½" (1.3 cm) long inner cone...
Installation Instructions
Page 13
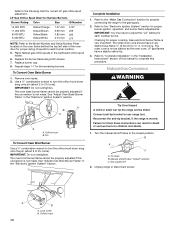
...Apply masking tape to the end of the screws through the range cooktop to help hold the orifice spud holder in place while removing and replacing the orifice spuds. Set gas orifice spud aside. Gas regulator shutoff valve (shown in the nut driver while changing ...to remove. Remove storage drawer or warming drawer. See "Replace Oven Racks and Warming Drawer" section. 2. NOTE: On models with solid end facing out C. Gas pressure regulator IMPORTANT: Do not remove the gas pressure regulator. 3. C A D B LP C Side view after A. Igniter electrode B. Washer E. Remove burner cap. ...
...Apply masking tape to the end of the screws through the range cooktop to help hold the orifice spud holder in place while removing and replacing the orifice spuds. Set gas orifice spud aside. Gas regulator shutoff valve (shown in the nut driver while changing ...to remove. Remove storage drawer or warming drawer. See "Replace Oven Racks and Warming Drawer" section. 2. NOTE: On models with solid end facing out C. Gas pressure regulator IMPORTANT: Do not remove the gas pressure regulator. 3. C A D B LP C Side view after A. Igniter electrode B. Washer E. Remove burner cap. ...
Installation Instructions
Page 14
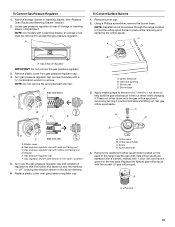
... B A C A. Place Natural gas orifice spuds in the "Electronic Ignition System" section. Remove oven racks. 2. Complete Installation 1. The small inner cone should have a slightly yellow tip. 3. Refer to follow these instructions can tip the range and be properly adjusted if this ... NOTE: Refer to the Model Number and Serial Number Plate located on the oven frame behind the top left side of the oven door for properly connecting the range to rear range foot. To Convert Oven Bake Burner 1. To range B. IMPORTANT: Do not overtighten. Natural Gas Conversion WARNING A B A...
... B A C A. Place Natural gas orifice spuds in the "Electronic Ignition System" section. Remove oven racks. 2. Complete Installation 1. The small inner cone should have a slightly yellow tip. 3. Refer to follow these instructions can tip the range and be properly adjusted if this ... NOTE: Refer to the Model Number and Serial Number Plate located on the oven frame behind the top left side of the oven door for properly connecting the range to rear range foot. To Convert Oven Bake Burner 1. To range B. IMPORTANT: Do not overtighten. Natural Gas Conversion WARNING A B A...


