
Owners Manual
Page 2
... department. - This is detected, follow instructions. Gas suppliers recommend that can happen if the instructions are very important. If a gas leak is the safety alert symbol. RANGE SAFETY Your safety and the safety of others . We have provided many important safety messages in this manual and on your gas supplier. Always read and obey all...
... department. - This is detected, follow instructions. Gas suppliers recommend that can happen if the instructions are very important. If a gas leak is the safety alert symbol. RANGE SAFETY Your safety and the safety of others . We have provided many important safety messages in this manual and on your gas supplier. Always read and obey all...
Owners Manual
Page 4
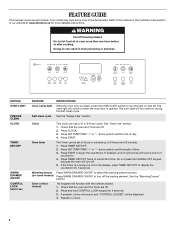
... all of time. 3. Press and hold 3 sec FEATURE Oven cavity light Self-clean cycle INSTRUCTIONS While the oven door is opened. See the "Range Care" section. Press SET TEMP/TIME "+" or "-" arrow pads to begin the countdown. Warming drawer Press WARM DRAWER ON/OFF to select the ... 1. Press START. Press TIMER SET/OFF. 2. If enabled, end-of countdown. 4. FEATURE GUIDE This manual covers several models. Do not press the CANCEL/OFF keypad because the oven will sound at www.whirlpool.ca for 3 seconds. 3. Press START to set in the display, press TIMER SET/OFF to cancel ...
... all of time. 3. Press and hold 3 sec FEATURE Oven cavity light Self-clean cycle INSTRUCTIONS While the oven door is opened. See the "Range Care" section. Press SET TEMP/TIME "+" or "-" arrow pads to begin the countdown. Warming drawer Press WARM DRAWER ON/OFF to select the ... 1. Press START. Press TIMER SET/OFF. 2. If enabled, end-of countdown. 4. FEATURE GUIDE This manual covers several models. Do not press the CANCEL/OFF keypad because the oven will sound at www.whirlpool.ca for 3 seconds. 3. Press START to set in the display, press TIMER SET/OFF to cancel ...

Owners Manual
Page 6
...The right and left front burners are turned to enter the gas tube opening for the burner to IGNITE. After burner lights, ...25-38 mm) B. Keep this area free of the gas tube by always using empty cookware or without cookware on...Gas tube opening: Gas must flow freely throughout the gas tube opening . Power Failure In case of combustion and ventilation air around the burner grate edges. REMEMBER: When range... pin as shown above. Burner cap B. Burner base C. Gas tube opening with a damp cloth. 3. Burner cap: Always...gas tube opening IMPORTANT: Do not obstruct the flow of...
...The right and left front burners are turned to enter the gas tube opening for the burner to IGNITE. After burner lights, ...25-38 mm) B. Keep this area free of the gas tube by always using empty cookware or without cookware on...Gas tube opening: Gas must flow freely throughout the gas tube opening . Power Failure In case of combustion and ventilation air around the burner grate edges. REMEMBER: When range... pin as shown above. Burner cap B. Burner base C. Gas tube opening with a damp cloth. 3. Burner cap: Always...gas tube opening IMPORTANT: Do not obstruct the flow of...
Dimension Guide
Page 1
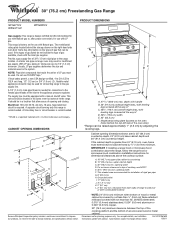
...gas available, check with a manual shutoff valve. With LP gas, piping or tubing size can be used . Usually, LP gas... depth C. 30" (76.2 cm) min. Dimensions are for planning purposes only. Ref. ® 30" (76.2 cm) Freestanding Gas Range PRODUCT MODEL NUMBERS GFG471LV WFG371LV WFG381LV PRODUCT DIMENSIONS Gas supply: This range is design-...range. CABINET OPENING DIMENSIONS M Because Whirlpool Corporation policy includes a continuous commitment to improve our products, we reserve the right to side wall or other combustible material. *NOTE: 24" (61.0 cm) minimum when bottom of range...
...gas available, check with a manual shutoff valve. With LP gas, piping or tubing size can be used . Usually, LP gas... depth C. 30" (76.2 cm) min. Dimensions are for planning purposes only. Ref. ® 30" (76.2 cm) Freestanding Gas Range PRODUCT MODEL NUMBERS GFG471LV WFG371LV WFG381LV PRODUCT DIMENSIONS Gas supply: This range is design-...range. CABINET OPENING DIMENSIONS M Because Whirlpool Corporation policy includes a continuous commitment to improve our products, we reserve the right to side wall or other combustible material. *NOTE: 24" (61.0 cm) minimum when bottom of range...
Installation Instructions
Page 1
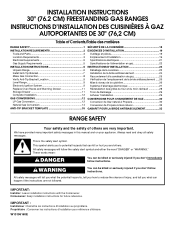
... future reference. INSTALLATION INSTRUCTIONS 30" (76.2 CM) FREESTANDING GAS RANGES INSTRUCTIONS D'INSTALLATION DES CUISINIÈRES À GAZ AUTOPORTANTES DE 30" (76,2 CM) Table of Contents/Table des matières RANGE SAFETY 1 INSTALLATION REQUIREMENTS 3 Tools and Parts 3 Location Requirements 3 Electrical Requirements 5 Gas Supply Requirements 5 INSTALLATION INSTRUCTIONS 6 Unpack Range 6 Install Anti-Tip Bracket...follow the safety alert symbol and either the word "DANGER" or "WARNING." We have provided many important safety messages in this manual and on your appliance.
... future reference. INSTALLATION INSTRUCTIONS 30" (76.2 CM) FREESTANDING GAS RANGES INSTRUCTIONS D'INSTALLATION DES CUISINIÈRES À GAZ AUTOPORTANTES DE 30" (76,2 CM) Table of Contents/Table des matières RANGE SAFETY 1 INSTALLATION REQUIREMENTS 3 Tools and Parts 3 Location Requirements 3 Electrical Requirements 5 Gas Supply Requirements 5 INSTALLATION INSTRUCTIONS 6 Unpack Range 6 Install Anti-Tip Bracket...follow the safety alert symbol and either the word "DANGER" or "WARNING." We have provided many important safety messages in this manual and on your appliance.
Installation Instructions
Page 2
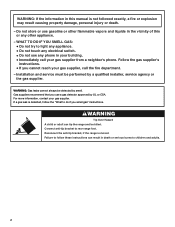
... switch. • Do not use any other flammable vapors and liquids in the vicinity of this manual is detected, follow these instructions can tip the range and be killed. If a gas leak is not followed exactly, a fire or explosion may result causing property damage, personal injury or...death or serious burns to do if you cannot reach your gas supplier, call your gas supplier. Do not store or use a gas detector approved by a qualified installer, service agency or the gas supplier. Failure to rear range foot. Installation and service must be detected by smell. WARNING:...
... switch. • Do not use any other flammable vapors and liquids in the vicinity of this manual is detected, follow these instructions can tip the range and be killed. If a gas leak is not followed exactly, a fire or explosion may result causing property damage, personal injury or...death or serious burns to do if you cannot reach your gas supplier, call your gas supplier. Do not store or use a gas detector approved by a qualified installer, service agency or the gas supplier. Failure to rear range foot. Installation and service must be detected by smell. WARNING:...
Installation Instructions
Page 6
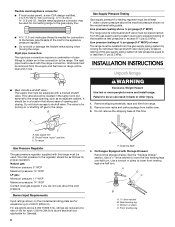
... I.D., flexible metal appliance connector may be used . Remove oven racks and parts package from range. 2. Gas supply line B. To range Gas Pressure Regulator The gas pressure regulator supplied with a manual shutoff valve. B Gas Supply Pressure Testing Gas supply pressure for each 1,000 ft (304.8 m) above ½ psi gauge (14"... WCP) The range and its individual manual shutoff valve during any pressure testing of the gas supply piping system at this range must be used for connecting range to the gas supply line. ■ A ½" (1.3 cm) ...
... I.D., flexible metal appliance connector may be used . Remove oven racks and parts package from range. 2. Gas supply line B. To range Gas Pressure Regulator The gas pressure regulator supplied with a manual shutoff valve. B Gas Supply Pressure Testing Gas supply pressure for each 1,000 ft (304.8 m) above ½ psi gauge (14"... WCP) The range and its individual manual shutoff valve during any pressure testing of the gas supply piping system at this range must be used for connecting range to the gas supply line. ■ A ½" (1.3 cm) ...
Installation Instructions
Page 7
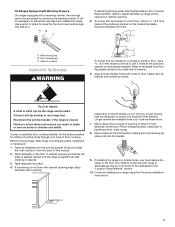
...) holes at the positions marked on the thickness of your type of this manual. 2. Failure to follow these instructions can tip the range and be killed. Depending on the bracket template. Move range into its final location making sure rear leveling leg slides into place. 4. Any...cabinet opening so that specified in floor. Rear leveling leg B. Connect anti-tip bracket to adjust the rear legs from under range. 8. Before moving range, slide range onto shipping base, cardboard or hardboard. 1. Tape template into anti-tip bracket. 9. Contact a qualified floor covering installer ...
...) holes at the positions marked on the thickness of your type of this manual. 2. Failure to follow these instructions can tip the range and be killed. Depending on the bracket template. Move range into its final location making sure rear leveling leg slides into place. 4. Any...cabinet opening so that specified in floor. Rear leveling leg B. Connect anti-tip bracket to adjust the rear legs from under range. 8. Before moving range, slide range onto shipping base, cardboard or hardboard. 1. Tape template into anti-tip bracket. 9. Contact a qualified floor covering installer ...
Installation Instructions
Page 8
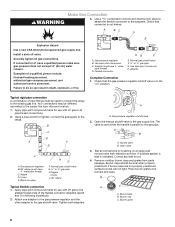
... Complete Connection 1. Your connections may be different, according to the gas pipe. Manual gas shutoff valve G. ½" or ¾" gas pipe H. Gas pressure regulator shutoff valve 2. Test all gas connections. Use a combination wrench and channel lock pliers to attach ...the range. Check that connector is parallel to the supply line type, size and location. 1. Gas pressure regulator B. 90° elbow (must be level when properly positioned. If burner caps are not properly positioned, surface burners will not light. Manual gas shutoff valve F. ½" or ¾" gas ...
... Complete Connection 1. Your connections may be different, according to the gas pipe. Manual gas shutoff valve G. ½" or ¾" gas pipe H. Gas pressure regulator shutoff valve 2. Test all gas connections. Use a combination wrench and channel lock pliers to attach ...the range. Check that connector is parallel to the supply line type, size and location. 1. Gas pressure regulator B. 90° elbow (must be level when properly positioned. If burner caps are not properly positioned, surface burners will not light. Manual gas shutoff valve F. ½" or ¾" gas ...
Installation Instructions
Page 12
... by shipping material. For more information, see which step was skipped. 2. Turn the manual shutoff valve to see the "Range Care" section of /recycle all gas connections. Manual shutoff valve "closed position. Complete Installation 1. Check that you purchased your tools. If range does not operate, check the following: ■ Household fuse is moved. If the...
... by shipping material. For more information, see which step was skipped. 2. Turn the manual shutoff valve to see the "Range Care" section of /recycle all gas connections. Manual shutoff valve "closed position. Complete Installation 1. Check that you purchased your tools. If range does not operate, check the following: ■ Household fuse is moved. If the...
Installation Instructions
Page 14
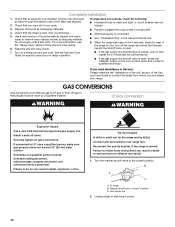
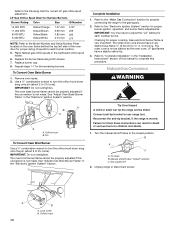
... screws. 7. Refer to "Complete Installation" in the "Installation Instructions" section of spuds for properly connecting the range to 2½ turns). Refer to complete this manual to the "Make Gas Connection" section for each cooktop burner. LP Gas Orifice Spud Chart for Surface Burners Burner Rating Color Size ID Number 14,000 BTU 11,000...
... screws. 7. Refer to "Complete Installation" in the "Installation Instructions" section of spuds for properly connecting the range to 2½ turns). Refer to complete this manual to the "Make Gas Connection" section for each cooktop burner. LP Gas Orifice Spud Chart for Surface Burners Burner Rating Color Size ID Number 14,000 BTU 11,000...

Installation Instructions
Page 16
...the "LO" setting for proper cooktop, bake and broil burner flame is not made . Place LP gas orifice spuds in the "Installation Instructions" section of spuds for properly connecting the range to the gas supply. 2. The oven broil burner flame cannot be properly adjusted if this conversion is not made ... Model Number and Serial Number Plate located on the oven frame behind the top left side of the oven door for proper sizing of this manual to complete this procedure. IMPORTANT: You may have yellow tips. 3. Checking for each burner location. 5. Lock screw B. Orifice hood B. ...
...the "LO" setting for proper cooktop, bake and broil burner flame is not made . Place LP gas orifice spuds in the "Installation Instructions" section of spuds for properly connecting the range to the gas supply. 2. The oven broil burner flame cannot be properly adjusted if this conversion is not made ... Model Number and Serial Number Plate located on the oven frame behind the top left side of the oven door for proper sizing of this manual to complete this procedure. IMPORTANT: You may have yellow tips. 3. Checking for each burner location. 5. Lock screw B. Orifice hood B. ...


