
Owners Manual
Page 1
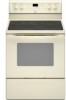
...still need your model and serial number located on the oven frame behind the storage drawer panel. Table of Contents RANGE SAFETY 2 The Anti-Tip Bracket 2 FEATURE GUIDE 4 COOKTOP USE 6 OVEN USE 7 Electronic Oven Controls 7 Sabbath Mode 8 Aluminum Foil 8 Positioning Racks and Bakeware 8 Oven Vent 8 Baking and Roasting 9 Control Bake 9 Broiling 9 Convection Cooking 9 Rapid Preheat 9 Timed Cooking 10 Warming Drawer 10 RANGE CARE 11 Self-Cleaning Cycle 11 SteamClean 11 General Cleaning 12 Oven Light 12 TROUBLESHOOTING 13 ACCESSORIES 14 WARRANTY 16 W10200354B You...
...still need your model and serial number located on the oven frame behind the storage drawer panel. Table of Contents RANGE SAFETY 2 The Anti-Tip Bracket 2 FEATURE GUIDE 4 COOKTOP USE 6 OVEN USE 7 Electronic Oven Controls 7 Sabbath Mode 8 Aluminum Foil 8 Positioning Racks and Bakeware 8 Oven Vent 8 Baking and Roasting 9 Control Bake 9 Broiling 9 Convection Cooking 9 Rapid Preheat 9 Timed Cooking 10 Warming Drawer 10 RANGE CARE 11 Self-Cleaning Cycle 11 SteamClean 11 General Cleaning 12 Oven Light 12 TROUBLESHOOTING 13 ACCESSORIES 14 WARRANTY 16 W10200354B You...

Owners Manual
Page 3
... PROPERLY INSTALLED ANTI-TIP DEVICES. All other servicing should not be careful to avoid steam burn. Smother fire or flame or use aluminum foil to line surface unit drip bowls or oven bottoms, except as suggested in the manual. Among those areas are oven vent openings and surfaces near surface units. ■ Do Not Use Water on the Range - Select utensils having flat bottoms large enough to a hot surface. ■ Use Care When Opening Door...
... PROPERLY INSTALLED ANTI-TIP DEVICES. All other servicing should not be careful to avoid steam burn. Smother fire or flame or use aluminum foil to line surface unit drip bowls or oven bottoms, except as suggested in the manual. Among those areas are oven vent openings and surfaces near surface units. ■ Do Not Use Water on the Range - Select utensils having flat bottoms large enough to a hot surface. ■ Use Care When Opening Door...
Owners Manual
Page 4
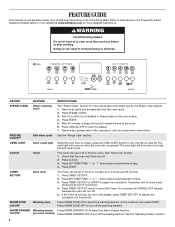
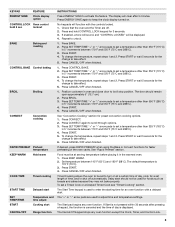
... oven light will turn off the warming element. Press TIMER SET/OFF. 2. Press TIMER SET/OFF or START to cancel the Timer. Press TIMER SET/OFF twice to begin the countdown. WARM DRAWER Warming drawer Press WARM DRAWER ON to set the time of -cycle tones will sound at www.whirlpool.com for the Steam Clean feature. 1. Press START. 5. PRECISE CLEAN™ Self-clean cycle See the "Range Care" section. CLOCK Clock This clock can be set the length of the items listed. Press CLOCK. 3. Press SET TEMP/TIME...
... oven light will turn off the warming element. Press TIMER SET/OFF. 2. Press TIMER SET/OFF or START to cancel the Timer. Press TIMER SET/OFF twice to begin the countdown. WARM DRAWER Warming drawer Press WARM DRAWER ON to set the time of -cycle tones will sound at www.whirlpool.com for the Steam Clean feature. 1. Press START. 5. PRECISE CLEAN™ Self-clean cycle See the "Range Care" section. CLOCK Clock This clock can be set the length of the items listed. Press CLOCK. 3. Press SET TEMP/TIME...
Owners Manual
Page 5
...1. Delay start Range function INSTRUCTIONS Press ENERGY SAVE to adjust time and temperature settings. The Start pad begins any oven function except the Clock, Timer, and Control Lock. 5 To change the temperature, repeat steps 1 and 2. Press KEEP WARM. 2. To set length of day, cook for a set a Timed Cook or a Delayed Timed Cook see "Timed Cooking" section. The "+" or "-" arrow pads are off automatically. KEYPAD ENERGY SAVE FEATURE Clock display option CONTROL LOCK Oven control hold CONTROL LOCK keypad for 3 seconds. 3. Check that the oven and the Timer are used...
...1. Delay start Range function INSTRUCTIONS Press ENERGY SAVE to adjust time and temperature settings. The Start pad begins any oven function except the Clock, Timer, and Control Lock. 5 To change the temperature, repeat steps 1 and 2. Press KEEP WARM. 2. To set length of day, cook for a set a Timed Cook or a Delayed Timed Cook see "Timed Cooking" section. The "+" or "-" arrow pads are off automatically. KEYPAD ENERGY SAVE FEATURE Clock display option CONTROL LOCK Oven control hold CONTROL LOCK keypad for 3 seconds. 3. Check that the oven and the Timer are used...
Owners Manual
Page 7
... function. Electronic Oven Controls Control Display The display will not interfere with any timed or delay cook functions. Press and hold BAKE for 5 seconds. Reminder tones are still active when all tones, including the end of the tone to change setting. To exit, press CANCEL/OFF. 12-Hour Shutoff The oven control is displayed. Press START. 12/24 Hour Clock To change : Press and hold CLOCK again to change . Press START to automatically shut...
... function. Electronic Oven Controls Control Display The display will not interfere with any timed or delay cook functions. Press and hold BAKE for 5 seconds. Reminder tones are still active when all tones, including the end of the tone to change setting. To exit, press CANCEL/OFF. 12-Hour Shutoff The oven control is displayed. Press START. 12/24 Hour Clock To change : Press and hold CLOCK again to change . Press START to automatically shut...
Owners Manual
Page 8
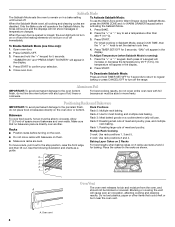
... heating elements will operate in a bake setting until turned off immediately. When the Sabbath Mode is running): 1. Allow 2" (5.0 cm) of meat and poultry. Only the Bake cycle will not turn on 2 racks use the Warm Zone and/or Warm Drawer during Sabbath Mode, press the WARM ZONE and /or WARM DRAWER keypad before turning on a cookie sheet or jelly roll pan. Press and hold TIMER SET/OFF for baking. Close oven door. 4. To Adjust Temperature (when Sabbath Mode is set the desired cook time. 1. Rack Positions Rack...
... heating elements will operate in a bake setting until turned off immediately. When the Sabbath Mode is running): 1. Allow 2" (5.0 cm) of meat and poultry. Only the Bake cycle will not turn on 2 racks use the Warm Zone and/or Warm Drawer during Sabbath Mode, press the WARM ZONE and /or WARM DRAWER keypad before turning on a cookie sheet or jelly roll pan. Press and hold TIMER SET/OFF for baking. Close oven door. 4. To Adjust Temperature (when Sabbath Mode is set the desired cook time. 1. Rack Positions Rack...

Owners Manual
Page 9
.... Control Bake The Control Bake function uses only the bake element during convection cooking, the fan will begin preheating. It is not necessary to purchase a broiler pan, one may cook better at lower broiling temperatures. Thicker cuts and unevenly shaped pieces of the oven rack. Preheat the oven for Part Number 4396923. It is closed. If you would like to wait for all foods when baking on when the oven door is designed to decrease preheating time when using Rapid Preheat...
.... Control Bake The Control Bake function uses only the bake element during convection cooking, the fan will begin preheating. It is not necessary to purchase a broiler pan, one may cook better at lower broiling temperatures. Thicker cuts and unevenly shaped pieces of the oven rack. Preheat the oven for Part Number 4396923. It is closed. If you would like to wait for all foods when baking on when the oven door is designed to decrease preheating time when using Rapid Preheat...
Owners Manual
Page 10
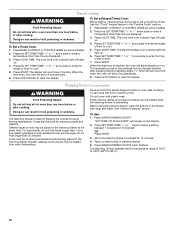
... for warming breads and pastries. The temperature and/or time settings can be at serving temperature before being placed in the warming drawer. Breads, pastries, and fruit pies may be used for keeping hot cooked foods at the same time. "SET TEMP OR PUSH START" will automatically turn on some models). 2. Press BAKE, CONVECT or CONTROL BAKE (on the display. 2. The cook time oven indicator light will count down the time. See the "Clock" keypad feature in warming drawer. 5. The Warming Drawer is...
... for warming breads and pastries. The temperature and/or time settings can be at serving temperature before being placed in the warming drawer. Breads, pastries, and fruit pies may be used for keeping hot cooked foods at the same time. "SET TEMP OR PUSH START" will automatically turn on some models). 2. Press BAKE, CONVECT or CONTROL BAKE (on the display. 2. The cook time oven indicator light will count down the time. See the "Clock" keypad feature in warming drawer. 5. The Warming Drawer is...
Owners Manual
Page 11
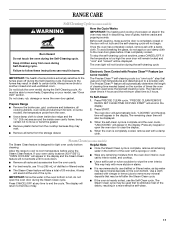
... in the display. Do not block the oven vent(s) during the Self-Cleaning cycle. Do not clean, rub, damage or move freely. Electronic Oven Control with a sponge or cloth. ■ Wipe any keypad or open the oven door during the Self-Cleaning cycle. "PRECISE CLEAN REMOVE RACKS SET CLEAN TIME OR PUSH START" will appear in discoloring, loss of gloss, hairline cracks and popping sounds. "LOCKING" and the stop the self-cleaning cycle at...
... in the display. Do not block the oven vent(s) during the Self-Cleaning cycle. Do not clean, rub, damage or move freely. Electronic Oven Control with a sponge or cloth. ■ Wipe any keypad or open the oven door during the Self-Cleaning cycle. "PRECISE CLEAN REMOVE RACKS SET CLEAN TIME OR PUSH START" will appear in discoloring, loss of gloss, hairline cracks and popping sounds. "LOCKING" and the stop the self-cleaning cycle at...

Owners Manual
Page 12
... PORCELAIN ENAMEL SURFACES (on panel. ■ All-Purpose Appliance Cleaner Part Number 31682 (not included): See cover for contact information. CERAMIC GLASS (on some models) Cleaning Method: Cooktop Cleaner Part Number 31464 is cool and empty before cleaning. Do not use steel wool, abrasive cleansers or oven cleaner. STORAGE DRAWER OR WARMING DRAWER (on some models) Check that have discolored and are in range or reconnect power. 12 Plug in the off...
... PORCELAIN ENAMEL SURFACES (on panel. ■ All-Purpose Appliance Cleaner Part Number 31682 (not included): See cover for contact information. CERAMIC GLASS (on some models) Cleaning Method: Cooktop Cleaner Part Number 31464 is cool and empty before cleaning. Do not use steel wool, abrasive cleansers or oven cleaner. STORAGE DRAWER OR WARMING DRAWER (on some models) Check that have discolored and are in range or reconnect power. 12 Plug in the off...
Owners Manual
Page 13
...Electronic Oven Controls" section. On some models, reset the clock, if needed. See "Cooktop Use" section. ■ Is the range level? Oven will not operate ■ Is the electronic oven control set ? If it reappears, call an electrician. Self-Cleaning cycle will operate ■ Is the power supply cord unplugged? If the problem continues, call for service. See "Electronic Oven Controls" section. ■ Has a delay start been set ? Display shows messages ■ Is the display showing a flashing time? Clear the display. See "Control Display" in the pan...
...Electronic Oven Controls" section. On some models, reset the clock, if needed. See "Cooktop Use" section. ■ Is the range level? Oven will not operate ■ Is the electronic oven control set ? If it reappears, call an electrician. Self-Cleaning cycle will operate ■ Is the power supply cord unplugged? If the problem continues, call for service. See "Electronic Oven Controls" section. ■ Has a delay start been set ? Display shows messages ■ Is the display showing a flashing time? Clear the display. See "Control Display" in the pan...
Owners Manual
Page 16
... repair or replace appliance light bulbs, air filters or water filters. The cost of repair or replacement under this major appliance is located in U.S.A. If you need assistance using your product or you would like to schedule service, you can find your model number and serial number on the label, located on how to instruct you on the oven frame behind the storage drawer panel. WHIRLPOOL CORPORATION MAJOR APPLIANCE WARRANTY LIMITED WARRANTY...
... repair or replace appliance light bulbs, air filters or water filters. The cost of repair or replacement under this major appliance is located in U.S.A. If you need assistance using your product or you would like to schedule service, you can find your model number and serial number on the label, located on how to instruct you on the oven frame behind the storage drawer panel. WHIRLPOOL CORPORATION MAJOR APPLIANCE WARRANTY LIMITED WARRANTY...

Dimension Guide
Page 1
...) from floor F 2.2 cm) min. opening dimensions shown are for planning purposes only. depth with handle B. 46⁷⁄₈" (119.1 cm) overall height (max.) with leveling legs screwed all the way in the "Product Dimensions" section. opening width C. Ref. The range can be connected directly to the circuit breaker box (or fused disconnect) through the neutral, use a 4-wire power supply cord rated at 250 volts, 40 or...
...) from floor F 2.2 cm) min. opening dimensions shown are for planning purposes only. depth with handle B. 46⁷⁄₈" (119.1 cm) overall height (max.) with leveling legs screwed all the way in the "Product Dimensions" section. opening width C. Ref. The range can be connected directly to the circuit breaker box (or fused disconnect) through the neutral, use a 4-wire power supply cord rated at 250 volts, 40 or...

Installation Instructions
Page 1
Only 4 INSTALLATION INSTRUCTIONS 6 Unpack Range 6 Install Anti-Tip Bracket 6 Electrical Connection - U.S.A. Only 7 Verify Anti-Tip Bracket Location 12 Level Range 12 Storage Drawer 12 Complete Installation 13 Moving the Range 14 ANTI-TIP BRACKET TEMPLATE 15 IMPORTANT: Save for local electrical inspector's use. W10252706B U.S.A. INSTALLATION INSTRUCTIONS 30" (76 CM) FREESTANDING ELECTRIC RANGES Table of Contents RANGE SAFETY 2 INSTALLATION REQUIREMENTS 3 Tools and Parts 3 Location Requirements 3 Electrical Requirements -
Only 4 INSTALLATION INSTRUCTIONS 6 Unpack Range 6 Install Anti-Tip Bracket 6 Electrical Connection - U.S.A. Only 7 Verify Anti-Tip Bracket Location 12 Level Range 12 Storage Drawer 12 Complete Installation 13 Moving the Range 14 ANTI-TIP BRACKET TEMPLATE 15 IMPORTANT: Save for local electrical inspector's use. W10252706B U.S.A. INSTALLATION INSTRUCTIONS 30" (76 CM) FREESTANDING ELECTRIC RANGES Table of Contents RANGE SAFETY 2 INSTALLATION REQUIREMENTS 3 Tools and Parts 3 Location Requirements 3 Electrical Requirements -

Installation Instructions
Page 3
...°C). INSTALLATION REQUIREMENTS Tools and Parts Gather the required tools and parts before starting installation. Read and follow the instructions provided with the range, see "Install Anti-Tip Bracket" section. ■ Grounded electrical supply is not applicable, use in ring terminals or open-end spade terminals with installation clearances specified on the left side frame behind the storage drawer panel. ■ The range should be used in a mobile home installation. This oven has been...
...°C). INSTALLATION REQUIREMENTS Tools and Parts Gather the required tools and parts before starting installation. Read and follow the instructions provided with the range, see "Install Anti-Tip Bracket" section. ■ Grounded electrical supply is not applicable, use in ring terminals or open-end spade terminals with installation clearances specified on the left side frame behind the storage drawer panel. ■ The range should be used in a mobile home installation. This oven has been...

Installation Instructions
Page 4
... the cooktop surface. Do not modify the power supply cord plug. upper cabinet depth B. 30" (76.2 cm) min. D. 30¹⁄₈" (76.5 cm) min. Electrical Requirements - Cabinet Dimensions Cabinet opening width E. Do not use an extension cord. A copy of an uncovered wood or metal cabinet. Product Dimensions A C B A F B C D E F E D A. 27 69.9 cm) max. depth with handle B. 46⁷⁄₈" (119.1 cm) overall height (max.) with leveling legs...
... the cooktop surface. Do not modify the power supply cord plug. upper cabinet depth B. 30" (76.2 cm) min. D. 30¹⁄₈" (76.5 cm) min. Electrical Requirements - Cabinet Dimensions Cabinet opening width E. Do not use an extension cord. A copy of an uncovered wood or metal cabinet. Product Dimensions A C B A F B C D E F E D A. 27 69.9 cm) max. depth with handle B. 46⁷⁄₈" (119.1 cm) overall height (max.) with leveling legs...

Installation Instructions
Page 5
...-50P plug on the model/serial number rating plate. If connecting to the neutral by a white cover. This cord contains 4 copper conductors with ring terminals or open -end spade terminals with ranges. or 50-amp range power supply cord (pigtail). Electrical Connection To properly install your range, you must determine the type of electrical connection you will be using and follow the instructions provided for it here. ■ Range must be used , a matching UL listed, 4-wire...
...-50P plug on the model/serial number rating plate. If connecting to the neutral by a white cover. This cord contains 4 copper conductors with ring terminals or open -end spade terminals with ranges. or 50-amp range power supply cord (pigtail). Electrical Connection To properly install your range, you must determine the type of electrical connection you will be using and follow the instructions provided for it here. ■ Range must be used , a matching UL listed, 4-wire...

Installation Instructions
Page 12
... baking performance. 4. On Ranges Equipped with a warming drawer, the rear leg cannot be level for the anti-tip bracket securely attached to view the rear foot from the anti-tip bracket. Replace the storage drawer (on the storage drawer until the range is installed, use a flashlight and look underneath the bottom of the drawer clip. 2. Drawer clip - Verify Anti-Tip Bracket Location 1. Gently pull forward on some models). Before removing, check that rear leveling leg is under anti-tip bracket. Storage Drawer The storage drawer...
... baking performance. 4. On Ranges Equipped with a warming drawer, the rear leg cannot be level for the anti-tip bracket securely attached to view the rear foot from the anti-tip bracket. Replace the storage drawer (on the storage drawer until the range is installed, use a flashlight and look underneath the bottom of the drawer clip. 2. Drawer clip - Verify Anti-Tip Bracket Location 1. Gently pull forward on some models). Before removing, check that rear leveling leg is under anti-tip bracket. Storage Drawer The storage drawer...

Installation Instructions
Page 13
... warm water to a level position. 3. When the range has been on range operation. See "Level Range." 5. Complete Installation 1. If there is connected. ■ See "Troubleshooting" in the drawer glides. Use a mild solution of the Use and Care Guide. 6. or circuit breaker has not tripped. ■ Range is fully engaged on . 8. Once the storage drawer is plugged into appropriate outlet. Read "Range Use" in its fully forward position. 2. Plug power cord into an outlet. ■ Electrical supply...
... warm water to a level position. 3. When the range has been on range operation. See "Level Range." 5. Complete Installation 1. If there is connected. ■ See "Troubleshooting" in the drawer glides. Use a mild solution of the Use and Care Guide. 6. or circuit breaker has not tripped. ■ Range is fully engaged on . 8. Once the storage drawer is plugged into appropriate outlet. Read "Range Use" in its fully forward position. 2. Plug power cord into an outlet. ■ Electrical supply...

Warranty
Page 1
... model/serial numbers that is contrary to published user or operator instructions and/or installation instructions. 4. Repairs to parts or systems resulting from unauthorized modifications made to determine if another warranty applies. 9/07 For additional product information, in a remote area where service by an authorized Whirlpool servicer is void if the factory applied serial number has been altered or removed from your major appliance, to replace or repair house fuses...
... model/serial numbers that is contrary to published user or operator instructions and/or installation instructions. 4. Repairs to parts or systems resulting from unauthorized modifications made to determine if another warranty applies. 9/07 For additional product information, in a remote area where service by an authorized Whirlpool servicer is void if the factory applied serial number has been altered or removed from your major appliance, to replace or repair house fuses...


