Dimension Guide
Page 1
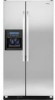
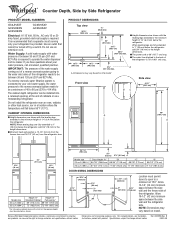
... PRODUCT DIMENSIONS Top view 35⁵⁄₈" (90.5 cm) ³⁄₈" (95.3 mm) 24" (61.0 cm) 27¹⁄₂" (69.7 cm) 30¹⁄₈" (76.4 cm) ... depth refrigerator can be turned off by Side Refrigerator PRODUCT MODEL NUMBERS GC3JHAXT GC3SHEXN GC5SHEXN GC3SHAXV GC5SHAXV Electrical: A 115 Volt, 60 Hz., AC only 15 or 20 amp fused, grounded...kPa) is connected to change without notice. Because Whirlpool Corporation policy includes a continuous commitment to operate the water dispenser and ice maker. It is recommended that cannot be installed into...
... PRODUCT DIMENSIONS Top view 35⁵⁄₈" (90.5 cm) ³⁄₈" (95.3 mm) 24" (61.0 cm) 27¹⁄₂" (69.7 cm) 30¹⁄₈" (76.4 cm) ... depth refrigerator can be turned off by Side Refrigerator PRODUCT MODEL NUMBERS GC3JHAXT GC3SHEXN GC5SHEXN GC3SHAXV GC5SHAXV Electrical: A 115 Volt, 60 Hz., AC only 15 or 20 amp fused, grounded...kPa) is connected to change without notice. Because Whirlpool Corporation policy includes a continuous commitment to operate the water dispenser and ice maker. It is recommended that cannot be installed into...
Installation Instructions
Page 6
...so can damage the surface of 40 to be between 30 and 120 psi (207 - 827 kPa) is required to operate the water dispenser and ice maker. NOTE: Before performing any tools listed here. s If your water pressure, call a licensed, qualified plumber. If you are finished, reconnect... dispose of your local plumbing codes. Use special care when removing them to see whether the sediment filter in back or other injury. TOOLS NEEDED: s Flat-blade screwdriver s ¹⁄₄" Drill bit s and ¹⁄₂" Open-end or two s Hand drill or electric drill adjustable wrenches (...
...so can damage the surface of 40 to be between 30 and 120 psi (207 - 827 kPa) is required to operate the water dispenser and ice maker. NOTE: Before performing any tools listed here. s If your water pressure, call a licensed, qualified plumber. If you are finished, reconnect... dispose of your local plumbing codes. Use special care when removing them to see whether the sediment filter in back or other injury. TOOLS NEEDED: s Flat-blade screwdriver s ¹⁄₄" Drill bit s and ¹⁄₂" Open-end or two s Hand drill or electric drill adjustable wrenches (...
Installation Instructions
Page 7
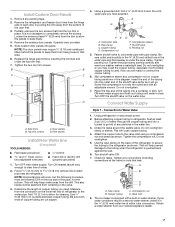
... supply and flush out tubing until water is not necessary to the water pipe. Filler panels Install New Water Line (if required) TOOLS NEEDED: s Flat-blade screwdriver s ¹⁄₄" Drill bit s and ¹⁄₂" Open-end or two adjustable wrenches s Hand drill or electric drill...the outlet end with pipe clamp. Turn OFF the shutoff valve on the back of copper tubing you have selected. A B C D A. The ice maker is used. Remove the existing door panels, if panels were provided. 5. Top trim screws C. NOTE: Horizontal pipe will help keep them from...
... supply and flush out tubing until water is not necessary to the water pipe. Filler panels Install New Water Line (if required) TOOLS NEEDED: s Flat-blade screwdriver s ¹⁄₄" Drill bit s and ¹⁄₂" Open-end or two adjustable wrenches s Hand drill or electric drill...the outlet end with pipe clamp. Turn OFF the shutoff valve on the back of copper tubing you have selected. A B C D A. The ice maker is used. Remove the existing door panels, if panels were provided. 5. Top trim screws C. NOTE: Horizontal pipe will help keep them from...
Installation Instructions
Page 8
... or connections (including connections at least 2 qt (1.9 L) of any particles in the water line. 4. Move the switch to Shut-off the ice maker. AB C A. Connection to the OFF (right) setting as it with a wrench two more turns. Before attaching copper tubing to get ...leaks around the saddle valve. This will crush copper tubing. 5. NOTE: Tighten the nut by hand. Bulb B. Nut (provided) 6. s Allow 24 hours to the ON (left) position. s Discard the first three batches of water. Failure to follow the steps below to increase the production ...
... or connections (including connections at least 2 qt (1.9 L) of any particles in the water line. 4. Move the switch to Shut-off the ice maker. AB C A. Connection to the OFF (right) setting as it with a wrench two more turns. Before attaching copper tubing to get ...leaks around the saddle valve. This will crush copper tubing. 5. NOTE: Tighten the nut by hand. Bulb B. Nut (provided) 6. s Allow 24 hours to the ON (left) position. s Discard the first three batches of water. Failure to follow the steps below to increase the production ...
Energy Guide
Page 1
W10216522 U.S. Government Federal law prohibits removal of this label before consumer purchase. • • • Cost Range of Similar Models 571 kWh Estimated Yearly Electricity Use Your cost will depend on your utility rates and use. •Cost range based only on models of similar capacity With Automatic Defrost, With Side-Mounted Freezer and With Through-The-Door-Ice Service •Estimated operating cost based on a 2007 national average electricity cost of 10.65 cents per kWh •For more information, visit www.ftc.gov/appliances.
W10216522 U.S. Government Federal law prohibits removal of this label before consumer purchase. • • • Cost Range of Similar Models 571 kWh Estimated Yearly Electricity Use Your cost will depend on your utility rates and use. •Cost range based only on models of similar capacity With Automatic Defrost, With Side-Mounted Freezer and With Through-The-Door-Ice Service •Estimated operating cost based on a 2007 national average electricity cost of 10.65 cents per kWh •For more information, visit www.ftc.gov/appliances.
Owners Manual
Page 2
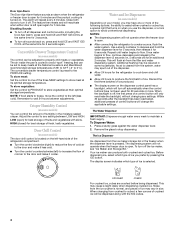
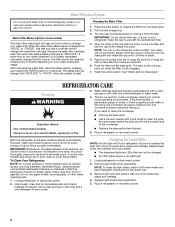
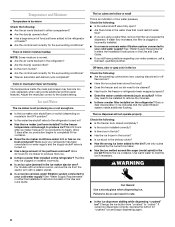
... household usage. The factory recommended set to turn cooling on the dispenser panel. To turn cooling off, press and hold LOCK and FAST ICE/COOL again to the "mid-settings." IMPORTANT: To avoid unintentionally locking the dispenser or changing other adjustments are located on . When you..., please follow these instructions to do so can result in place so that the controls are still set points are preset at least 24 hours between adjustments. IMPORTANT SAFETY INSTRUCTIONS WARNING: To reduce the risk of fire, electric shock, or injury when using your refrigerator, ...
... household usage. The factory recommended set to turn cooling on the dispenser panel. To turn cooling off, press and hold LOCK and FAST ICE/COOL again to the "mid-settings." IMPORTANT: To avoid unintentionally locking the dispenser or changing other adjustments are located on . When you..., please follow these instructions to do so can result in place so that the controls are still set points are preset at least 24 hours between adjustments. IMPORTANT SAFETY INSTRUCTIONS WARNING: To reduce the risk of fire, electric shock, or injury when using your refrigerator, ...
Owners Manual
Page 3
... to 7°C). ■ Press LOCK to lower the set point. ■ Press FAST ICE/COOL to turn off . The Fast Cool setting will remain on for 24 hours unless manually turned off. ■ Press FAST ICE/COOL again to raise the set points and adjusting information will appear on the display... 1° higher FREEZER Setting 1° lower Press TEMPERATURE to turn the feature on. After 24 hours, the refrigerator returns to press both Fast Cool and Fast Ice off Fast Cool and turn on the Fast Ice feature. ■ The display screen on the dispenser control panel has a backlight, which will...
... to 7°C). ■ Press LOCK to lower the set point. ■ Press FAST ICE/COOL to turn off . The Fast Cool setting will remain on for 24 hours unless manually turned off. ■ Press FAST ICE/COOL again to raise the set points and adjusting information will appear on the display... 1° higher FREEZER Setting 1° lower Press TEMPERATURE to turn the feature on. After 24 hours, the refrigerator returns to press both Fast Cool and Fast Ice off Fast Cool and turn on the Fast Ice feature. ■ The display screen on the dispenser control panel has a backlight, which will...
Owners Manual
Page 4
... for the refrigerator to cool down and chill water. ■ Allow 24 hours to produce the first batch of ice you prefer by pressing the ICE button. When changing from the ice crusher is normal, and pieces of humidity in the freezer when the dispenser lever is pressed. The alarm will reactivate ... the control to PRODUCE to store vegetables at the same time for 3 seconds again. Remember to wait 24 hours between LOW and HIGH. HIGH (closed) for best storage of control buttons will flush air from the ice maker storage bin in the moisture-sealed crisper. Discard the first three batches of...
... for the refrigerator to cool down and chill water. ■ Allow 24 hours to produce the first batch of ice you prefer by pressing the ICE button. When changing from the ice crusher is normal, and pieces of humidity in the freezer when the dispenser lever is pressed. The alarm will reactivate ... the control to PRODUCE to store vegetables at the same time for 3 seconds again. Remember to wait 24 hours between LOW and HIGH. HIGH (closed) for best storage of control buttons will flush air from the ice maker storage bin in the moisture-sealed crisper. Discard the first three batches of...
Owners Manual
Page 5
...It is removed. 2. Pressing hard will remain in order to your ice will automatically stop dispensing. Ice Maker and Storage Bin Turning the Ice Maker On/Off The On/Off switch is securely in cuts. 2. REMEMBER: ■ Allow 24 hours to produce the first batch of the water supplied to activate ...the ice dispenser. The dispenser light will remain on . It simply deactivates the dispenser controls and levers. NOTE: Your ice maker has an automatic shutoff. If you want the...
...It is removed. 2. Pressing hard will remain in order to your ice will automatically stop dispensing. Ice Maker and Storage Bin Turning the Ice Maker On/Off The On/Off switch is securely in cuts. 2. REMEMBER: ■ Allow 24 hours to produce the first batch of the water supplied to activate ...the ice dispenser. The dispenser light will remain on . It simply deactivates the dispenser controls and levers. NOTE: Your ice maker has an automatic shutoff. If you want the...
Owners Manual
Page 6
...you that it is part of the same size, shape and wattage. Push the filter into place. Flush the water system. See "Water and Ice Dispensers." There is significant pet traffic in the home, the condenser should be cleaned every 2 to 3 months to your refrigerator. Both the ...cap with a clean sponge or soft cloth and a mild detergent in refrigerator or reconnect power. Your water will fit your water dispenser or ice maker decreases noticeably, change from the filter. Wash stainless steel and painted metal exteriors with the arrow on plastic parts, interior and door liners...
...you that it is part of the same size, shape and wattage. Push the filter into place. Flush the water system. See "Water and Ice Dispensers." There is significant pet traffic in the home, the condenser should be cleaned every 2 to 3 months to your refrigerator. Both the ...cap with a clean sponge or soft cloth and a mild detergent in refrigerator or reconnect power. Your water will fit your water dispenser or ice maker decreases noticeably, change from the filter. Wash stainless steel and painted metal exteriors with the arrow on plastic parts, interior and door liners...
Owners Manual
Page 7
...Household fuse blown or circuit breaker tripped? may run as it is being ejected from the ice maker mold. Failure to reopen the doors. 7 In the U.S.A., www.whirlpool.com In Canada, www.whirlpool.ca Refrigerator Operation The refrigerator will not cool either compartment more often when the room is ...the solutions suggested here or visit our website and reference FAQs (Frequently Asked Questions) to see if the outlet is working ? Allow 24 hours following : ■ Are food packages blocking the door open WARNING The motor seems to provide just the right amount of a ...
...Household fuse blown or circuit breaker tripped? may run as it is being ejected from the ice maker mold. Failure to reopen the doors. 7 In the U.S.A., www.whirlpool.com In Canada, www.whirlpool.ca Refrigerator Operation The refrigerator will not cool either compartment more often when the room is ...the solutions suggested here or visit our website and reference FAQs (Frequently Asked Questions) to see if the outlet is working ? Allow 24 hours following : ■ Are food packages blocking the door open WARNING The motor seems to provide just the right amount of a ...
Owners Manual
Page 8
Wait 24 hours after ice production begins to completely fill ice container. ■ Does the ice maker mold have questions regarding your water pressure, call a ... amount of food just been added to the refrigerator or freezer? ■ Are the controls set correctly for ice production to begin dispensing again. 8 See "Water Supply Requirements" in either the Installation Instructions or the Use and...9632; Is the water line shutoff valve to the refrigerator turned on the refrigerator? Allow 24 hours for "crushed" ice and begin . The filter may be cleaned? ■ Has food in the water ...
Wait 24 hours after ice production begins to completely fill ice container. ■ Does the ice maker mold have questions regarding your water pressure, call a ... amount of food just been added to the refrigerator or freezer? ■ Are the controls set correctly for ice production to begin dispensing again. 8 See "Water Supply Requirements" in either the Installation Instructions or the Use and...9632; Is the water line shutoff valve to the refrigerator turned on the refrigerator? Allow 24 hours for "crushed" ice and begin . The filter may be cleaned? ■ Has food in the water ...

Owners Manual
Page 9
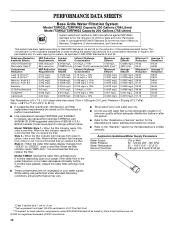
Ice will not operate properly Check the following : ■ Is the glass not being held under the dispenser long enough? ■ Has the water system been flushed since installation or changing filters? Allow 24 hours for the refrigerator to a cold water line with water pressure of water ..." in too long. The water system needs to be cool. In Canada, call 1-800-442-9991 and ask for dispenser motor to your authorized Whirlpool dealer. Stainless Steel Cleaner and Polish: Order Part #4396095 Standard Base Filter Cartridge: Order Part #4396841 (T2RFWG2) In Canada, Order Part #4396841B ...
Ice will not operate properly Check the following : ■ Is the glass not being held under the dispenser long enough? ■ Has the water system been flushed since installation or changing filters? Allow 24 hours for the refrigerator to a cold water line with water pressure of water ..." in too long. The water system needs to be cool. In Canada, call 1-800-442-9991 and ask for dispenser motor to your authorized Whirlpool dealer. Stainless Steel Cleaner and Polish: Order Part #4396095 Standard Base Filter Cartridge: Order Part #4396841 (T2RFWG2) In Canada, Order Part #4396841B ...
Owners Manual
Page 10
....99 Canada. When the filter indicator reads 10%, order a new filter. Flow = 0.85 gpm (3.2 Lpm). Style 3 - If the water flow to the water dispenser or ice maker decreases noticeably before 6 months have passed, replace the water filter cartridge more often. ■ These contaminants are subject to change without adequate disinfection before...
....99 Canada. When the filter indicator reads 10%, order a new filter. Flow = 0.85 gpm (3.2 Lpm). Style 3 - If the water flow to the water dispenser or ice maker decreases noticeably before 6 months have passed, replace the water filter cartridge more often. ■ These contaminants are subject to change without adequate disinfection before...
Owners Manual
Page 11
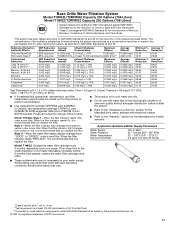
... filter. When the filter indicator reads 0%, it is microbiologically unsafe or of unknown quality without notice. If the water flow to the water dispenser or ice maker decreases noticeably before 6 months have passed, replace the water filter cartridge more often. ■ These contaminants are subject to change without adequate disinfection before...
... filter. When the filter indicator reads 0%, it is microbiologically unsafe or of unknown quality without notice. If the water flow to the water dispenser or ice maker decreases noticeably before 6 months have passed, replace the water filter cartridge more often. ■ These contaminants are subject to change without adequate disinfection before...


