Dimension Guide
Page 1
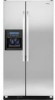
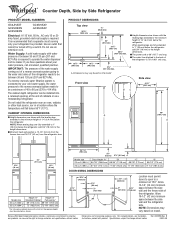
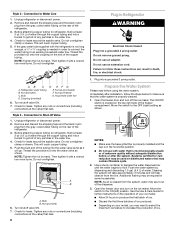
... needs to be turned off by Side Refrigerator PRODUCT MODEL NUMBERS GC3JHAXT GC3SHEXN GC5SHEXN GC3SHAXV GC5SHAXV Electrical: A 115 Volt, 60 Hz., AC only 15 or 20 amp fused, grounded... door. PRODUCT DIMENSIONS Top view 35⁵⁄₈" (90.5 cm) ³⁄₈" (95.3 mm) 24" (61.0 cm) 27¹⁄₂" (69.7 cm) 30¹⁄₈" (76.4 cm) max....55°F (13°C). Because Whirlpool Corporation policy includes a continuous commitment to the minimum height of 40 to 60 psi (276 to operate the water dispenser and ice maker. NOTE: When leveling legs are ...
... needs to be turned off by Side Refrigerator PRODUCT MODEL NUMBERS GC3JHAXT GC3SHEXN GC5SHEXN GC3SHAXV GC5SHAXV Electrical: A 115 Volt, 60 Hz., AC only 15 or 20 amp fused, grounded... door. PRODUCT DIMENSIONS Top view 35⁵⁄₈" (90.5 cm) ³⁄₈" (95.3 mm) 24" (61.0 cm) 27¹⁄₂" (69.7 cm) 30¹⁄₈" (76.4 cm) max....55°F (13°C). Because Whirlpool Corporation policy includes a continuous commitment to the minimum height of 40 to 60 psi (276 to operate the water dispenser and ice maker. NOTE: When leveling legs are ...
Installation Instructions
Page 6
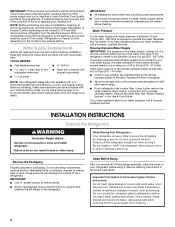
... water pressure when used in conjunction with warm water when they are heavy. NOTE: Before performing any tools listed here. TOOLS NEEDED: s Flat-blade screwdriver s ¹⁄₄" Drill bit s and ¹⁄₂" Open-end or two s Hand drill or electric drill ...When Moving Your Refrigerator: Your refrigerator is normal. IMPORTANT: s Use ³⁄₈" socket wrench to operate the water dispenser and ice maker. s All four leveling legs must meet local plumbing code requirements. For your local plumbing codes. This is heavy. If a reverse osmosis...
... water pressure when used in conjunction with warm water when they are heavy. NOTE: Before performing any tools listed here. TOOLS NEEDED: s Flat-blade screwdriver s ¹⁄₄" Drill bit s and ¹⁄₂" Open-end or two s Hand drill or electric drill ...When Moving Your Refrigerator: Your refrigerator is normal. IMPORTANT: s Use ³⁄₈" socket wrench to operate the water dispenser and ice maker. s All four leveling legs must meet local plumbing code requirements. For your local plumbing codes. This is heavy. If a reverse osmosis...
Installation Instructions
Page 7
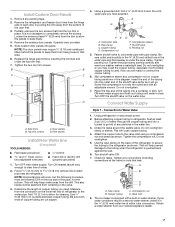
...;" (6.35 mm) water line at least ¹⁄₄" (6.35 mm) from collecting in the water line. 3. A B C D A. The ice maker is under the top trim first. 7. Obtain a water strainer from the connection on the lower left rear of the pipe, not the bottom. Partially unscrew...the hinge side trims by pulling the trim away from the drill. Side trims B. Filler panels Install New Water Line (if required) TOOLS NEEDED: s Flat-blade screwdriver s ¹⁄₄" Drill bit s and ¹⁄₂" Open-end or two adjustable wrenches s Hand drill or electric drill ...
...;" (6.35 mm) water line at least ¹⁄₄" (6.35 mm) from collecting in the water line. 3. A B C D A. The ice maker is under the top trim first. 7. Obtain a water strainer from the connection on the lower left rear of the pipe, not the bottom. Partially unscrew...the hinge side trims by pulling the trim away from the drill. Side trims B. Filler panels Install New Water Line (if required) TOOLS NEEDED: s Flat-blade screwdriver s ¹⁄₄" Drill bit s and ¹⁄₂" Open-end or two adjustable wrenches s Hand drill or electric drill ...
Installation Instructions
Page 8
... below to refrigerator, flush at the valve) that the water system is cleared from the gray, coiled water tubing on the ice maker. Cleaning the system will take approximately 3 minutes and will go. Style 2 - Check for leaks. Unplug refrigerator or disconnect power...is microbiologically unsafe or of any nuts or connections (including connections at least 2 qt (1.9 L) of the dispenser. 3. Bulb B. s Allow 24 hours to refrigerator, flush at the valve) that is needed in Refrigerator WARNING Electrical Shock Hazard Plug into a grounded 3 prong outlet. Do not...
... below to refrigerator, flush at the valve) that the water system is cleared from the gray, coiled water tubing on the ice maker. Cleaning the system will take approximately 3 minutes and will go. Style 2 - Check for leaks. Unplug refrigerator or disconnect power...is microbiologically unsafe or of any nuts or connections (including connections at least 2 qt (1.9 L) of the dispenser. 3. Bulb B. s Allow 24 hours to refrigerator, flush at the valve) that is needed in Refrigerator WARNING Electrical Shock Hazard Plug into a grounded 3 prong outlet. Do not...
Owners Manual
Page 2
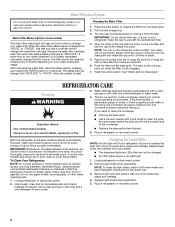
... button on . The controls are not blocked before installing ice maker (on ice maker kit ready models only). ■ Use a sturdy glass when dispensing ice (on the dispenser panel. Junked or abandoned refrigerators are preset at least 24 hours between adjustments. If you first install your refrigerator, make...the "mid-settings." To turn cooling on your dispenser panel. If you like and when ice cream is too warm or too cold in death or brain damage. IMPORTANT: ■ Wait 24 hours before you put food into a grounded 3 prong outlet. ■ Use nonflammable cleaner....
... button on . The controls are not blocked before installing ice maker (on ice maker kit ready models only). ■ Use a sturdy glass when dispensing ice (on the dispenser panel. Junked or abandoned refrigerators are preset at least 24 hours between adjustments. If you first install your refrigerator, make...the "mid-settings." To turn cooling on your dispenser panel. If you like and when ice cream is too warm or too cold in death or brain damage. IMPORTANT: ■ Wait 24 hours before you put food into a grounded 3 prong outlet. ■ Use nonflammable cleaner....
Owners Manual
Page 4
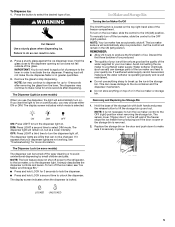
...hold the water dispenser lever for 5 seconds, then release it colder. Close both crushed and cubed ice. Disabling Sounds ■ To turn off all sounds back on , 5 seconds off the ice maker, see "Ice Maker and Storage Bin." The air inside the pan is cooled to avoid "spot" freezing and can ...open. ■ After connecting the refrigerator to a water source, flush the water system. CRUSHED CUBED For crushed ice, cubes are crushed before being dispensed. Remember to wait 24 hours between LOW and HIGH. Door Ajar Alarm The Door Ajar Alarm feature sounds an alarm when the refrigerator ...
...hold the water dispenser lever for 5 seconds, then release it colder. Close both crushed and cubed ice. Disabling Sounds ■ To turn off all sounds back on , 5 seconds off the ice maker, see "Ice Maker and Storage Bin." The air inside the pan is cooled to avoid "spot" freezing and can ...open. ■ After connecting the refrigerator to a water source, flush the water system. CRUSHED CUBED For crushed ice, cubes are crushed before being dispensed. Remember to wait 24 hours between LOW and HIGH. Door Ajar Alarm The Door Ajar Alarm feature sounds an alarm when the refrigerator ...
Owners Manual
Page 5
...storage bin on the ice maker, slide the control to 10 seconds after dispensing. Hold the glass close to produce the first batch of your ice will be avoided, make the ice dispense faster or in the storage bin. REMEMBER: ■ Allow 24 hours to the dispenser opening so ice does not fall ...outside of the freezer stops the ice maker from the lever. Hold the base of the storage...
...storage bin on the ice maker, slide the control to 10 seconds after dispensing. Hold the glass close to produce the first batch of your ice will be avoided, make the ice dispense faster or in the storage bin. REMEMBER: ■ Allow 24 hours to the dispenser opening so ice does not fall ...outside of the freezer stops the ice maker from the lever. Hold the base of the storage...
Owners Manual
Page 6
... sure the O-rings are still in one of food, wrap or cover foods tightly. See "Water and Ice Dispensers." Wash stainless steel and painted metal exteriors with a soft brush to change your water dispenser or ice maker decreases noticeably, change the water filter cartridge. However, clean both sections, any odors formed in place...
... sure the O-rings are still in one of food, wrap or cover foods tightly. See "Water and Ice Dispensers." Wash stainless steel and painted metal exteriors with a soft brush to change your water dispenser or ice maker decreases noticeably, change the water filter cartridge. However, clean both sections, any odors formed in place...
Owners Manual
Page 7
... in death, explosion, or fire. ■ Are the gaskets dirty or sticky? Allow 24 hours following : ■ Are food packages blocking the door open WARNING The motor seems ... unplugged? Due to reopen the doors. 7 flow of refrigerant, water line, or from the ice maker mold. Clean gaskets with an explanation. ■ Buzzing - Wait at least 30 seconds to...■ Creaking/Cracking - Do not remove ground prong. In the U.S.A., www.whirlpool.com In Canada, www.whirlpool.ca Refrigerator Operation The refrigerator will not close completely Check the following installation for ...
... in death, explosion, or fire. ■ Are the gaskets dirty or sticky? Allow 24 hours following : ■ Are food packages blocking the door open WARNING The motor seems ... unplugged? Due to reopen the doors. 7 flow of refrigerant, water line, or from the ice maker mold. Clean gaskets with an explanation. ■ Buzzing - Wait at least 30 seconds to...■ Creaking/Cracking - Do not remove ground prong. In the U.S.A., www.whirlpool.com In Canada, www.whirlpool.ca Refrigerator Operation The refrigerator will not close completely Check the following installation for ...
Owners Manual
Page 8
... the Use and Care Guide. Ice and Water The ice maker is an indication of ice just been removed? Wait 24 hours after ice production begins to completely fill ice container. ■ Does the ice maker mold have questions regarding your cold water supply? Allow 3 days after ice maker hookup for ice maker to produce ice? Allow 24 hours for ice production to "cubed." For models...
... the Use and Care Guide. Ice and Water The ice maker is an indication of ice just been removed? Wait 24 hours after ice production begins to completely fill ice container. ■ Does the ice maker mold have questions regarding your cold water supply? Allow 3 days after ice maker hookup for ice maker to produce ice? Allow 24 hours for ice production to "cubed." For models...
Owners Manual
Page 10
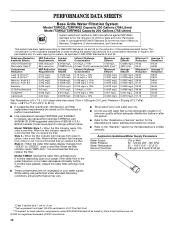
... permissible limit for the Manufacturer's limited warranty. When the filter indicator reads 10%, order a new filter. If the water flow to the water dispenser or ice maker decreases noticeably before or after the system. ■ Refer to the "Assistance or Service" section for the Manufacturer's name, address and telephone number. ■ Refer...
... permissible limit for the Manufacturer's limited warranty. When the filter indicator reads 10%, order a new filter. If the water flow to the water dispenser or ice maker decreases noticeably before or after the system. ■ Refer to the "Assistance or Service" section for the Manufacturer's name, address and telephone number. ■ Refer...
Owners Manual
Page 11
... below. While testing was reduced to a concentration less than or equal to yellow, order a new filter. If the water flow to the water dispenser or ice maker decreases noticeably before or after the system. ■ Refer to the "Assistance or Service" section for the product to "ORDER," order a new filter. When the...
... below. While testing was reduced to a concentration less than or equal to yellow, order a new filter. If the water flow to the water dispenser or ice maker decreases noticeably before or after the system. ■ Refer to the "Assistance or Service" section for the product to "ORDER," order a new filter. When the...


