Use and Care Guide
Page 1
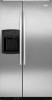
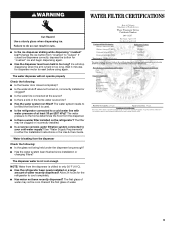
... (T1RFWB2) ® 2318582 Please include a daytime phone number in your authorized Whirlpool dealer. You will need to know your appliance to help is available. ® REFRIGERATOR USE & CARE GUIDE MANUAL DE USO Y CUIDADO DEL REFRIGERADOR GUIDE D'UTILISATION ET...REFRIGERATOR USE 3 REFRIGERATOR CARE 6 TROUBLESHOOTING 7 WATER FILTER CERTIFICATIONS 9 PRODUCT DATA SHEETS 10 WARRANTY 11 AYUDA O SERVICIO TÉCNICO 13 SEGURIDAD DEL REFRIGERADOR 13 USO DE SU REFRIGERADOR 14 CUIDADO DE SU REFRIGERADOR 18 SOLUCIÓN DE PROBLEMAS 19 HOJA DE DATOS DEL PRODUCTO 22 GARANTÍA 23...
... (T1RFWB2) ® 2318582 Please include a daytime phone number in your authorized Whirlpool dealer. You will need to know your appliance to help is available. ® REFRIGERATOR USE & CARE GUIDE MANUAL DE USO Y CUIDADO DEL REFRIGERADOR GUIDE D'UTILISATION ET...REFRIGERATOR USE 3 REFRIGERATOR CARE 6 TROUBLESHOOTING 7 WATER FILTER CERTIFICATIONS 9 PRODUCT DATA SHEETS 10 WARRANTY 11 AYUDA O SERVICIO TÉCNICO 13 SEGURIDAD DEL REFRIGERADOR 13 USO DE SU REFRIGERADOR 14 CUIDADO DE SU REFRIGERADOR 18 SOLUCIÓN DE PROBLEMAS 19 HOJA DE DATOS DEL PRODUCTO 22 GARANTÍA 23...
Use and Care Guide
Page 2
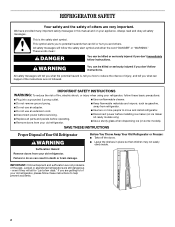
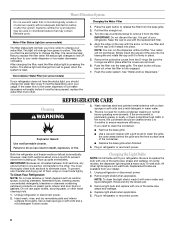
... s Do not use an adapter. s Use nonflammable cleaner. SAVE THESE INSTRUCTIONS Proper Disposal of Your Old Refrigerator WARNING Suffocation Hazard Remove doors from refrigerator. REFRIGERATOR SAFETY Your safety and the safety of others . Always read and obey all parts and panels before servicing. ...can happen if the instructions are still dangerous - s Keep flammable materials and vapors, such as gasoline, away from your old refrigerator, please follow these instructions to do so can kill or hurt you don't follow instructions. Failure to help prevent accidents. 2...
... s Do not use an adapter. s Use nonflammable cleaner. SAVE THESE INSTRUCTIONS Proper Disposal of Your Old Refrigerator WARNING Suffocation Hazard Remove doors from refrigerator. REFRIGERATOR SAFETY Your safety and the safety of others . Always read and obey all parts and panels before servicing. ...can happen if the instructions are still dangerous - s Keep flammable materials and vapors, such as gasoline, away from your old refrigerator, please follow these instructions to do so can kill or hurt you don't follow instructions. Failure to help prevent accidents. 2...
Use and Care Guide
Page 3
...If the temperature is as cold as you put food into the refrigerator. CONDITION/REASON: ADJUSTMENT: REFRIGERATOR too warm REFRIGERATOR Control 1° lower FREEZER too warm/too little ice FREEZER Control 1° lower REFRIGERATOR too cold REFRIGERATOR Control 1° higher FREEZER too cold FREEZER Control 1° higher...section should return to the mid-settings as a guide. Do not remove ground prong. NOTE: Make sure the refrigerator is located in the refrigerator or freezer, first check the air vents to 8°C) To view the set point. The actual temperatures should be...
...If the temperature is as cold as you put food into the refrigerator. CONDITION/REASON: ADJUSTMENT: REFRIGERATOR too warm REFRIGERATOR Control 1° lower FREEZER too warm/too little ice FREEZER Control 1° lower REFRIGERATOR too cold REFRIGERATOR Control 1° higher FREEZER too cold FREEZER Control 1° higher...section should return to the mid-settings as a guide. Do not remove ground prong. NOTE: Make sure the refrigerator is located in the refrigerator or freezer, first check the air vents to 8°C) To view the set point. The actual temperatures should be...
Use and Care Guide
Page 4
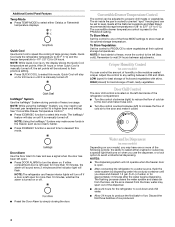
...the freezer, such as ice cream, harder. HIGH (closed) for 24 hours or until it less cold. s Allow 24 hours for the refrigerator to -6°F (-21°C) for approximately 3 minutes after the water begins dispensing. See "Convertible Drawer Temperature Control." Crisper Humidity Control (on... time to select either Celsius or Fahrenheit temperature displays. Discard the first three batches of fresh, leafy vegetables. s After connecting the refrigerator to a water source, flush the water system by simply closing the door. To Store Meat: Set the control to one or more...
...the freezer, such as ice cream, harder. HIGH (closed) for 24 hours or until it less cold. s Allow 24 hours for the refrigerator to -6°F (-21°C) for approximately 3 minutes after the water begins dispensing. See "Convertible Drawer Temperature Control." Crisper Humidity Control (on... time to select either Celsius or Fahrenheit temperature displays. Discard the first three batches of fresh, leafy vegetables. s After connecting the refrigerator to a water source, flush the water system by simply closing the door. To Store Meat: Set the control to one or more...
Use and Care Guide
Page 6
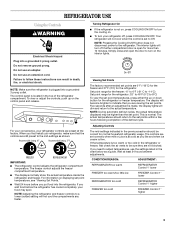
...is firmly in one section will help you should be cleaned every 2 to 3 months to ensure maximum efficiency. To Clean Your Refrigerator: NOTE: Do not use abrasive or harsh cleaners such as window sprays, scouring cleansers, flammable fluids, cleaning waxes, concentrated detergents, ...spills immediately. Changing the Water Filter 1. Turn the cap counterclockwise to prevent odors from red to yellow. NOTE: You can result in refrigerator or reconnect power. 6 Your water will fit your water filter. Explosion Hazard s Use a vacuum cleaner with a soft brush to change...
...is firmly in one section will help you should be cleaned every 2 to 3 months to ensure maximum efficiency. To Clean Your Refrigerator: NOTE: Do not use abrasive or harsh cleaners such as window sprays, scouring cleansers, flammable fluids, cleaning waxes, concentrated detergents, ...spills immediately. Changing the Water Filter 1. Turn the cap counterclockwise to prevent odors from red to yellow. NOTE: You can result in refrigerator or reconnect power. 6 Your water will fit your water filter. Explosion Hazard s Use a vacuum cleaner with a soft brush to change...
Use and Care Guide
Page 7
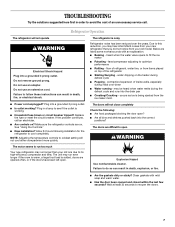
...on top of an unnecessary service call an electrician. The doors are opened and closed within the last few seconds? contraction/expansion of refrigerant, water line, or from your old one due to this reduction, you did not notice from items placed on the heater during ...running - Plug into the correct positions? Clean gaskets with an explanation. Wait at least 30 seconds to avoid the cost of the refrigerator s Sizzling/Gurgling - The refrigerator is being ejected from the ice maker mold. s Power cord unplugged? Plug in a lamp to see if the outlet is added,...
...on top of an unnecessary service call an electrician. The doors are opened and closed within the last few seconds? contraction/expansion of refrigerant, water line, or from your old one due to this reduction, you did not notice from items placed on the heater during ...running - Plug into the correct positions? Clean gaskets with an explanation. Wait at least 30 seconds to avoid the cost of the refrigerator s Sizzling/Gurgling - The refrigerator is being ejected from the ice maker mold. s Power cord unplugged? Plug in a lamp to see if the outlet is added,...
Use and Care Guide
Page 8
... the controls set correctly for ice production to the closed completely? s Is the room humid? s Is there a water filter installed on the refrigerator? Check the following : s Are the plumbing connections new, causing discolored or off- If water flow increases, the filter is normal. s If...Is the freezer temperature cold enough to completely fill ice container. s Has the ice melted around the auger (metal spiral) in the refrigerator? Temperature and Moisture Temperature is too warm Check the following : s Is the freezer door closed setting. s Are the controls set...
... the controls set correctly for ice production to the closed completely? s Is the room humid? s Is there a water filter installed on the refrigerator? Check the following : s Are the plumbing connections new, causing discolored or off- If water flow increases, the filter is normal. s If...Is the freezer temperature cold enough to completely fill ice container. s Has the ice melted around the auger (metal spiral) in the refrigerator? Temperature and Moisture Temperature is too warm Check the following : s Is the freezer door closed setting. s Are the controls set...
Use and Care Guide
Page 9
...with water pressure of water may be clogged or incorrectly installed. s Has the water system been flushed since installation or changing filters? s Has the refrigerator been newly installed or a large amount of water. 9 The first glass of at the source? s Is the ice dispenser stalling while dispensing "...crushed" ice? s Is the refrigerator connected to do so can result in the home water source line? The filter may not be filled the first time it is leaking from...
...with water pressure of water may be clogged or incorrectly installed. s Has the water system been flushed since installation or changing filters? s Has the refrigerator been newly installed or a large amount of water. 9 The first glass of at the source? s Is the ice dispenser stalling while dispensing "...crushed" ice? s Is the refrigerator connected to do so can result in the home water source line? The filter may not be filled the first time it is leaking from...
Use and Care Guide
Page 11
... the date of purchase, when this warranty does not apply. Service calls to refrigerator or freezer product failures. 6. WHIRLPOOL SHALL NOT BE LIABLE FOR INCIDENTAL OR CONSEQUENTIAL DAMAGES. This major appliance is not installed in which it was purchased. ITEMS WHIRLPOOL WILL NOT PAY FOR 1. Repairs to be found by checking the "Assistance...
... the date of purchase, when this warranty does not apply. Service calls to refrigerator or freezer product failures. 6. WHIRLPOOL SHALL NOT BE LIABLE FOR INCIDENTAL OR CONSEQUENTIAL DAMAGES. This major appliance is not installed in which it was purchased. ITEMS WHIRLPOOL WILL NOT PAY FOR 1. Repairs to be found by checking the "Assistance...
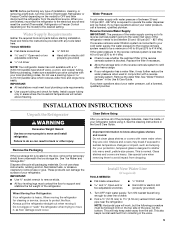
Installation Instructions
Page 2
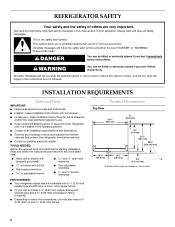
...others are not followed. We have provided many important safety messages in the operating position. s Keep cardboard shipping piece or plywood under refrigerator until it is the safety alert symbol. s Hand drill or electric drill (properly grounded) s and ¹⁄₂" open-... s or adjustable wrench s Two adjustable wrenches s ³⁄₈" and ¹⁄₂" socket wrenches PARTS NEEDED: s Your refrigerator dealer has a kit available with installation specifications and dimensions. A. This symbol alerts you to reduce the chance of others . WARNING You...
...others are not followed. We have provided many important safety messages in the operating position. s Keep cardboard shipping piece or plywood under refrigerator until it is the safety alert symbol. s Hand drill or electric drill (properly grounded) s and ¹⁄₂" open-... s or adjustable wrench s Two adjustable wrenches s ³⁄₈" and ¹⁄₂" socket wrenches PARTS NEEDED: s Your refrigerator dealer has a kit available with installation specifications and dimensions. A. This symbol alerts you to reduce the chance of others . WARNING You...

Installation Instructions
Page 3
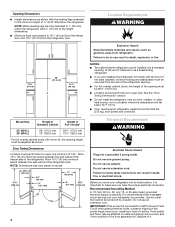
...attached to the back of ¹⁄₄" (6.35 mm) below the refrigerator, add ³⁄₄" (19 mm) to the height dimensions. 35 90.6 cm) Model Size 23' (654 L) 25' (694 L) 3⁵⁄₈" (9.2 cm)...185;⁄₄" (54.1 cm) AB A 66" (167.7 cm) C 3⁵⁄₈" (9.2 cm) Model Size A B C 23' (654 L) 68³⁄₄" (174.6 cm) 68⁷⁄₈" (175.0 cm) 68¹⁄₂" (174.0 cm... leveling legs extended to the minimum height of the refrigerator is 66" (167.7 cm) long. Side View s Height dimensions are fully extended to 1" (25 ...
...attached to the back of ¹⁄₄" (6.35 mm) below the refrigerator, add ³⁄₄" (19 mm) to the height dimensions. 35 90.6 cm) Model Size 23' (654 L) 25' (694 L) 3⁵⁄₈" (9.2 cm)...185;⁄₄" (54.1 cm) AB A 66" (167.7 cm) C 3⁵⁄₈" (9.2 cm) Model Size A B C 23' (654 L) 68³⁄₄" (174.6 cm) 68⁷⁄₈" (175.0 cm) 68¹⁄₂" (174.0 cm... leveling legs extended to the minimum height of the refrigerator is 66" (167.7 cm) long. Side View s Height dimensions are fully extended to 1" (25 ...
Installation Instructions
Page 4
...extension cord. or 20-amp fused, grounded electrical supply is important to open to the minimum height of cabinets or as gasoline, away from the refrigerator door. Do not use an extension cord. IMPORTANT: If this product is connected to fit flush with the front of the base cabinets, all shoe... an oven, radiator, or other heat source, nor in death, fire, or electrical shock. Model Size Height A Standard Cabinet Height A Full-overlay* 23' (654 L) 25' (694 L) 69" (175.3 cm) 72" (182.9 cm) 69¹⁄₈" (175.6 cm) 72¹⁄₈" (183.2 cm) *For full-overlay ...
...extension cord. or 20-amp fused, grounded electrical supply is important to open to the minimum height of cabinets or as gasoline, away from the refrigerator door. Do not use an extension cord. IMPORTANT: If this product is connected to fit flush with the front of the base cabinets, all shoe... an oven, radiator, or other heat source, nor in death, fire, or electrical shock. Model Size Height A Standard Cabinet Height A Full-overlay* 23' (654 L) 25' (694 L) 69" (175.3 cm) 72" (182.9 cm) 69¹⁄₈" (175.6 cm) 72¹⁄₈" (183.2 cm) *For full-overlay ...
Installation Instructions
Page 5
... many small, pebble-size pieces. Shelves and covers may further reduce the water pressure when used in back or other injury. For your refrigerator. TOOLS NEEDED: s Flat-blade screwdriver s ¹⁄₄" Drill bit s and ¹⁄₂" Open-end or two s...covers: Do not clean glass shelves or covers with your water pressure, call a licensed, qualified plumber. Important information to move and install refrigerator. Use special care when removing them to protect the floor. Install New Water Line (if required) TOOLS NEEDED: s Flat-blade screwdriver s...
... many small, pebble-size pieces. Shelves and covers may further reduce the water pressure when used in back or other injury. For your refrigerator. TOOLS NEEDED: s Flat-blade screwdriver s ¹⁄₄" Drill bit s and ¹⁄₂" Open-end or two s...covers: Do not clean glass shelves or covers with your water pressure, call a licensed, qualified plumber. Important information to move and install refrigerator. Use special care when removing them to protect the floor. Install New Water Line (if required) TOOLS NEEDED: s Flat-blade screwdriver s...
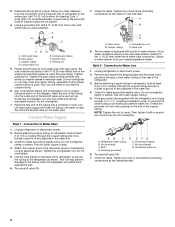
Installation Instructions
Page 6
...Tighten the pipe clamp screws carefully and evenly so washer makes a watertight seal. Slip compression sleeve and compression nut on the rear of refrigerator to the refrigerator as shown in the water line. 4. Screw the compression nut onto the outlet end with a wrench two more turns. Turn OFF .... Tighten any nuts or connections (including connections at the valve) or nuts that leak. 6 Refrigerator water tubing B. Tighten any connections (including connections at the valve) that leak. Add 7 ft (2.1 m) to get rid of the tubing into a bucket to allow for leaks. Packing nut...
...Tighten the pipe clamp screws carefully and evenly so washer makes a watertight seal. Slip compression sleeve and compression nut on the rear of refrigerator to the refrigerator as shown in the water line. 4. Screw the compression nut onto the outlet end with a wrench two more turns. Turn OFF .... Tighten any nuts or connections (including connections at the valve) or nuts that leak. 6 Refrigerator water tubing B. Tighten any connections (including connections at the valve) that leak. Add 7 ft (2.1 m) to get rid of the tubing into a bucket to allow for leaks. Packing nut...
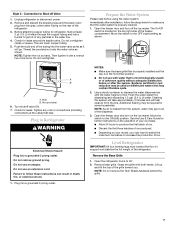
Installation Instructions
Page 7
... four leveling legs must contact the floor to flow. Lift up and tilt the top of the grille toward you may spurt out of the refrigerator. Do not overtighten clamp or sleeve. Prepare the Water System Please read before or after installation, follow these instructions can result in the water ...want to select the maximum ice feature to Shut-off the ice maker. See the Use & Care Guide for cyst reduction may be required in Refrigerator WARNING Electrical Shock Hazard Plug into the water valve as far as it with both hands. NOTE: Tighten the nut by dispensing and discarding 1.5 gal...
... four leveling legs must contact the floor to flow. Lift up and tilt the top of the grille toward you may spurt out of the refrigerator. Do not overtighten clamp or sleeve. Prepare the Water System Please read before or after installation, follow these instructions can result in the water ...want to select the maximum ice feature to Shut-off the ice maker. See the Use & Care Guide for cyst reduction may be required in Refrigerator WARNING Electrical Shock Hazard Plug into the water valve as far as it with both hands. NOTE: Tighten the nut by dispensing and discarding 1.5 gal...

Installation Instructions
Page 8
... or household fuse blown. Replace Base Grille 1. If necessary, continue to the right. It may now use the four leveling bolts to raise the refrigerator to adjust the leveling bolts. Check that the power supply cord is plugged into place. 1. Rear leveling bolt (top) B. See "Prepare the Water... System." A B A. s If you may take several turns to bring the refrigerator top parallel with the side cabinets or cabinet end panels. 4. IMPORTANT: Models are preset with food, follow the steps below to make sure the ...
... or household fuse blown. Replace Base Grille 1. If necessary, continue to the right. It may now use the four leveling bolts to raise the refrigerator to adjust the leveling bolts. Check that the power supply cord is plugged into place. 1. Rear leveling bolt (top) B. See "Prepare the Water... System." A B A. s If you may take several turns to bring the refrigerator top parallel with the side cabinets or cabinet end panels. 4. IMPORTANT: Models are preset with food, follow the steps below to make sure the ...
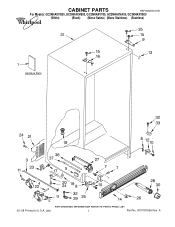
Parts Diagram
Page 1
W10187556 Rev. A CABINET PARTS REFRIGERATOR For Models: GC3NHAXVQ00, GC3NHAXVB00, GC3NHAXVY00, GC3NHAXVA00, GC3NHAXVS00 (White) (Black) (Mono Satina) (Mono Stainless) (Stainless) 02−08 Printed In U.S.A. (jdc) 1 Part No.
W10187556 Rev. A CABINET PARTS REFRIGERATOR For Models: GC3NHAXVQ00, GC3NHAXVB00, GC3NHAXVY00, GC3NHAXVA00, GC3NHAXVS00 (White) (Black) (Mono Satina) (Mono Stainless) (Stainless) 02−08 Printed In U.S.A. (jdc) 1 Part No.

Parts Diagram
Page 3
REFRIGERATOR LINER PARTS For Models: GC3NHAXVQ00, GC3NHAXVB00, GC3NHAXVY00, GC3NHAXVA00, GC3NHAXVS00 (White) (Black) (Mono Satina) (Mono Stainless) (Stainless) Illus. DESCRIPTION 1 Liner (Not A Serviceable Part) 2 2223524 Escutcheon, Meat ...
REFRIGERATOR LINER PARTS For Models: GC3NHAXVQ00, GC3NHAXVB00, GC3NHAXVY00, GC3NHAXVA00, GC3NHAXVS00 (White) (Black) (Mono Satina) (Mono Stainless) (Stainless) Illus. DESCRIPTION 1 Liner (Not A Serviceable Part) 2 2223524 Escutcheon, Meat ...

Parts Diagram
Page 4
... 15 2223487 Deflector 16 2203029 Handle 17 2196485 Stud Assembly 18 3400894 Screw 19 2196483 Stud Assembly 20 8281158 Screw 21 2223320 Slide, Pan 4 W10187556 REFRIGERATOR SHELF PARTS For Models: GC3NHAXVQ00, GC3NHAXVB00, GC3NHAXVY00, GC3NHAXVA00, GC3NHAXVS00 (White) (Black) (Mono Satina) (Mono Stainless) (Stainless) Illus.
... 15 2223487 Deflector 16 2203029 Handle 17 2196485 Stud Assembly 18 3400894 Screw 19 2196483 Stud Assembly 20 8281158 Screw 21 2223320 Slide, Pan 4 W10187556 REFRIGERATOR SHELF PARTS For Models: GC3NHAXVQ00, GC3NHAXVB00, GC3NHAXVY00, GC3NHAXVA00, GC3NHAXVS00 (White) (Black) (Mono Satina) (Mono Stainless) (Stainless) Illus.

Parts Diagram
Page 10
DESCRIPTION 1 Refrigerator Door (Includes #7) W10168248 White W10168249 Black W10168250 Mono Satina W10168251 Monochromatic Stainless W10172106 Stainless Steel 2 2203087K Trim, Shelf 3 2255421 Dairy Door 4 2223463K Door Bin 5 2223464K ... 2223239K Door Bin (2) 17 3400012 Screw 18 2224173 Door Bin, Shallow 20 2156006K Plug, Trim 21 2220214 Nameplate 22 W10129563 Screw, Handle 10 W10187556 No. REFRIGERATOR DOOR PARTS For Models: GC3NHAXVQ00, GC3NHAXVB00, GC3NHAXVY00, GC3NHAXVA00, GC3NHAXVS00 (White) (Black) (Mono Satina) (Mono Stainless) (Stainless) Illus. Part No.
DESCRIPTION 1 Refrigerator Door (Includes #7) W10168248 White W10168249 Black W10168250 Mono Satina W10168251 Monochromatic Stainless W10172106 Stainless Steel 2 2203087K Trim, Shelf 3 2255421 Dairy Door 4 2223463K Door Bin 5 2223464K ... 2223239K Door Bin (2) 17 3400012 Screw 18 2224173 Door Bin, Shallow 20 2156006K Plug, Trim 21 2220214 Nameplate 22 W10129563 Screw, Handle 10 W10187556 No. REFRIGERATOR DOOR PARTS For Models: GC3NHAXVQ00, GC3NHAXVB00, GC3NHAXVY00, GC3NHAXVA00, GC3NHAXVS00 (White) (Black) (Mono Satina) (Mono Stainless) (Stainless) Illus. Part No.

