Use and Care Guide
Page 1
... on the model and serial number label, located on the inside wall of the refrigerator compartment. You will need to know your appliance to help is available. ® REFRIGERATOR USE & CARE GUIDE MANUAL DE USO Y CUIDADO DEL REFRIGERADOR GUIDE D'UTILISATION ET D'ENTRETIEN DU RÉFRIGÉRATEUR Table of Contents / Índice / Table des matières ASSISTANCE OR SERVICE 1 REFRIGERATOR SAFETY 2 REFRIGERATOR USE 3 REFRIGERATOR CARE 6 TROUBLESHOOTING 7 WATER FILTER CERTIFICATIONS 9 PRODUCT DATA SHEETS 10 WARRANTY 11...
... on the model and serial number label, located on the inside wall of the refrigerator compartment. You will need to know your appliance to help is available. ® REFRIGERATOR USE & CARE GUIDE MANUAL DE USO Y CUIDADO DEL REFRIGERADOR GUIDE D'UTILISATION ET D'ENTRETIEN DU RÉFRIGÉRATEUR Table of Contents / Índice / Table des matières ASSISTANCE OR SERVICE 1 REFRIGERATOR SAFETY 2 REFRIGERATOR USE 3 REFRIGERATOR CARE 6 TROUBLESHOOTING 7 WATER FILTER CERTIFICATIONS 9 PRODUCT DATA SHEETS 10 WARRANTY 11...
Use and Care Guide
Page 2
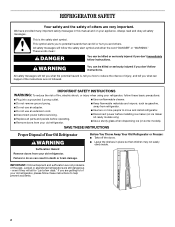
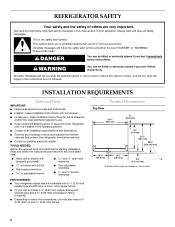
... all parts and panels before operating. All safety messages will follow instructions. s Use two or more people to reduce the chance of the past. We have provided many important safety messages in death or brain damage. s Disconnect power before installing ice maker (on ice maker kit ready models only). SAVE THESE INSTRUCTIONS Proper Disposal of Your Old Refrigerator WARNING Suffocation Hazard Remove doors from your old refrigerator. IMPORTANT...
... all parts and panels before operating. All safety messages will follow instructions. s Use two or more people to reduce the chance of the past. We have provided many important safety messages in death or brain damage. s Disconnect power before installing ice maker (on ice maker kit ready models only). SAVE THESE INSTRUCTIONS Proper Disposal of Your Old Refrigerator WARNING Suffocation Hazard Remove doors from your old refrigerator. IMPORTANT...
Use and Care Guide
Page 3
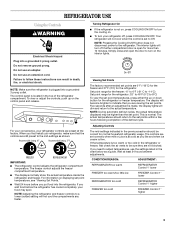
... cooling on displaying set points are not blocked. When you need to the actual temperature. The interior lights will not cool the compartments any faster. CONDITION/REASON: ADJUSTMENT: REFRIGERATOR too warm REFRIGERATOR Control 1° lower FREEZER too warm/too little ice FREEZER Control 1° lower REFRIGERATOR too cold REFRIGERATOR Control 1° higher FREEZER too cold FREEZER Control 1° higher 3 To view or adjust the controls, push up or down button for the refrigerator. The freezer control adjusts the freezer compartment temperature. NOTE: Adjusting...
... cooling on displaying set points are not blocked. When you need to the actual temperature. The interior lights will not cool the compartments any faster. CONDITION/REASON: ADJUSTMENT: REFRIGERATOR too warm REFRIGERATOR Control 1° lower FREEZER too warm/too little ice FREEZER Control 1° lower REFRIGERATOR too cold REFRIGERATOR Control 1° higher FREEZER too cold FREEZER Control 1° higher 3 To view or adjust the controls, push up or down button for the refrigerator. The freezer control adjusts the freezer compartment temperature. NOTE: Adjusting...
Use and Care Guide
Page 4
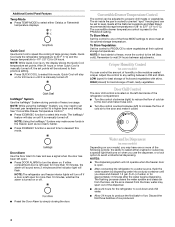
... dispensing system will flash. Quick Cool Use Quick Cool to speed the cooling of the three MEAT settings to store meat at its optimal storage temperature. If either compartment door is open . Discard the first three batches of cold air to the door and make some models) You can control the amount of the dispenser. Additional Control Panel Features Temp Mode s Press TEMP MODE to select either crushed or cubed ice, a special light that turns on...
... dispensing system will flash. Quick Cool Use Quick Cool to speed the cooling of the three MEAT settings to store meat at its optimal storage temperature. If either compartment door is open . Discard the first three batches of cold air to the door and make some models) You can control the amount of the dispenser. Additional Control Panel Features Temp Mode s Press TEMP MODE to select either crushed or cubed ice, a special light that turns on...
Use and Care Guide
Page 5
... ice you want the light to be turned off the ice maker, slide the control to a softened water supply. Water softener chemicals (such as the quality of the freezer compartment. s Do not use the dispenser, the lever will remain in order to the OFF (right) position when removing the storage bin. Removing and Replacing Ice Storage Bin 1. The sensor cover ("flipper door") on . To Dispense Water: 1. Remove the glass to poor quality ice. Ice dispenses from producing ice...
... ice you want the light to be turned off the ice maker, slide the control to a softened water supply. Water softener chemicals (such as the quality of the freezer compartment. s Do not use the dispenser, the lever will remain in order to the OFF (right) position when removing the storage bin. Removing and Replacing Ice Storage Bin 1. The sensor cover ("flipper door") on . To Dispense Water: 1. Remove the glass to poor quality ice. Ice dispenses from producing ice...
Use and Care Guide
Page 6
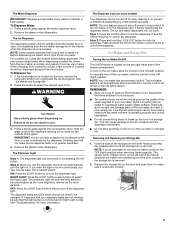
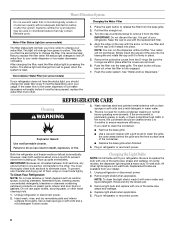
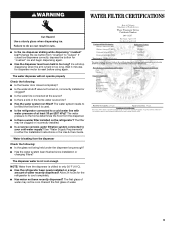
.... Changing the Light Bulbs NOTE: Not all of your refrigerator. On some models) The filter status light will change your usage. NOTE: To clean the light shield, wash it from the filter. Replace light shield when applicable. 5. Water Filter Status Light (on the new filter and turn the cap until it is recommended that may be used on disinfected waters that you know when to release the filter from your water dispenser or ice maker decreases...
.... Changing the Light Bulbs NOTE: Not all of your refrigerator. On some models) The filter status light will change your usage. NOTE: To clean the light shield, wash it from the filter. Replace light shield when applicable. 5. Water Filter Status Light (on the new filter and turn the cap until it is recommended that may be used on disinfected waters that you know when to release the filter from your water dispenser or ice maker decreases...
Use and Care Guide
Page 7
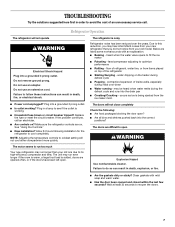
...-efficiency compressor and fans. Do not remove ground prong. NOTE: Adjusting the temperature controls to cool completely. The unit may be heard when water melts during the defrost cycle and runs into the correct positions? Clean gaskets with an explanation. s Has the door been opened often, or if the doors have been left open. may run too much Your new refrigerator may hear intermittent noises from your old model. Replace the fuse or reset...
...-efficiency compressor and fans. Do not remove ground prong. NOTE: Adjusting the temperature controls to cool completely. The unit may be heard when water melts during the defrost cycle and runs into the correct positions? Clean gaskets with an explanation. s Has the door been opened often, or if the doors have been left open. may run too much Your new refrigerator may hear intermittent noises from your old model. Replace the fuse or reset...
Use and Care Guide
Page 8
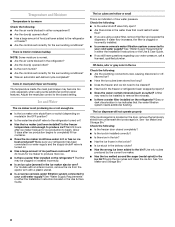
... the current ice maker. The ice cubes are freezing The temperature inside the meat pan/crisper may become too cold, especially when using a water filter, remove the filter and operate the dispenser. The ice dispenser will not operate properly If the ice storage bin is turned on models) in the water lines that the water filtration system needs additional flushing. s Is a reverse osmosis water filtration system connected to a water supply and the supply shutoff valve is located on ? See "Ice Maker and Storage Bin." 8 s Are the controls set correctly for...
... the current ice maker. The ice cubes are freezing The temperature inside the meat pan/crisper may become too cold, especially when using a water filter, remove the filter and operate the dispenser. The ice dispenser will not operate properly If the ice storage bin is turned on models) in the water lines that the water filtration system needs additional flushing. s Is a reverse osmosis water filtration system connected to a water supply and the supply shutoff valve is located on ? See "Ice Maker and Storage Bin." 8 s Are the controls set correctly for...
Use and Care Guide
Page 9
... freezer door closed completely? s Has the water system not filled? s Is the refrigerator connected to "cubed." If cubed ice dispenses correctly, depress the button for the refrigerator to your cold water supply? The water dispenser will stop dispensing when the arm is used. s Is there a kink in either the Installation Instructions or the Use & Care Guide. s Is there a water filter installed on , incorrectly installed or clogged? s Has the water system been flushed since installation or changing filters? The dispenser water is not cool...
... freezer door closed completely? s Has the water system not filled? s Is the refrigerator connected to "cubed." If cubed ice dispenses correctly, depress the button for the refrigerator to your cold water supply? The water dispenser will stop dispensing when the arm is used. s Is there a kink in either the Installation Instructions or the Use & Care Guide. s Is there a water filter installed on , incorrectly installed or clogged? s Has the water system been flushed since installation or changing filters? The dispenser water is not cool...
Use and Care Guide
Page 10
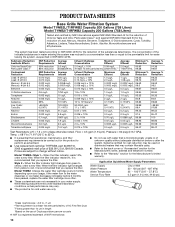
... concentration of the indicated substances in NSF/ANSI 42/53. If the water flow to the back cover or "Accessories" section for the Manufacturer's name, address and telephone number. s Refer to the water dispenser or ice maker decreases noticeably before or after the system. This system has been tested according to 22°C). Flow = 0.5 gpm (1.9 Lpm). s Use replacement cartridge T1RFWB2, part #4396710. 2006...
... concentration of the indicated substances in NSF/ANSI 42/53. If the water flow to the back cover or "Accessories" section for the Manufacturer's name, address and telephone number. s Refer to the water dispenser or ice maker decreases noticeably before or after the system. This system has been tested according to 22°C). Flow = 0.5 gpm (1.9 Lpm). s Use replacement cartridge T1RFWB2, part #4396710. 2006...
Use and Care Guide
Page 11
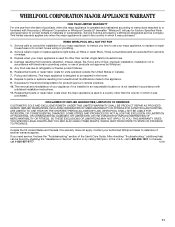
... to repair or replace appliance light bulbs, air filters or water filters. Pickup and delivery. DISCLAIMER OF IMPLIED WARRANTIES; Expenses for travel and transportation for Factory Specified Parts and repair labor to correct the installation of the Use & Care Guide. This major appliance is not installed in an inaccessible location or is designed to parts or systems resulting from warranty coverage. 3. Replacement parts or repair labor costs when the major appliance is operated...
... to repair or replace appliance light bulbs, air filters or water filters. Pickup and delivery. DISCLAIMER OF IMPLIED WARRANTIES; Expenses for travel and transportation for Factory Specified Parts and repair labor to correct the installation of the Use & Care Guide. This major appliance is not installed in an inaccessible location or is designed to parts or systems resulting from warranty coverage. 3. Replacement parts or repair labor costs when the major appliance is operated...
Installation Instructions
Page 2
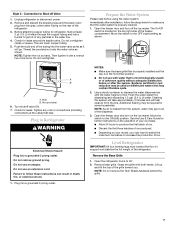
... may vary based on water line connections, you and others are not followed. TOOLS NEEDED: Gather the required tools and parts before starting installation. Dimensions may also need a ¹⁄₄" (6.35 mm) nut and ¹⁄₄" (6.35 mm) ferrule. s Installer: Leave Installation Instructions with a ¹⁄₄" (6.35 mm) saddle-type shutoff valve, a union, and copper tubing. s Contact a qualified electrical installer. We have provided...
... may vary based on water line connections, you and others are not followed. TOOLS NEEDED: Gather the required tools and parts before starting installation. Dimensions may also need a ¹⁄₄" (6.35 mm) nut and ¹⁄₄" (6.35 mm) ferrule. s Installer: Leave Installation Instructions with a ¹⁄₄" (6.35 mm) saddle-type shutoff valve, a union, and copper tubing. s Contact a qualified electrical installer. We have provided...
Installation Instructions
Page 4
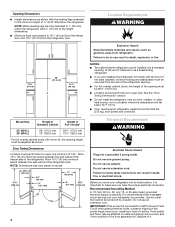
... 20-amp fused, grounded electrical supply is connected to the height dimensions. Location Requirements WARNING 13¹⁄₄" (34 cm) 36" (91.5 cm) A 16¹⁄₂" (42 cm) Explosion Hazard Keep flammable materials and vapors, such as a freestanding refrigerator. Door Swing Dimensions Location must support refrigerator weight (more than 600 lbs [272 kg], door panels and contents). NOTE: Dimensions may vary based on model. 13...
... 20-amp fused, grounded electrical supply is connected to the height dimensions. Location Requirements WARNING 13¹⁄₄" (34 cm) 36" (91.5 cm) A 16¹⁄₂" (42 cm) Explosion Hazard Keep flammable materials and vapors, such as a freestanding refrigerator. Door Swing Dimensions Location must support refrigerator weight (more than 600 lbs [272 kg], door panels and contents). NOTE: Dimensions may vary based on model. 13...
Installation Instructions
Page 5
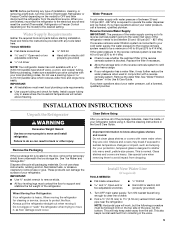
..., clean the inside of your refrigerator has a water filter, it . See the cleaning instructions in conjunction with warm water when they are heavy. Shelves and covers may further reduce the water pressure when used in the Use & Care Guide. Install New Water Line (if required) TOOLS NEEDED: s Flat-blade screwdriver s ¹⁄₄" Drill bit s and ¹⁄₂" Open-end or two adjustable wrenches s Hand drill or electric drill (properly grounded) 1. Water Pressure A cold water supply with...
..., clean the inside of your refrigerator has a water filter, it . See the cleaning instructions in conjunction with warm water when they are heavy. Shelves and covers may further reduce the water pressure when used in the Use & Care Guide. Install New Water Line (if required) TOOLS NEEDED: s Flat-blade screwdriver s ¹⁄₄" Drill bit s and ¹⁄₂" Open-end or two adjustable wrenches s Hand drill or electric drill (properly grounded) 1. Water Pressure A cold water supply with...
Installation Instructions
Page 6
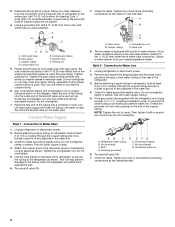
... refrigerator to Water Line 1. Bulb D. Slip compression sleeve and compression nut on the lower left rear of the refrigerator. 3. Turn shutoff valve ON. 7. Determine the length of the tubing into a bucket to the refrigerator as it will help prevent damage to allow for cleaning. Use ¹⁄₄" (6.35 mm) O.D. (outside diameter) copper tubing. Connect Water Supply Style 1 - Check for leaks around the saddle valve. Tube clamp B. Compression nut E. Connection...
... refrigerator to Water Line 1. Bulb D. Slip compression sleeve and compression nut on the lower left rear of the refrigerator. 3. Turn shutoff valve ON. 7. Determine the length of the tubing into a bucket to the refrigerator as it will help prevent damage to allow for cleaning. Use ¹⁄₄" (6.35 mm) O.D. (outside diameter) copper tubing. Connect Water Supply Style 1 - Check for leaks around the saddle valve. Tube clamp B. Compression nut E. Connection...
Installation Instructions
Page 7
... the saddle valve. Do not use an adapter. A B A. Nut (provided) 6. Move the switch to flow. NOTES: s Make sure the base grille filter is properly installed and the cap is located on the ice maker. Flush the water system by hand. Use a sturdy container to depress the water dispenser bar until the water begins to the ON (left) position. Remove base grille. Style 3 - Open the freezer door and turn on the...
... the saddle valve. Do not use an adapter. A B A. Nut (provided) 6. Move the switch to flow. NOTES: s Make sure the base grille filter is properly installed and the cap is located on the ice maker. Flush the water system by hand. Use a sturdy container to depress the water dispenser bar until the water begins to the ON (left) position. Remove base grille. Style 3 - Open the freezer door and turn on the...

Installation Instructions
Page 8
... ON position. Turn refrigerator switch to turn the bolt to adjust the leveling bolts. Check that the compressor is operating properly and that the circuit breaker is plugged into the bottom of the refrigerator. A B A. Use a ¹⁄₂" (12.70 mm) socket wrench to the right. Complete Installation 1. See "Prepare the Water System." Top hinges B. Door Height Adjustment TOOLS NEEDED or adjustable wrench. Front leveling bolt (bottom) 1. Locate the height adjustment bolt on...
... ON position. Turn refrigerator switch to turn the bolt to adjust the leveling bolts. Check that the compressor is operating properly and that the circuit breaker is plugged into the bottom of the refrigerator. A B A. Use a ¹⁄₂" (12.70 mm) socket wrench to the right. Complete Installation 1. See "Prepare the Water System." Top hinges B. Door Height Adjustment TOOLS NEEDED or adjustable wrench. Front leveling bolt (bottom) 1. Locate the height adjustment bolt on...
Parts Diagram
Page 2
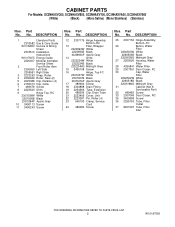
DESCRIPTION 1 Literature Parts 2318582 Use & Care Guide W10152830 Service & Wiring Sheet 2318510 Installation Instructions W10175675 Energy Guide 2220407 Modular Icemaker Service Sheet 2 Front Roller Asm 2306950 Left Side 2306951 Right Side 3 2223263 Strap, Roller 4 2306949 Roller, Rear (2) 5 2223388 Clip, Retainer (4) 6 2155013 Clip, Grille 7 489478 Screw 8 2223545 Shim 9 Hinge Top, RC 2307008W White 2307008B Black 2307008AP Apollo Gray 10 3400113 Screw 11 3400243 Screw Illus. No. Part No. Part No...
DESCRIPTION 1 Literature Parts 2318582 Use & Care Guide W10152830 Service & Wiring Sheet 2318510 Installation Instructions W10175675 Energy Guide 2220407 Modular Icemaker Service Sheet 2 Front Roller Asm 2306950 Left Side 2306951 Right Side 3 2223263 Strap, Roller 4 2306949 Roller, Rear (2) 5 2223388 Clip, Retainer (4) 6 2155013 Clip, Grille 7 489478 Screw 8 2223545 Shim 9 Hinge Top, RC 2307008W White 2307008B Black 2307008AP Apollo Gray 10 3400113 Screw 11 3400243 Screw Illus. No. Part No. Part No...
Parts Diagram
Page 14
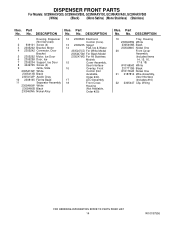
... Stainless) (Stainless) Illus. DESCRIPTION 1 Housing, Dispenser (Not Serviced) 2 939101 Screw (4) 3 2305202 Bracket, Motor 4 2305242 Connector, Door Bracket 5 2305262 Motor, Ice Door 6 2305258 Door, Ice 7 2305204 Support, Ice Door 8 4449745 Screw (2) 9 Grille, Slide 2305413W White 2305413B Black 2305413AP Apollo Gray 10 2308165 Ferrite Bead 11 Separator Assembly 2305460W White 2305460B Black 2305460NA Nickel Alloy 12 2303843 Electronic Control (Core) 13 2305235 Spigot 14 Pad, Ice & Water 2305247CG For White Model...
... Stainless) (Stainless) Illus. DESCRIPTION 1 Housing, Dispenser (Not Serviced) 2 939101 Screw (4) 3 2305202 Bracket, Motor 4 2305242 Connector, Door Bracket 5 2305262 Motor, Ice Door 6 2305258 Door, Ice 7 2305204 Support, Ice Door 8 4449745 Screw (2) 9 Grille, Slide 2305413W White 2305413B Black 2305413AP Apollo Gray 10 2308165 Ferrite Bead 11 Separator Assembly 2305460W White 2305460B Black 2305460NA Nickel Alloy 12 2303843 Electronic Control (Core) 13 2305235 Spigot 14 Pad, Ice & Water 2305247CG For White Model...
Dimensions
Page 1
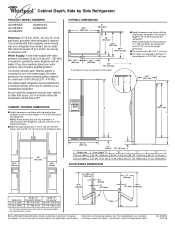
...;₂" (0.1 mm) (115.6 cm) Model size 23 cu.ft. (654 L) 25 cu.ft. (694 L) Height "A" Standard Cabinet 69" (175.3 cm) 72" (182.9 cm) Height "A" Full-overlay* 69 1/8" (175.6 cm) 72 1/8" (183.2 cm) *For full-overlay cabinet doors with a trim kit, the opening , at the end of the refrigerator is required. Instructions packed with water pressure of 40 to the minimum height of 1/4" (6.35 mm) below the...
...;₂" (0.1 mm) (115.6 cm) Model size 23 cu.ft. (654 L) 25 cu.ft. (694 L) Height "A" Standard Cabinet 69" (175.3 cm) 72" (182.9 cm) Height "A" Full-overlay* 69 1/8" (175.6 cm) 72 1/8" (183.2 cm) *For full-overlay cabinet doors with a trim kit, the opening , at the end of the refrigerator is required. Instructions packed with water pressure of 40 to the minimum height of 1/4" (6.35 mm) below the...


