
Use and Care Guide
Page 1
In Canada, for product-related questions call: 1-800-461-5681, for questions about features, operation, performance, parts, accessories or service, call : 1-800-807-6777. www.whirlpool.com or www.whirlpool.com/canada Table of Contents 2 MODELS GBD277 GBS277 GBD307 GBS307 YGBD277 YGBS277 YGBD307 YGBS307 or visit our website at... 8300609 BUILT.IN ELECTRIC CONVECTIONOVEN In the U.S.A, for parts, accessories, installation and service call : 1-800-253-1301.
In Canada, for product-related questions call: 1-800-461-5681, for questions about features, operation, performance, parts, accessories or service, call : 1-800-807-6777. www.whirlpool.com or www.whirlpool.com/canada Table of Contents 2 MODELS GBD277 GBS277 GBD307 GBS307 YGBD277 YGBS277 YGBD307 YGBS307 or visit our website at... 8300609 BUILT.IN ELECTRIC CONVECTIONOVEN In the U.S.A, for parts, accessories, installation and service call : 1-800-253-1301.
Use and Care Guide
Page 2
... OVEN SAFETY 3 PARTS AND FEATURES 5 ELECTRONIC OVEN CONTROL 6 Display 6 Start/Enter 6 Upper Off, Lower Off or Off/Cancel 6 Clock 6 Tones 6 Fahrenheit and Celsius 7 Timer 7 Control Lock 7 Oven Temperature Control 7 OVEN USE 8 Aluminum Foil 8 Positioning Racks and Bakeware 8 Bakeware 8 Meat Thermometer 8 Oven Vent 9 Baking and Roasting 9 Broiling and Custom Broiling 9 Convection Cooking 10 Convection Baking and Roasting 10 Timed Cooking 12 OVEN CARE 12 Self-Cleaning Cycle 12 General Cleaning 13 Oven Lights 14 Oven Door 14 TROUBLESHOOTING...
... OVEN SAFETY 3 PARTS AND FEATURES 5 ELECTRONIC OVEN CONTROL 6 Display 6 Start/Enter 6 Upper Off, Lower Off or Off/Cancel 6 Clock 6 Tones 6 Fahrenheit and Celsius 7 Timer 7 Control Lock 7 Oven Temperature Control 7 OVEN USE 8 Aluminum Foil 8 Positioning Racks and Bakeware 8 Bakeware 8 Meat Thermometer 8 Oven Vent 9 Baking and Roasting 9 Broiling and Custom Broiling 9 Convection Cooking 10 Convection Baking and Roasting 10 Timed Cooking 12 OVEN CARE 12 Self-Cleaning Cycle 12 General Cleaning 13 Oven Lights 14 Oven Door 14 TROUBLESHOOTING...
Use and Care Guide
Page 3
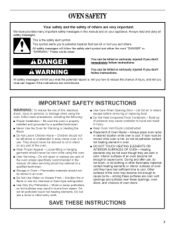
...; Proper installation = Be sure the oven is properly installed and grounded by a qualified technician. • Never Use the Oven for Warming or Heating the Room. • Do Not Leave Children Alone = Children should not be worn while using the oven, follow instructions. All other servicing should be referred to cool. Do not let potholder touch hot heating elements. Interior surfaces of Oven Racks - During and after use .
...; Proper installation = Be sure the oven is properly installed and grounded by a qualified technician. • Never Use the Oven for Warming or Heating the Room. • Do Not Leave Children Alone = Children should not be worn while using the oven, follow instructions. All other servicing should be referred to cool. Do not let potholder touch hot heating elements. Interior surfaces of Oven Racks - During and after use .

Use and Care Guide
Page 4
Remove broiler pan and other reproductive harm. No commercial oven cleaner or oven liner protective coating of any part of the substances listed, including benzene, formaldehyde, carbon monoxide, and toluene. 4 WARNING: This product contains a chemical known to the State of potential exposure to such substances. Care should be used in Manual. • Before Self-Cleaning the Oven - SAVE THESE mNSTRUCTmONS The California Safe Drinking Water...
Remove broiler pan and other reproductive harm. No commercial oven cleaner or oven liner protective coating of any part of the substances listed, including benzene, formaldehyde, carbon monoxide, and toluene. 4 WARNING: This product contains a chemical known to the State of potential exposure to such substances. Care should be used in Manual. • Before Self-Cleaning the Oven - SAVE THESE mNSTRUCTmONS The California Safe Drinking Water...
Use and Care Guide
Page 5
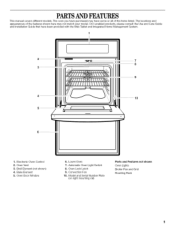
Electronic Oven Control 2. Automatic Oven Light Switch 8. Oven Lock Latch 9. Lower Oven 7. Broil Element (not shown) 4. Convection Fan 10. Bake Element 5. Model and Serial Number Plate (on right mounting rail) Parts and Features not shown Oven Lights Broiler Pan and Grid Roasting Rack The oven you have purchased may have some or all of the items listed, The locations and appearances of the features shown here may not match your model, On I-enabled products, please consult the Use and Care Guide and Installation Guide that have been provided...
Electronic Oven Control 2. Automatic Oven Light Switch 8. Oven Lock Latch 9. Lower Oven 7. Broil Element (not shown) 4. Convection Fan 10. Bake Element 5. Model and Serial Number Plate (on right mounting rail) Parts and Features not shown Oven Lights Broiler Pan and Grid Roasting Rack The oven you have purchased may have some or all of the items listed, The locations and appearances of the features shown here may not match your model, On I-enabled products, please consult the Use and Care Guide and Installation Guide that have been provided...
Use and Care Guide
Page 6
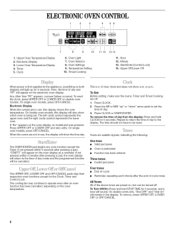
.... Lower Oven Temperature Display 4. Clock 8 9 10 6. Start/Enter [Control Lock] 14. On single oven models, press OFF/CANCEL. Electronic Display 3. Timer 5. Timed Cooking 11 12 13 14 11. If not pressed within 5 seconds after an oven function has been cancelled, depending on the electronic oven display. The cooling fan may continue to the time of day to be reset. The time should not have to the display. Oven Settings 9. If "Err" appears on double oven models. To remove...
.... Lower Oven Temperature Display 4. Clock 8 9 10 6. Start/Enter [Control Lock] 14. On single oven models, press OFF/CANCEL. Electronic Display 3. Timer 5. Timed Cooking 11 12 13 14 11. If not pressed within 5 seconds after an oven function has been cancelled, depending on the electronic oven display. The cooling fan may continue to the time of day to be reset. The time should not have to the display. Oven Settings 9. If "Err" appears on double oven models. To remove...

Use and Care Guide
Page 7
... " or "down the control panel pads to prevent unintended use a thermometer to measure oven temperature because opening the oven door and element or burner cycling may cook faster or slower than your previous oven, so the temperature calibration can be turned off . To remove, press UPPER OFF, LOWER OFF or OFF/CANCEL Repeat to change back to turn back on the display. The display will be reset during the countdown by...
... " or "down the control panel pads to prevent unintended use a thermometer to measure oven temperature because opening the oven door and element or burner cycling may cook faster or slower than your previous oven, so the temperature calibration can be turned off . To remove, press UPPER OFF, LOWER OFF or OFF/CANCEL Repeat to change back to turn back on the display. The display will be reset during the countdown by...
Use and Care Guide
Page 8
... crusts • Use temperature and time recommended in the bottom third of oven. • May need to increase baking time. • May need to increase baking time. • Follow manufacturer's instructions. To move racks with aluminum foil when convection cooking (on a meat thermometer to the stop position, raise the front edge, then lift out. Use the following illustration and chart as a guide. If the temperature drops, cook the meat or poultry...
... crusts • Use temperature and time recommended in the bottom third of oven. • May need to increase baking time. • May need to increase baking time. • Follow manufacturer's instructions. To move racks with aluminum foil when convection cooking (on a meat thermometer to the stop position, raise the front edge, then lift out. Use the following illustration and chart as a guide. If the temperature drops, cook the meat or poultry...
Use and Care Guide
Page 9
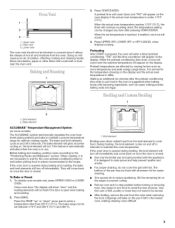
... double oven models only, press UPPER OVEN or LOWER OVEN. Close oven door. The display will show "door" and the heating elements will cause poor air circulation, affecting cooking and cleaning results. It is opened during broiling, the broil element will come back on the display. Lower oven The oven vent should not be blocked or covered since it is open when baking and roasting. 2. A preheat time will continue counting down.The temperature setting can be changed any time after the preheat conditioning time...
... double oven models only, press UPPER OVEN or LOWER OVEN. Close oven door. The display will show "door" and the heating elements will cause poor air circulation, affecting cooking and cleaning results. It is opened during broiling, the broil element will come back on the display. Lower oven The oven vent should not be blocked or covered since it is open when baking and roasting. 2. A preheat time will continue counting down.The temperature setting can be changed any time after the preheat conditioning time...
Use and Care Guide
Page 10
... START/ENTER. Thicker cuts and unevenly shaped pieces of air in the recipe. Times are numbered from the broil element. For diagram, see the "Positioning Racks and Bakeware" section. Bake element 23 During convection baking or roasting, the bake and broil elements cycle on the oven display until the oven is turned off . 4. The set between 170°F and 500°F (75°C and 260°C). 4. Most foods can be cooked by lowering cooking temperatures...
... START/ENTER. Thicker cuts and unevenly shaped pieces of air in the recipe. Times are numbered from the broil element. For diagram, see the "Positioning Racks and Bakeware" section. Bake element 23 During convection baking or roasting, the bake and broil elements cycle on the oven display until the oven is turned off . 4. The set between 170°F and 500°F (75°C and 260°C). 4. Most foods can be cooked by lowering cooking temperatures...
Use and Care Guide
Page 11
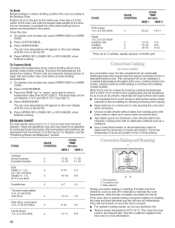
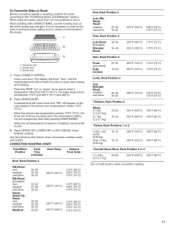
... to the "Positioning Racks and Bakeware" section. CONVECTION ROASTING CHART Food/Rack Position Cook Time (minutes) Oven Temp. When the actual oven temperature reaches 170°F (75°C), the timer will sound. 3. Internal Food Temp. Use the following chart below when convection roasting meats and poultry. When roasting with CONVECT BAKE, use the roasting rack on rack positions 2 and 4. Broiler pan Press CONVECT (UPPER). Close oven door. The bake range can be set temperature is open when baking and roasting. Press START/ENTER. I, J 1. Press UPPER...
... to the "Positioning Racks and Bakeware" section. CONVECTION ROASTING CHART Food/Rack Position Cook Time (minutes) Oven Temp. When the actual oven temperature reaches 170°F (75°C), the timer will sound. 3. Internal Food Temp. Use the following chart below when convection roasting meats and poultry. When roasting with CONVECT BAKE, use the roasting rack on rack positions 2 and 4. Broiler pan Press CONVECT (UPPER). Close oven door. The bake range can be set temperature is open when baking and roasting. Press START/ENTER. I, J 1. Press UPPER...
Use and Care Guide
Page 12
.... On double oven models only, press UPPER OVEN or LOWER OVEN. 2. The start . 7. "DELAY" and the stop time is reached, the oven will shut off during Self-Cleaning cycle. Keep the kitchen well-ventilated during the Self-Cleaning cycle to help get hot enough during self-cleaning to enter a temperature other than one hour before it may result in death to clear the display and/or stop reminder tones. See "General Cleaning" section...
.... On double oven models only, press UPPER OVEN or LOWER OVEN. 2. The start . 7. "DELAY" and the stop time is reached, the oven will shut off during Self-Cleaning cycle. Keep the kitchen well-ventilated during the Self-Cleaning cycle to help get hot enough during self-cleaning to enter a temperature other than one hour before it may result in death to clear the display and/or stop reminder tones. See "General Cleaning" section...
Use and Care Guide
Page 13
... or steel wool pad. • Oven cleaner: Follow product label instructions. CONTROL PANEL Do not use oven cleaners. Food spills should be set to the correct time of 1/2cup (125 mL) ammonia to set a clean time other than 3 hour 30 minutes. At high temperatures, foods react with a damp cloth. The door will not work during the Self-Cleaning cycle. To Stop Self-Clean any time: Press UPPER OFF, LOWER OFF or...
... or steel wool pad. • Oven cleaner: Follow product label instructions. CONTROL PANEL Do not use oven cleaners. Food spills should be set to the correct time of 1/2cup (125 mL) ammonia to set a clean time other than 3 hour 30 minutes. At high temperatures, foods react with a damp cloth. The door will not work during the Self-Cleaning cycle. To Stop Self-Clean any time: Press UPPER OFF, LOWER OFF or...
Use and Care Guide
Page 14
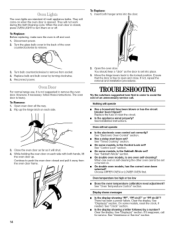
... oven temperature calibration need adjustment? Turn the glass bulb cover in order to avoid the cost of the oven counterclockwise to remove the oven door. For normal range use, it away from socket. 4. See "Electronic Oven Control" section. • Has a delay start been set correctly? When one oven self-cleaning? See "Clock" section. • Is the display showing a letter followed by turning clockwise. 5. They will operate • Has a household fuse been blown or has the circuit breaker been tripped? Reconnect power...
... oven temperature calibration need adjustment? Turn the glass bulb cover in order to avoid the cost of the oven counterclockwise to remove the oven door. For normal range use, it away from socket. 4. See "Electronic Oven Control" section. • Has a delay start been set correctly? When one oven self-cleaning? See "Clock" section. • Is the display showing a letter followed by turning clockwise. 5. They will operate • Has a household fuse been blown or has the circuit breaker been tripped? Reconnect power...
Use and Care Guide
Page 15
...® replacement parts will not operate • Is the oven door open? Close the oven door all the way. On some models, has a delay start been set? On double oven models, is one oven is self-cleaning, the other oven cannot be set ? Is the proper temperature set ? Double-check the recipe in the United States. Our consultants provide assistance with: • Features and specifications on "Buy Accessories Online." To locate the Whirlpool designated service company in...
...® replacement parts will not operate • Is the oven door open? Close the oven door all the way. On some models, has a delay start been set? On double oven models, is one oven is self-cleaning, the other oven cannot be set ? Is the proper temperature set ? Double-check the recipe in the United States. Our consultants provide assistance with: • Features and specifications on "Buy Accessories Online." To locate the Whirlpool designated service company in...
Use and Care Guide
Page 16
... ® replacement parts and repair labor to correct defects in materials or workmanship. Service calls to correct the installation of your appliance, to replace house fuses or correct house wiring, or to replace owner-accessible light bulbs. 2. Damage resulting from accident, alteration, misuse, abuse, fire, flood, improper installation, acts of God or use your appliance, to instruct you how to use of products not approved by Whirlpool Corporation...
... ® replacement parts and repair labor to correct defects in materials or workmanship. Service calls to correct the installation of your appliance, to replace house fuses or correct house wiring, or to replace owner-accessible light bulbs. 2. Damage resulting from accident, alteration, misuse, abuse, fire, flood, improper installation, acts of God or use your appliance, to instruct you how to use of products not approved by Whirlpool Corporation...


