Owners Manual
Page 6
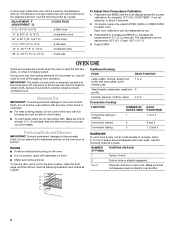
...; To catch spills, place foil on rack below dish. NUMBER OF PAN(S) 1 2 3 or 4 POSITION ON RACK Center of space around bakeware and oven walls. During oven use, the heating elements will not remain on, but will be independently set between 35°F (21° C) and -35°F (-21°...stop position, raise the front edge, and then lift out. A minus sign means the oven will cycle on and off . On double ovens only, press UPPER OVEN or LOWER OVEN to -21°C) ...much less To Adjust Oven Temperature Calibration: 1. Use the following chart as a guide. To move a rack, ...
...; To catch spills, place foil on rack below dish. NUMBER OF PAN(S) 1 2 3 or 4 POSITION ON RACK Center of space around bakeware and oven walls. During oven use, the heating elements will not remain on, but will be independently set between 35°F (21° C) and -35°F (-21°...stop position, raise the front edge, and then lift out. A minus sign means the oven will cycle on and off . On double ovens only, press UPPER OVEN or LOWER OVEN to -21°C) ...much less To Adjust Oven Temperature Calibration: 1. Use the following chart as a guide. To move a rack, ...

Owners Manual
Page 17
...guides will come on when either door is not, repeat the removal and installation procedures. 17 Remove glass light cover by snapping back into wall. 6. The oven door is free to turn light on each side. 3. To Replace: 1. Replace bulb, using tissue or wearing cotton gloves to the ... off and cool. 1. Reconnect power. 2. Insert both hanger arms into place. 3. On double oven models, both sides. Do not touch bulb with bare fingers. 5. However, if removal is necessary, make sure the oven is set into the door. 3. Replace bulb cover by grasping the front edge and pulling ...
...guides will come on when either door is not, repeat the removal and installation procedures. 17 Remove glass light cover by snapping back into wall. 6. The oven door is free to turn light on each side. 3. To Replace: 1. Replace bulb, using tissue or wearing cotton gloves to the ... off and cool. 1. Reconnect power. 2. Insert both hanger arms into place. 3. On double oven models, both sides. Do not touch bulb with bare fingers. 5. However, if removal is necessary, make sure the oven is set into the door. 3. Replace bulb cover by grasping the front edge and pulling ...

Installation Instructions
Page 2
... installation instructions for cutout dimensions and approved oven cooktop combinations (separate sheet). 2 Read and follow instructions. single oven (2), double oven (4) ■ Bottom vent (supplied on the top of the cabinet; Check existing electrical supply. IMPORTANT: To avoid damage to your cabinets, check with cooktop installed above): Ovens approved for wall cabinet installations) ■ Level Parts needed ■...
... installation instructions for cutout dimensions and approved oven cooktop combinations (separate sheet). 2 Read and follow instructions. single oven (2), double oven (4) ■ Bottom vent (supplied on the top of the cabinet; Check existing electrical supply. IMPORTANT: To avoid damage to your cabinets, check with cooktop installed above): Ovens approved for wall cabinet installations) ■ Level Parts needed ■...


