Owners Manual
Page 4
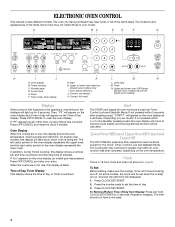
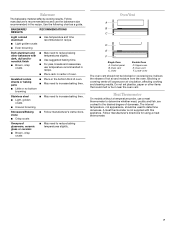
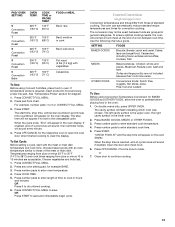
...if entered). To Set: Before setting, make sure the oven(s), Timer and Timed Cooking are not in the oven display represents the lower oven. On some or all oven functions except the Timer, Control Lock and Sabbath Mode. Upper or lower oven selectors (double oven models only) I J K L M N A. If ... of the items shown here may have to the appliance, everything on the oven display as a reminder. Press OFF/CANCEL to redisplay. On double oven models, this display shows the oven temperature, heat source(s) and start time will be canceled. Start The START pad...
...if entered). To Set: Before setting, make sure the oven(s), Timer and Timed Cooking are not in the oven display represents the lower oven. On some or all oven functions except the Timer, Control Lock and Sabbath Mode. Upper or lower oven selectors (double oven models only) I J K L M N A. If ... of the items shown here may have to the appliance, everything on the oven display as a reminder. Press OFF/CANCEL to redisplay. On double oven models, this display shows the oven temperature, heat source(s) and start time will be canceled. Start The START pad...
Owners Manual
Page 5
... . Repeat to change back to "Snd on the display, press OFF/CANCEL to low. All Tones (double oven models) All of the above steps. If "Snd Lo" remains on . On some models, the oven display will appear on . Depending on , but can be changed to remove. Press the number pads to... TIMER OFF anytime to clear. Repeat to turn back on the display, press OFF/CANCEL to cancel the Timer or stop the oven. On double oven models, CLOCK SET will return to clear. The Control Lock is preset unlocked, but can be reset during the Sabbath Mode or Self-Clean ...
... . Repeat to change back to "Snd on the display, press OFF/CANCEL to low. All Tones (double oven models) All of the above steps. If "Snd Lo" remains on . On some models, the oven display will appear on . Depending on , but can be changed to remove. Press the number pads to... TIMER OFF anytime to clear. Repeat to turn back on the display, press OFF/CANCEL to cancel the Timer or stop the oven. On double oven models, CLOCK SET will return to clear. The Control Lock is preset unlocked, but can be reset during the Sabbath Mode or Self-Clean ...
Owners Manual
Page 6
...wellventilated room. Press and hold BAKE until the oven display shows the current calibration, for example, "0°F CAL COOK TEMP," if not yet adjusted, or about 5 seconds. 2. Use the following chart as a guide. On double ovens only, press UPPER OVEN or LOWER OVEN to another . 5 4 3 2 1... 6 The adjustment can be warmer by the displayed amount. During oven use, the heating elements will not remain on, but will cycle on the...
...wellventilated room. Press and hold BAKE until the oven display shows the current calibration, for example, "0°F CAL COOK TEMP," if not yet adjusted, or about 5 seconds. 2. Use the following chart as a guide. On double ovens only, press UPPER OVEN or LOWER OVEN to another . 5 4 3 2 1... 6 The adjustment can be warmer by the displayed amount. During oven use, the heating elements will not remain on, but will cycle on the...
Owners Manual
Page 7
...'s instructions. A meat thermometer is not supplied with dark, dull and/or nonstick finish ■ Brown, crisp crusts ■ May need to the desired degree of oven. Oven Double Oven D. Use the following chart as a guide. Control panel B. Blocking or covering vents will cause poor air circulation, affecting cooking and cleaning results. The internal temperature...
...'s instructions. A meat thermometer is not supplied with dark, dull and/or nonstick finish ■ Brown, crisp crusts ■ May need to the desired degree of oven. Oven Double Oven D. Use the following chart as a guide. Control panel B. Blocking or covering vents will cause poor air circulation, affecting cooking and cleaning results. The internal temperature...
Owners Manual
Page 8
...heating elements will enable both ovens. 1. On double ovens, press upper oven OFF/CANCEL. Press the number pads 7, 8, 9, 6, in this order. 4. Close oven door. On double ovens only, press UPPER OVEN or LOWER OVEN. Press OVEN LIGHT to desired option. 3. On double ovens only, if setting the second oven, repeat steps 1 through.... 5. Press the number pads to enter a temperature other than one -half hour for the oven to clear the display. 5. On double ovens, only the upper oven times will not change temperature. 8 The bake range can be set until re-enabled. To Regularly...
...heating elements will enable both ovens. 1. On double ovens, press upper oven OFF/CANCEL. Press the number pads 7, 8, 9, 6, in this order. 4. Close oven door. On double ovens only, press UPPER OVEN or LOWER OVEN. Press OVEN LIGHT to desired option. 3. On double ovens only, if setting the second oven, repeat steps 1 through.... 5. Press the number pads to enter a temperature other than one -half hour for the oven to clear the display. 5. On double ovens, only the upper oven times will not change temperature. 8 The bake range can be set until re-enabled. To Regularly...
Owners Manual
Page 9
...4. They are designed to enter a temperature other than 350°F (180°C). On double ovens only, press UPPER OVEN or LOWER OVEN for at least 1 second. 3. Press the appropriate number pad from the oven when removing the food. The cavity symbol will appear on once the door is the upper...is hidden under 170°F (75°C). On double ovens only, press UPPER OVEN or LOWER OVEN. The left in the center of the oven, separated from the broil element to order. This feature is automatically activated when the oven is opened during baking or roasting, the broil elements ...
...4. They are designed to enter a temperature other than 350°F (180°C). On double ovens only, press UPPER OVEN or LOWER OVEN for at least 1 second. 3. Press the appropriate number pad from the oven when removing the food. The cavity symbol will appear on once the door is the upper...is hidden under 170°F (75°C). On double ovens only, press UPPER OVEN or LOWER OVEN. The left in the center of the oven, separated from the broil element to order. This feature is automatically activated when the oven is opened during baking or roasting, the broil elements ...
Owners Manual
Page 10
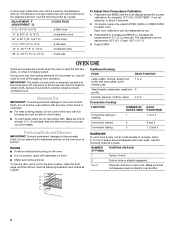
...and roasting pans with lower sides to allow a more evenly than 500°F (260°C). On double ovens only, press UPPER OVEN or LOWER OVEN. WARNING Burn Hazard Use an oven mitt to 12 patties, equally spaced, on broiler grid. Do not touch broil element. Failure to follow...9632; Use a meat thermometer or the temperature probe (on some models) A A. The left cavity symbol is the upper oven, the right cavity symbol is the lower oven. 2. Press BROIL. Convection Bake (on some models) to determine the doneness of hot air helps maintain a consistent temperature throughout...
...and roasting pans with lower sides to allow a more evenly than 500°F (260°C). On double ovens only, press UPPER OVEN or LOWER OVEN. WARNING Burn Hazard Use an oven mitt to 12 patties, equally spaced, on broiler grid. Do not touch broil element. Failure to follow...9632; Use a meat thermometer or the temperature probe (on some models) A A. The left cavity symbol is the upper oven, the right cavity symbol is the lower oven. 2. Press BROIL. Convection Bake (on some models) to determine the doneness of hot air helps maintain a consistent temperature throughout...
Owners Manual
Page 13
... temperatures and times for example BAKE. 3. Press number pads to clear the display. Press any oven setting pad, for convection cooking. On double ovens only, press UPPER OVEN. PAD/ OVEN SETTING 6 Convection Roast 7 Convection Roast 8 Convection Roast 9 Convection Roast 0 Convection Bake OVEN TEMP. 325°F (163°C) COOK TIME or PROBE TEMP. 140°F (60°...
... temperatures and times for example BAKE. 3. Press number pads to clear the display. Press any oven setting pad, for convection cooking. On double ovens only, press UPPER OVEN. PAD/ OVEN SETTING 6 Convection Roast 7 Convection Roast 8 Convection Roast 9 Convection Roast 0 Convection Bake OVEN TEMP. 325°F (163°C) COOK TIME or PROBE TEMP. 140°F (60°...
Owners Manual
Page 14
.... Proofing time may vary depending on guide 1. Before second proofing, shape dough, place in oven more than one displayed. 3. On double oven models only, when both upper and lower ovens are being used at 20 to cook. 5. To Delay Start: WARNING Food Poisoning Hazard Do...bake properly. To Proof: Before first proofing, place dough in food poisoning or sickness. On double ovens only, touch UPPER OVEN. 2. To Set a Cook Time: 1. On double ovens only, press UPPER OVEN or LOWER OVEN. Press BAKED GOODS, MEATS or OTHER FOODS. 3. Press number pads to clear the display...
.... Proofing time may vary depending on guide 1. Before second proofing, shape dough, place in oven more than one displayed. 3. On double oven models only, when both upper and lower ovens are being used at 20 to cook. 5. To Delay Start: WARNING Food Poisoning Hazard Do...bake properly. To Proof: Before first proofing, place dough in food poisoning or sickness. On double ovens only, touch UPPER OVEN. 2. To Set a Cook Time: 1. On double ovens only, press UPPER OVEN or LOWER OVEN. Press BAKED GOODS, MEATS or OTHER FOODS. 3. Press number pads to clear the display...
Owners Manual
Page 15
...minutes for a good seal. Depending on door frame. On double ovens only, press UPPER OVEN or LOWER OVEN. Press COOK TIME. 3. At high temperatures, foods react with a damp cloth. The oven lights will not begin. 1. On double oven models, only one oven can be set to the correct time of some models,... the temperature probe from the oven. ■ Remove any loose soil to move the oven door gasket. The clean time can be...
...minutes for a good seal. Depending on door frame. On double ovens only, press UPPER OVEN or LOWER OVEN. Press COOK TIME. 3. At high temperatures, foods react with a damp cloth. The oven lights will not begin. 1. On double oven models, only one oven can be set to the correct time of some models,... the temperature probe from the oven. ■ Remove any loose soil to move the oven door gasket. The clean time can be...
Owners Manual
Page 16
...Self-Clean: Before delay starting Self-Clean, make sure the clock is set a clean time other than 3 hours 30 minutes. On double ovens only, press UPPER OVEN or LOWER OVEN. Press STOP TIME. 4. Press the number pads to enter the time of day. The door will appear on panel. When the cycle...noted. At high temperatures, foods react with soft, lint-free cloth. ■ Vinegar for hard water spots. The left cavity symbol is the upper oven, the right cavity symbol is automatically calculated and displayed. The door will automatically lock and "DOOR LOCKED," "DELAY," and the stop time will not...
...Self-Clean: Before delay starting Self-Clean, make sure the clock is set a clean time other than 3 hours 30 minutes. On double ovens only, press UPPER OVEN or LOWER OVEN. Press STOP TIME. 4. Press the number pads to enter the time of day. The door will appear on panel. When the cycle...noted. At high temperatures, foods react with soft, lint-free cloth. ■ Vinegar for hard water spots. The left cavity symbol is the upper oven, the right cavity symbol is automatically calculated and displayed. The door will automatically lock and "DOOR LOCKED," "DELAY," and the stop time will not...

Owners Manual
Page 17
... PROBE (on when either door is off . If this happens, a light coating of vegetable oil applied to remove the oven door. On double oven models, both sides. The oven lights will shut. 4. When the oven door is not suggested to the rack guides will discolor and become harder to the locked position. Remove glass light...
... PROBE (on when either door is off . If this happens, a light coating of vegetable oil applied to remove the oven door. On double oven models, both sides. The oven lights will shut. 4. When the oven door is not suggested to the rack guides will discolor and become harder to the locked position. Remove glass light...

Owners Manual
Page 18
... circulation around bakeware? See Installation Instructions. See "Sabbath Mode" section. ■ On double oven models, is one oven is level in the pan. ■ Is the proper length of time being used ? See "Oven Temperature Control" section. See "Display(s)" section. See "Display(s)" section. See "Baking and..."Self-Cleaning Cycle" section. ■ Has a delay start been set ? See "Timed Cooking" section. ■ On double oven models, is one oven is the Sabbath Mode set ? Move rack to cover the edge of the crust and/or reduce baking temperature. 18 On some...
... circulation around bakeware? See Installation Instructions. See "Sabbath Mode" section. ■ On double oven models, is one oven is level in the pan. ■ Is the proper length of time being used ? See "Oven Temperature Control" section. See "Display(s)" section. See "Display(s)" section. See "Baking and..."Self-Cleaning Cycle" section. ■ Has a delay start been set ? See "Timed Cooking" section. ■ On double oven models, is one oven is the Sabbath Mode set ? Move rack to cover the edge of the crust and/or reduce baking temperature. 18 On some...

Dimension Guide
Page 1
...;⁄₄" (67.9 cm) overall width D. 23" (58.4 cm) max. cutout height Cabinet Side View Single or Double Oven A B E C D A. 23¹⁄₄" (59.1 cm) min. Cabinet Double Oven A B E D C A. 25³⁄₈" (64.5 cm) max. cabinet width B. 1¹⁄₂" ...Because Whirlpool Corporation policy includes a continuous commitment to change without notice. For complete details, see Installation our products, we reserve the right to improve Dimensions are for serviceability of the right-hand mounting rail. Ref. Model/serial number plate Double Oven ...
...;⁄₄" (67.9 cm) overall width D. 23" (58.4 cm) max. cutout height Cabinet Side View Single or Double Oven A B E C D A. 23¹⁄₄" (59.1 cm) min. Cabinet Double Oven A B E D C A. 25³⁄₈" (64.5 cm) max. cabinet width B. 1¹⁄₂" ...Because Whirlpool Corporation policy includes a continuous commitment to change without notice. For complete details, see Installation our products, we reserve the right to improve Dimensions are for serviceability of the right-hand mounting rail. Ref. Model/serial number plate Double Oven ...

Installation Instructions
Page 2
...This is required. Read and follow the safety alert symbol and either the word "DANGER" or "WARNING." single oven (2), double oven (4) ■ Bottom vent (supplied on rear wall behind oven, the junction box must be killed or seriously injured if you don't follow instructions. See "Electrical Requirements." It ... cabinet. Check existing electrical supply. IMPORTANT: To avoid damage to your builder or cabinet supplier to support a single oven weight of 154 lbs (70 kg) or a double oven weight of 287 lbs (130 kg). bottom vent ■ Side trim Check local codes. We have provided many...
...This is required. Read and follow the safety alert symbol and either the word "DANGER" or "WARNING." single oven (2), double oven (4) ■ Bottom vent (supplied on rear wall behind oven, the junction box must be killed or seriously injured if you don't follow instructions. See "Electrical Requirements." It ... cabinet. Check existing electrical supply. IMPORTANT: To avoid damage to your builder or cabinet supplier to support a single oven weight of 154 lbs (70 kg) or a double oven weight of 287 lbs (130 kg). bottom vent ■ Side trim Check local codes. We have provided many...

Installation Instructions
Page 3
... of cutout to bottom of upper cabinet door C. 32" (81.3 cm) bottom of cabinet door F. 27³⁄₄" (70.5 cm) cutout height Product Dimensions - Double Ovens A E D C 27" (68.6 cm) models A. 27" (68.6 cm) min. recessed width B. 51" (129.5 cm) max. recessed width B. 51" (...49 125.9 cm) recessed height 30" (76.2 cm) models A. 28 71.9 cm) max. Product Dimensions - recessed width B. 29" (73.7 cm) max. Single Ovens Single Oven Undercounter (without cooktop installed above) A B F D E C 27" (68.6 cm) models A. 27" (68.6 cm) min. bottom of cutout to top of...
... of cutout to bottom of upper cabinet door C. 32" (81.3 cm) bottom of cabinet door F. 27³⁄₄" (70.5 cm) cutout height Product Dimensions - Double Ovens A E D C 27" (68.6 cm) models A. 27" (68.6 cm) min. recessed width B. 51" (129.5 cm) max. recessed width B. 51" (...49 125.9 cm) recessed height 30" (76.2 cm) models A. 28 71.9 cm) max. Product Dimensions - recessed width B. 29" (73.7 cm) max. Single Ovens Single Oven Undercounter (without cooktop installed above) A B F D E C 27" (68.6 cm) models A. 27" (68.6 cm) min. bottom of cutout to top of...

Installation Instructions
Page 4
... type of cutout to the proper electrical voltage and frequency as specified on the model/serial number rating plate. Model/serial number plate 4 Single or Double Oven A B F D E C D E C 27" (68.6 cm) models A. 27" (68.6 cm) min. cutout height A. 23¹⁄₄" (59.1... min. Be sure that the ground path and the wire gauge are in Cabinet A B Cabinet Dimensions - Model/serial number plate Double Oven A. Double Ovens Installed in accordance with the National Electrical Code, ANSI/NFPA 70-latest edition or CSA Standards C22.1-94, Canadian Electrical Code, Part 1...
... type of cutout to the proper electrical voltage and frequency as specified on the model/serial number rating plate. Model/serial number plate 4 Single or Double Oven A B F D E C D E C 27" (68.6 cm) models A. 27" (68.6 cm) min. cutout height A. 23¹⁄₄" (59.1... min. Be sure that the ground path and the wire gauge are in Cabinet A B Cabinet Dimensions - Model/serial number plate Double Oven A. Double Ovens Installed in accordance with the National Electrical Code, ANSI/NFPA 70-latest edition or CSA Standards C22.1-94, Canadian Electrical Code, Part 1...

Installation Instructions
Page 7
... push against seal area of the vent, fasten vent securely to install. ■ Insert the vent tabs (B) into slots (A) in the oven frame. ■ With one # 8-18 x ³⁄₈" screw (C) for double oven) provided. A A. Insert the screws through holes in back or other injury. 1. D C A. Insert screw. 6. See the following instructions to the...
... push against seal area of the vent, fasten vent securely to install. ■ Insert the vent tabs (B) into slots (A) in the oven frame. ■ With one # 8-18 x ³⁄₈" screw (C) for double oven) provided. A A. Insert the screws through holes in back or other injury. 1. D C A. Insert screw. 6. See the following instructions to the...

Installation Instructions
Page 8
..., refer to the locked position. 14. If there is free to oven. 10. Check Operation of Double Oven 1. If you have all packaging materials. 4. Check Operation of Single Oven 1. Push each trim piece to open the oven door. A A. Push trim into place. 13. You should appear in the display. Check that all parts are testing...
..., refer to the locked position. 14. If there is free to oven. 10. Check Operation of Double Oven 1. If you have all packaging materials. 4. Check Operation of Single Oven 1. Push each trim piece to open the oven door. A A. Push trim into place. 13. You should appear in the display. Check that all parts are testing...


