Dimension Guide
Page 1
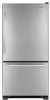
... (78.4 cm) 30 ⁄7 8 " (78.4 cm) Cab. NOTE: It is required. ® Bottom Mount Refrigerator PRODUCT MODEL NUMBER GB9SHDXV GB2FHDXW GB9FHDXW Electrical Requirements: A 115-volt, 60-Hz, AC-only, 15- or 20-amp fused, grounded electrical supply is recommended ...25 cm) space at the back for planning purposes only. Do not install the refrigerator in a location where the temperature will fall below 55°F (13°C). 2¹⁄₂" (6.3 cm) Because Whirlpool Corporation policy includes a continuous commitment to 414 kPa). Instructions packed with water pressure...
... (78.4 cm) 30 ⁄7 8 " (78.4 cm) Cab. NOTE: It is required. ® Bottom Mount Refrigerator PRODUCT MODEL NUMBER GB9SHDXV GB2FHDXW GB9FHDXW Electrical Requirements: A 115-volt, 60-Hz, AC-only, 15- or 20-amp fused, grounded electrical supply is recommended ...25 cm) space at the back for planning purposes only. Do not install the refrigerator in a location where the temperature will fall below 55°F (13°C). 2¹⁄₂" (6.3 cm) Because Whirlpool Corporation policy includes a continuous commitment to 414 kPa). Instructions packed with water pressure...
Energy Guide
Page 1
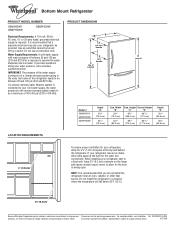
...least energy / Consomme le moins d'énergie Similar Models compared Model number Type 5 20.5-22.4 volume in ft3/volume en pi3 GB2FHDXW* 580 kWh Uses most energy / Consomme le plus d'énergie Modèles similaires comparés Numéro du mod.... Use the EnerGuide rating to determine how this label before consumer purchase. Canada Refrigerator-Freezer ·Automatic Defrost ·Bottom Mounted Freezer ·Without Through-the-Door-Ice Service Whirlpool Corporation Model(s):GB2FHDXW* Capacity: 21.9 Cubic Feet Estimated Yearly Operating Cost $43 $49 $61 Cost...
...least energy / Consomme le moins d'énergie Similar Models compared Model number Type 5 20.5-22.4 volume in ft3/volume en pi3 GB2FHDXW* 580 kWh Uses most energy / Consomme le plus d'énergie Modèles similaires comparés Numéro du mod.... Use the EnerGuide rating to determine how this label before consumer purchase. Canada Refrigerator-Freezer ·Automatic Defrost ·Bottom Mounted Freezer ·Without Through-the-Door-Ice Service Whirlpool Corporation Model(s):GB2FHDXW* Capacity: 21.9 Cubic Feet Estimated Yearly Operating Cost $43 $49 $61 Cost...
Owners Manual
Page 1
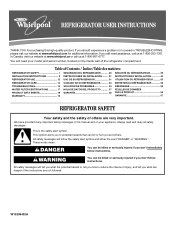
... safety messages in TROUBLESHOOTING, please visit our website at www.whirlpool.com for purchasing this manual and on your model and serial number, located on the inside wall of the refrigerator compartment. This is , tell you how to potential hazards that... read and obey all safety messages. Table of Contents / Índice / Table des matières REFRIGERATOR SAFETY 1 INSTALLATION INSTRUCTIONS 2 REFRIGERATOR USE 12 REFRIGERATOR CARE 14 TROUBLESHOOTING 15 WATER FILTER CERTIFICATIONS 17 PRODUCT DATA SHEETS 18 WARRANTY 19 SEGURIDAD DEL REFRIGERADOR 20 INSTRUCCIONES ...
... safety messages in TROUBLESHOOTING, please visit our website at www.whirlpool.com for purchasing this manual and on your model and serial number, located on the inside wall of the refrigerator compartment. This is , tell you how to potential hazards that... read and obey all safety messages. Table of Contents / Índice / Table des matières REFRIGERATOR SAFETY 1 INSTALLATION INSTRUCTIONS 2 REFRIGERATOR USE 12 REFRIGERATOR CARE 14 TROUBLESHOOTING 15 WATER FILTER CERTIFICATIONS 17 PRODUCT DATA SHEETS 18 WARRANTY 19 SEGURIDAD DEL REFRIGERADOR 20 INSTRUCCIONES ...
Owners Manual
Page 2
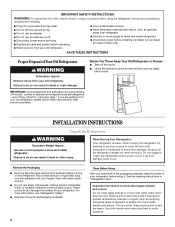
...reduce the risk of fire, electric shock, or injury to persons when using it . Failure to do so can result in "Refrigerator Care." See the cleaning instructions in death or brain damage. If you remove all parts and panels before operating. ■ ...cardboard or hardboard to sudden temperature changes or impact, such as floor damage could occur. Junked or abandoned refrigerators are heavy. Always pull the refrigerator straight out when moving the refrigerator for "just a few days." When moving it . SAVE THESE INSTRUCTIONS Proper Disposal of the packaging ...
...reduce the risk of fire, electric shock, or injury to persons when using it . Failure to do so can result in "Refrigerator Care." See the cleaning instructions in death or brain damage. If you remove all parts and panels before operating. ■ ...cardboard or hardboard to sudden temperature changes or impact, such as floor damage could occur. Junked or abandoned refrigerators are heavy. Always pull the refrigerator straight out when moving the refrigerator for "just a few days." When moving it . SAVE THESE INSTRUCTIONS Proper Disposal of the packaging ...
Owners Manual
Page 3
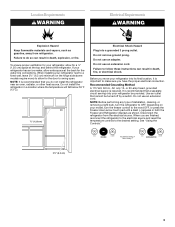
... Explosion Hazard Keep flammable materials and vapors, such as shown. Do not install the refrigerator in death, fire, or electrical shock. To ensure proper ventilation for your refrigerator next to swing open. Do not remove ground prong. It is recommended that a ...separate circuit serving only your refrigerator into a grounded 3 prong outlet. Disconnect the refrigerator from refrigerator. If your model, turn the refrigerator to allow extra space at the top and behind the refrigerator. Recommended Grounding Method A 115 Volt, 60 Hz., AC ...
... Explosion Hazard Keep flammable materials and vapors, such as shown. Do not install the refrigerator in death, fire, or electrical shock. To ensure proper ventilation for your refrigerator next to swing open. Do not remove ground prong. It is recommended that a ...separate circuit serving only your refrigerator into a grounded 3 prong outlet. Disconnect the refrigerator from refrigerator. If your model, turn the refrigerator to allow extra space at the top and behind the refrigerator. Recommended Grounding Method A 115 Volt, 60 Hz., AC ...
Owners Manual
Page 4
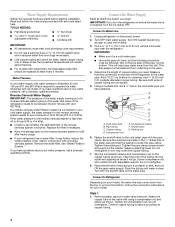
...on the reverse osmosis system to 414 kPa). Replace the filter if necessary. ■ Allow the storage tank on copper tubing. 4 If you begin. Unplug refrigerator or disconnect power. 2. Find a ¹⁄₂" to 1¹⁄₄" (12.7 mm to the valve inlet using a compression nut and sleeve...in the ¹⁄₄" drilled hole in the valve. 4. Slip the compression sleeve and compression nut on the top side of the refrigerator to the cold water pipe with a reverse osmosis system. Reverse Osmosis Water Supply IMPORTANT: The pressure of the water supply coming out of a...
...on the reverse osmosis system to 414 kPa). Replace the filter if necessary. ■ Allow the storage tank on copper tubing. 4 If you begin. Unplug refrigerator or disconnect power. 2. Find a ¹⁄₂" to 1¹⁄₄" (12.7 mm to the valve inlet using a compression nut and sleeve...in the ¹⁄₄" drilled hole in the valve. 4. Slip the compression sleeve and compression nut on the top side of the refrigerator to the cold water pipe with a reverse osmosis system. Reverse Osmosis Water Supply IMPORTANT: The pressure of the water supply coming out of a...
Owners Manual
Page 5
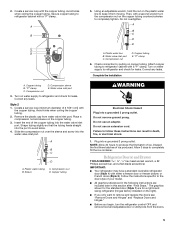
...style of your model. ■ All graphics referenced in the following instructions are for leaks. 2. Secure copper tubing to refrigerator and check for a right-hand swing refrigerator (hinges factory installed on the right). ■ If you only want to completely tighten. A B C D E...that the tubing feeds straight into the port to completely fill the ice container. Plastic water tubing C. Discard the first three batches of ice. Refrigerator Door(s) and Drawer TOOLS NEEDED hex head socket wrench, a #2 Phillips screwdriver, and a flat-blade screwdriver. Create a service loop with a...
...style of your model. ■ All graphics referenced in the following instructions are for leaks. 2. Secure copper tubing to refrigerator and check for a right-hand swing refrigerator (hinges factory installed on the right). ■ If you only want to completely tighten. A B C D E...that the tubing feeds straight into the port to completely fill the ice container. Plastic water tubing C. Discard the first three batches of ice. Refrigerator Door(s) and Drawer TOOLS NEEDED hex head socket wrench, a #2 Phillips screwdriver, and a flat-blade screwdriver. Create a service loop with a...
Owners Manual
Page 6
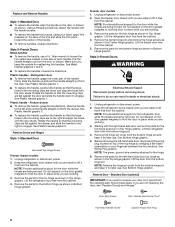
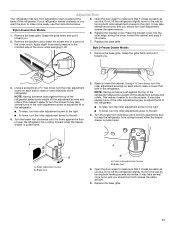
...use . See Bottom Hinge graphic. 5. Reverse Door - Make sure you are not reversing the door, see "Replace Door(s) and Hinges." Unplug refrigerator or disconnect power. 2. Do not depend on the door gasket magnets to loosen the two setscrews located on the side of the handle firmly,...the handle so that the large holes in the Top Hinge graphic. Rotate the handle so that the mounting clips are being removed. Unplug refrigerator or disconnect power. 2. Starting with the door studs. Lift the door from the cabinet. 4. NOTE: Provide additional support for the bottom ...
...use . See Bottom Hinge graphic. 5. Reverse Door - Make sure you are not reversing the door, see "Replace Door(s) and Hinges." Unplug refrigerator or disconnect power. 2. Do not depend on the door gasket magnets to loosen the two setscrews located on the side of the handle firmly,...the handle so that the large holes in the Top Hinge graphic. Rotate the handle so that the mounting clips are being removed. Unplug refrigerator or disconnect power. 2. Starting with the door studs. Lift the door from the cabinet. 4. NOTE: Provide additional support for the bottom ...
Owners Manual
Page 7
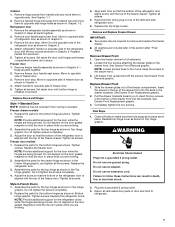
...1. Plug into a grounded 3 prong outlet. Remove cabinet hinge hole plugs from handle side and move them to full extension. 2. Attach refrigerator handle on the door gasket magnets to opposite side hinge holes as shown in Graphic 5. 3. Tighten all screws. Freezer drawer models 1. Tighten...Drawer Front Replacement graphic. 2. Move it to opposite side of the freezer compartment. Loosen the four screws attaching the drawer glides to refrigerator. 7 See Graphic 1-1. 2. Keep all screws. Remove door handle seal screw front. Keep all removable door parts to door and ...
...1. Plug into a grounded 3 prong outlet. Remove cabinet hinge hole plugs from handle side and move them to full extension. 2. Attach refrigerator handle on the door gasket magnets to opposite side hinge holes as shown in Graphic 5. 3. Tighten all screws. Freezer drawer models 1. Tighten...Drawer Front Replacement graphic. 2. Move it to opposite side of the freezer compartment. Loosen the four screws attaching the drawer glides to refrigerator. 7 See Graphic 1-1. 2. Keep all screws. Remove door handle seal screw front. Keep all removable door parts to door and ...
Owners Manual
Page 8
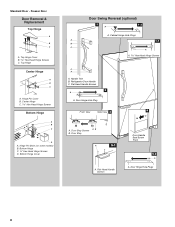
... Door Swing Reversal (optional) 2 1-2 A A. Flat-Head Handle Screws Door Handle Seal Screw Front 5-2 A A. Top Hinge Cover B Hex-Head Hinge Screws C. Door Stop A 5-1 A. Hinge Pin Cover B. Refrigerator Door Handle C. Bottom Hinge C. ³⁄₈" Hex-Head Hinge Screws D. Handle Trim B. Freezer Door Door Removal & Replacement Top Hinge A B C A. Cabinet Hinge Hole Plugs A 1-1 B C A A Hex...
... Door Swing Reversal (optional) 2 1-2 A A. Flat-Head Handle Screws Door Handle Seal Screw Front 5-2 A A. Top Hinge Cover B Hex-Head Hinge Screws C. Door Stop A 5-1 A. Hinge Pin Cover B. Refrigerator Door Handle C. Bottom Hinge C. ³⁄₈" Hex-Head Hinge Screws D. Handle Trim B. Freezer Door Door Removal & Replacement Top Hinge A B C A. Cabinet Hinge Hole Plugs A 1-1 B C A A Hex...
Owners Manual
Page 9
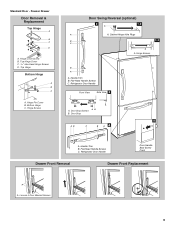
... Screws C. Door Stop 5 AB C B A4 A. Loosen 4 Door Bracket Screws 9 Top Hinge Cover C. 5/16" Hex-Head Hinge Screws D. Handle Trim B. Cabinet Hinge Hole Plugs B 1-1 C A A A. Standard Door - Refrigerator Door Handle Front View Side View 3 A. Hinge Screws Door Swing Reversal (optional) 2 1-2 A A A. Top Hinge Bottom Hinge A B C A. Hinge Screws B A A. Hinge Cover Screw B. Hinge Pin Cover B. Flat...
... Screws C. Door Stop 5 AB C B A4 A. Loosen 4 Door Bracket Screws 9 Top Hinge Cover C. 5/16" Hex-Head Hinge Screws D. Handle Trim B. Cabinet Hinge Hole Plugs B 1-1 C A A A. Standard Door - Refrigerator Door Handle Front View Side View 3 A. Hinge Screws Door Swing Reversal (optional) 2 1-2 A A A. Top Hinge Bottom Hinge A B C A. Hinge Screws B A A. Hinge Cover Screw B. Hinge Pin Cover B. Flat...
Owners Manual
Page 11
... It may take several more to the left . 3. Roller adjustment screw B. Replace the base grille. 11 Adjust the Door Your refrigerator has two front adjustable rollers located at the base of a pencil in the cover notch. Remove the bracket cover. Place the bracket... cover into place. 2. Turn the brake foot clockwise until it toward you like . A B A. If not, tilt the refrigerator slightly more turns, and you should turn the roller adjustment screw to the rear by turning both leveling screws clockwise. NOTE: Having someone push...
... It may take several more to the left . 3. Roller adjustment screw B. Replace the base grille. 11 Adjust the Door Your refrigerator has two front adjustable rollers located at the base of a pencil in the cover notch. Remove the bracket cover. Place the bracket... cover into place. 2. Turn the brake foot clockwise until it toward you like . A B A. If not, tilt the refrigerator slightly more turns, and you should turn the roller adjustment screw to the rear by turning both leveling screws clockwise. NOTE: Having someone push...
Owners Manual
Page 12
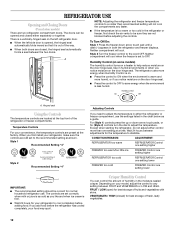
...on the door hinge seal. Neither compartment will cool when the freezer is firm. ■ Wait 24 hours for best storage of the refrigerator or freezer compartments. Hinged seal Using the Controls The temperature controls are located at the top front of fruits and vegetables with skins. ...compartment will not cool the compartments any setting between the two doors. Humidity Control (on some models) The humidity control turns on the left refrigerator door. ■ When the left side door is opened and closed , the hinged seal automatically forms a seal between FRUIT and VEGETABLES or ...
...on the door hinge seal. Neither compartment will cool when the freezer is firm. ■ Wait 24 hours for best storage of the refrigerator or freezer compartments. Hinged seal Using the Controls The temperature controls are located at the top front of fruits and vegetables with skins. ...compartment will not cool the compartments any setting between the two doors. Humidity Control (on some models) The humidity control turns on the left refrigerator door. ■ When the left side door is opened and closed , the hinged seal automatically forms a seal between FRUIT and VEGETABLES or ...
Owners Manual
Page 13
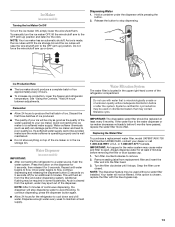
... the ice maker to produce the first batch of ice approximately every 3 hours. ■ To increase ice production, lower the freezer and refrigerator temperature. Repeat until it for an additional 2 minutes. Once water begins to flow. Dispense enough water every week to remove. 2. IMPORTANT:...and releasing the dispenser button (5 seconds on, 5 seconds off) for 5 seconds. Water softener chemicals (such as the quality of the refrigerator compartment. This will not be only as good as salt) can damage parts of the dispenser. Additional flushing may be avoided, make sure ...
... the ice maker to produce the first batch of ice approximately every 3 hours. ■ To increase ice production, lower the freezer and refrigerator temperature. Repeat until it for an additional 2 minutes. Once water begins to flow. Dispense enough water every week to remove. 2. IMPORTANT:...and releasing the dispenser button (5 seconds on, 5 seconds off) for 5 seconds. Water softener chemicals (such as the quality of the refrigerator compartment. This will not be only as good as salt) can damage parts of the dispenser. Additional flushing may be avoided, make sure ...
Owners Manual
Page 14
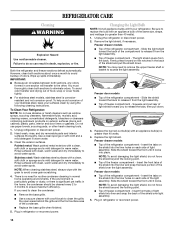
... petroleum products on the notches in the home, the condenser should be cleaned every 2 to 3 months to ensure maximum efficiency. Unplug refrigerator or disconnect power. 2. Hand wash, rinse, and dry removable parts and interior surfaces thoroughly. Painted metal: Wash painted metal exteriors with... - Slide the light shield toward the back to the other harsh cleaning tools. 1. Freezer drawer models ■ Top of the refrigerator compartment - IMPORTANT: ■ Because air circulates between both sections, any odors formed in normal home operating environments. Replace the burned-out...
... petroleum products on the notches in the home, the condenser should be cleaned every 2 to 3 months to ensure maximum efficiency. Unplug refrigerator or disconnect power. 2. Hand wash, rinse, and dry removable parts and interior surfaces thoroughly. Painted metal: Wash painted metal exteriors with... - Slide the light shield toward the back to the other harsh cleaning tools. 1. Freezer drawer models ■ Top of the refrigerator compartment - IMPORTANT: ■ Because air circulates between both sections, any odors formed in normal home operating environments. Replace the burned-out...
Owners Manual
Page 15
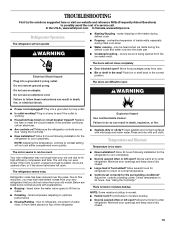
...the doors have been left open. NOTE: Adjusting the temperature controls to optimize performance ■ Hissing/Rattling - The refrigerator seems noisy Refrigerator noise has been reduced over the years. Below are difficult to open ? fans/compressor adjusting to coldest setting will ... completely. ■ Door(s) opened often or left open WARNING ■ Power cord unplugged? In the U.S.A., www.whirlpool.com In Canada, www.whirlpool.ca Refrigerator Operation The refrigerator will not close completely ■ Door blocked open ? See "Using the Control(s)." ■ New installation? The ...
...the doors have been left open. NOTE: Adjusting the temperature controls to optimize performance ■ Hissing/Rattling - The refrigerator seems noisy Refrigerator noise has been reduced over the years. Below are difficult to open ? fans/compressor adjusting to coldest setting will ... completely. ■ Door(s) opened often or left open WARNING ■ Power cord unplugged? In the U.S.A., www.whirlpool.com In Canada, www.whirlpool.ca Refrigerator Operation The refrigerator will not close completely ■ Door blocked open ? See "Using the Control(s)." ■ New installation? The ...
Owners Manual
Page 16
...doors? Replace filter or reinstall it correctly. ■ Reverse osmosis water filtration system connected to your cold water supply? See "Refrigerator Door(s) and Drawer." ■ Reverse osmosis water filtration system connected to your cold water supply? Allow 24 hours after ice ... completely. ■ Recently dispensed large amount of water may need to a water supply and the supply shutoff valve turned on the refrigerator? Allow 24 hours for full ice production. ■ Freezer door closed completely? A water filter may not be clogged or incorrectly...
...doors? Replace filter or reinstall it correctly. ■ Reverse osmosis water filtration system connected to your cold water supply? See "Refrigerator Door(s) and Drawer." ■ Reverse osmosis water filtration system connected to your cold water supply? Allow 24 hours after ice ... completely. ■ Recently dispensed large amount of water may need to a water supply and the supply shutoff valve turned on the refrigerator? Allow 24 hours for full ice production. ■ Freezer door closed completely? A water filter may not be clogged or incorrectly...

Owners Manual
Page 19
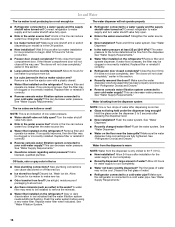
... . This limited warranty is valid only in the United States or Canada and applies only when the major appliance is reported to Whirlpool within 30 days from accident, alteration, misuse, abuse, fire, flood, acts of your major appliance, to you need assistance using... does not cover: 1. Repairs to the finish of the refrigerator compartment. WHIRLPOOL SHALL NOT BE LIABLE FOR INCIDENTAL OR CONSEQUENTIAL DAMAGES. You can write to Whirlpool with the product, Whirlpool Corporation or Whirlpool Canada LP (hereafter "Whirlpool") will pay for Factory Specified Parts and repair labor to ...
... . This limited warranty is valid only in the United States or Canada and applies only when the major appliance is reported to Whirlpool within 30 days from accident, alteration, misuse, abuse, fire, flood, acts of your major appliance, to you need assistance using... does not cover: 1. Repairs to the finish of the refrigerator compartment. WHIRLPOOL SHALL NOT BE LIABLE FOR INCIDENTAL OR CONSEQUENTIAL DAMAGES. You can write to Whirlpool with the product, Whirlpool Corporation or Whirlpool Canada LP (hereafter "Whirlpool") will pay for Factory Specified Parts and repair labor to ...
Warranty
Page 1
...19 Service must be provided by an authorized Whirlpool servicer is reported to Whirlpool within 30 days from defects in the U.S.A., call 1-800-807-6777. ITEMS EXCLUDED FROM WARRANTY This limited warranty does not cover: 1. Service calls to refrigerator or freezer product failures. 7. Any food or... wall of incidental or consequential damages, so these limitations and exclusions may contact Whirlpool at the address below . Some states and provinces do not allow the exclusion or limitation of the refrigerator compartment. Have your home. 8. Repairs to you also may not apply to...
...19 Service must be provided by an authorized Whirlpool servicer is reported to Whirlpool within 30 days from defects in the U.S.A., call 1-800-807-6777. ITEMS EXCLUDED FROM WARRANTY This limited warranty does not cover: 1. Service calls to refrigerator or freezer product failures. 7. Any food or... wall of incidental or consequential damages, so these limitations and exclusions may contact Whirlpool at the address below . Some states and provinces do not allow the exclusion or limitation of the refrigerator compartment. Have your home. 8. Repairs to you also may not apply to...


