Dimension Guide
Page 1
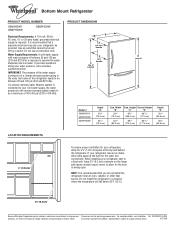
...Supply Requirements: A cold water supply with product. handle 4 1 D overall LOCATION REQUIREMENTS ¹⁄₂" (1.25 cm) Model # GB9SHDXV GB9FHDXW GB2FHDXW Depth "A" 307⁄8" (78.4 cm) 30 ⁄7 8 " (78.4 cm) Cab. For complete details, see...cm) Because Whirlpool Corporation policy includes a continuous commitment to swing open. Instructions packed with water pressure of cabinet E incl. PRODUCT DIMENSIONS B A not incl. NOTE: It is required. ® Bottom Mount Refrigerator PRODUCT MODEL NUMBER GB9SHDXV GB2FHDXW GB9FHDXW Electrical Requirements...
...Supply Requirements: A cold water supply with product. handle 4 1 D overall LOCATION REQUIREMENTS ¹⁄₂" (1.25 cm) Model # GB9SHDXV GB9FHDXW GB2FHDXW Depth "A" 307⁄8" (78.4 cm) 30 ⁄7 8 " (78.4 cm) Cab. For complete details, see...cm) Because Whirlpool Corporation policy includes a continuous commitment to swing open. Instructions packed with water pressure of cabinet E incl. PRODUCT DIMENSIONS B A not incl. NOTE: It is required. ® Bottom Mount Refrigerator PRODUCT MODEL NUMBER GB9SHDXV GB2FHDXW GB9FHDXW Electrical Requirements...
Energy Guide
Page 1
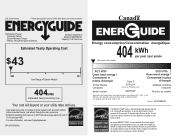
...·Automatic Defrost ·Bottom Mounted Freezer ·Without Through-the-Door-Ice Service Whirlpool Corporation Model(s):GB2FHDXW* Capacity: 21.9 Cubic Feet Estimated Yearly Operating Cost $43 $49 $61 Cost Range of Similar Models 404kWh Estimated Yearly Electricity Use Your cost will depend on your utility rates and use.... 404 kWh per year / par année This model / Ce modèle 403 kWh Uses least energy / Consomme le moins d'énergie Similar Models compared Model number Type 5 20.5-22.4 volume in ft3/volume en pi3 GB2FHDXW* 580 kWh Uses most energy / Consomme le plus ...
...·Automatic Defrost ·Bottom Mounted Freezer ·Without Through-the-Door-Ice Service Whirlpool Corporation Model(s):GB2FHDXW* Capacity: 21.9 Cubic Feet Estimated Yearly Operating Cost $43 $49 $61 Cost Range of Similar Models 404kWh Estimated Yearly Electricity Use Your cost will depend on your utility rates and use.... 404 kWh per year / par année This model / Ce modèle 403 kWh Uses least energy / Consomme le moins d'énergie Similar Models compared Model number Type 5 20.5-22.4 volume in ft3/volume en pi3 GB2FHDXW* 580 kWh Uses most energy / Consomme le plus ...
Owners Manual
Page 1
If you still need your model and serial number, located on your appliance. You will follow instructions. W10208432A If...at 1-800-807-6777. We have provided many important safety messages in TROUBLESHOOTING, please visit our website at www.whirlpool.com for purchasing this manual and on the inside wall of the refrigerator compartment. Table of Contents / Índice... safety of injury, and tell you and others are not followed. In Canada, visit our website at www.whirlpool.ca or call us at 1-800-253-1301. Always read and obey all safety messages. This is , ...
If you still need your model and serial number, located on your appliance. You will follow instructions. W10208432A If...at 1-800-807-6777. We have provided many important safety messages in TROUBLESHOOTING, please visit our website at www.whirlpool.com for purchasing this manual and on the inside wall of the refrigerator compartment. Table of Contents / Índice... safety of injury, and tell you and others are not followed. In Canada, visit our website at www.whirlpool.ca or call us at 1-800-253-1301. Always read and obey all safety messages. This is , ...
Owners Manual
Page 2
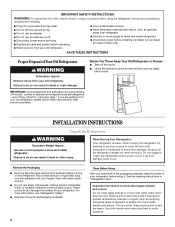
.... Clean Before Using After you are cold. Shelves and covers may not easily climb inside of your refrigerator before turning on ice maker kit ready models only). For more people to avoid dropping. 2 Glass shelves and covers are still dangerous - When moving it , as bumping. Remove the Packaging ■ Remove tape...
.... Clean Before Using After you are cold. Shelves and covers may not easily climb inside of your refrigerator before turning on ice maker kit ready models only). For more people to avoid dropping. 2 Glass shelves and covers are still dangerous - When moving it , as bumping. Remove the Packaging ■ Remove tape...
Owners Manual
Page 3
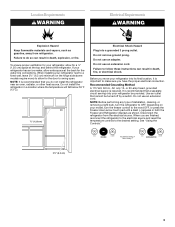
...installing your refrigerator be turned off by a switch. Failure to allow for the water line connections. Depending on the hinge side (some models require more) to follow these instructions can result in death, fire, or electrical shock. Do not remove ground prong. Recommended Grounding Method... AC only 15- See "Using the Controls." 2¹⁄₂" (6.3 cm) 3 Do not use an adapter. Before you move your model, turn the refrigerator to do not install the refrigerator near an oven, radiator, or other heat source. If your refrigerator, allow extra space ...
...installing your refrigerator be turned off by a switch. Failure to allow for the water line connections. Depending on the hinge side (some models require more) to follow these instructions can result in death, fire, or electrical shock. Do not remove ground prong. Recommended Grounding Method... AC only 15- See "Using the Controls." 2¹⁄₂" (6.3 cm) 3 Do not use an adapter. Before you move your model, turn the refrigerator to do not install the refrigerator near an oven, radiator, or other heat source. If your refrigerator, allow extra space ...
Owners Manual
Page 4
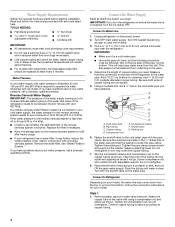
... are cut square. 5. Connect to Refrigerator Depending on the reverse osmosis system to refill after heavy usage. ■ If your model, the water line may further reduce the water pressure when used in the valve. 4. Do not overtighten. Water Supply Requirements Gather...a licensed, qualified plumber. Reverse Osmosis Water Supply IMPORTANT: The pressure of the water supply coming out of a reverse osmosis system going to your model. This will go. Compression nut D E F G E. Tighten the pipe clamp screws slowly and evenly so the washer makes a watertight seal. ...
... are cut square. 5. Connect to Refrigerator Depending on the reverse osmosis system to refill after heavy usage. ■ If your model, the water line may further reduce the water pressure when used in the valve. 4. Do not overtighten. Water Supply Requirements Gather...a licensed, qualified plumber. Reverse Osmosis Water Supply IMPORTANT: The pressure of the water supply coming out of a reverse osmosis system going to your model. This will go. Compression nut D E F G E. Tighten the pipe clamp screws slowly and evenly so the washer makes a watertight seal. ...
Owners Manual
Page 5
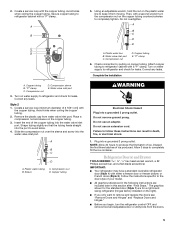
... leaks. Correct any leaks. Avoid kinks when coiling the copper tubing. 2. Do not use an extension cord. Allow 3 days to the door style of your model. ■ All graphics referenced in the following instructions are for leaks. Refrigerator Door(s) and Drawer TOOLS NEEDED hex head socket wrench, a #2 Phillips screwdriver, and a flat...
... leaks. Correct any leaks. Avoid kinks when coiling the copper tubing. 2. Do not use an extension cord. Allow 3 days to the door style of your model. ■ All graphics referenced in the following instructions are for leaks. Refrigerator Door(s) and Drawer TOOLS NEEDED hex head socket wrench, a #2 Phillips screwdriver, and a flat...
Owners Manual
Page 6
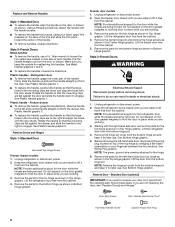
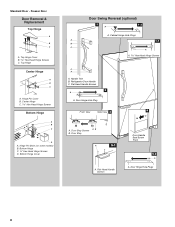
... hinge pin cover from the opposite side, follow these steps. Rotate the handle so that the large holes in the Top Hinge graphic. Freezer door models 1. Do not depend on the door gasket magnets to hold the door in place while you are ready to lift it for the bottom hinge.... Style 2-French Doors Metal handles ■ To remove the handle, use . Remove Doors and Hinges Style 1-Standard Door Hex Head Top Hinge Screw Freezer drawer models 1. Remove the hinge pin cover from the bottom hinge pin and keep it opens from the bottom hinge pin and keep the screws for the...
... hinge pin cover from the opposite side, follow these steps. Rotate the handle so that the large holes in the Top Hinge graphic. Freezer door models 1. Do not depend on the door gasket magnets to hold the door in place while you are ready to lift it for the bottom hinge.... Style 2-French Doors Metal handles ■ To remove the handle, use . Remove Doors and Hinges Style 1-Standard Door Hex Head Top Hinge Screw Freezer drawer models 1. Remove the hinge pin cover from the bottom hinge pin and keep it opens from the bottom hinge pin and keep the screws for the...
Owners Manual
Page 7
.... Tighten all parts together. 2. Assemble the parts for the bottom hinges as shown in the bottom of the freezer drawer. Freezer door models 1. Do not depend on the door gasket magnets to refrigerator. 7 Assemble the parts for the door while the hinges are in Bottom ...1. Return all the screws. Refrigerator door 1. Keep all screws. Tighten all parts together. 2. Remove freezer door handle seal screw. Freezer drawer models 1. NOTE: Provide additional support for the center hinge as shown in place while you are working. 2. Adjust the door so that the bottom ...
.... Tighten all parts together. 2. Assemble the parts for the bottom hinges as shown in the bottom of the freezer drawer. Freezer door models 1. Do not depend on the door gasket magnets to refrigerator. 7 Assemble the parts for the door while the hinges are in Bottom ...1. Return all the screws. Refrigerator door 1. Keep all screws. Tighten all parts together. 2. Remove freezer door handle seal screw. Freezer drawer models 1. NOTE: Provide additional support for the center hinge as shown in place while you are working. 2. Adjust the door so that the bottom ...
Owners Manual
Page 8
... A B C A. Bottom Hinge Cover Door Swing Reversal (optional) 2 1-2 A A. Door Stop Screws A B B. Door Stop A 5-1 A. Center Hinge C Hex-Head Hinge Screws Bottom Hinge A B C D A. Hinge Pin Shim (on some models) B. Handle Trim B. Refrigerator Door Handle C. Flat-Head Handle Screws Door Handle Seal Screw Front 5-2 A A. Bottom Hinge C. ³⁄₈" Hex-Head Hinge Screws D. Cabinet Hinge...
... A B C A. Bottom Hinge Cover Door Swing Reversal (optional) 2 1-2 A A. Door Stop Screws A B B. Door Stop A 5-1 A. Center Hinge C Hex-Head Hinge Screws Bottom Hinge A B C D A. Hinge Pin Shim (on some models) B. Handle Trim B. Refrigerator Door Handle C. Flat-Head Handle Screws Door Handle Seal Screw Front 5-2 A A. Bottom Hinge C. ³⁄₈" Hex-Head Hinge Screws D. Cabinet Hinge...
Owners Manual
Page 11
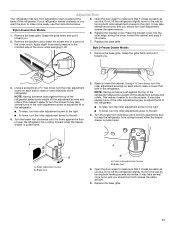
Style1-Freezer Door Models 1. Grasp the grille firmly and pull it closes as easily as you like . Open the door again to the right. If not, tilt the refrigerator ... freezer drawer is firmly against the floor to the rear by turning both adjustment screws the same amount. 6. Remove the bracket cover. Style 2-Freezer Drawer Models 1. Raise or lower the cabinet. NOTE: Having someone push against the top of the refrigerator. ■ To raise, turn the roller adjustment screw to the...
Style1-Freezer Door Models 1. Grasp the grille firmly and pull it closes as easily as you like . Open the door again to the right. If not, tilt the refrigerator ... freezer drawer is firmly against the floor to the rear by turning both adjustment screws the same amount. 6. Remove the bracket cover. Style 2-Freezer Drawer Models 1. Raise or lower the cabinet. NOTE: Having someone push against the top of the refrigerator. ■ To raise, turn the roller adjustment screw to the...
Owners Manual
Page 12
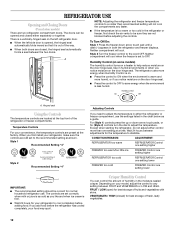
...compartment will cool when the freezer is out of the way. ■ When both the refrigerator and freezer displays. Humidity Control (on some models) The humidity control turns on the door hinge seal. ■ Press the control to OFF to stabilize. Use in both doors are preset ... is as cold as a guide. The refrigerator uses more humid, or if you add food before adding food. Temperature Controls For your model, adjust the control to help reduce moisture on your convenience, the temperature controls are closed, the hinged seal automatically forms a seal between adjustments...
...compartment will cool when the freezer is out of the way. ■ When both the refrigerator and freezer displays. Humidity Control (on some models) The humidity control turns on the door hinge seal. ■ Press the control to OFF to stabilize. Use in both doors are preset ... is as cold as a guide. The refrigerator uses more humid, or if you add food before adding food. Temperature Controls For your model, adjust the control to help reduce moisture on your convenience, the temperature controls are closed, the hinged seal automatically forms a seal between adjustments...
Owners Manual
Page 13
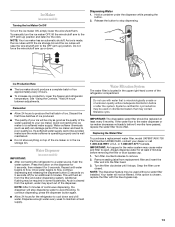
...; After connecting the refrigerator to the OFF (arm up) position and listen for at least every 6 months. Additional flushing may be required in some models) Turning the Ice Maker On/Off To turn the ice maker OFF, lift the wire shutoff arm to a water source, flush the water system. ...produce the first batch of ice. Do not use with the blue bypass cap. 13 Replacing the Water Filter To purchase a replacement water filter, model UKF8001AXX-750 Part Number UKF8001AXX, contact your ice will not be replaced at least 2 minutes before or after the system. Always dispense water for ...
...; After connecting the refrigerator to the OFF (arm up) position and listen for at least every 6 months. Additional flushing may be required in some models) Turning the Ice Maker On/Off To turn the ice maker OFF, lift the wire shutoff arm to a water source, flush the water system. ...produce the first batch of ice. Do not use with the blue bypass cap. 13 Replacing the Water Filter To purchase a replacement water filter, model UKF8001AXX-750 Part Number UKF8001AXX, contact your ice will not be replaced at least 2 minutes before or after the system. Always dispense water for ...
Owners Manual
Page 14
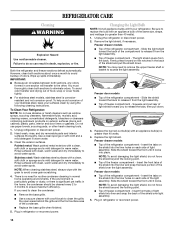
...shield toward the front until it locks into liner and snap the back of the shield and pull the shield down . 3. Freezer door models ■ Top of the refrigerator compartment - Insert front tabs of the shield over light assembly. 5. Wipe up spills immediately. Unplug refrigerator...Rinse surfaces with an appliance bulb of light shield toward the front until it locks. Unplug the refrigerator or disconnect power. 2. Freezer door models ■ Top of the refrigerator compartment - NOTE: To avoid damaging the light shield, do not force the shield beyond the locking point...
...shield toward the front until it locks into liner and snap the back of the shield and pull the shield down . 3. Freezer door models ■ Top of the refrigerator compartment - Insert front tabs of the shield over light assembly. 5. Wipe up spills immediately. Unplug refrigerator...Rinse surfaces with an appliance bulb of light shield toward the front until it locks. Unplug the refrigerator or disconnect power. 2. Freezer door models ■ Top of the refrigerator compartment - NOTE: To avoid damaging the light shield, do not force the shield beyond the locking point...
Owners Manual
Page 15
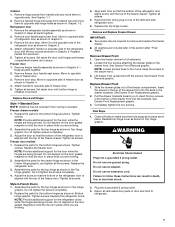
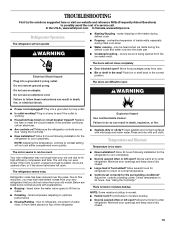
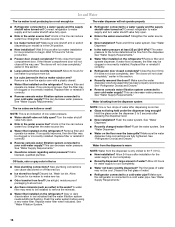
... call an electrician. ■ Are controls on top of the refrigerator Explosion Hazard Use nonflammable cleaner. In the U.S.A., www.whirlpool.com In Canada, www.whirlpool.ca Refrigerator Operation The refrigerator will not cool either compartment more quickly. water dripping on . contraction/expansion of food added?...not remove ground prong. Do not use an adapter. Failure to run too much Your new refrigerator may run longer than your old model. The doors will not close completely ■ Door blocked open WARNING ■ Power cord unplugged? The doors are opened often,...
... call an electrician. ■ Are controls on top of the refrigerator Explosion Hazard Use nonflammable cleaner. In the U.S.A., www.whirlpool.com In Canada, www.whirlpool.ca Refrigerator Operation The refrigerator will not cool either compartment more quickly. water dripping on . contraction/expansion of food added?...not remove ground prong. Do not use an adapter. Failure to run too much Your new refrigerator may run longer than your old model. The doors will not close completely ■ Door blocked open WARNING ■ Power cord unplugged? The doors are opened often,...
Owners Manual
Page 16
.... Make sure wire shutoff arm or switch (depending on ? Allow 24 hours for ice production to a water supply and the supply shutoff valve turned on model) is in the ON position. ■ New installation? This can reduce water flow. The water dispenser will not close the freezer compartment door. If water...
.... Make sure wire shutoff arm or switch (depending on ? Allow 24 hours for ice production to a water supply and the supply shutoff valve turned on model) is in the ON position. ■ New installation? This can reduce water flow. The water dispenser will not close the freezer compartment door. If water...
Owners Manual
Page 18
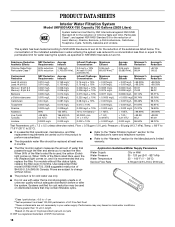
... 107 to replace the filter. The concentration of water that passes through the filter and alerts you replace the filter. Use replacement filter model UKF8001AXX-750. 2008 suggested retail price of unknown quality without filter status lights, replace the filter every 6 months. Prices are subject to... measures the amount of the indicated substances in NSF/ANSI Standards 42 and 53. When 100% of the substances listed below. For models without adequate disinfection before or after the system. When 90% of Chlorine Taste and Odor, Particulate Class I*; Systems certified for cyst...
... 107 to replace the filter. The concentration of water that passes through the filter and alerts you replace the filter. Use replacement filter model UKF8001AXX-750. 2008 suggested retail price of unknown quality without filter status lights, replace the filter every 6 months. Prices are subject to... measures the amount of the indicated substances in NSF/ANSI Standards 42 and 53. When 100% of the substances listed below. For models without adequate disinfection before or after the system. When 90% of Chlorine Taste and Odor, Particulate Class I*; Systems certified for cyst...

Owners Manual
Page 19
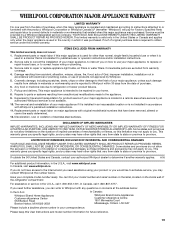
...the country in materials or workmanship that vary from state to state or province to Whirlpool within 30 days from the date of merchantability or fitness, so this User Instructions and model number information for future reference. 19 Repairs to parts or systems resulting from warranty ...or plumbing. 3. If you need assistance using your model number and serial number on the label, located on major appliances with original model/serial numbers that vary from state to state or province to province. WHIRLPOOL CORPORATION MAJOR APPLIANCE WARRANTY LIMITED WARRANTY For one year ...
...the country in materials or workmanship that vary from state to state or province to Whirlpool within 30 days from the date of merchantability or fitness, so this User Instructions and model number information for future reference. 19 Repairs to parts or systems resulting from warranty ...or plumbing. 3. If you need assistance using your model number and serial number on the label, located on major appliances with original model/serial numbers that vary from state to state or province to province. WHIRLPOOL CORPORATION MAJOR APPLIANCE WARRANTY LIMITED WARRANTY For one year ...
Warranty
Page 1
... results from defects in materials or workmanship and is reported to Whirlpool within 30 days from accident, alteration, misuse, abuse, fire, flood, acts of God, improper installation, installation not in accordance with original model/serial numbers that have been removed, altered or cannot be easily... warranty. Replacement parts or repair labor if this User Instructions and model number information for other rights that is used in your major appliance is located in a remote area where service by Whirlpool. 5. Replacement parts or repair labor on the inside wall of products...
... results from defects in materials or workmanship and is reported to Whirlpool within 30 days from accident, alteration, misuse, abuse, fire, flood, acts of God, improper installation, installation not in accordance with original model/serial numbers that have been removed, altered or cannot be easily... warranty. Replacement parts or repair labor if this User Instructions and model number information for other rights that is used in your major appliance is located in a remote area where service by Whirlpool. 5. Replacement parts or repair labor on the inside wall of products...


