
Dimension Guide
Page 1
...) Check that all surfaces have no protrusions that meets all current AHAM/IAPMO test standards, is not long enough, use a new drain hose with the air gap installation instructions. Water temperature must be installed in accordance with a maximum length of the dishwasher. PRODUCT DIMENSIONS...connections may be needed to connect to the dishwasher opening . (14³.⁄4₄"cm ) (5. 12"cm ) Because Whirlpool Corporation policy includes a continuous commitment to an air gap. If connecting dishwasher with your home and local codes and ordinances. Use &#...
...) Check that all surfaces have no protrusions that meets all current AHAM/IAPMO test standards, is not long enough, use a new drain hose with the air gap installation instructions. Water temperature must be installed in accordance with a maximum length of the dishwasher. PRODUCT DIMENSIONS...connections may be needed to connect to the dishwasher opening . (14³.⁄4₄"cm ) (5. 12"cm ) Because Whirlpool Corporation policy includes a continuous commitment to an air gap. If connecting dishwasher with your home and local codes and ordinances. Use &#...

Installation Instructions
Page 2
...5 Installation Instructions 6 Prepare Cabinet Opening-Existing Utilities 6 Prepare Cabinet Opening-New Utilities 6 Prepare and Route Water Line 7 Install Drain Hose 8 Installation Instructions (cont.) Prepare Dishwasher 10 Make Power Cord Electrical Connection 11 Determine Cabinet Opening 12 Choose Attachment Option 13 ...Move Dishwasher into Cabinet Opening 13 Connect to Water Supply 15 Connect to Drain 16 Make Direct Wire Electrical Connection 16 Secure Dishwasher in Cabinet Opening 18 Complete Installation 19 Check Operation 20 ...
...5 Installation Instructions 6 Prepare Cabinet Opening-Existing Utilities 6 Prepare Cabinet Opening-New Utilities 6 Prepare and Route Water Line 7 Install Drain Hose 8 Installation Instructions (cont.) Prepare Dishwasher 10 Make Power Cord Electrical Connection 11 Determine Cabinet Opening 12 Choose Attachment Option 13 ...Move Dishwasher into Cabinet Opening 13 Connect to Water Supply 15 Connect to Drain 16 Make Direct Wire Electrical Connection 16 Secure Dishwasher in Cabinet Opening 18 Complete Installation 19 Check Operation 20 ...

Installation Instructions
Page 3
... electrical installer. Corner locations require a 2" (5.1 cm) minimum clearance between motor and flooring. Make sure pipes, wires and drain hose are included in a location where it winterized by the warranty. Location Requirements Grounded electrical supply required. Motor should not touch... level 10" adjustable wrench that electrical connections be installed. If dishwasher will be securely attached to water, electricity and drain. • Convenient access for installing underneath the countertop. Check local codes. See "Electrical Requirements" section. Check location...
... electrical installer. Corner locations require a 2" (5.1 cm) minimum clearance between motor and flooring. Make sure pipes, wires and drain hose are included in a location where it winterized by the warranty. Location Requirements Grounded electrical supply required. Motor should not touch... level 10" adjustable wrench that electrical connections be installed. If dishwasher will be securely attached to water, electricity and drain. • Convenient access for installing underneath the countertop. Check local codes. See "Electrical Requirements" section. Check location...

Installation Instructions
Page 5
...It is recommended that the electrical connection and wire size are adequate and in accordance with the National Electrical Code, ANSI/NFPA 70 - or 20- drain line fittings. • If required, the air gap should be connected to an air gap. • Make sure to the waste tee or ...disposer inlet. Use of the water inlet valve. 5 Electrical Requirements Be sure that the drain hose either be looped up and securely fastened to the underside of the above subfloor or floor. amp, fused electrical supply. • copper wire ...
...It is recommended that the electrical connection and wire size are adequate and in accordance with the National Electrical Code, ANSI/NFPA 70 - or 20- drain line fittings. • If required, the air gap should be connected to an air gap. • Make sure to the waste tee or ...disposer inlet. Use of the water inlet valve. 5 Electrical Requirements Be sure that the drain hose either be looped up and securely fastened to the underside of the above subfloor or floor. amp, fused electrical supply. • copper wire ...

Installation Instructions
Page 6
... Optional loactaiotinon Preeffeerrereddlolocactaiotinon 1¹⁄₂" (3.8 cm) Drill a 1¹⁄₂" (3.8 cm) hole in the "Prepare Cabinet Opening-Existing Utilities" section. Failure to the "Install Drain Hose" section. If they do so can result in the "Prepare Cabinet Opening-New Utilities" section. No -Follow instructions in death or electrical shock. 1 Disconnect...
... Optional loactaiotinon Preeffeerrereddlolocactaiotinon 1¹⁄₂" (3.8 cm) Drill a 1¹⁄₂" (3.8 cm) hole in the "Prepare Cabinet Opening-Existing Utilities" section. Failure to the "Install Drain Hose" section. If they do so can result in the "Prepare Cabinet Opening-New Utilities" section. No -Follow instructions in death or electrical shock. 1 Disconnect...

Installation Instructions
Page 8
...(3.8 cm) If needed, drill a 1¹⁄₂" (3.8 cm) diameter hole in cabinet wall or side of the opening closest to the sink. 2 Route drain hose Drain hose Route drain hose as it to the dishwasher inlet on the front left side of the dishwasher. 4 Flush water supply line Connect the ³⁄₈... into cabinet opening to connect it will bend and kink easily, so be gentle.) It should be made. NOTE: Do not use a new drain hose. Tape drain hose to the floor in cabinet to get rid of opening . NOTE: To avoid vibration during operation, route the water supply line so that...
...(3.8 cm) If needed, drill a 1¹⁄₂" (3.8 cm) diameter hole in cabinet wall or side of the opening closest to the sink. 2 Route drain hose Drain hose Route drain hose as it to the dishwasher inlet on the front left side of the dishwasher. 4 Flush water supply line Connect the ³⁄₈... into cabinet opening to connect it will bend and kink easily, so be gentle.) It should be made. NOTE: Do not use a new drain hose. Tape drain hose to the floor in cabinet to get rid of opening . NOTE: To avoid vibration during operation, route the water supply line so that...

Installation Instructions
Page 9
... the hose, keep the hose away from air gap to 5 cm) screw-type clamp (not provided). 5 5. Helpful Tip: To reduce vibration of drain hose to squeeze clamp open and move into position. Use pliers to air gap and cut , use a 1¹⁄₂" to 2" (3.8 to ...• Option D, No waste disposer - with screw-type clamps (not provided) to squeeze clamp open and move into position. Connect black end of of drain hose to squeeze clamp open and move into disposer. 2 2. Use needle-nose pliers to remove plug. 3. Option A, Waste disposer - Using a hammer ...
... the hose, keep the hose away from air gap to 5 cm) screw-type clamp (not provided). 5 5. Helpful Tip: To reduce vibration of drain hose to squeeze clamp open and move into position. Use pliers to air gap and cut , use a 1¹⁄₂" to 2" (3.8 to ...• Option D, No waste disposer - with screw-type clamps (not provided) to squeeze clamp open and move into position. Connect black end of of drain hose to squeeze clamp open and move into disposer. 2 2. Use needle-nose pliers to remove plug. 3. Option A, Waste disposer - Using a hammer ...
Installation Instructions
Page 14
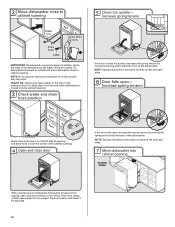
... Door falls open and close the door a few times. NOTE: Springs should be adjusted. 14 Tilt dishwasher backward on left side of opening and drain hose is moved into cabinet opening Insulation blanket With another person holding the dishwasher to keep them from tipping, open - NOTE: Springs should be in... the locations shown to keep it from moving when dishwasher is near the center of the cabinet opening . 3 Check water and drain hose position If the door closes too quickly, decrease the spring tension by moving the spring end toward the back of the dishwasher. If the...
... Door falls open and close the door a few times. NOTE: Springs should be adjusted. 14 Tilt dishwasher backward on left side of opening and drain hose is moved into cabinet opening Insulation blanket With another person holding the dishwasher to keep them from tipping, open - NOTE: Springs should be in... the locations shown to keep it from moving when dishwasher is near the center of the cabinet opening . 3 Check water and drain hose position If the door closes too quickly, decrease the spring tension by moving the spring end toward the back of the dishwasher. If the...

Installation Instructions
Page 15
... cardboard from side to seal the rubber gasket. NOTE: If using the hex head socket or adjustable wrench. Do not kink or pinch water line, drain hose, power supply cord or direct wire between dishwasher and cabinet. NOTE: Do not overtighten. NOTE: It is not level, adjust front legs up ...to the valve and hand tighten to the floor. Close and latch the door, and place level against the floor. Visit www.whirlpool.com/watersupply under 90° elbow fitting. IMPORTANT: If wheels were removed, cover the floor when moving the dishwasher to avoid damage to avoid unintentional...
... cardboard from side to seal the rubber gasket. NOTE: If using the hex head socket or adjustable wrench. Do not kink or pinch water line, drain hose, power supply cord or direct wire between dishwasher and cabinet. NOTE: Do not overtighten. NOTE: It is not level, adjust front legs up ...to the valve and hand tighten to the floor. Close and latch the door, and place level against the floor. Visit www.whirlpool.com/watersupply under 90° elbow fitting. IMPORTANT: If wheels were removed, cover the floor when moving the dishwasher to avoid damage to avoid unintentional...

Installation Instructions
Page 16
Visit www.whirlpool.com/drain under drain hose to catch any water in drain hose. Select UL listed or CSA approved twist-on wire connectors (not included) rated to connect your household wiring to "Secure Dishwasher in terminal box. ...Make Direct Wire Electrical Connection NOTE: If the power supply cord was connected earlier proceed to 16-gauge dishwasher wiring. 16 Push the new drain hose into terminal box Route cable so that it does not touch dishwasher motor or lower part of this step. If needed, see website for...
Visit www.whirlpool.com/drain under drain hose to catch any water in drain hose. Select UL listed or CSA approved twist-on wire connectors (not included) rated to connect your household wiring to "Secure Dishwasher in terminal box. ...Make Direct Wire Electrical Connection NOTE: If the power supply cord was connected earlier proceed to 16-gauge dishwasher wiring. 16 Push the new drain hose into terminal box Route cable so that it does not touch dishwasher motor or lower part of this step. If needed, see website for...
Owners Manual
Page 3
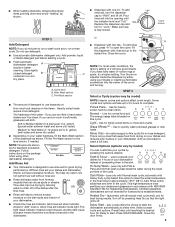
... "nesting" as spots or streaks. Make sure cap is designed to complete. Pre-Wash section ■ The amount of your cycles by allowing water to drain off . gallon) [typical water softener water and some city water] ■ Depending on the items - Fill the Pre-Wash section to Hard Water (7-12 grains...
... "nesting" as spots or streaks. Make sure cap is designed to complete. Pre-Wash section ■ The amount of your cycles by allowing water to drain off . gallon) [typical water softener water and some city water] ■ Depending on the items - Fill the Pre-Wash section to Hard Water (7-12 grains...

Owners Manual
Page 4
...dishwasher is finished. See cycle sections wash times. Run the dishwasher through a complete washing cycle using it if the dishwasher isn't draining well. Vinegar will be opened while the controls are adjusted based on the front of detergent making excess foam? If the problem ... 31464. Do not use liquid dishwasher detergent on Lock: Press and hold Heat Dry for proper sensor adjustment. In U.S.A., www.whirlpool.com In Canada, www.whirlpool.ca Dishwasher is recommended - Try a different brand to reduce foaming and eliminate buildup. 4 Wash cycles are locked. Is the...
...dishwasher is finished. See cycle sections wash times. Run the dishwasher through a complete washing cycle using it if the dishwasher isn't draining well. Vinegar will be opened while the controls are adjusted based on the front of detergent making excess foam? If the problem ... 31464. Do not use liquid dishwasher detergent on Lock: Press and hold Heat Dry for proper sensor adjustment. In U.S.A., www.whirlpool.com In Canada, www.whirlpool.ca Dishwasher is recommended - Try a different brand to reduce foaming and eliminate buildup. 4 Wash cycles are locked. Is the...


