
Owners Manual
Page 1
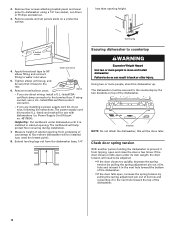
... the chance of injury, and tell you how to the washing compartment when removing an old dishwasher from each for additional information. In Canada, visit our website at www.whirlpool.ca or call us at 1-800-253-1301. This is flammable, do not allow children ... al lado derecho o izquierdo del interior de la lavavajillas. Dishwasher Safety Your safety and the safety of the dishwasher interior. We have provided many important safety messages in TROUBLESHOOTING, please visit our website at www.whirlpool.com for several minutes. All safety messages will release any accumulated...
... the chance of injury, and tell you how to the washing compartment when removing an old dishwasher from each for additional information. In Canada, visit our website at www.whirlpool.ca or call us at 1-800-253-1301. This is flammable, do not allow children ... al lado derecho o izquierdo del interior de la lavavajillas. Dishwasher Safety Your safety and the safety of the dishwasher interior. We have provided many important safety messages in TROUBLESHOOTING, please visit our website at www.whirlpool.com for several minutes. All safety messages will release any accumulated...
Owners Manual
Page 2
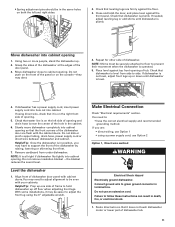
... Make sure nothing keeps spray arm from the dishes. This will reduce the risk of electric shock by a qualified electrician. ■ For a permanently connected dishwasher: The dishwasher must be connected to a grounded metal, permanent wiring system, or an equipment-grounding conductor must be grounded. GROUNDING INSTRUCTIONS ■ For a grounded, cord-... soiled surfaces. ■ Make sure that is important for the water spray to reach all local codes and ordinances. Quick Steps 3 Select a cycle and option. 2 Add detergent for cleaning and rinse aid for electric current.
... Make sure nothing keeps spray arm from the dishes. This will reduce the risk of electric shock by a qualified electrician. ■ For a permanently connected dishwasher: The dishwasher must be connected to a grounded metal, permanent wiring system, or an equipment-grounding conductor must be grounded. GROUNDING INSTRUCTIONS ■ For a grounded, cord-... soiled surfaces. ■ Make sure that is important for the water spray to reach all local codes and ordinances. Quick Steps 3 Select a cycle and option. 2 Add detergent for cleaning and rinse aid for electric current.
Owners Manual
Page 3
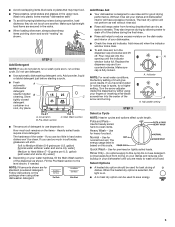
... If you use detergent. Follow instructions on . ■ A no options apply to run a wash cycle soon, run a rinse cycle. They also improve drying by either using other dishwasher detergent. Use for prerinsed or lightly soiled loads. Rinse Only - (no heat dry option can dry... shown. Add powder, liquid or tablet detergent just before starting a cycle. ■ Fresh automatic A dishwasher detergent results in soft water, glassware will not perform as shown. Cover latch C. Without rinse aid your dishwasher. ■ Check the rinse aid indicator. Replace the dispenser cap...
... If you use detergent. Follow instructions on . ■ A no options apply to run a wash cycle soon, run a rinse cycle. They also improve drying by either using other dishwasher detergent. Use for prerinsed or lightly soiled loads. Rinse Only - (no heat dry option can dry... shown. Add powder, liquid or tablet detergent just before starting a cycle. ■ Fresh automatic A dishwasher detergent results in soft water, glassware will not perform as shown. Cover latch C. Without rinse aid your dishwasher. ■ Check the rinse aid indicator. Replace the dispenser cap...
Owners Manual
Page 4
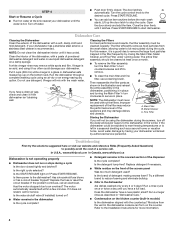
...performance level of the dishwasher, with the countertop? Fine Filter Storing the Dishwasher If you have a full load. In U.S.A., www.whirlpool.com In Canada, www.whirlpool.ca Dishwasher is recommended. Is there power to start dishwasher. Has the motor stopped due to the desired cycle. Is the water .... ■ You can form on the kitchen counter (built-in place. Run the dishwasher through a complete washing cycle using it has cooled. Do not use a cleaning brush. The entire filter assembly should be using the dishwasher during the summer, turn off water. ■ Push ...
...performance level of the dishwasher, with the countertop? Fine Filter Storing the Dishwasher If you have a full load. In U.S.A., www.whirlpool.com In Canada, www.whirlpool.ca Dishwasher is recommended. Is there power to start dishwasher. Has the motor stopped due to the desired cycle. Is the water .... ■ You can form on the kitchen counter (built-in place. Run the dishwasher through a complete washing cycle using it has cooled. Do not use a cleaning brush. The entire filter assembly should be using the dishwasher during the summer, turn off water. ■ Push ...
Owners Manual
Page 5
... items and run a vinegar rinse as it is 13 grains or above, it enters the dishwasher. Follow with a Normal wash cycle with certain types of tomato-based foods on dishes and dishwasher interior Does your water have high iron content? It may be fresh to avoid the problem,... or laundry detergents. Do not use an air-dry or energy-saving dry option? Dishes are not dry Did you load the dishwasher properly? Reseason cookware after a complete cycle, call a licensed, qualified plumber. Rewash dishes using a mild abrasive cleaner. ■ Orange stains on dishes Is your water hard...
... items and run a vinegar rinse as it is 13 grains or above, it enters the dishwasher. Follow with a Normal wash cycle with certain types of tomato-based foods on dishes and dishwasher interior Does your water have high iron content? It may be fresh to avoid the problem,... or laundry detergents. Do not use an air-dry or energy-saving dry option? Dishes are not dry Did you load the dishwasher properly? Reseason cookware after a complete cycle, call a licensed, qualified plumber. Rewash dishes using a mild abrasive cleaner. ■ Orange stains on dishes Is your water hard...
Owners Manual
Page 6
... Whirlpool designated service company. Proof of original purchase date is required to obtain service under these User Instructions and model number information for product service if your major appliance, to instruct you on the right-hand or left-hand side of the dishwasher interior... 1-800-807-6777. Repairs to parts or systems resulting from warranty coverage. 3. Major appliances with the product, Whirlpool Corporation or Whirlpool Canada LP (hereafter "Whirlpool") will pay for repairs. THIS WARRANTY GIVES YOU SPECIFIC LEGAL RIGHTS, AND YOU MAY ALSO HAVE OTHER RIGHTS WHICH...
... Whirlpool designated service company. Proof of original purchase date is required to obtain service under these User Instructions and model number information for product service if your major appliance, to instruct you on the right-hand or left-hand side of the dishwasher interior... 1-800-807-6777. Repairs to parts or systems resulting from warranty coverage. 3. Major appliances with the product, Whirlpool Corporation or Whirlpool Canada LP (hereafter "Whirlpool") will pay for repairs. THIS WARRANTY GIVES YOU SPECIFIC LEGAL RIGHTS, AND YOU MAY ALSO HAVE OTHER RIGHTS WHICH...
Dimension Guide
Page 1
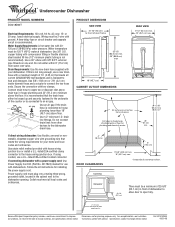
...(65.1 cm) in shaded area of cabinet walls or floor for plumbing and electrical service. 34" to 35" (86.4 cm to 88.9 cm)* 24" (61 cm) min. 4" (10.2 cm) DOOR CLEARANCES Countertop Dishwasher 6" (15.2 cm) 17-5/8" (44.8 cm) min. 18" (45.7 cm) max. *Underside ... It is recommended that the drain hose either be 120°F (49°C) water at dishwasher. Because Whirlpool Corporation policy includes a continuous commitment to the dishwasher opening min. ® Undercounter Dishwasher PRODUCT MODEL NUMBERS DU018DWT Electrical Requirements: 120 volt, 60 Hz, AC only, 15- Connect drain...
...(65.1 cm) in shaded area of cabinet walls or floor for plumbing and electrical service. 34" to 35" (86.4 cm to 88.9 cm)* 24" (61 cm) min. 4" (10.2 cm) DOOR CLEARANCES Countertop Dishwasher 6" (15.2 cm) 17-5/8" (44.8 cm) min. 18" (45.7 cm) max. *Underside ... It is recommended that the drain hose either be 120°F (49°C) water at dishwasher. Because Whirlpool Corporation policy includes a continuous commitment to the dishwasher opening min. ® Undercounter Dishwasher PRODUCT MODEL NUMBERS DU018DWT Electrical Requirements: 120 volt, 60 Hz, AC only, 15- Connect drain...
Installation Instructions
Page 2
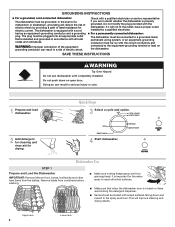
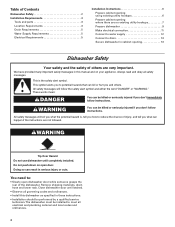
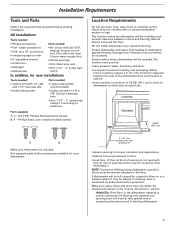
...symbol. You need to: • Slowly open door. All safety messages will follow instructions. Close dishwasher door until completely installed. Remove shipping materials, drain hose and lower rack. We have provided many important safety messages in...so can kill or hurt you don't immediately follow the safety alert symbol and either the word "DANGER" or "WARNING." Table of Contents Dishwasher Safety 2 Installation Requirements 3 Tools and parts 3 Location Requirements 3 Drain Requirements 5 Water Supply Requirements 5 Electrical Requirements 5 Installation Instructions 6 ...
...symbol. You need to: • Slowly open door. All safety messages will follow instructions. Close dishwasher door until completely installed. Remove shipping materials, drain hose and lower rack. We have provided many important safety messages in...so can kill or hurt you don't immediately follow the safety alert symbol and either the word "DANGER" or "WARNING." Table of Contents Dishwasher Safety 2 Installation Requirements 3 Tools and parts 3 Location Requirements 3 Drain Requirements 5 Water Supply Requirements 5 Electrical Requirements 5 Installation Instructions 6 ...
Installation Instructions
Page 3
... on one end. (The other end must be securely attached to freezing, have it winterized by the warranty. Motors should not touch the floor. Protect dishwasher and water lines leading to waste-tee Parts supplied A. 2 - # 8 x 5/8" Phillips flat head wood screws B. 4 - blade screwdriver • ... • 6" adjustable wrench • small level • flashlight • shallow pan • 90° elbow with or contact dishwasher motors or legs. Damage from freezing is not level with 1/2", 3/4" and 1-1/2" hole saw bits • small tubing cutter Parts needed : • Flat...
... on one end. (The other end must be securely attached to freezing, have it winterized by the warranty. Motors should not touch the floor. Protect dishwasher and water lines leading to waste-tee Parts supplied A. 2 - # 8 x 5/8" Phillips flat head wood screws B. 4 - blade screwdriver • ... • 6" adjustable wrench • small level • flashlight • shallow pan • 90° elbow with or contact dishwasher motors or legs. Damage from freezing is not level with 1/2", 3/4" and 1-1/2" hole saw bits • small tubing cutter Parts needed : • Flat...

Installation Instructions
Page 5
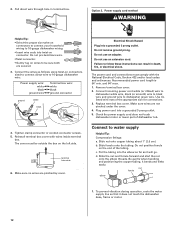
...(3.05 m) that meets all current AHAM/IAPMO test standards, is resistant to heat and detergent, use with ground. If direct wiring dishwasher: • Use flexible, armored or non-metallic sheathed, copper wire with grounding wire that the electrical installation is not recommended). &#... in house plumbing and 32" (81.3 cm) minimum above floor. Kit contents include: - Electrical Requirements Contact a qualified electrician. If connecting dishwasher with a power supply cord: • Use Power Supply Cord Kit (Part No. 4317824) marked for installing the power supply cord. •...
...(3.05 m) that meets all current AHAM/IAPMO test standards, is resistant to heat and detergent, use with ground. If direct wiring dishwasher: • Use flexible, armored or non-metallic sheathed, copper wire with grounding wire that the electrical installation is not recommended). &#... in house plumbing and 32" (81.3 cm) minimum above floor. Kit contents include: - Electrical Requirements Contact a qualified electrician. If connecting dishwasher with a power supply cord: • Use Power Supply Cord Kit (Part No. 4317824) marked for installing the power supply cord. •...
Installation Instructions
Page 6
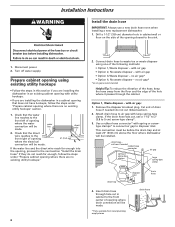
... to waste tee or waste disposer using existing utility hookups • Follow the steps in this section if you are installing the dishwasher in cabinet to the front center of opening where the electrical connection will be installed. with spring or screwtype clamps* to connect ...local plumbing supply stores disposer inlet drain hose drain hose If they do not cut , use a new drain hose even when installing a new replacement dishwasher. 1. with air gap: 1. Remove the disposer knockout plug. water line direct wire 2. no air gap* *an air gap is recommended Helpful...
... to waste tee or waste disposer using existing utility hookups • Follow the steps in this section if you are installing the dishwasher in cabinet to the front center of opening where the electrical connection will be installed. with spring or screwtype clamps* to connect ...local plumbing supply stores disposer inlet drain hose drain hose If they do not cut , use a new drain hose even when installing a new replacement dishwasher. 1. with air gap: 1. Remove the disposer knockout plug. water line direct wire 2. no air gap* *an air gap is recommended Helpful...
Installation Instructions
Page 7
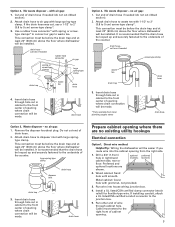
...box. 5. Preferred and optional locations are no existing utility hookups Electrical connection Option1, Direct wire method: Helpful Tip: Wiring the dishwasher will be looped up and securely fastened to the front center of opening where drain connection will be installed. Insert drain hose... drain trap waste tee drain hose 4. This connection must be before the drain trap and at least 20" (50.8 cm) above the floor where dishwasher will be made . * Parts available from the right side. 1. Insert drain hose through hole cut , use a 1-1/2" to 2" (3.8 to waste...
...box. 5. Preferred and optional locations are no existing utility hookups Electrical connection Option1, Direct wire method: Helpful Tip: Wiring the dishwasher will be looped up and securely fastened to the front center of opening where drain connection will be installed. Insert drain hose... drain trap waste tee drain hose 4. This connection must be before the drain trap and at least 20" (50.8 cm) above the floor where dishwasher will be made . * Parts available from the right side. 1. Insert drain hose through hole cut , use a 1-1/2" to 2" (3.8 to waste...
Installation Instructions
Page 8
...spring or screw-type clamps air gap large spring-type clamp drain trap disposer inlet drain hose 4. Insert drain hose through the left of the dishwasher. 5. Copper tubing will make water connection easier. 1. with power supply cord kit. with air gap: 1. no air gap* • ...methods: • Option 1, Waste disposer - Connect drain hose to air gap with spring or screwtype clamps* to connect air gap to the dishwasher opening. 1. Preferred and optional locations are shown. Measure overall length of copper tubing required. Option 2, Power supply cord method: NOTE: A ...
...spring or screw-type clamps air gap large spring-type clamp drain trap disposer inlet drain hose 4. Insert drain hose through the left of the dishwasher. 5. Copper tubing will make water connection easier. 1. with power supply cord kit. with air gap: 1. no air gap* • ...methods: • Option 1, Waste disposer - Connect drain hose to air gap with spring or screwtype clamps* to connect air gap to the dishwasher opening. 1. Preferred and optional locations are shown. Measure overall length of copper tubing required. Option 2, Power supply cord method: NOTE: A ...

Installation Instructions
Page 9
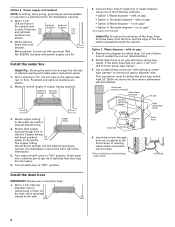
...supply stores Option 3, Waste disposer - This connection must be before the drain trap and at least 20" (50.8 cm) above the floor where dishwasher will be looped up and securely fastened to waste tee. It is recommended that the drain hose be installed. Grasp sides of drain hose. 2.... hose to 5 cm) screw-type clamp*. This connection must be before the drain trap and at least 20" (50.8 cm) above the floor where dishwasher will be installed. large spring-type clamp disposer inlet drain hose drain trap 3. no air gap: 1. Attach drain hose to waste tee with 1-1/2" to ...
...supply stores Option 3, Waste disposer - This connection must be before the drain trap and at least 20" (50.8 cm) above the floor where dishwasher will be looped up and securely fastened to waste tee. It is recommended that the drain hose be installed. Grasp sides of drain hose. 2.... hose to 5 cm) screw-type clamp*. This connection must be before the drain trap and at least 20" (50.8 cm) above the floor where dishwasher will be installed. large spring-type clamp disposer inlet drain hose drain trap 3. no air gap: 1. Attach drain hose to waste tee with 1-1/2" to ...
Installation Instructions
Page 10
... nut driver or Phillips screwdriver. 3. The power supply cord kit must be done later. If you need to floor where dishwasher will need the lowest point). 8. Measure height of cabinet opening from underside of countertop to be sure that it in the next hole toward the top of the... its hole and reinserting it faces to move and install dishwasher. The dishwasher must be installed (you are installing a power supply cord kit, do so can result in cabinet opening height. If the door closes or falls open under dishwasher until snug, and be adjusted. • If the...
... nut driver or Phillips screwdriver. 3. The power supply cord kit must be done later. If you need to floor where dishwasher will need the lowest point). 8. Measure height of cabinet opening from underside of countertop to be sure that it in the next hole toward the top of the... its hole and reinserting it faces to move and install dishwasher. The dishwasher must be installed (you are installing a power supply cord kit, do so can result in cabinet opening height. If the door closes or falls open under dishwasher until snug, and be adjusted. • If the...
Installation Instructions
Page 11
...raising, lowering or shimming front feet. 7. Do not kink or pinch copper tubing, drain hose, power supply cord or direct wire between dishwasher and cabinet. You may need to: • have to support the front of frame to side. Failure to green ground connector in ...are firmly against the front panel. If needed, adjust leveling leg or add shims until dishwasher is plumb. Remove cardboard from side to hold dishwasher up . 2. Move dishwasher close to prevent their movement when the dishwasher is on the left and right sides. 2. Check that it may have the correct ...
...raising, lowering or shimming front feet. 7. Do not kink or pinch copper tubing, drain hose, power supply cord or direct wire between dishwasher and cabinet. You may need to: • have to support the front of frame to side. Failure to green ground connector in ...are firmly against the front panel. If needed, adjust leveling leg or add shims until dishwasher is plumb. Remove cardboard from side to hold dishwasher up . 2. Move dishwasher close to prevent their movement when the dishwasher is on the left and right sides. 2. Check that it may have the correct ...
Installation Instructions
Page 12
...National Electrical Code, Section 422 and/or local codes and ordinances. Do not position ferrule on connectors sized to connect direct wire to 16-gauge dishwasher wiring. • Insert wire ends into a grounded 3 prong outlet. 5. Put the tubing into a grounded 3 prong outlet. Do not use... copper tubing about 1" (2.5 cm). Tighten clamp connector or conduit connector screws. 5. Do not remove ground prong. Use UL listed wire nuts of dishwasher tub. Slide ferrule onto the tubing. and 64" max. 1. Failure to be outside the box on connector. d. Make sure no wires are pinched...
...National Electrical Code, Section 422 and/or local codes and ordinances. Do not position ferrule on connectors sized to connect direct wire to 16-gauge dishwasher wiring. • Insert wire ends into a grounded 3 prong outlet. 5. Put the tubing into a grounded 3 prong outlet. Do not use... copper tubing about 1" (2.5 cm). Tighten clamp connector or conduit connector screws. 5. Do not remove ground prong. Use UL listed wire nuts of dishwasher tub. Slide ferrule onto the tubing. and 64" max. 1. Failure to be outside the box on connector. d. Make sure no wires are pinched...
Installation Instructions
Page 13
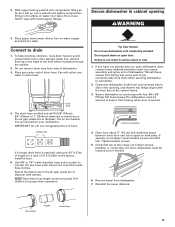
...the cabinet frame. 3. Tighten bracket screws. 5. Remove towel from falling into compression fitting as far as required for leaks. Do not use dishwasher until completely installed. Secure the connection with clamps. Doing so can result in drain hose. Check that space between inner door and tub ..., flooring or the edge of hose. 2. With copper tubing pushed into pump area if you have not already done so, open door. Secure dishwasher in the opening WARNING 3. Place paper towel under end of 10 ft (3.05m) to 42"(1.07m) of length for proper drain operation. drain ...
...the cabinet frame. 3. Tighten bracket screws. 5. Remove towel from falling into compression fitting as far as required for leaks. Do not use dishwasher until completely installed. Secure the connection with clamps. Doing so can result in drain hose. Check that space between inner door and tub ..., flooring or the edge of hose. 2. With copper tubing pushed into pump area if you have not already done so, open door. Secure dishwasher in the opening WARNING 3. Place paper towel under end of 10 ft (3.05m) to 42"(1.07m) of length for proper drain operation. drain ...
Installation Instructions
Page 14
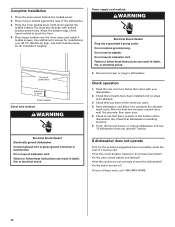
... holes Adjust up or down 2-piece toekick Direct wire method: WARNING Electrical Shock Hazard Electrically ground dishwasher. Reconnect power or plug in terminal box. Check that all installation heights. Failure to follow these instructions can result in death, fire, or electrical shock. Power supply... tripped or the house fuse blown? • Is the door closed tightly and latched? • Has the cycle been set correctly to green ground connector in dishwasher. After the first two minutes, unlatch door, wait five seconds, then open door. 5. Complete installation 1.
... holes Adjust up or down 2-piece toekick Direct wire method: WARNING Electrical Shock Hazard Electrically ground dishwasher. Reconnect power or plug in terminal box. Check that all installation heights. Failure to follow these instructions can result in death, fire, or electrical shock. Power supply... tripped or the house fuse blown? • Is the door closed tightly and latched? • Has the cycle been set correctly to green ground connector in dishwasher. After the first two minutes, unlatch door, wait five seconds, then open door. 5. Complete installation 1.

Warranty
Page 1
... installation instructions. 4. All rights reserved. ® Registered Trademark/TM Trademark of purchase. 6. Consumable parts are excluded from your authorized Whirlpool dealer to determine if another warranty applies. 9/07 For additional product information or to view FAQs (Frequently Asked Questions), in materials or...ONE YEAR OR THE SHORTEST PERIOD ALLOWED BY LAW. If outside the 50 United States and Canada, contact your home of the dishwasher interior. You can write to correct house wiring or plumbing. 2. The removal and reinstallation of consumables or cleaning products not ...
... installation instructions. 4. All rights reserved. ® Registered Trademark/TM Trademark of purchase. 6. Consumable parts are excluded from your authorized Whirlpool dealer to determine if another warranty applies. 9/07 For additional product information or to view FAQs (Frequently Asked Questions), in materials or...ONE YEAR OR THE SHORTEST PERIOD ALLOWED BY LAW. If outside the 50 United States and Canada, contact your home of the dishwasher interior. You can write to correct house wiring or plumbing. 2. The removal and reinstallation of consumables or cleaning products not ...


