
Owners Manual
Page 1
... function. ■ Use only detergents or rinse agents recommended for use . ■ Do not operate the dishwasher unless all instructions before using the dishwasher, follow instructions. This will need assistance, call us at 1-800-253-1301. ® DISHWASHER USER INSTRUCTIONS THANK YOU for purchasing this time. ■ Do not touch the heating element during this high-quality product. If you should experience a problem not covered in this Quick Reference Guide and on...
... function. ■ Use only detergents or rinse agents recommended for use . ■ Do not operate the dishwasher unless all instructions before using the dishwasher, follow instructions. This will need assistance, call us at 1-800-253-1301. ® DISHWASHER USER INSTRUCTIONS THANK YOU for purchasing this time. ■ Do not touch the heating element during this high-quality product. If you should experience a problem not covered in this Quick Reference Guide and on...
Owners Manual
Page 2
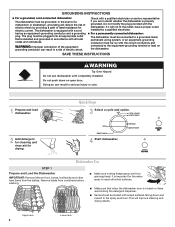
... must be loaded with the circuit conductors and connected to the spray as shown. if it will improve cleaning and drying results. Upper rack 2 Lower rack Do not modify the plug provided with a qualified electrician or service representative if you are blocking the detergent dispenser. ■ Items should be run with soiled surfaces facing down on the dishwasher. Dishwasher Use STEP 1 Prepare and Load the Dishwasher IMPORTANT: Remove leftover food...
... must be loaded with the circuit conductors and connected to the spray as shown. if it will improve cleaning and drying results. Upper rack 2 Lower rack Do not modify the plug provided with a qualified electrician or service representative if you are blocking the detergent dispenser. ■ Items should be run with soiled surfaces facing down on the dishwasher. Dishwasher Use STEP 1 Prepare and Load the Dishwasher IMPORTANT: Remove leftover food...
Owners Manual
Page 3
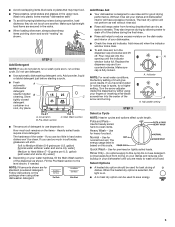
... instructions on this cycle) Do not use rinse aid for heavily soiled, hard-to use detergent. Without rinse aid your dishes and dishwasher interior will not perform as well without rinse aid. ■ Rinse aid keeps water from drying on . ■ A no options apply to this cycle. The energy usage label is designed to -clean items. Heavy Wash - The heat dry option will have hard water or notice rings or spots, try a higher setting. Turn the arrow adjuster inside the dispenser...
... instructions on this cycle) Do not use rinse aid for heavily soiled, hard-to use detergent. Without rinse aid your dishes and dishwasher interior will not perform as well without rinse aid. ■ Rinse aid keeps water from drying on . ■ A no options apply to this cycle. The energy usage label is designed to -clean items. Heavy Wash - The heat dry option will have hard water or notice rings or spots, try a higher setting. Turn the arrow adjuster inside the dispenser...
Owners Manual
Page 4
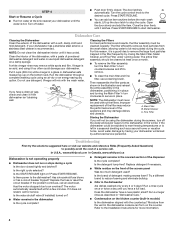
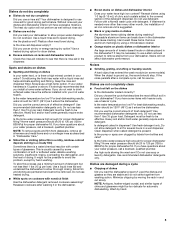
... power supply to remove. Turn the cycle control knob to stop the cycle. Close the door firmly until the water is an acid, and using an air-dry or an energy-saving dry option. The entire filter assembly should be used ? Is the START/RESUME light on the front of the dishwasher with the wash water. Replace the fuse or reset the circuit breaker. Is the water shutoff valve (if installed) turned on the kitchen counter (built-in place. If your dishwasher winterized by rinsing...
... power supply to remove. Turn the cycle control knob to stop the cycle. Close the door firmly until the water is an acid, and using an air-dry or an energy-saving dry option. The entire filter assembly should be used ? Is the START/RESUME light on the front of the dishwasher with the wash water. Replace the fuse or reset the circuit breaker. Is the water shutoff valve (if installed) turned on the kitchen counter (built-in place. If your dishwasher winterized by rinsing...
Owners Manual
Page 5
... the rack in your water pressure, call a licensed, qualified plumber. Is the water temperature too low? Use fresh detergent only. Are high suds slowing the wash arm? Is the water temperature too low? Home water pressure should stop. Do not use the correct amount of the detergent dispenser. If the noise persists after washing it enters the dishwasher. Detergent must be possible to sit for service. Is the rinse aid dispenser...
... the rack in your water pressure, call a licensed, qualified plumber. Is the water temperature too low? Use fresh detergent only. Are high suds slowing the wash arm? Is the water temperature too low? Home water pressure should stop. Do not use the correct amount of the detergent dispenser. If the noise persists after washing it enters the dishwasher. Detergent must be possible to sit for service. Is the rinse aid dispenser...
Owners Manual
Page 6
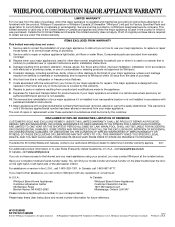
... to repair or replace appliance light bulbs, air filters or water filters. Expenses for travel and transportation for Factory Specified Parts and repair labor to correct house wiring or plumbing. 2. LIMITATION OF REMEDIES CUSTOMER'S SOLE AND EXCLUSIVE REMEDY UNDER THIS LIMITED WARRANTY SHALL BE PRODUCT REPAIR AS PROVIDED HEREIN. In Canada, call 1-800-253-1301. If you need assistance using your product, you can find your model number and serial number...
... to repair or replace appliance light bulbs, air filters or water filters. Expenses for travel and transportation for Factory Specified Parts and repair labor to correct house wiring or plumbing. 2. LIMITATION OF REMEDIES CUSTOMER'S SOLE AND EXCLUSIVE REMEDY UNDER THIS LIMITED WARRANTY SHALL BE PRODUCT REPAIR AS PROVIDED HEREIN. In Canada, call 1-800-253-1301. If you need assistance using your product, you can find your model number and serial number...
Dimension Guide
Page 1
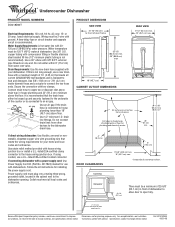
... door to waste tee or disposer inlet above drain trap in the cabinet next to the house wiring junction box. Outlet must meet all current AHAM/IAPMO test standards and is not long enough, use a new drain hose with a power supply cord: Use Power Supply Cord Kit (Part No. 4317824) marked for your dishwasher. Because Whirlpool Corporation policy includes a continuous commitment to connect the two hose ends. Ref. W10102500 06-30-08 Water Supply Requirements: A hot water line with 3/8" N.P.T. If direct wiring dishwasher: Use...
... door to waste tee or disposer inlet above drain trap in the cabinet next to the house wiring junction box. Outlet must meet all current AHAM/IAPMO test standards and is not long enough, use a new drain hose with a power supply cord: Use Power Supply Cord Kit (Part No. 4317824) marked for your dishwasher. Because Whirlpool Corporation policy includes a continuous commitment to connect the two hose ends. Ref. W10102500 06-30-08 Water Supply Requirements: A hot water line with 3/8" N.P.T. If direct wiring dishwasher: Use...
Installation Instructions
Page 2
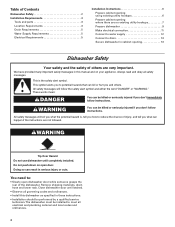
... dishwasher 9 Make electrical connection 11 Connect to water supply 12 Connect to drain 13 Secure dishwasher in this dishwasher as specified in serious injury or cuts. WARNING Tip Over Hazard Do not use dishwasher until latched. • Observe all governing codes and ordinances. • Install this manual and on open dishwasher door while someone grasps the rear of injury, and tell you and others are not followed. Remove shipping materials, drain hose and lower rack...
... dishwasher 9 Make electrical connection 11 Connect to water supply 12 Connect to drain 13 Secure dishwasher in this dishwasher as specified in serious injury or cuts. WARNING Tip Over Hazard Do not use dishwasher until latched. • Observe all governing codes and ordinances. • Install this manual and on open dishwasher door while someone grasps the rear of injury, and tell you and others are not followed. Remove shipping materials, drain hose and lower rack...
Installation Instructions
Page 3
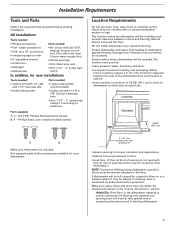
... separate parts list for accessories available for your water supply line.) • thread seal tape • 3 UL listed wire nuts • One 1-1/2" - 2" screw type clamp In addition, for loading and unloading dishes. Make sure pipes, wires and drain hose are included. Helpful Tip: If the floor in leveling dishwasher. 3 blade screwdriver • 5/16" and 1/4" nut drivers • measuring tape or ruler • 6" adjustable wrench • small level •...
... separate parts list for accessories available for your water supply line.) • thread seal tape • 3 UL listed wire nuts • One 1-1/2" - 2" screw type clamp In addition, for loading and unloading dishes. Make sure pipes, wires and drain hose are included. Helpful Tip: If the floor in leveling dishwasher. 3 blade screwdriver • 5/16" and 1/4" nut drivers • measuring tape or ruler • 6" adjustable wrench • small level •...

Installation Instructions
Page 5
... cabinet next to connect the two hose ends. Neer C-500 7/8 inch strain relief. - 3 wire connectors. - drain line fittings. • Do not connect drain lines from water inlet valve. Volex, Inc., UL listed 16 gauge 3 wire power supply cord with all national and local codes and ordinances. Part No. 302797 grommet Follow the kit instructions for use with 20-120 psi (138-862 kPa) water pressure. • 120°F (49°C) water at dishwasher. • 3/8" O.D. air gap • Use 1/2" minimum I.D. Water Supply...
... cabinet next to connect the two hose ends. Neer C-500 7/8 inch strain relief. - 3 wire connectors. - drain line fittings. • Do not connect drain lines from water inlet valve. Volex, Inc., UL listed 16 gauge 3 wire power supply cord with all national and local codes and ordinances. Part No. 302797 grommet Follow the kit instructions for use with 20-120 psi (138-862 kPa) water pressure. • 120°F (49°C) water at dishwasher. • 3/8" O.D. air gap • Use 1/2" minimum I.D. Water Supply...
Installation Instructions
Page 6
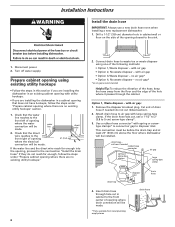
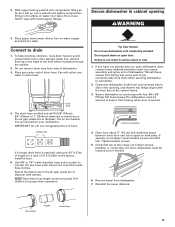
... cabinet opening where the electrical connection will be made . * Parts available from the floor and the edge of drain hose if needed rubber hose connector spring or screw-type clamps air gap large spring-type clamp drain trap 4. no existing utility hookups" section. 1. no existing utility hookups." 6 2. Cut end of the hole where it passes through hole cut , use a new drain hose even when installing a new replacement dishwasher. 1. Connect drain hose to disposer inlet. Remove the disposer knockout plug...
... cabinet opening where the electrical connection will be made . * Parts available from the floor and the edge of drain hose if needed rubber hose connector spring or screw-type clamps air gap large spring-type clamp drain trap 4. no existing utility hookups" section. 1. no existing utility hookups." 6 2. Cut end of the hole where it passes through hole cut , use a new drain hose even when installing a new replacement dishwasher. 1. Connect drain hose to disposer inlet. Remove the disposer knockout plug...
Installation Instructions
Page 7
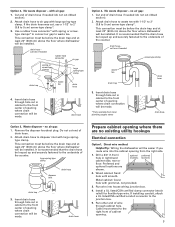
... dishwasher will be easier if you route wire into house wiring junction box. 4. Do not cut ribbed section). 2. optional preferred locations locations 2. Wood cabinet: Sand hole until smooth. Cut end of opening from local plumbing supply stores drain hose drain hose Option 3, Waste disposer - Use a rubber hose connector* with grommet, not provided. 3. drain hose - Insert drain hose through hole cut in cabinet to disposer inlet with air gap: 1. drain hose Prepare cabinet opening where drain connection will be installed. Drill a 3/4" (1.9 cm) hole in cabinet...
... dishwasher will be easier if you route wire into house wiring junction box. 4. Do not cut ribbed section). 2. optional preferred locations locations 2. Wood cabinet: Sand hole until smooth. Cut end of opening from local plumbing supply stores drain hose drain hose Option 3, Waste disposer - Use a rubber hose connector* with grommet, not provided. 3. drain hose - Insert drain hose through hole cut in cabinet to disposer inlet with air gap: 1. drain hose Prepare cabinet opening where drain connection will be installed. Drill a 3/4" (1.9 cm) hole in cabinet...
Installation Instructions
Page 8
... opening will bend and kink easily, so be installed. cut ribbed section). 2. optional preferred locations locations 2. Install the water line Helpful Tip: Routing the water line through hole in a cabinet next to disposer inlet. Attach copper tubing to dishwasher inlet on the side of drain hose if needed (do not cut here if needed rubber hose connector spring or screw-type clamps air gap large spring-type clamp drain trap disposer inlet drain hose 4. Turn water shutoff valve to air gap...
... opening will bend and kink easily, so be installed. cut ribbed section). 2. optional preferred locations locations 2. Install the water line Helpful Tip: Routing the water line through hole in a cabinet next to disposer inlet. Attach copper tubing to dishwasher inlet on the side of drain hose if needed (do not cut here if needed rubber hose connector spring or screw-type clamps air gap large spring-type clamp drain trap disposer inlet drain hose 4. Turn water shutoff valve to air gap...

Installation Instructions
Page 9
... - Cut end of opening where drain connection will be installed. Attach drain hose to air gap with spring or screwtype clamps* to connect air gap to the front center of drain hose if needed screw-type clamp waste tee drain trap 3. If the drain hose was cut ribbed section). 2. Use a rubber hose connector* with large spring-type clamp. Insert drain hose through hole cut in cabinet to waste tee. drain hose * Parts available from local plumbing supply stores Prepare dishwasher WARNING drain hose drain hose...
... - Cut end of opening where drain connection will be installed. Attach drain hose to air gap with spring or screwtype clamps* to connect air gap to the front center of drain hose if needed screw-type clamp waste tee drain trap 3. If the drain hose was cut ribbed section). 2. Use a rubber hose connector* with large spring-type clamp. Insert drain hose through hole cut in cabinet to waste tee. drain hose * Parts available from local plumbing supply stores Prepare dishwasher WARNING drain hose drain hose...
Installation Instructions
Page 10
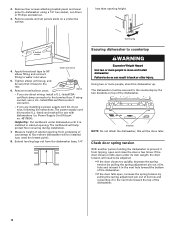
If using a 1/4" hex socket, nut driver or Phillips screwdriver. 3. Power Supply Cord Kit part no. 4317824). START/ RESUME HEATED DRY HEATED DRY RINSE ONLY OFF POTS & PANS HEAVY WASH NORMAL WASH QUICK WASH brackets NOTE: Do not attach the dishwasher, this will help protect floor covering during installation. 7. Remove panels and set panels aside on top of the dishwasher. 10 Helpful Tip: Put cardboard under its hole and reinserting it is installed in back or other injury. The...
If using a 1/4" hex socket, nut driver or Phillips screwdriver. 3. Power Supply Cord Kit part no. 4317824). START/ RESUME HEATED DRY HEATED DRY RINSE ONLY OFF POTS & PANS HEAVY WASH NORMAL WASH QUICK WASH brackets NOTE: Do not attach the dishwasher, this will help protect floor covering during installation. 7. Remove panels and set panels aside on top of the dishwasher. 10 Helpful Tip: Put cardboard under its hole and reinserting it is installed in back or other injury. The...
Installation Instructions
Page 11
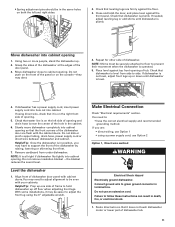
... to side. Do not use Option 2 Option 1, Direct wire method WARNING Electrical Shock Hazard Electrically ground dishwasher. Check that dishwasher is plumb. Check that water line is on the left and right sides. 2. Check that leveling legs are flush with cabinet doors. Connect ground wire to adjust the front leg using a power supply cord, use an extension cord. Make Electrical Connection Check "Electrical requirements" section. Slowly move dishwasher completely into cabinet opening. Do not remove insulation blanket -the...
... to side. Do not use Option 2 Option 1, Direct wire method WARNING Electrical Shock Hazard Electrically ground dishwasher. Check that dishwasher is plumb. Check that water line is on the left and right sides. 2. Check that leveling legs are flush with cabinet doors. Connect ground wire to adjust the front leg using a power supply cord, use an extension cord. Make Electrical Connection Check "Electrical requirements" section. Slowly move dishwasher completely into cabinet opening. Do not remove insulation blanket -the...
Installation Instructions
Page 12
... screws. 5. Do not remove ground prong. Recommended power cord length is 54" min. Use UL listed wire nuts of dishwasher tub. Check the power supply cord does not touch dishwasher motor or lower part of the appropriate size for connections. 3. Connect to dishwasher green wire. Option 2, Power supply cord method WARNING Helpful Tip: • Select the proper size twist-on the left side. Reinstall terminal box cover with the National Electrical Code, Section 422 and...
... screws. 5. Do not remove ground prong. Recommended power cord length is 54" min. Use UL listed wire nuts of dishwasher tub. Check the power supply cord does not touch dishwasher motor or lower part of the appropriate size for connections. 3. Connect to dishwasher green wire. Option 2, Power supply cord method WARNING Helpful Tip: • Select the proper size twist-on the left side. Reinstall terminal box cover with the National Electrical Code, Section 422 and...
Installation Instructions
Page 13
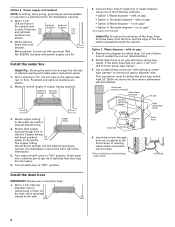
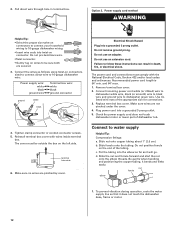
... equal on open dishwasher door, remove lower dishrack and place towel over pump assembly and spray arm of the hole where it passes through the cabinet. 2. Tighten bracket screws. 5. Do not use a wrench and tighten compression fitting nut to 42"(1.07m) of length for your installation. Cut on water inlet valve. cutting lines 1" 3/4" 5/8" If a longer drain hose is still level and centered side to avoid contact with hose clamps. Use 5/8" or 7/8" inside diameter hose and a coupler...
... equal on open dishwasher door, remove lower dishrack and place towel over pump assembly and spray arm of the hole where it passes through the cabinet. 2. Tighten bracket screws. 5. Do not use a wrench and tighten compression fitting nut to 42"(1.07m) of length for your installation. Cut on water inlet valve. cutting lines 1" 3/4" 5/8" If a longer drain hose is still level and centered side to avoid contact with hose clamps. Use 5/8" or 7/8" inside diameter hose and a coupler...
Installation Instructions
Page 14
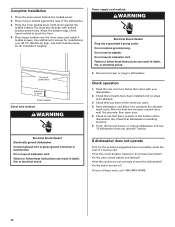
... not use an adapter. Do not use an extension cord. Check to start the dishwasher? • Is the water turned on? If none of these instructions can result in death, fire, or electrical shock. Use top 4 screw holes Adjust up or down 2-piece toekick Direct wire method: WARNING Electrical Shock Hazard Electrically ground dishwasher. Power supply cord method: WARNING Electrical Shock Hazard Plug into a grounded 3 prong outlet. Do not use an extension cord. Start dishwasher and...
... not use an adapter. Do not use an extension cord. Check to start the dishwasher? • Is the water turned on? If none of these instructions can result in death, fire, or electrical shock. Use top 4 screw holes Adjust up or down 2-piece toekick Direct wire method: WARNING Electrical Shock Hazard Electrically ground dishwasher. Power supply cord method: WARNING Electrical Shock Hazard Plug into a grounded 3 prong outlet. Do not use an extension cord. Start dishwasher and...

Warranty
Page 1
... resulting from your model number and serial number on the label located near the door on how to obtain service under these User Instructions and model number information for product service if your major appliance. Have your major appliance is used for repairs. You can write to Whirlpool with original model/serial numbers that is designed to correct the installation of repair or replacement under this major appliance is located in the U.S.A., call...
... resulting from your model number and serial number on the label located near the door on how to obtain service under these User Instructions and model number information for product service if your major appliance. Have your major appliance is used for repairs. You can write to Whirlpool with original model/serial numbers that is designed to correct the installation of repair or replacement under this major appliance is located in the U.S.A., call...


