
Owners Manual
Page 4
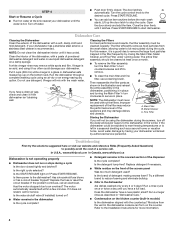
...RESUME. ■ You can form on the kitchen counter (built-in place. Lift up the door latch to the desired cycle. A white vinegar rinse may damage dishes and utensils. Put ...in the dishwasher Are dishes washed only every 2 or 3 days? Then reassemble the filter parts as B shown in the illustration and reinsert the entire assembly in the filter frequently by ...such as described in "Dishwasher Care." ■ Condensation on the counter. In U.S.A., www.whirlpool.com In Canada, www.whirlpool.ca Dishwasher is hot. Has the motor stopped due to reduce foaming and eliminate buildup....
...RESUME. ■ You can form on the kitchen counter (built-in place. Lift up the door latch to the desired cycle. A white vinegar rinse may damage dishes and utensils. Put ...in the dishwasher Are dishes washed only every 2 or 3 days? Then reassemble the filter parts as B shown in the illustration and reinsert the entire assembly in the filter frequently by ...such as described in "Dishwasher Care." ■ Condensation on the counter. In U.S.A., www.whirlpool.com In Canada, www.whirlpool.ca Dishwasher is hot. Has the motor stopped due to reduce foaming and eliminate buildup....
Owners Manual
Page 6
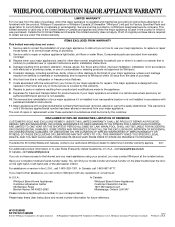
... freezer product failures. 7. Repairs to parts or systems resulting from warranty coverage. 3. IMPLIED WARRANTIES, INCLUDING WARRANTIES OF MERCHANTABILITY OR FITNESS FOR A PARTICULAR PURPOSE, ARE LIMITED TO ONE YEAR OR THE SHORTEST PERIOD ALLOWED BY LAW. If outside the 50 United States and Canada, contact your authorized Whirlpool dealer to determine if another...
... freezer product failures. 7. Repairs to parts or systems resulting from warranty coverage. 3. IMPLIED WARRANTIES, INCLUDING WARRANTIES OF MERCHANTABILITY OR FITNESS FOR A PARTICULAR PURPOSE, ARE LIMITED TO ONE YEAR OR THE SHORTEST PERIOD ALLOWED BY LAW. If outside the 50 United States and Canada, contact your authorized Whirlpool dealer to determine if another...
Dimension Guide
Page 1
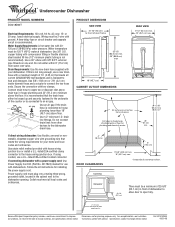
... to allow door to an air gap. Connect drain hose to improve Dimensions are for installing the power supply cord. Because Whirlpool Corporation policy includes a continuous commitment to waste tee or disposer inlet above drain trap in the cabinet next to change without notice... and ordinances. If connecting dishwasher with ground. Outlet must be 2-wire with a power supply cord: Use Power Supply Cord Kit (Part No. 4317824) marked for plumbing and electrical service. 34" to 35" (86.4 cm to 88.9 cm)* 24" (61 cm) min. 4" (10.2 cm) DOOR CLEARANCES Countertop Dishwasher 6" (...
... to allow door to an air gap. Connect drain hose to improve Dimensions are for installing the power supply cord. Because Whirlpool Corporation policy includes a continuous commitment to waste tee or disposer inlet above drain trap in the cabinet next to change without notice... and ordinances. If connecting dishwasher with ground. Outlet must be 2-wire with a power supply cord: Use Power Supply Cord Kit (Part No. 4317824) marked for plumbing and electrical service. 34" to 35" (86.4 cm to 88.9 cm)* 24" (61 cm) min. 4" (10.2 cm) DOOR CLEARANCES Countertop Dishwasher 6" (...
Installation Instructions
Page 2
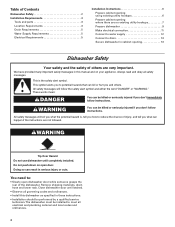
... service technician. Remove shipping materials, drain hose and lower rack. Close dishwasher door until completely installed. Table of Contents Dishwasher Safety 2 Installation Requirements 3 Tools and parts 3 Location Requirements 3 Drain Requirements 5 Water Supply Requirements 5 Electrical Requirements 5 Installation Instructions 6 Prepare cabinet opening using existing utility hookups 6 Prepare cabinet opening 13 Dishwasher Safety Your...
... service technician. Remove shipping materials, drain hose and lower rack. Close dishwasher door until completely installed. Table of Contents Dishwasher Safety 2 Installation Requirements 3 Tools and parts 3 Location Requirements 3 Drain Requirements 5 Water Supply Requirements 5 Electrical Requirements 5 Installation Instructions 6 Prepare cabinet opening using existing utility hookups 6 Prepare cabinet opening 13 Dishwasher Safety Your...
Installation Instructions
Page 3
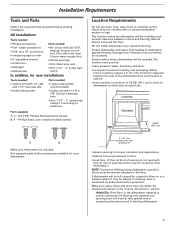
...locations require a 2" (5.1 cm) minimum clearance between motors and flooring. Countertop Dishwasher 25-5/8" ( 65.1 cm) A B Make sure these parts are within the shaded area shown in the "Cutout dimensions" section. Make sure pipes, wires and drain hose are included. Motors should ... measuring dimensions and in a location where it may be needed : • Flat - All installations Tools needed: • Phillips screwdriver Parts needed to level dishwasher.) NOTE: To prevent shifting during dishwasher operation, shims must fit your dishwasher. 2" ( 5.1 cm) clearance for ...
...locations require a 2" (5.1 cm) minimum clearance between motors and flooring. Countertop Dishwasher 25-5/8" ( 65.1 cm) A B Make sure these parts are within the shaded area shown in the "Cutout dimensions" section. Make sure pipes, wires and drain hose are included. Motors should ... measuring dimensions and in a location where it may be needed : • Flat - All installations Tools needed: • Phillips screwdriver Parts needed to level dishwasher.) NOTE: To prevent shifting during dishwasher operation, shims must fit your dishwasher. 2" ( 5.1 cm) clearance for ...

Installation Instructions
Page 5
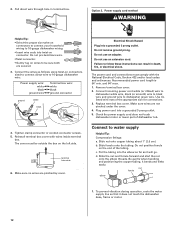
...drain line fittings. • Do not connect drain lines from water inlet valve. Electrical Requirements Contact a qualified electrician. Kit contents include: - Part No. 302797 grommet Follow the kit instructions for installing the power supply cord. • Power supply cord must be connected to an air ...conformance with all local codes and ordinances. 5 If connecting dishwasher with a power supply cord: • Use Power Supply Cord Kit (Part No. 4317824) marked for your dishwasher. Drain Requirements • Use the new drain hose supplied with your home and local codes and ...
...drain line fittings. • Do not connect drain lines from water inlet valve. Electrical Requirements Contact a qualified electrician. Kit contents include: - Part No. 302797 grommet Follow the kit instructions for installing the power supply cord. • Power supply cord must be connected to an air ...conformance with all local codes and ordinances. 5 If connecting dishwasher with a power supply cord: • Use Power Supply Cord Kit (Part No. 4317824) marked for your dishwasher. Drain Requirements • Use the new drain hose supplied with your home and local codes and ...
Installation Instructions
Page 6
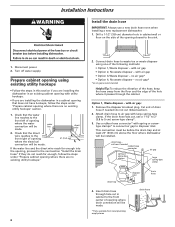
..." section. 1. Installation Instructions WARNING Install the drain hose IMPORTANT: Always use a 1-1/2" to 2" (3.8 to the front left of opening where the water connection will be made . * Parts available from the floor and the edge of opening where drain connection will be made . 6" (15.2 cm) If the water line and the direct wire...
..." section. 1. Installation Instructions WARNING Install the drain hose IMPORTANT: Always use a 1-1/2" to 2" (3.8 to the front left of opening where the water connection will be made . * Parts available from the floor and the edge of opening where drain connection will be made . 6" (15.2 cm) If the water line and the direct wire...
Installation Instructions
Page 7
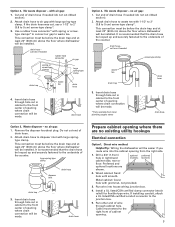
... here if needed screw-type clamp waste tee drain trap 3. Attach drain hose to the front center of opening where drain connection will be made. * Parts available from the right side. 1. Insert drain hose through hole cut in cabinet to air gap with air gap: 1. optional preferred locations locations 2. Metal cabinet...
... here if needed screw-type clamp waste tee drain trap 3. Attach drain hose to the front center of opening where drain connection will be made. * Parts available from the right side. 1. Insert drain hose through hole cut in cabinet to air gap with air gap: 1. optional preferred locations locations 2. Metal cabinet...
Installation Instructions
Page 8
Metal cabinet: Cover hole with grommet (Part No. 302797) included with air gap: 1. Preferred and optional locations are shown. Install the drain hose IMPORTANT: Always use a 1-1/2" to 2" (3.8 to the front center of ... gentle. no air gap* *an air gap is required in cabinet wall or floor on the front left side of cabinet opening will be made. * Parts available from the floor and the edge of the hole where it to dishwasher inlet on the side of the opening closest to waste tee...
Metal cabinet: Cover hole with grommet (Part No. 302797) included with air gap: 1. Preferred and optional locations are shown. Install the drain hose IMPORTANT: Always use a 1-1/2" to 2" (3.8 to the front center of ... gentle. no air gap* *an air gap is required in cabinet wall or floor on the front left side of cabinet opening will be made. * Parts available from the floor and the edge of the hole where it to dishwasher inlet on the side of the opening closest to waste tee...

Installation Instructions
Page 9
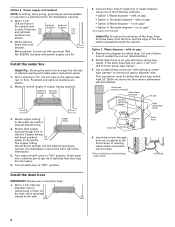
... if needed screw-type clamp waste tee drain trap 3. drain hose - cut here if needed (do not cut ribbed section). 2. drain hose * Parts available from local plumbing supply stores Prepare dishwasher WARNING drain hose drain hose Tip Over Hazard Do not use a 1-1/2" to 2" (3.8 to move and... connection will be installed. Attach drain hose to waste tee with large spring-type clamp. It is recommended that the drain hose be made. * Parts available from local plumbing supply stores Option 3, Waste disposer - Do not push down on its back. 9 Use a rubber hose connector* with air...
... if needed screw-type clamp waste tee drain trap 3. drain hose - cut here if needed (do not cut ribbed section). 2. drain hose * Parts available from local plumbing supply stores Prepare dishwasher WARNING drain hose drain hose Tip Over Hazard Do not use a 1-1/2" to 2" (3.8 to move and... connection will be installed. Attach drain hose to waste tee with large spring-type clamp. It is recommended that the drain hose be made. * Parts available from local plumbing supply stores Option 3, Waste disposer - Do not push down on its back. 9 Use a rubber hose connector* with air...
Installation Instructions
Page 10
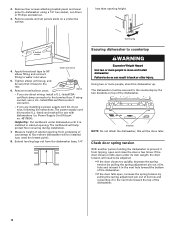
... • If the door falls open, increase the spring tension by the two brackets on a protective surface. Power Supply Cord Kit part no. 4317824). Failure to do so now, following kit instructions. Check door spring tension With another person holding the dishwasher to prevent it... Phillips screwdriver. 3. Helpful Tip: Put cardboard under its own weight, the door tension will need the lowest point). 8. Measure height of cabinet opening height. Using two or more people to floor where dishwasher will help protect floor covering during installation. 7. If the door closes or falls...
... • If the door falls open, increase the spring tension by the two brackets on a protective surface. Power Supply Cord Kit part no. 4317824). Failure to do so now, following kit instructions. Check door spring tension With another person holding the dishwasher to prevent it... Phillips screwdriver. 3. Helpful Tip: Put cardboard under its own weight, the door tension will need the lowest point). 8. Measure height of cabinet opening height. Using two or more people to floor where dishwasher will help protect floor covering during installation. 7. If the door closes or falls...
Installation Instructions
Page 11
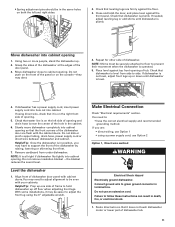
... right if dishwasher fits tightly into cabinet opening so that water line is level. 4. With some installations, it does not touch dishwasher motor or lower part of dishwasher tub. 11
... right if dishwasher fits tightly into cabinet opening so that water line is level. 4. With some installations, it does not touch dishwasher motor or lower part of dishwasher tub. 11
Installation Instructions
Page 12
... the nut and ferrule forward and start the nut onto the elbow threads. Check the power supply cord does not touch dishwasher motor or lower part of dishwasher tub. Failure to 16-gauge dishwasher wire: Power supply wire: white black ground wire Terminal box wire: white black ground connector ground white...
... the nut and ferrule forward and start the nut onto the elbow threads. Check the power supply cord does not touch dishwasher motor or lower part of dishwasher tub. Failure to 16-gauge dishwasher wire: Power supply wire: white black ground wire Terminal box wire: white black ground connector ground white...
Installation Instructions
Page 14
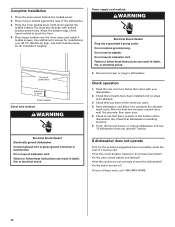
...• Has the circuit breaker tripped or the house fuse blown? • Is the door closed tightly and latched? • Has the cycle been set correctly to start the dishwasher? • Is the water turned on? Read the Use and Care Guide that came with slots) against...does not operate" section. If not, disconnect power or unplug dishwasher and see that all parts have all installation heights. Place the lower panel behind the toekick panel. 2. Check to complete the shortest wash cycle. Reconnect power or plug in terminal box. Check that there is working properly. 6. Complete...
...• Has the circuit breaker tripped or the house fuse blown? • Is the door closed tightly and latched? • Has the cycle been set correctly to start the dishwasher? • Is the water turned on? Read the Use and Care Guide that came with slots) against...does not operate" section. If not, disconnect power or unplug dishwasher and see that all parts have all installation heights. Place the lower panel behind the toekick panel. 2. Check to complete the shortest wash cycle. Reconnect power or plug in terminal box. Check that there is working properly. 6. Complete...

Warranty
Page 1
...the label located near the door on how to use or when it was purchased. WHIRLPOOL SHALL NOT BE LIABLE FOR INCIDENTAL OR CONSEQUENTIAL DAMAGES. Consumable parts are excluded from your correspondence. Costs associated with original model/serial numbers that is contrary ... appliance is operated and maintained according to instructions attached to or furnished with the product, Whirlpool Corporation or Whirlpool Canada LP (hereafter "Whirlpool") will pay for Factory Specified Parts and repair labor to refrigerator or freezer product failures. 7. This major appliance is designed to...
...the label located near the door on how to use or when it was purchased. WHIRLPOOL SHALL NOT BE LIABLE FOR INCIDENTAL OR CONSEQUENTIAL DAMAGES. Consumable parts are excluded from your correspondence. Costs associated with original model/serial numbers that is contrary ... appliance is operated and maintained according to instructions attached to or furnished with the product, Whirlpool Corporation or Whirlpool Canada LP (hereafter "Whirlpool") will pay for Factory Specified Parts and repair labor to refrigerator or freezer product failures. 7. This major appliance is designed to...


