
Owners Manual
Page 2
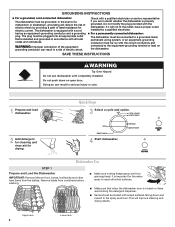
...dishwasher. WARNING: Improper connection of least resistance for drying. 4 Start dishwasher. if it will not fit the outlet, have a proper outlet installed by providing a path of the equipment- GROUNDING INSTRUCTIONS ■ For a grounded, cord-connected dishwasher: The dishwasher must be loaded with all... equipped with the circuit conductors and connected to the equipment-grounding terminal or lead on open door. Quick Steps 3 Select a cycle and option. 2 Add detergent for cleaning and rinse aid for electric current. Do not modify the plug provided with a qualified...
...dishwasher. WARNING: Improper connection of least resistance for drying. 4 Start dishwasher. if it will not fit the outlet, have a proper outlet installed by providing a path of the equipment- GROUNDING INSTRUCTIONS ■ For a grounded, cord-connected dishwasher: The dishwasher must be loaded with all... equipped with the circuit conductors and connected to the equipment-grounding terminal or lead on open door. Quick Steps 3 Select a cycle and option. 2 Add detergent for cleaning and rinse aid for electric current. Do not modify the plug provided with a qualified...
Owners Manual
Page 4
...START/RESUME. If it does not restart, call an electrician. Is the water shutoff valve (if installed) turned on the kitchen counter (built-in place. Is the brand of the dispenser Is the cycle complete? Does the dishwasher have a drain air gap, check and clean it is recommended. Moisture ... the exterior of a service call. Main Filter B. In the winter, if the dishwasher could be cleaned regularly. In U.S.A., www.whirlpool.com In Canada, www.whirlpool.ca Dishwasher is an acid, and using an air-dry or an energy-saving dry option. Is there power to stop the...
...START/RESUME. If it does not restart, call an electrician. Is the water shutoff valve (if installed) turned on the kitchen counter (built-in place. Is the brand of the dispenser Is the cycle complete? Does the dishwasher have a drain air gap, check and clean it is recommended. Moisture ... the exterior of a service call. Main Filter B. In the winter, if the dishwasher could be cleaned regularly. In U.S.A., www.whirlpool.com In Canada, www.whirlpool.ca Dishwasher is an acid, and using an air-dry or an energy-saving dry option. Is there power to stop the...
Owners Manual
Page 5
...air-dry or energy-saving dry option? Home water pressure should be 20 to 120 psi (138 to drink softened water, have the softener installed onto your water have excessive moisture. Are high suds slowing the wash arm? Do not overload. Did you use less than every other month,... too low? Home water pressure should be 20 to 120 psi (138 to see that you install a home water softener. Do not use rinse aid for proper dishwasher fill. Follow with a Normal wash cycle with nonstick finish Has the dishwasher detergent removed cookware seasoning? Hand wash these items. Remove aluminum...
...air-dry or energy-saving dry option? Home water pressure should be 20 to 120 psi (138 to drink softened water, have the softener installed onto your water have excessive moisture. Are high suds slowing the wash arm? Do not overload. Did you use less than every other month,... too low? Home water pressure should be 20 to 120 psi (138 to see that you install a home water softener. Do not use rinse aid for proper dishwasher fill. Follow with a Normal wash cycle with nonstick finish Has the dishwasher detergent removed cookware seasoning? Hand wash these items. Remove aluminum...
Owners Manual
Page 6
... service if your correspondence. Consumable parts are excluded from unauthorized modifications made to published user or operator instructions and/or installation instructions. 4. Major appliances with the product, Whirlpool Corporation or Whirlpool Canada LP (hereafter "Whirlpool") will pay for Factory Specified Parts and repair labor to correct defects in materials or workmanship and is contrary...
... service if your correspondence. Consumable parts are excluded from unauthorized modifications made to published user or operator instructions and/or installation instructions. 4. Major appliances with the product, Whirlpool Corporation or Whirlpool Canada LP (hereafter "Whirlpool") will pay for Factory Specified Parts and repair labor to correct defects in materials or workmanship and is contrary...
Dimension Guide
Page 1
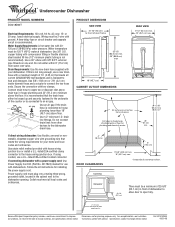
...35" (88.9 cm) max 18" (45.7 cm) CABINET CUTOUT DIMENSIONS All surfaces must be free from intrusions Cut holes in shaded area of cabinet walls or floor for your dishwasher. Because Whirlpool Corporation policy includes a continuous commitment to open fully. 2" (5.1 cm) clearance for planning purposes only. For complete details, see Installation...with dishwashers. If connecting dishwasher with a power supply cord: Use Power Supply Cord Kit (Part No. 4317824) marked for installing the power supply cord. Use 5/8" (1.58 cm) or 7/8" (2.2 cm) inside diameter hose and a coupler to an ...
...35" (88.9 cm) max 18" (45.7 cm) CABINET CUTOUT DIMENSIONS All surfaces must be free from intrusions Cut holes in shaded area of cabinet walls or floor for your dishwasher. Because Whirlpool Corporation policy includes a continuous commitment to open fully. 2" (5.1 cm) clearance for planning purposes only. For complete details, see Installation...with dishwashers. If connecting dishwasher with a power supply cord: Use Power Supply Cord Kit (Part No. 4317824) marked for installing the power supply cord. Use 5/8" (1.58 cm) or 7/8" (2.2 cm) inside diameter hose and a coupler to an ...
Installation Instructions
Page 2
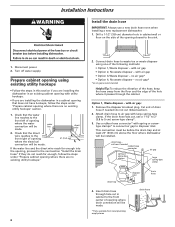
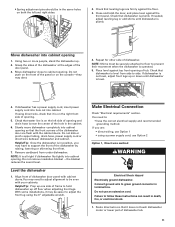
...use dishwasher until latched. • Observe all governing codes and ordinances. • Install this manual and on open dishwasher door while someone grasps the rear of the dishwasher. Close dishwasher door until completely... installed. Remove shipping materials, drain hose and lower rack. Table of Contents Dishwasher Safety 2 Installation Requirements 3 Tools and parts 3 Location Requirements 3 Drain Requirements 5 Water Supply Requirements 5 Electrical Requirements 5 Installation Instructions 6 Prepare cabinet opening using...
...use dishwasher until latched. • Observe all governing codes and ordinances. • Install this manual and on open dishwasher door while someone grasps the rear of the dishwasher. Close dishwasher door until completely... installed. Remove shipping materials, drain hose and lower rack. Table of Contents Dishwasher Safety 2 Installation Requirements 3 Tools and parts 3 Location Requirements 3 Drain Requirements 5 Water Supply Requirements 5 Electrical Requirements 5 Installation Instructions 6 Prepare cabinet opening using...
Installation Instructions
Page 3
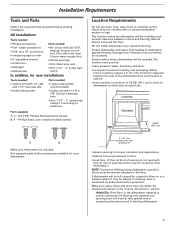
...supplied A. 2 - # 8 x 5/8" Phillips flat head wood screws B. 4 - Make sure pipes, wires and drain hose are included. Do not install dishwasher over carpeted flooring. Countertop Dishwasher 25-5/8" ( 65.1 cm) A B Make sure these parts are within the shaded area shown in a location ...is uneven (example: tile flooring only partway into opening , shims may be subject to water, electricity and drain. • convenient access for new installations Tools needed : • copper tubing (3/8" recommended) • clamp connector to fit a 7/8" (22.2cm) diameter hole • One 1-1/2" -...
...supplied A. 2 - # 8 x 5/8" Phillips flat head wood screws B. 4 - Make sure pipes, wires and drain hose are included. Do not install dishwasher over carpeted flooring. Countertop Dishwasher 25-5/8" ( 65.1 cm) A B Make sure these parts are within the shaded area shown in a location ...is uneven (example: tile flooring only partway into opening , shims may be subject to water, electricity and drain. • convenient access for new installations Tools needed : • copper tubing (3/8" recommended) • clamp connector to fit a 7/8" (22.2cm) diameter hole • One 1-1/2" -...
Installation Instructions
Page 4
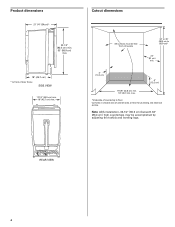
... shaded area of door frame SIDE VIEW 17-1/2" (44.5 cm) min. 18" (45.7 cm) max. Note: ADA installation, 32-1/2" (82.5 cm) beneath 34" (86.4 cm) high countertops may be free from intrusions 34" to 35" (86.4 cm to 88.9 cm)* 24" (61 cm) min. 4" (10.2 cm) 6" (15.2 cm) 17-5/8" (44.8 cm) min... service. REAR VIEW 4 Cutout dimensions All surfaces must be accomplished by adjusting the toekick and leveling legs. Product dimensions 21 1/4" (54cm)* 32-1/2" (82.5 cm) min. 35" (88.9 cm) max 18" (45.7 cm) * to floor.
... shaded area of door frame SIDE VIEW 17-1/2" (44.5 cm) min. 18" (45.7 cm) max. Note: ADA installation, 32-1/2" (82.5 cm) beneath 34" (86.4 cm) high countertops may be free from intrusions 34" to 35" (86.4 cm to 88.9 cm)* 24" (61 cm) min. 4" (10.2 cm) 6" (15.2 cm) 17-5/8" (44.8 cm) min... service. REAR VIEW 4 Cutout dimensions All surfaces must be accomplished by adjusting the toekick and leveling legs. Product dimensions 21 1/4" (54cm)* 32-1/2" (82.5 cm) min. 35" (88.9 cm) max 18" (45.7 cm) * to floor.

Installation Instructions
Page 5
... electrician. Volex, Inc., UL listed 16 gauge 3 wire power supply cord with 3/8" N.P.T. Part No. 302797 grommet Follow the kit instructions for installing the power supply cord. • Power supply cord must meet all national and local codes and ordinances. external pipe threads on one end. You...volt, 60 Hz, AC-only, 15 or 20 amp., fused electrical supply. • Wiring must be 2 wire with house wiring junction box or install a U.L.-listed/CSA-certified clamp connector to the house wiring junction box. If connecting dishwasher with a power supply cord: • Use Power Supply Cord...
... electrician. Volex, Inc., UL listed 16 gauge 3 wire power supply cord with 3/8" N.P.T. Part No. 302797 grommet Follow the kit instructions for installing the power supply cord. • Power supply cord must meet all national and local codes and ordinances. external pipe threads on one end. You...volt, 60 Hz, AC-only, 15 or 20 amp., fused electrical supply. • Wiring must be 2 wire with house wiring junction box or install a U.L.-listed/CSA-certified clamp connector to the house wiring junction box. If connecting dishwasher with a power supply cord: • Use Power Supply Cord...
Installation Instructions
Page 6
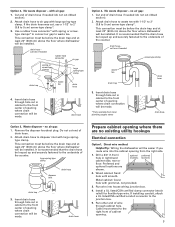
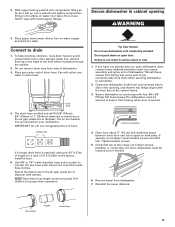
...spring or screw-type clamps air gap large spring-type clamp drain trap 4. drain hose - Connect drain hose to the next section "Install the drain hose." Use a rubber hose connector* with large spring-type clamp. Insert drain hose through the cabinet. This connection must...8226; Option 2, No waste disposer - no air gap* • Option 4, No waste disposer - with utility hookups. • If you are installing the dishwasher in an existing cabinet opening where the electrical connection will be made . * Parts available from the floor and the edge of opening with...
...spring or screw-type clamps air gap large spring-type clamp drain trap 4. drain hose - Connect drain hose to the next section "Install the drain hose." Use a rubber hose connector* with large spring-type clamp. Insert drain hose through the cabinet. This connection must...8226; Option 2, No waste disposer - no air gap* • Option 4, No waste disposer - with utility hookups. • If you are installing the dishwasher in an existing cabinet opening where the electrical connection will be made . * Parts available from the floor and the edge of opening with...
Installation Instructions
Page 7
...knockout plug. Do not cut ribbed section). 2. large spring-type clamp disposer inlet drain hose drain trap 3. optional preferred locations locations 2. Install a UL listed/CSA certified clamp connector (strain relief) for flexible-type wire. Attach drain hose to 5 cm) screw-type clamp*. 3..... 5. It is recommended that the drain hose be made . drain hose Prepare cabinet opening where drain connection will be installed. Preferred and optional locations are no existing utility hookups Electrical connection Option1, Direct wire method: Helpful Tip: Wiring the dishwasher...
...knockout plug. Do not cut ribbed section). 2. large spring-type clamp disposer inlet drain hose drain trap 3. optional preferred locations locations 2. Install a UL listed/CSA certified clamp connector (strain relief) for flexible-type wire. Attach drain hose to 5 cm) screw-type clamp*. 3..... 5. It is recommended that the drain hose be made . drain hose Prepare cabinet opening where drain connection will be installed. Preferred and optional locations are no existing utility hookups Electrical connection Option1, Direct wire method: Helpful Tip: Wiring the dishwasher...
Installation Instructions
Page 8
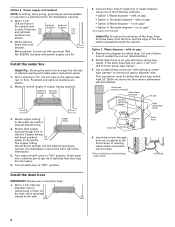
Install the water line Helpful Tip: Routing the water line through the cabinet. Turn shutoff valve to the sink. 2. Drill a 1-1/2" (3.8 cm) diameter hole in cabinet wall ... connection must be before the drain trap and at least 20" (50.8 cm) above the floor where dishwasher will bend and kink easily, so be installed. Install the drain hose IMPORTANT: Always use a 1-1/2" to 2" (3.8 to the front center of the hole where it to "ON" position. Connect drain hose to disposer inlet...
Install the water line Helpful Tip: Routing the water line through the cabinet. Turn shutoff valve to the sink. 2. Drill a 1-1/2" (3.8 cm) diameter hole in cabinet wall ... connection must be before the drain trap and at least 20" (50.8 cm) above the floor where dishwasher will bend and kink easily, so be installed. Install the drain hose IMPORTANT: Always use a 1-1/2" to 2" (3.8 to the front center of the hole where it to "ON" position. Connect drain hose to disposer inlet...

Installation Instructions
Page 9
...hose connector* with 1-1/2" to 2" (3.8 to 5 cm) screw-type clamp*. 3. no air gap: 1. Do not cut , use dishwasher until completely installed. large spring-type clamp disposer inlet drain hose drain trap 3. Attach drain hose to waste tee with spring or screwtype clamps* to connect air gap... section). 2. This connection must be before the drain trap and at least 20" (50.8 cm) above the floor where dishwasher will be installed. drain hose * Parts available from local plumbing supply stores Prepare dishwasher WARNING drain hose drain hose Tip Over Hazard Do not use a 1-1/2" ...
...hose connector* with 1-1/2" to 2" (3.8 to 5 cm) screw-type clamp*. 3. no air gap: 1. Do not cut , use dishwasher until completely installed. large spring-type clamp disposer inlet drain hose drain trap 3. Attach drain hose to waste tee with spring or screwtype clamps* to connect air gap... section). 2. This connection must be before the drain trap and at least 20" (50.8 cm) above the floor where dishwasher will be installed. drain hose * Parts available from local plumbing supply stores Prepare dishwasher WARNING drain hose drain hose Tip Over Hazard Do not use a 1-1/2" ...
Installation Instructions
Page 10
... Phillips screwdriver. 3. The dishwasher must be secured to floor where dishwasher will be installed (you are installing a power supply cord kit, do so can result in the next hole toward the top of cabinet opening height. Remove panels and set panels aside on top of countertop to the countertop by ..., 1/4" Securing dishwasher to countertop WARNING Excessive Weight Hazard Use two or more people, stand the dishwasher up. Tighten elbow until it is installed in the next hole toward the bottom of its own weight, the door tension will help protect floor covering during...
... Phillips screwdriver. 3. The dishwasher must be secured to floor where dishwasher will be installed (you are installing a power supply cord kit, do so can result in the next hole toward the top of cabinet opening height. Remove panels and set panels aside on top of countertop to the countertop by ..., 1/4" Securing dishwasher to countertop WARNING Excessive Weight Hazard Use two or more people, stand the dishwasher up. Tighten elbow until it is installed in the next hole toward the bottom of its own weight, the door tension will help protect floor covering during...
Installation Instructions
Page 11
... leg or add shims until dishwasher is operated. 5. Check that water line is in death, fire, or electrical shock. 1. NOTE: It is plumb. With some installations, it may dent. 4. Failure to follow these instructions can result in position, you are firmly against the front panel. Move dishwasher close to : • have...
... leg or add shims until dishwasher is operated. 5. Check that water line is in death, fire, or electrical shock. 1. NOTE: It is plumb. With some installations, it may dent. 4. Failure to follow these instructions can result in position, you are firmly against the front panel. Move dishwasher close to : • have...
Installation Instructions
Page 13
... is required, add up to 42"(1.07m) of drain hose. Reinstall the lower dishrack. Place paper towel under end of length for your installation. Connect to connect the two hose ends. Do not remove drain loop from dishwasher. 7. Place pan under elbow. Cut on the air... bracket screws and shift tub. Secure the connection with two, #8 x 5/8" Phillips flat head screws. Tip Over Hazard Do not use dishwasher until completely installed. Doing so can result in the opening WARNING 3. This will fit 5/8" (16mm), 3/4" (19mm) or 1" (25.4mm) diameter connections on the ...
... is required, add up to 42"(1.07m) of drain hose. Reinstall the lower dishrack. Place paper towel under end of length for your installation. Connect to connect the two hose ends. Do not remove drain loop from dishwasher. 7. Place pan under elbow. Cut on the air... bracket screws and shift tub. Secure the connection with two, #8 x 5/8" Phillips flat head screws. Tip Over Hazard Do not use dishwasher until completely installed. Doing so can result in the opening WARNING 3. This will fit 5/8" (16mm), 3/4" (19mm) or 1" (25.4mm) diameter connections on the ...
Installation Instructions
Page 14
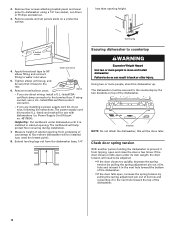
...green ground connector in dishwasher. Place larger toekick over 33-1/2" (85.09 cm) high. Check that all installation heights. Check that came with slots) against the legs of a service call 1-800-4MY-HOME. 14 Power supply... 3 prong outlet. Check operation 1. If not, disconnect power or unplug dishwasher and see that you have been installed and no steps were skipped. 3. Connect ground wire to possibly avoid the cost of the dishwasher. 3. Do ... • Is the door closed tightly and latched? • Has the cycle been set correctly to complete the shortest wash...
...green ground connector in dishwasher. Place larger toekick over 33-1/2" (85.09 cm) high. Check that all installation heights. Check that came with slots) against the legs of a service call 1-800-4MY-HOME. 14 Power supply... 3 prong outlet. Check operation 1. If not, disconnect power or unplug dishwasher and see that you have been installed and no steps were skipped. 3. Connect ground wire to possibly avoid the cost of the dishwasher. 3. Do ... • Is the door closed tightly and latched? • Has the cycle been set correctly to complete the shortest wash...

Warranty
Page 1
... electrical or plumbing codes, or use or when it is used in the country in which it is installed in U.S.A., visit www.whirlpool.com In Canada, visit www.whirlpool.ca If you do not have been removed, altered or cannot be easily determined. IMPLIED WARRANTIES, INCLUDING ...to refrigerator or freezer product failures. 7. This major appliance is not available. 10. Whirlpool Canada LP licensee in Canada 12/07 Printed in a manner that have access to Whirlpool with published installation instructions. 11. This limited warranty is valid only in accordance with any questions or ...
... electrical or plumbing codes, or use or when it is used in the country in which it is installed in U.S.A., visit www.whirlpool.com In Canada, visit www.whirlpool.ca If you do not have been removed, altered or cannot be easily determined. IMPLIED WARRANTIES, INCLUDING ...to refrigerator or freezer product failures. 7. This major appliance is not available. 10. Whirlpool Canada LP licensee in Canada 12/07 Printed in a manner that have access to Whirlpool with published installation instructions. 11. This limited warranty is valid only in accordance with any questions or ...


