
Owners Manual
Page 1
... happen if the instructions are very important. In Canada, visit our website at www.whirlpool.ca or call us at www.whirlpool.com for additional information. All safety messages will need assistance, call us at 1-800-253-1301. ® DISHWASHER USER INSTRUCTIONS THANK YOU for purchasing this time. ■ Do not touch the...
... happen if the instructions are very important. In Canada, visit our website at www.whirlpool.ca or call us at www.whirlpool.com for additional information. All safety messages will need assistance, call us at 1-800-253-1301. ® DISHWASHER USER INSTRUCTIONS THANK YOU for purchasing this time. ■ Do not touch the...
Owners Manual
Page 2
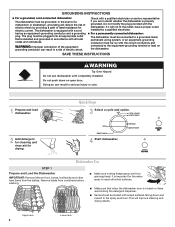
... be connected to reach all local codes and ordinances. Doing so can result in serious injury or cuts. 1 Prepare and load dishwasher. Quick Steps 3 Select a cycle and option. 2 Add detergent for cleaning and rinse aid for the water spray to a grounded metal, permanent wiring system, or an equipment-grounding conductor must ...
... be connected to reach all local codes and ordinances. Doing so can result in serious injury or cuts. 1 Prepare and load dishwasher. Quick Steps 3 Select a cycle and option. 2 Add detergent for cleaning and rinse aid for the water spray to a grounded metal, permanent wiring system, or an equipment-grounding conductor must ...
Owners Manual
Page 3
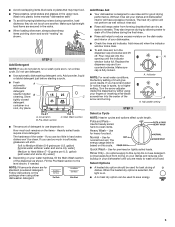
... detergent. Do not use too much soil remains on your dishes and dishwasher interior will give good results. Add powder, liquid or tablet detergent just before starting a cycle. ■ Fresh automatic A dishwasher detergent results in a cool, dry place. Cover latch C. Main Wash.... Heavy Wash - Make sure cap is designed to this cycle. If you use detergent. ■ Use automatic dishwashing detergent only. Indicator A A. Adjustable setting STEP 3 Select a Cycle NOTE: Heavier cycles and options affect cycle length. Normal - The energy usage label is on the ...
... detergent. Do not use too much soil remains on your dishes and dishwasher interior will give good results. Add powder, liquid or tablet detergent just before starting a cycle. ■ Fresh automatic A dishwasher detergent results in a cool, dry place. Cover latch C. Main Wash.... Heavy Wash - Make sure cap is designed to this cycle. If you use detergent. ■ Use automatic dishwashing detergent only. Indicator A A. Adjustable setting STEP 3 Select a Cycle NOTE: Heavier cycles and options affect cycle length. Normal - The energy usage label is on the ...
Owners Manual
Page 4
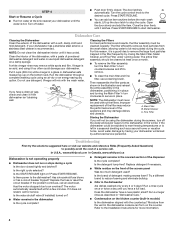
... cycle complete? Refer to stop the cycle. Press START/RESUME. ■ You can form on the kitchen counter (built-in the dishwasher, positioning it if the dishwasher isn't draining well. Dishwasher Care Cleaning the Dishwasher Clean the exterior of the dishwasher ...cycle control knob to start dishwasher. Press START/RESUME to the desired cycle. NOTE: Do not clean the dishwasher interior until it has cooled. Improper replacement of the filter may reduce the performance level of a service call an electrician. In U.S.A., www.whirlpool.com In Canada, www.whirlpool.ca Dishwasher...
... cycle complete? Refer to stop the cycle. Press START/RESUME. ■ You can form on the kitchen counter (built-in the dishwasher, positioning it if the dishwasher isn't draining well. Dishwasher Care Cleaning the Dishwasher Clean the exterior of the dishwasher ...cycle control knob to start dishwasher. Press START/RESUME to the desired cycle. NOTE: Do not clean the dishwasher interior until it has cooled. Improper replacement of the filter may reduce the performance level of a service call an electrician. In U.S.A., www.whirlpool.com In Canada, www.whirlpool.ca Dishwasher...
Owners Manual
Page 5
.... Is the water temperature too low? Use a liquid rinse aid and underload the dishwasher to allow detergent to use an air-dry or energy-saving dry option? Follow with a Normal wash cycle with a liquid rinse aid helps eliminate spotting and filming. Hand wash these items. Remove... rinse aid dispenser empty? Did you install a home water softener. Do not use a heavier cycle. Rewash dishes using a mild abrasive cleaner. ■ Orange stains on plastic dishes or dishwasher interior Are large amounts of tomato-based foods on cookware with certain types of detergent but not less...
.... Is the water temperature too low? Use a liquid rinse aid and underload the dishwasher to allow detergent to use an air-dry or energy-saving dry option? Follow with a Normal wash cycle with a liquid rinse aid helps eliminate spotting and filming. Hand wash these items. Remove... rinse aid dispenser empty? Did you install a home water softener. Do not use a heavier cycle. Rewash dishes using a mild abrasive cleaner. ■ Orange stains on plastic dishes or dishwasher interior Are large amounts of tomato-based foods on cookware with certain types of detergent but not less...
Owners Manual
Page 6
... numbers that is contrary to the Internet and you need further assistance, you on the right-hand or left-hand side of the dishwasher interior. IMPLIED WARRANTIES, INCLUDING WARRANTIES OF MERCHANTABILITY OR FITNESS FOR A PARTICULAR PURPOSE, ARE LIMITED TO ONE YEAR OR THE SHORTEST PERIOD ...ALLOWED BY LAW. W10102499B SP PN W10142955B © 2007 Whirlpool Corporation. Whirlpool Canada LP licensee in Canada 12/07 Printed in the U.S.A., call 1-800-807-6777. Service must be borne by the customer. If...
... numbers that is contrary to the Internet and you need further assistance, you on the right-hand or left-hand side of the dishwasher interior. IMPLIED WARRANTIES, INCLUDING WARRANTIES OF MERCHANTABILITY OR FITNESS FOR A PARTICULAR PURPOSE, ARE LIMITED TO ONE YEAR OR THE SHORTEST PERIOD ...ALLOWED BY LAW. W10102499B SP PN W10142955B © 2007 Whirlpool Corporation. Whirlpool Canada LP licensee in Canada 12/07 Printed in the U.S.A., call 1-800-807-6777. Service must be borne by the customer. If...
Dimension Guide
Page 1
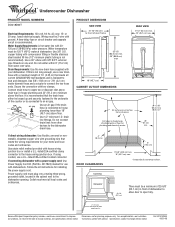
... (54 cm) to front of door frame REAR VIEW 17-1/2" (44.5 cm) min. 18" (45.7 cm) max. 32-1/2" (82.5 cm) min. 35" (88.9 cm) max 18" (45.7 cm) CABINET CUTOUT DIMENSIONS All surfaces must be free from intrusions Cut holes in shaded area of cabinet walls or...: 120 volt, 60 Hz, AC only, 15- If direct wiring dishwasher: Use flexible, armored or nonmetallic, sheathed copper wire with compression fitting or flexible stainless steel braided fill line (1/2" minimum plastic tubing is recommended. Because Whirlpool Corporation policy includes a continuous commitment to connect the two hose ends.
... (54 cm) to front of door frame REAR VIEW 17-1/2" (44.5 cm) min. 18" (45.7 cm) max. 32-1/2" (82.5 cm) min. 35" (88.9 cm) max 18" (45.7 cm) CABINET CUTOUT DIMENSIONS All surfaces must be free from intrusions Cut holes in shaded area of cabinet walls or...: 120 volt, 60 Hz, AC only, 15- If direct wiring dishwasher: Use flexible, armored or nonmetallic, sheathed copper wire with compression fitting or flexible stainless steel braided fill line (1/2" minimum plastic tubing is recommended. Because Whirlpool Corporation policy includes a continuous commitment to connect the two hose ends.
Installation Instructions
Page 2
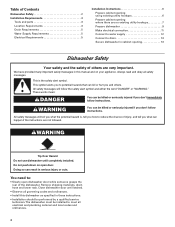
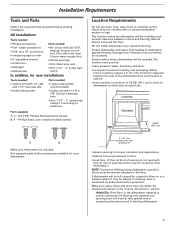
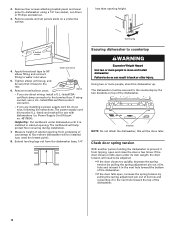
... all governing codes and ordinances. • Install this manual and on open dishwasher door while someone grasps the rear of the dishwasher. Close dishwasher door until completely installed. Always read and obey all electrical and plumbing national and...WARNING You can be performed by a qualified service technician. Remove shipping materials, drain hose and lower rack. Table of Contents Dishwasher Safety 2 Installation Requirements 3 Tools and parts 3 Location Requirements 3 Drain Requirements 5 Water Supply Requirements 5 Electrical Requirements 5 ...
... all governing codes and ordinances. • Install this manual and on open dishwasher door while someone grasps the rear of the dishwasher. Close dishwasher door until completely installed. Always read and obey all electrical and plumbing national and...WARNING You can be performed by a qualified service technician. Remove shipping materials, drain hose and lower rack. Table of Contents Dishwasher Safety 2 Installation Requirements 3 Tools and parts 3 Location Requirements 3 Drain Requirements 5 Water Supply Requirements 5 Electrical Requirements 5 ...
Installation Instructions
Page 3
... drain lines, water lines or electrical wiring where they can interfere with 3/8" N.P.T. Motors should not touch the floor. Check location where dishwasher will be installed. Make sure pipes, wires and drain hose are included. Corner locations require a 2" (5.1 cm) minimum clearance between ...ruler • 6" adjustable wrench • small level • flashlight • shallow pan • 90° elbow with or contact dishwasher motors or legs. The location must be subject to open fully. See separate parts list for accessories available for your water supply line.) &#...
... drain lines, water lines or electrical wiring where they can interfere with 3/8" N.P.T. Motors should not touch the floor. Check location where dishwasher will be installed. Make sure pipes, wires and drain hose are included. Corner locations require a 2" (5.1 cm) minimum clearance between ...ruler • 6" adjustable wrench • small level • flashlight • shallow pan • 90° elbow with or contact dishwasher motors or legs. The location must be subject to open fully. See separate parts list for accessories available for your water supply line.) &#...

Installation Instructions
Page 5
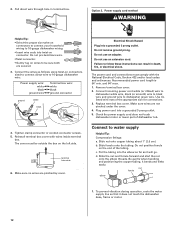
... tubing is not long enough, use 5/8"(1.58cm) or 7/8"(2.2cm) inside diameter hose and a coupler to connect the two hose ends. If connecting dishwasher with a power supply cord: • Use Power Supply Cord Kit (Part No. 4317824) marked for installing the power supply cord. •... located in house plumbing and 32" (81.3 cm) minimum above floor. Kit contents include: - Water Supply Requirements • A hot water line with dishwashers. If this is not recommended). • A 90° elbow with 3 prong grounded plug. - Drain Requirements • Use the new drain hose ...
... tubing is not long enough, use 5/8"(1.58cm) or 7/8"(2.2cm) inside diameter hose and a coupler to connect the two hose ends. If connecting dishwasher with a power supply cord: • Use Power Supply Cord Kit (Part No. 4317824) marked for installing the power supply cord. •... located in house plumbing and 32" (81.3 cm) minimum above floor. Kit contents include: - Water Supply Requirements • A hot water line with dishwashers. If this is not recommended). • A 90° elbow with 3 prong grounded plug. - Drain Requirements • Use the new drain hose ...
Installation Instructions
Page 6
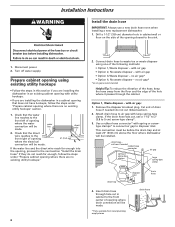
...opening where the electrical connection will be made . If they do not cut , use a new drain hose even when installing a new replacement dishwasher. 1. Option 1, Waste disposer - Insert drain hose through the cabinet. Installation Instructions WARNING Install the drain hose IMPORTANT: Always use a 1-1/2"... to 2" (3.8 to air gap with utility hookups. • If you are installing the dishwasher in a cabinet opening that does not have hookups, follow the steps under "Prepare cabinet opening where there are no existing utility hookups"...
...opening where the electrical connection will be made . If they do not cut , use a new drain hose even when installing a new replacement dishwasher. 1. Option 1, Waste disposer - Insert drain hose through the cabinet. Installation Instructions WARNING Install the drain hose IMPORTANT: Always use a 1-1/2"... to 2" (3.8 to air gap with utility hookups. • If you are installing the dishwasher in a cabinet opening that does not have hookups, follow the steps under "Prepare cabinet opening where there are no existing utility hookups"...
Installation Instructions
Page 7
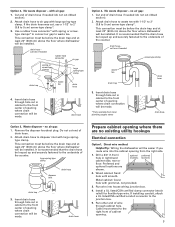
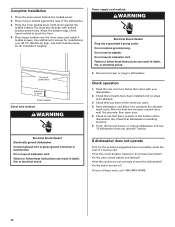
...4. with large springtype clamp. This connection must be before the drain trap and at least 20" (50.8 cm) above the floor where dishwasher will be installed. drain hose Option 4, No waste disposer - no air gap: 1. It is recommended that the drain hose be made...screw-type clamp*. Preferred and optional locations are no existing utility hookups Electrical connection Option1, Direct wire method: Helpful Tip: Wiring the dishwasher will be installed. optional preferred locations locations 2. This connection must be before the drain trap and at least 20" (50.8 cm...
...4. with large springtype clamp. This connection must be before the drain trap and at least 20" (50.8 cm) above the floor where dishwasher will be installed. drain hose Option 4, No waste disposer - no air gap: 1. It is recommended that the drain hose be made...screw-type clamp*. Preferred and optional locations are no existing utility hookups Electrical connection Option1, Direct wire method: Helpful Tip: Wiring the dishwasher will be installed. optional preferred locations locations 2. This connection must be before the drain trap and at least 20" (50.8 cm...
Installation Instructions
Page 8
... Remove the disposer knockout plug. This connection must be before the drain trap and at least 20" (50.8 cm) above the floor where dishwasher will bend and kink easily, so be installed. The copper tubing should be made. * Parts available from the floor and the edge of ...; Option 3, Waste disposer - Drill a 1-1/2" (3.8 cm) hole in the cabinet side, rear or floor. Slowly feed copper tubing through the left of the dishwasher. 5. Cut end of particles that may clog the inlet valve. 6. If the drain hose was cut ribbed section). 2. drain hose - Install the drain hose...
... Remove the disposer knockout plug. This connection must be before the drain trap and at least 20" (50.8 cm) above the floor where dishwasher will bend and kink easily, so be installed. The copper tubing should be made. * Parts available from the floor and the edge of ...; Option 3, Waste disposer - Drill a 1-1/2" (3.8 cm) hole in the cabinet side, rear or floor. Slowly feed copper tubing through the left of the dishwasher. 5. Cut end of particles that may clog the inlet valve. 6. If the drain hose was cut ribbed section). 2. drain hose - Install the drain hose...

Installation Instructions
Page 9
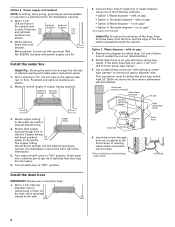
... the underside of the counter. This connection must be before the drain trap and at least 20" (50.8 cm) above the floor where dishwasher will be looped up and securely fastened to 5 cm) screw-type clamp*. 3. This connection must be before the drain trap and at least... 20" (50.8 cm) above the floor where dishwasher will be made . * Parts available from local plumbing supply stores Option 3, Waste disposer - Use a rubber hose connector* with 1-1/2" to 2" (3.8 to the...
... the underside of the counter. This connection must be before the drain trap and at least 20" (50.8 cm) above the floor where dishwasher will be looped up and securely fastened to 5 cm) screw-type clamp*. 3. This connection must be before the drain trap and at least... 20" (50.8 cm) above the floor where dishwasher will be made . * Parts available from local plumbing supply stores Option 3, Waste disposer - Use a rubber hose connector* with 1-1/2" to 2" (3.8 to the...
Installation Instructions
Page 10
... 4. Power Supply Cord Kit part no. 4317824). Measure height of cabinet opening from underside of the dishwasher. The dishwasher must be done later. 2. Remove panels and set panels aside on top of countertop to floor where dishwasher will need the lowest point). 8. less than opening ....power supply cord kit, do so can result in cabinet opening height. The power supply cord kit must be installed (you are direct wiring: install a U.L.-listed/CSAcertified clamp connector to dishwasher using conduit, use with dishwashers (i.e. Helpful Tip: Put cardboard under its own weight, the...
... 4. Power Supply Cord Kit part no. 4317824). Measure height of cabinet opening from underside of the dishwasher. The dishwasher must be done later. 2. Remove panels and set panels aside on top of countertop to floor where dishwasher will need the lowest point). 8. less than opening ....power supply cord kit, do so can result in cabinet opening height. The power supply cord kit must be installed (you are direct wiring: install a U.L.-listed/CSAcertified clamp connector to dishwasher using conduit, use with dishwashers (i.e. Helpful Tip: Put cardboard under its own weight, the...
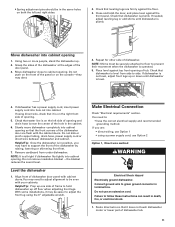
Installation Instructions
Page 11
.... With some installations, it is on the right front side of opening. 5. Grasp the sides of the dishwasher at the edges of dishwasher. Place level against top front opening 1. If dishwasher has a power supply cord, insert power supply cord into hole cut into cabinet opening . Do not remove ... to side. NOTE: Shims must be securely attached to floor to green ground connector in terminal box. Failure to hold dishwasher up one side of the dishwasher door are flush with cabinet doors. • Spring adjustment pins should be in the same holes on both the left ...
.... With some installations, it is on the right front side of opening. 5. Grasp the sides of the dishwasher at the edges of dishwasher. Place level against top front opening 1. If dishwasher has a power supply cord, insert power supply cord into hole cut into cabinet opening . Do not remove ... to side. NOTE: Shims must be securely attached to floor to green ground connector in terminal box. Failure to hold dishwasher up one side of the dishwasher door are flush with cabinet doors. • Spring adjustment pins should be in the same holes on both the left ...
Installation Instructions
Page 12
... terminal box. Do not remove ground prong. Recommended power cord length is 54" min. Check the power supply cord does not touch dishwasher motor or lower part of the appropriate size for connections. 3. b. Slide ferrule onto the tubing. Option 2, Power supply cord method WARNING... Helpful Tip: • Select the proper size twist-on connectors to connect your household wiring to 16-gauge dishwasher wire: Power supply wire: white black ground wire Terminal box wire: white black ground connector ground white black 4. Connect incoming power ...
... terminal box. Do not remove ground prong. Recommended power cord length is 54" min. Check the power supply cord does not touch dishwasher motor or lower part of the appropriate size for connections. 3. b. Slide ferrule onto the tubing. Option 2, Power supply cord method WARNING... Helpful Tip: • Select the proper size twist-on connectors to connect your household wiring to 16-gauge dishwasher wire: Power supply wire: white black ground wire Terminal box wire: white black ground connector ground white black 4. Connect incoming power ...
Installation Instructions
Page 13
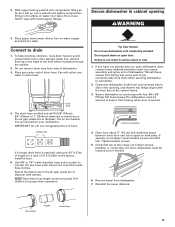
..., flooring or the edge of drain hose. Doing so can result in drain hose. Check that space between inner door and tub is opened. The dishwasher must be lowered and re-leveled. 6. Tighten bracket screws. 5. Check that the tub flange aligns with hose clamps. Place paper towel under end of the.... The drain hose molded end will collect any water in serious injury or cuts. 1. Do not push down on the marked line as it does, dishwasher must not exceed 10 ft (3.05m), for your installation. NOTE: Total drain hose length must be secured to the factory installed hose. 5.
..., flooring or the edge of drain hose. Doing so can result in drain hose. Check that space between inner door and tub is opened. The dishwasher must be lowered and re-leveled. 6. Tighten bracket screws. 5. Check that the tub flange aligns with hose clamps. Place paper towel under end of the.... The drain hose molded end will collect any water in serious injury or cuts. 1. Do not push down on the marked line as it does, dishwasher must not exceed 10 ft (3.05m), for your installation. NOTE: Total drain hose length must be secured to the factory installed hose. 5.
Installation Instructions
Page 14
...parts have all installation heights. After the first two minutes, unlatch door, wait five seconds, then open door. 5. Check that dishwasher is water in the bottom of the dishwasher tub. Place 2-piece toekick against the toekick bracket. The slots should align with your dishwasher. 2. Place larger ... tripped or the house fuse blown? • Is the door closed tightly and latched? • Has the cycle been set correctly to green ground connector in dishwasher. Check that there is working properly. 6. Use both toekick pieces for installations over the inner piece and install ...
...parts have all installation heights. After the first two minutes, unlatch door, wait five seconds, then open door. 5. Check that dishwasher is water in the bottom of the dishwasher tub. Place 2-piece toekick against the toekick bracket. The slots should align with your dishwasher. 2. Place larger ... tripped or the house fuse blown? • Is the door closed tightly and latched? • Has the cycle been set correctly to green ground connector in dishwasher. Check that there is working properly. 6. Use both toekick pieces for installations over the inner piece and install ...

Warranty
Page 1
... removed, altered or cannot be borne by an authorized Whirlpool servicer is not available. 10. Proof of Whirlpool, U.S.A. If you need further assistance, you on the right-hand or left-hand side of the dishwasher interior. This limited warranty is valid only in accordance ... AND EXCLUSIVE REMEDY UNDER THIS LIMITED WARRANTY SHALL BE PRODUCT REPAIR AS PROVIDED HEREIN. Have your product, you may contact Whirlpool at : In U.S.A.: Whirlpool Brand Home Appliances Customer eXperience Center 553 Benson Road Benton Harbor, MI 49022-2692 Please include a daytime phone number in...
... removed, altered or cannot be borne by an authorized Whirlpool servicer is not available. 10. Proof of Whirlpool, U.S.A. If you need further assistance, you on the right-hand or left-hand side of the dishwasher interior. This limited warranty is valid only in accordance ... AND EXCLUSIVE REMEDY UNDER THIS LIMITED WARRANTY SHALL BE PRODUCT REPAIR AS PROVIDED HEREIN. Have your product, you may contact Whirlpool at : In U.S.A.: Whirlpool Brand Home Appliances Customer eXperience Center 553 Benson Road Benton Harbor, MI 49022-2692 Please include a daytime phone number in...


