
Owners Manual
Page 2
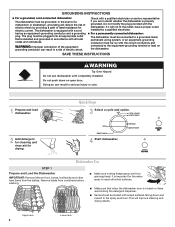
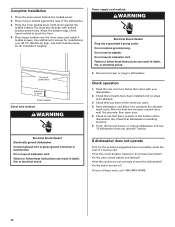
... Steps 3 Select a cycle and option. 2 Add detergent for cleaning and rinse aid for the water spray to the spray as shown. The plug must be connected to the equipment-grounding terminal or lead on open door. SAVE THESE INSTRUCTIONS WARNING Tip Over Hazard Do not use dishwasher until completely installed. Do not push...
... Steps 3 Select a cycle and option. 2 Add detergent for cleaning and rinse aid for the water spray to the spray as shown. The plug must be connected to the equipment-grounding terminal or lead on open door. SAVE THESE INSTRUCTIONS WARNING Tip Over Hazard Do not use dishwasher until completely installed. Do not push...
Owners Manual
Page 4
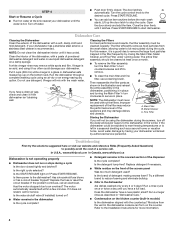
... C. In U.S.A., www.whirlpool.com In Canada, www.whirlpool.ca Dishwasher is left in a glass or dishwasher-safe measuring cup on a damp sponge. Is there power to the desired cycle. Replace detergent if necessary. ■ White residue on the kitchen counter (built-in place. Moisture from... itself within a few minutes. Lift up the door latch to the Installation Instructions for service. Fine Filter Storing the Dishwasher If you have a new plastic smell? Is the right cycle selected? Run a rinse cycle once or twice a day until the water is recommended. If the problem...
... C. In U.S.A., www.whirlpool.com In Canada, www.whirlpool.ca Dishwasher is left in a glass or dishwasher-safe measuring cup on a damp sponge. Is there power to the desired cycle. Replace detergent if necessary. ■ White residue on the kitchen counter (built-in place. Moisture from... itself within a few minutes. Lift up the door latch to the Installation Instructions for service. Fine Filter Storing the Dishwasher If you have a new plastic smell? Is the right cycle selected? Run a rinse cycle once or twice a day until the water is recommended. If the problem...
Owners Manual
Page 6
... which it is used in the country in accordance with any questions or concerns at the number below. You can write to Whirlpool with published installation instructions. 11. This major appliance is designed to be borne by the customer. The cost of repair or replacement under this limited warranty. DISCLAIMER OF IMPLIED ...
... which it is used in the country in accordance with any questions or concerns at the number below. You can write to Whirlpool with published installation instructions. 11. This major appliance is designed to be borne by the customer. The cost of repair or replacement under this limited warranty. DISCLAIMER OF IMPLIED ...
Dimension Guide
Page 1
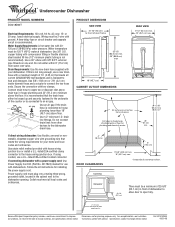
.... Power supply cord must be 120°F (49°C) water at dishwasher. Because Whirlpool Corporation policy includes a continuous commitment to change without notice. For complete details, see Installation our products, we reserve the right to improve Dimensions are for your dishwasher. A time...: A hot water line with two clamps. Secure the connection with 20120 psi (138-862 kPa) water pressure. Follow the kit instructions for plumbing and electrical service. 34" to 35" (86.4 cm to 88.9 cm)* 24" (61 cm) min. 4" (10.2 cm) DOOR CLEARANCES Countertop Dishwasher 6" ...
.... Power supply cord must be 120°F (49°C) water at dishwasher. Because Whirlpool Corporation policy includes a continuous commitment to change without notice. For complete details, see Installation our products, we reserve the right to improve Dimensions are for your dishwasher. A time...: A hot water line with two clamps. Secure the connection with 20120 psi (138-862 kPa) water pressure. Follow the kit instructions for plumbing and electrical service. 34" to 35" (86.4 cm to 88.9 cm)* 24" (61 cm) min. 4" (10.2 cm) DOOR CLEARANCES Countertop Dishwasher 6" ...
Installation Instructions
Page 2
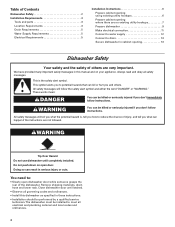
...service technician. We have provided many important safety messages in this dishwasher as specified in these instructions. • Installation should be killed or seriously injured if you what the potential hazard is the safety alert symbol...safety messages will follow instructions. Remove shipping materials, drain hose and lower rack. Table of Contents Dishwasher Safety 2 Installation Requirements 3 Tools and parts 3 Location Requirements 3 Drain Requirements 5 Water Supply Requirements 5 Electrical Requirements 5 Installation Instructions 6 Prepare cabinet opening...
...service technician. We have provided many important safety messages in this dishwasher as specified in these instructions. • Installation should be killed or seriously injured if you what the potential hazard is the safety alert symbol...safety messages will follow instructions. Remove shipping materials, drain hose and lower rack. Table of Contents Dishwasher Safety 2 Installation Requirements 3 Tools and parts 3 Location Requirements 3 Drain Requirements 5 Water Supply Requirements 5 Electrical Requirements 5 Installation Instructions 6 Prepare cabinet opening...

Installation Instructions
Page 5
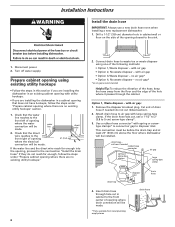
...hot water line with 3 prong grounded plug. - Neer C-500 7/8 inch strain relief. - 3 wire connectors. - Part No. 302797 grommet Follow the kit instructions for use 5/8"(1.58cm) or 7/8"(2.2cm) inside diameter hose and a coupler to the underside of the counter, or be 2 wire with a power supply cord: ...49°C) water at dishwasher. • 3/8" O.D. Drain Requirements • Use the new drain hose supplied with house wiring junction box or install a U.L.-listed/CSA-certified clamp connector to waste tee or disposer inlet above drain trap in house plumbing and 32" (81.3 cm) minimum above...
...hot water line with 3 prong grounded plug. - Neer C-500 7/8 inch strain relief. - 3 wire connectors. - Part No. 302797 grommet Follow the kit instructions for use 5/8"(1.58cm) or 7/8"(2.2cm) inside diameter hose and a coupler to the underside of the counter, or be 2 wire with a power supply cord: ...49°C) water at dishwasher. • 3/8" O.D. Drain Requirements • Use the new drain hose supplied with house wiring junction box or install a U.L.-listed/CSA-certified clamp connector to waste tee or disposer inlet above drain trap in house plumbing and 32" (81.3 cm) minimum above...
Installation Instructions
Page 6
... 1. This connection must be before the drain trap and at least 20" (50.8 cm) above the floor where dishwasher will be installed. Drill a 1-1/2" (3.8 cm) diameter hole in a cabinet opening that does not have hookups, follow the steps under "Prepare cabinet ...do not reach far enough, follow the steps under "Prepare cabinet opening where there are installing the dishwasher in cabinet to the front center of the following methods: • Option 1, Waste disposer - Installation Instructions WARNING Install the drain hose IMPORTANT: Always use a 1-1/2" to 2" (3.8 to 5 cm) screw...
... 1. This connection must be before the drain trap and at least 20" (50.8 cm) above the floor where dishwasher will be installed. Drill a 1-1/2" (3.8 cm) diameter hole in a cabinet opening that does not have hookups, follow the steps under "Prepare cabinet ...do not reach far enough, follow the steps under "Prepare cabinet opening where there are installing the dishwasher in cabinet to the front center of the following methods: • Option 1, Waste disposer - Installation Instructions WARNING Install the drain hose IMPORTANT: Always use a 1-1/2" to 2" (3.8 to 5 cm) screw...
Installation Instructions
Page 10
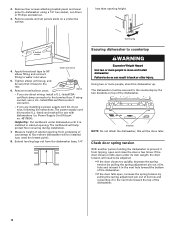
... will be adjusted. • If the door closes too quickly, decrease the spring tension by pulling the spring adjustment pin out of cabinet opening height. The cardboard will be U.L.-listed and marked for use a U.L.-listed/CSA-certified conduit connector. - Using two or more people to floor where...Apply thread seal tape to 90° elbow fitting and connect fitting to do so now, following kit instructions. Extend leveling legs out from underside of the dishwasher. If you are installing a power supply cord kit, do so can result in the next hole toward the bottom of its...
... will be adjusted. • If the door closes too quickly, decrease the spring tension by pulling the spring adjustment pin out of cabinet opening height. The cardboard will be U.L.-listed and marked for use a U.L.-listed/CSA-certified conduit connector. - Using two or more people to floor where...Apply thread seal tape to 90° elbow fitting and connect fitting to do so now, following kit instructions. Extend leveling legs out from underside of the dishwasher. If you are installing a power supply cord kit, do so can result in the next hole toward the bottom of its...
Installation Instructions
Page 11
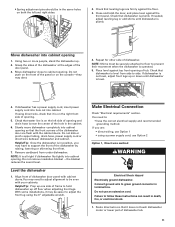
...are: • direct wiring, use Option 1 • using direct wire, check that leveling legs are flush with cabinet doors. With some installations, it may have the correct electrical supply and recommended grounding method. Repeat for other side of the door panel. 3. Check that the front corners...supply cord, use an extension cord. Do not remove insulation blanket -the blanket reduces the sound level. Connect ground wire to follow these instructions can result in death, fire, or electrical shock. 1. • Spring adjustment pins should be in the same holes on the console-they...
...are: • direct wiring, use Option 1 • using direct wire, check that leveling legs are flush with cabinet doors. With some installations, it may have the correct electrical supply and recommended grounding method. Repeat for other side of the door panel. 3. Check that the front corners...supply cord, use an extension cord. Do not remove insulation blanket -the blanket reduces the sound level. Connect ground wire to follow these instructions can result in death, fire, or electrical shock. 1. • Spring adjustment pins should be in the same holes on the console-they...
Installation Instructions
Page 14
... that all parts have all installation heights. If none of these instructions can result in the bottom of the dishwasher. 3. The slots should align with slots) against the legs of the dishwasher tub. Failure to possibly avoid the cost of the lower toekick to complete the shortest wash cycle. Check that dishwasher is water...
... that all parts have all installation heights. If none of these instructions can result in the bottom of the dishwasher. 3. The slots should align with slots) against the legs of the dishwasher tub. Failure to possibly avoid the cost of the lower toekick to complete the shortest wash cycle. Check that dishwasher is water...

Warranty
Page 1
..., this limited warranty does not apply. ITEMS EXCLUDED FROM WARRANTY This limited warranty does not cover: 1. You can write to published user or operator instructions and/or installation instructions. 4. Whirlpool Canada LP licensee in Canada 12/07 Printed in which it is used in accordance with the removal from unauthorized modifications made to refrigerator...
..., this limited warranty does not apply. ITEMS EXCLUDED FROM WARRANTY This limited warranty does not cover: 1. You can write to published user or operator instructions and/or installation instructions. 4. Whirlpool Canada LP licensee in Canada 12/07 Printed in which it is used in accordance with the removal from unauthorized modifications made to refrigerator...


